

pre-notify
取名字真难!
测试用例搭建
首先是入口文件,
import React from 'react';
import ReactDOM from 'react-dom';
import App from './App.js';

ReactDOM.render(
	<App/>
    ,window.root
);
我们只让入口文件干一件事,即渲染真实DOM到挂载元素上。
注意即使只干这么一件事,react库也是必须引入的,否则会报
'React' must be in scope when using JSX react/react-in-jsx-scope
接下来我们把路由和导航都统一放在App组件里,只求一目了然
import React from 'react';
import {HashRouter as Router,Route} from './react-router-dom'; //引入我们自己的router库
export default class App extends React.Component{
render(){
return (
<Router>
<div className='container'>
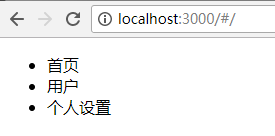
<ul className='Nav'>
<li><Link to='/home'>首页</Link></li>
<li><Link to='/user'>用户</Link></li>
<li><Link to='/profile'>个人设置</Link></li>
</ul>
<div className='View'>
<Route path='/home' component={Home}/>
<Route path='/user'component={User}/>
<Route path='/profile' component={Profile}/>
</div>
</div>
</Router>
)
}
}
Router实现
import React from 'react';
import PropTypes from 'prop-types';

export default class Router extends React.Component{
    static childContextTypes = {
    	location:PropTypes.object
        ,history:PropTypes.object
    }

    constructor(props){
    	...
    }

    getChildContext(){
    	...
    }

    componentDidMount(){
    	...
    }

    render(){
    	...
    }
}
Router返回值
Router组件只是一个路由容器,它并不会生成一个div什么的,它会直接返回它包裹住的子元素们children,
render(){
    return this.props.children; //注意children只是props下的一个属性
}
需要注意的是Router依然遵循JSX tag嵌套时的单一入口规则,So如果有多个平级的子元素需要用一层div或则其它什么的给包起来。
<Router>
    <div>
    	<Route ... />
        <Route ... />
        ...
    </div>
</Router>
hash值的初始化
为了效仿原版(没有hash值时,自动补上/)
pathname属性赋一个初始值,这个pathname就是我们以后的hash值了(除去#部分)
 constructor(props){
    super(props);
    this.state = {
        location:{
            pathname:window.location.hash.slice(1)||'/'
        }
    }
}
接着我们需要在Router组件挂载完毕时对location.hash进行赋值
window.location.hash = this.state.location.pathname;
这样就完成了/的自动补全功能。
监听hash
Router最重要的功能之一就是监听hash值,一旦hash值发生改变,Router应该让路由Route重新渲染。
那么,怎么才能让路由组件重新匹配和渲染呢?
嗯,只需要调用this.setState即可,React中的setState方法只要被调用,就会重新渲染调用这个方法的组件,理所当然,也包括其子组件。
[danger] 注意: 虽然setState只要调用就会重新渲染,但有一种情况例外,则是setState()什么也不传的时。而只要有传参,哪怕是一个{},也会重启渲染。
我们选在在组件渲染完毕时开启监听
componentDidMount(){
   ...
    window.addEventListener('hashchange',()=>{
      	this.setState({location:{pathname:window.location.hash.slice(1)||'/'}});
    });
}
关于setState:
setState虽然有自动合并state的功能,但若这个state里还嵌套了一层,它是不会自动合并的,比如你有一个location的state,它长这样{location:{pathname:xxx,other:yyy}},然后你像这样更新了一下state {location:{pathname:xxx}},那么location中的other将不再保留,因为setState并不支持第二层嵌套的自动合并。
缓存
Router在监听hash的时会实时的把hash值同步缓存在state上,这样我们就不用在每一次的路由匹配中都重头获取这个hash值而只需要从Router中拿即可。
那么我们怎么在route中从一个父组件(router)中拿取东东呢?
React中提供了一个叫context的东东,在一个组件类中添加这个东东,就相当于开辟了一块作用域,让子孙组件能够轻易的通过这个作用域拿到父组件共享出的属性和方法,我称之为React中的任意门。
这个门有两侧,一侧在开通这个context的根组件(相对于其子孙组件的称谓)这边
// 申明父组件要在context作用域里放哪些东东
...
static childContextTypes = {
    location:PropTypes.object
    ,history:PropTypes.object
};

// 定义要放这些东东的具体细节
getChildContext(){
    return {
        location:this.state.location
        ,history:{
            push(path){
                window.location.hash = path;
            }
        }
    }
}
...
一侧在要从根组件拿取东东的子孙组件这边
[danger] 注意: 这里的的静态属性不再带child字样
...
// 和根组件相比 去除了child字样
// 要用哪些东东就需要申明哪些东东
static contextTypes = {
    location:propTypes.object
    ,history:propTypes.object
}

// 在声明完要从根组件中拿取哪些东东后,可以在任意地方获取到这些东东
fn(){
	...
    console.log(this.context.location);
}
...
Route实现
从上一节中我们已经知道,Router组件最后返回的其实是它的children们,So,也就是一条条Route.
<Router>
    <Route path='/a' component={myComponent1} />
    <Route path='/b' component={myComponent2} />
    <Route path='/c' component={myComponent3} />
</Router>
其中每一条<Route .. />都代表一次Route类的实例化,并且返回这个类中render函数所返回的东东。
我们通过将准备要渲染的组件作为属性传递给<Route ../>组件,以求Route组件能帮我们控制住我们真正想要渲染的那些组件的渲染。(路由Route的角色就类似于编辑,需要对要渲染的内容进行审稿)
路由的匹配
实际中,我们只有当url中的pathname和我们在Route中设置的path相匹配时才会让Route组件渲染我们传递给它的那些个真正想要渲染在页面上的可视组件。
像这样
...
// 接收根组件(Router)Context作用域中的 location 和 history
static contextTypes = {
    location:propTypes.object
    ,history:propTypes.object
}
...
// class Route の render方法中
...
let {component:Component,path} = this.props;
let {location} = this.context;
let pathname = location.pathname;

if(path==pathname||pathname.startsWith(path)){
  return <Component />
}else{
  return null;
}
...
路由的传参
当路由真正被匹配上时,会传递三个参数给真正要渲染的可视组件
// class Route の render方法中
....
...
static contextTypes = {
    location:PropTypes.object
    ,history:PropTypes.object
}
...
let props = {
  location
  ,history:this.context.history
  ,match:{}
};
...
if(path==pathname||pathname.startsWith(path)){
      return <Component {...props}/>
      ...
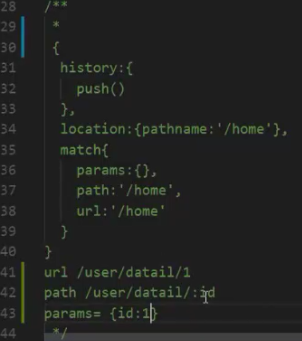
如上所示,这三个参数属性分别是:
- location:主要存放着当前实时pathname
- history:主要存放着各种跳转路由的方法
- match:存放着url 和 给route指定的path 以及动态路由参数params对象
pathname、path、url三者的区别
pathname在hashrotuer中是指#后面那一串,是url的子集。
而path是我们给Route组件手动指定的匹配路径,和pathname进行匹配的,但不一定等于pathname,有startsWith匹配。除此之外path还可能是一个/user/:id这样的动态路由。
最后url,在react中它并不是我们的url地址,而是pathname经过path转换成的正则匹配后的结果,它不一定等于path(因为还有动态路由)。
路由的渲染
React中路由的渲染有三种方式
- component
<Route path=.. compoent={Component1}/>
这种就是最常见的,会根据路径是否匹配决定是否渲染传递过来的组件。
- render (多用于权限验证)
<Route path=.. render={(props)=>{...}}>
采用render方式渲染时,组件是否渲染不仅要看路径是否匹配,还要由render属性所接受的函数来共同决定。
注意,此时render函数会接受一个参数props,即当前Route组件的props对象。
- children (多用于菜单)
<Route path=.. children={(props)=>{...}}>
貌似和render没区别,实则区别挺大!因为这货不论路由的路径是否匹配都会调用children这个回调函数。
So,分清楚了三种渲染方式的区别后,我们来大概写下如何实现
// Routeのrender函数中
...
if(result){ //表示路由匹配得上
    if(this.props.render){
    	return this.props.render(this.props);
    }else{
    	return <Component {...this.props}/>
    }
}else{
    if(this.props.children){ //如果children存在,就算路径没有匹配也会调用
    	return this.props.children(this.props);
    }else{
    	return null;
    }
}
...
动态路由
要实现动态路由,需要我们将给Route设置的/xxx/:xxx们替换成正则用以匹配路径,为了代码的清晰我门使用path-to-regexp模块对所有路由(包括非动态路由)都进行正则替换。
path-to-regexp 模块的实现在我的这篇文章中讲过 Express源码级实现の路由全解析(下阕)
而这一步需要在路由初始化的时候就完成
constructor(props){
    super(props);
    let {path} = props; //user/detail/:id
    this.keys = [];
    this.regexp = pathToRegexp(path,this.keys,{end:false}); //false表示只要开头匹配即可
    this.keys = this.keys.map(key=>key.name); //即是传递给渲染组件的match对象中的params对象
}
这样路由规则就不会在每次render重绘时都进行一次计算
接下来我们需要在每次render中对路径重新进行匹配
// render()中
...
let result = location.pathname.match(this.regexp);
...
如果匹配上了,有结果,还要准备一个params对象传放进match对象中传递给渲染组件
if(result){
    let [url,...values] = result;

    props.match = {
        url //匹配上的路径(<=pathname)
        ,path //route上的path
        ,params:this.keys.reduce((memo,key,idx)=>{
          memo[key] = values[idx];
          return memo;
        },{})
    };
}
最后再判断是根据三种渲染方式中的哪一种来渲染
if (result) {
      ...
  if (render) {
    return render(props);
  } else if (Component) {
    return <Component {...props}/>
  } else if (children) {
    return children(props);
  }
  return null;

} else {
  if (children) {
    return children(props);
  } else {
    return null;
  }
}
Link 组件
Link组件能让我们通过点击连接来达到切换显示路由组件的效果
export default class xxx extends React.Component{
  static contextTypes = {
    history:PropTypes.object
  };
  render(){
    return (
      <a onClick={()=>this.context.history.push(this.props.to)}>
        {this.props.children}
      </a>
    )
  }
}
MenuLink 组件
export default ({to,children})=>{
  return <Route path={to} children={props=>(
    <li className={props.match?"active":""}>
      <Link to={to}>{children}</Link>
    </li>
  )}/>
}
<ul className='Nav'>
    <MenuLink to='/home'>首页</MenuLink>
    <MenuLink to='/user'>用户</MenuLink>
    <MenuLink to='/profile'>详情</MenuLink>
</ul>
这组件的作用即是让匹配得上当前路由的link高亮
登录验证与重定向
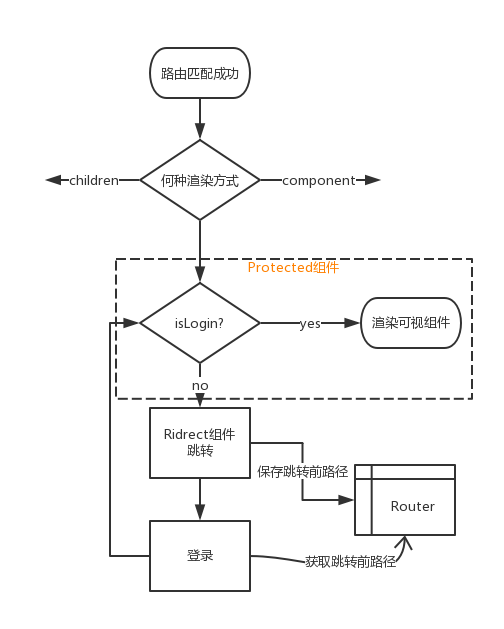
在介绍三个相关组件之前需要对Router中存储的push方法做出调整,以便保存Redirect跳转前的路径
...
push(path){
	if(typeof path === 'object'){
        let {pathname,state} = path;
        that.setState({location:{...that.state.location,state}},()=>{
          window.location.hash = pathname;
        })
    }else{
    	window.location.hash = path; //会自动添加'#'
    }
}
...
Redirect 组件
export default class xxx extends React.Component {
  static contextTypes = {
    history:PropTypes.object
  }

  componentWillMount() {
    this.context.history.push(this.props.to);
  }

  render() {
    return null;
  }
}
Protected 组件
export default function({component:Component,...rest}){
  return <Route {...rest} render={props=>(
    localStorage.getItem('login')?<Component {...props}/>:<Redirect to={{pathname:'/login',state:{from:props.location.pathname}}}/>
  )}/>;
}
Login 组件
import React from 'react';

export default class xxx extends React.Component{
  handleClick=()=>{
    localStorage.setItem('login',true);
    this.props.history.push(this.props.location.state.from);
  }
  render(){
    return (
      <div>
        <button onClick={this.handleClick} className="btn btn-primary">登录</button>
      </div>
    )
  }
}
Switch组件
<Router>
    <Route path='/a' component={myComponent1} />
    <Route path='/b' component={myComponent2} />
    <Route path='/c' component={myComponent3} />
</Router>
通常情况下我们这样写Route有一点不好的是,不管第一个路由匹配没匹配上,Router都会接着往下匹配,这样就增加运算量。
So,Switch组件就是为了解决这个问题
<Router>
    <Switch>
        <Route path='/a' component={myComponent1} />
        <Route path='/b' component={myComponent2} />
        <Route path='/c' component={myComponent3} />
    </Switch>
</Router>
export default class xxx extends React.Component{
  static contextTypes = {
    location:PropTypes.object
  }
  render(){
    console.log('Router render'); //只会打印一次
    let {pathname} = this.context.location;
    let children = this.props.children;
    for(let i=0;i<children.length;++i){
      let child = children[i]; //一个route
      let {path} = child.props;
      if(pathToRegexp(path,[],{end:false}).test(pathname)){
        return child;
      }
    }
    return null;
  }
}
这样只有一个Route会被初始化以及渲染。
但,有一个bug,我们上面写Route时,是将path转正则的部分放在constructor里的,这意味着只有在这个Route初始化的时候才会将path转换为正则,这样很好,只用计算一次,但和Switch搭配使用时就不好了,因为React的复用机制,即使路由路径已经不一样了,它仍然把上次的Route拿过来进行渲染,So此时的正则还是上一次的,也就不会被匹配上,嗯,bug。
解决方案:
- 第一种,给Route增加key
- 第二种,将正则替换的部分放在render中
获取demo代码
仓库地址:点我~点我!
推荐:
=== ToBeContinue ===
