

原文标题:Loading WebAssembly modules efficiently原文链接:https://developers.google.com/web/updates/2018/04/loading-wasm(需越墙)
原文作者:Mathias Bynens 译者:西楼听雨 (转载请注明出处)
我们在使用 WebAssembly 的时候,通常的做法都是,先下载一个模块,然后编译它,再进行实例化,最后使用通过 JavaScript 导出(exports)的东西。本文将以一段常见的但不是最优的实现这种做法的代码来开始,接着再讨论几个可以优化的地方,最后以给出一种最简单最高效的方式来结束。
提示:像 Emsciptent 这类工具,可以自动帮你生成这种做法的模板代码,所以你没必要自己动手编写。本文的目的是考虑到你可能会有需要对 WebAssembly 模块的加载进行精细控制的时候,所以提供下面这些最佳实践,以期给你带来帮助。
下面这段代码的作用就是上面说的这种“下载-编译-实例化”的完整实现,但是是一种欠优化的方式:
// 不要采用这种方式
(async () => {
  const response = await fetch('fibonacci.wasm');
  const buffer = await response.arrayBuffer();
  const module = new WebAssembly.Module(buffer);
  const instance = new WebAssembly.Instance(module);
  const result = instance.exports.fibonacci(42);
  console.log(result);
})();
注意我们使用的是 new WebAssembly.Module(buffer) 来把一个 response 的 buffer 来转化为一个 module 的。不过这个 API 是同步的,这就意味着在它执行完之前它会一直阻塞主线程。为了抑制对它的使用,Chrome 会在 buffer 的大小超过 4KB 时禁止使用它。如果要避开这个限制,我们可以改为使用 await WebAssembly.compile(buffer):
(async () => {
  const response = await fetch('fibonacci.wasm');
  const buffer = await response.arrayBuffer();
  const module = await WebAssembly.compile(buffer);
  const instance = new WebAssembly.Instance(module);
  const result = instance.exports.fibonacci(42);
  console.log(result);
})();
await WebAssembly.compile(buffer) 还不是最优的方法,最优的方法待会我们就会知道。
从上面这段调整过后的代码对 await 的使用上来看我们就能知道,几乎所有的操作都是异步的了。唯一的例外就是 new WebAssembly.Instance(module),它同样会受到 Chrome 的“4KB buffer 大小”的限制。为了保持一致性以及“保障主线程任何时候都不受牵制”的目的,我们可以改为使用异步的 WebAssembly.instantiate(module)。
(async () => {
const response = await fetch('fibonacci.wasm');
const buffer = await response.arrayBuffer();
const module = await WebAssembly.compile(buffer);
const instance = await WebAssembly.instantiate(module);
const result = instance.exports.fibonacci(42);
console.log(result);
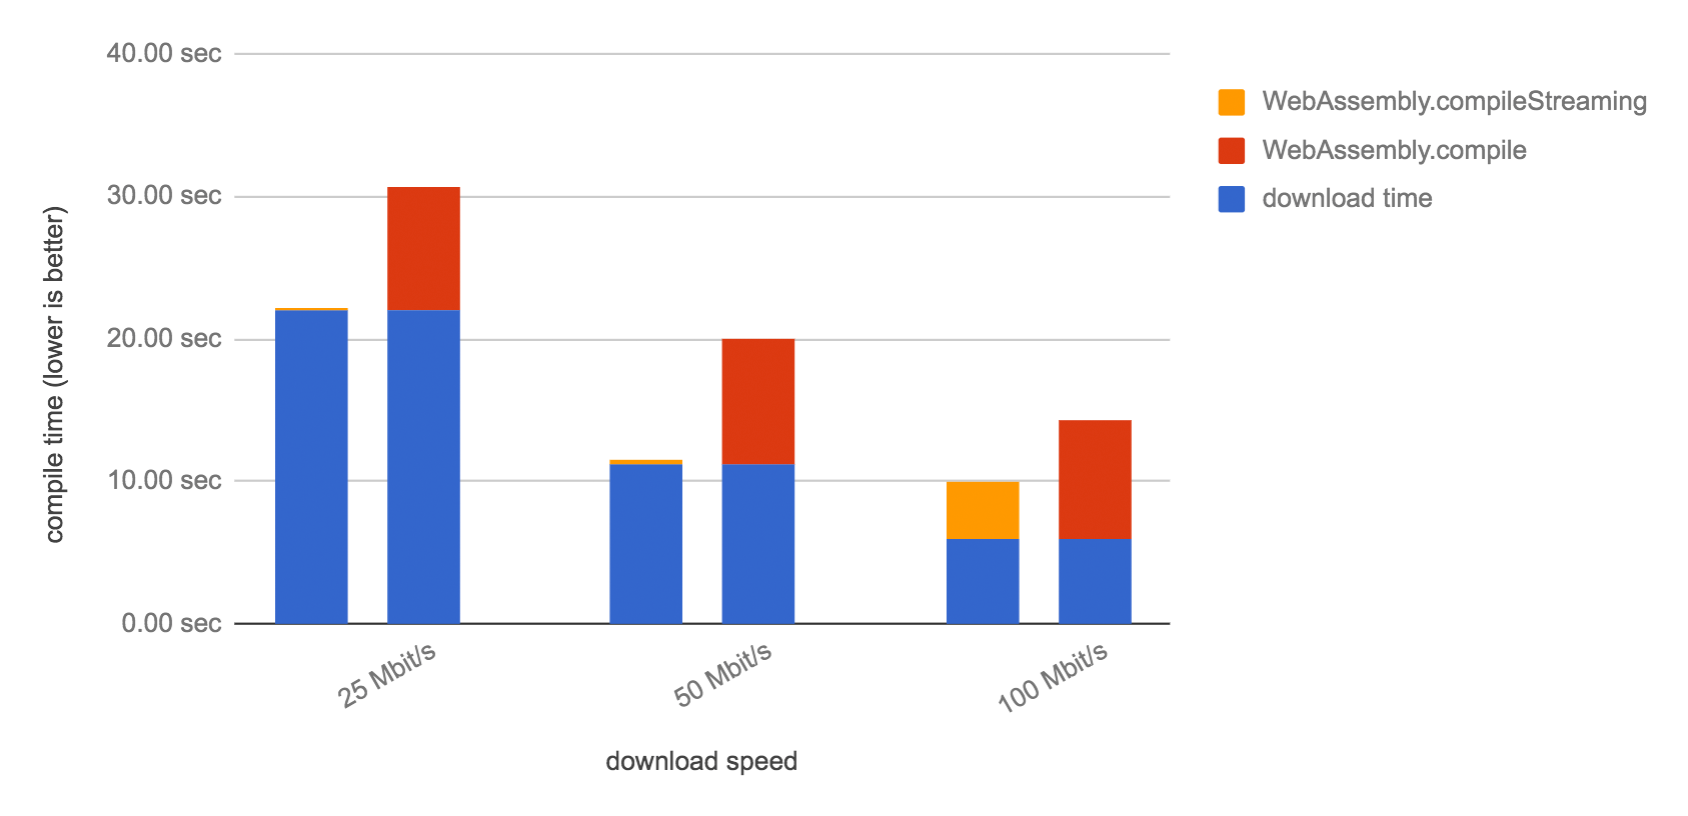
})();现在开始看下前面我提到的 compile 的最优的方法。借助于“流式编译(streaming compilation)”,浏览器现在已经可以直接在模块数据还在下载时就开始编译 WebAssembly 模块。由于下载和编译是同时进行的,速度自然更快——特别是在载荷(payload)大的时候(译:即模块的体积大的时候)。
要使用这种优化,我们需要改 WebAssebly.compile 的使用为WebAssembly.compileStreaming。这种改变还可以帮我们避免中间性的 arraybuffer,因为现在我们传递的直接是 await fetch(url) 返回的 Response 实例了:
(async () => {
  const response = await fetch('fibonacci.wasm');
  const module = await WebAssembly.compileStreaming(response);
  const instance = await WebAssembly.instantiate(module);
  const result = instance.exports.fibonacci(42);
  console.log(result);
})();
注意:这种方式要求服务器必须对 .wasm 文件做正确的 MIME 类型的配置,方法是发送Content-Type: application/wasm 头。在上一个例子中,这个步骤不是必须的,因为我们传递的是 response 的 arraybuffer,所以就不会发生对 MIME 类型的检测。WebAssembly.compileStreaming API 还支持传入能够解析(resolve)为 Response 的 promise。如果你在代码中没有其他使用response的地方,这样你就可以直接传递fetch返回的promise,不需要await它的结果了:
(async () => {
  const fetchPromise = fetch('fibonacci.wasm');
  const module = await WebAssembly.compileStreaming(fetchPromise);
  const instance = await WebAssembly.instantiate(module);
  const result = instance.exports.fibonacci(42);
  console.log(result);
})();
如果对fetch的返回也没有其他使用的需求,你更可以直接传递了:
(async () => {
  const module = await WebAssembly.compileStreaming(
    fetch('fibonacci.wasm'));
  const instance = await WebAssembly.instantiate(module);
  const result = instance.exports.fibonacci(42);
  console.log(result);
})();
虽然如此,不过我个人觉得把它单独放一行更具可读性。
看到我们是如何把 response 编译为一个 module,又是如何把它立刻实例化的了吗?其实,WebAssembly.instantiate 可以一步到位完成到编译和实例化。WebAssembly.instantiateStreaming API 当然也可以,而且是流式的:
(async () => {
  const fetchPromise = fetch('fibonacci.wasm');
  const { module, instance } = await WebAssembly.instantiateStreaming(fetchPromise);
  // 稍后创建的另一个新的实例:
  const otherInstance = await WebAssembly.instantiate(module);
  const result = instance.exports.fibonacci(42);
  console.log(result);
})();
如果你只需要一个实例的话,保存 module 对象就没有任何意义了,所以代码还可以更一步简化:
// 这就是我们所推荐的加载 WebAssembley 的方式
(async () => {
  const fetchPromise = fetch('fibonacci.wasm');
  const { instance } = await WebAssembly.instantiateStreaming(fetchPromise);
  const result = instance.exports.fibonacci(42);
  console.log(result);
})();
你可以在 WebAssembly Studio 中在线把玩这段代码示例。
总结以下我们所应用的优化:
- 使用异步 API 来防止主线程阻塞
- 使用流式 API 来更快地编译和实例化 WebAssembly 模块
- 不写不需要代码
祝你玩 WebAssembly 玩的开心!
