

背景
ConstraintLayout是Google在2016年I/O大会上提出的一种全新的布局容器,其目标是简化布局层次,让布局尽可能扁平化。
优势
它具有LinearLayout和RelativeLayotu的所有特点,如线性布局,权重,相对位置,所以使用一层结构也可实现复杂的布局,大大简化了布局的层次结构。
位置
ConstraintLayout提供了完善的约束方式,通过合理使用,我们可快速实现View的位置布局:
app:layout_constraintTop_toBottomOf
app:layout_constraintLeft_toRightOf
app:layout_constraintRight_toLeftOf
app:layout_constraintBottom_toTopOf
app:layout_constraintStart_toEndOf
app:layout_constraintEnd_toStartOf
app:layout_constraintBaseline_toBaselineOf
这些属性都是layout_constraintX_toYOf形式,看起来很复杂,其实这只是为了清晰地表达约束条件而已,实际上在使用上我们只需要关注toYof部分,如:toBottomof表示在指定元素的底部。
既然有依赖关系,那就存在所依赖的View被隐藏的情况,与RelativeLayout不同的是,如果所依赖的View被隐藏(visibility被设置为GONE)时,它的依赖关系依然存在,同时还提供了当所依赖的View被隐藏后设置margin的功能(相当于View被隐藏了,但原来的位置提供了一个隐形的瞄点)。
app:layout_goneMarginTop
app:layout_goneMarginLeft
app:layout_goneMarginRight
app:layout_goneMarginBottom
需要注意以下几点:
- 上面的这几种属性的值大多数情况都应该使用指定View的id,而不是parent, 使用parent时,当前View被放置在parent的外侧,所以,只有特殊情况下才使用parent;
- layout_goneMarginX属性只有所依赖的一侧才有效。例如,当前View在所依赖的View的底部,那么只有layout_goneMarginTop才有效;
- layout_constraintBaseline_toBaselineOf这个属性,它表示以baseline对齐(baseline简单来说,就是文字的底部,而不是View的底部),在文本对齐中很好用,使用RelativeLayout 时,对两个文字大小不同的TextView进行底部对齐时,设置了底部对齐,还需要设置margin来手动调整,而在ConstraintLayout中,使用layout_constraintBaseline_toBaselineOf就可直接对齐。 这个属性的优先级比layout_constraintTop_toBottomOf和layout_constraintBottom_toTopOf要高,所以同时使用时,会覆盖上面两个属性的值。
边距
在ConstraintLayout中,我们发现layout_marginXXX不起作用,原因是没有对元素添加约束,所以在设置边距时,我们需要先设置约束条件,再使用layout_marginXXX属性:
// 距离父布局左侧24dp
android:layout_marginLeft="24dp"
app:layout_constraintLeft_toLeftOf="parent"

 // 距离id为start_text的View左侧24dp
android:layout_marginLeft="24dp"
app:layout_constraintLeft_toLeftOf="@id/start_text"
对齐方式
在ConstraintLayout中,子元素不能使用layout_gravity属性设置对齐方式,而只能使用下面几个属性:
// 顶部对齐
app:layout_constraintTop_toTopOf="parent"
// 左边对齐
app:layout_constraintLeft_toLeftOf="parent"
// 右边对齐
app:layout_constraintRight_toRightOf="parent"
// 底部对齐
app:layout_constraintBottom_toBottomOf="parent"
这几个元素的值可为指定元素的id或parent, 为元素id表示与指定元素对齐,设置为parent表示与父布局的对齐方式。虽没有提供居中对齐(水平居中,垂直居中,居中),但可通过组合的方式来实现:
// 水平居中
app:layout_constraintLeft_toLeftOf="parent"
app:layout_constraintRight_toRightOf="parent"

// 垂直居中
app:layout_constraintTop_toTopOf="parent"
app:layout_constraintBottom_toBottomOf="parent"

// 居中
app:layout_constraintTop_toTopOf="parent"
app:layout_constraintLeft_toLeftOf="parent"
app:layout_constraintRight_toRightOf="parent"
app:layout_constraintBottom_toBottomOf="parent"
实现起来还是比较麻烦,尤其是居中,需要四个属性组合才可以实现,但愿Google能够添加相应的属性,简化属性实现过程。当然,也可自己扩展。
虽然ConstraintLayout没有提供单个的居中属性,但却提供了一个很别致的属性——Bias, 表示居中情况下的偏移,其取值为[0, 1],默认为0.5。以水平方面来说,0表示左对齐,0.5表示水平对齐,1表示右对齐。当然,前提是要设置水平居中。
// 左对齐
app:layout_constraintLeft_toLeftOf="parent"
app:layout_constraintRight_toRightOf="parent"
app:layout_constraintHorizontal_bias="0"

// 右对齐
app:layout_constraintLeft_toLeftOf="parent"
app:layout_constraintRight_toRightOf="parent"
app:layout_constraintHorizontal_bias="1"

// 从水平中心点向左偏移一定的距离,偏移的距离=(ConstraintLayout.width - View.width) * 0.25
app:layout_constraintLeft_toLeftOf="parent"
app:layout_constraintRight_toRightOf="parent"
app:layout_constraintHorizontal_bias="0.25"
==特别说明:==
ConstraintLayout中的View允许宽度或高度被设置为0dp, 但不能同时被设置为0dp。如果为0dp,则以wrap_content的形式显示。 当View居中(相对于ConstraintLayout居中或相对于指定View居中)显示时,如果是水平居中,width被设置为0dp,则width会被自动设置为所依赖的View的宽度,高度同理。
<android.support.constraint.ConstraintLayout
    xmlns:android="http://schemas.android.com/apk/res/android"
    xmlns:app="http://schemas.android.com/apk/res-auto"
    android:layout_width="match_parent"
    android:layout_height="match_parent">

    <TextView
        android:id="@+id/text1"
        android:layout_width="100dp"
        android:layout_height="wrap_content"
        android:text="Hello"
        android:gravity="center"/>

    <TextView
        android:id="@+id/text2"
        android:layout_width="0dp"
        android:layout_height="wrap_content"
        android:text="world"
        android:gravity="center"
        app:layout_constraintTop_toBottomOf="@id/text1"
        app:layout_constraintLeft_toLeftOf="@id/text1"
        app:layout_constraintRight_toRightOf="@id/text1"/>
</android.support.constraint.ConstraintLayout>
这个布局中,text2的宽度将被自动设置成100dp。如果设置为以父布局居中,则宽度就是ConstraintLayout的宽度减去padding的距离。
比例
ConstraintLayout还支持比例设置,通过layout_constraintDimensionRatio即可设置View的宽高比例:
但使用时需要注意以下几点:
-
width或height有且只有一边需要设置为0dp, 另一边需要设置为固定值或match_parent;
-
至少需要一个约束条件,如位置或对齐方式,否则设置的比例无效;
-
layout_constraintDimensionRatio的值表示width:height,可设置为比例的形式,也可设置为比例值,如2:1或2。当然,也可指定为height:width:
app:layout_constraintDimensionRatio="H,2:1" // 表示height:width=2:1
链条
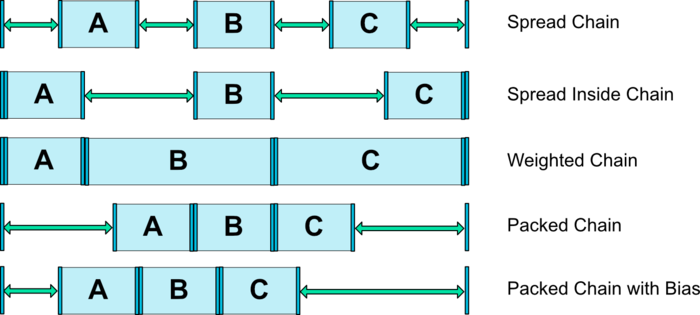
Chains是ConstraintLayout又一独特的地方,它可以看做是LinearLayout的另类实现。不过它只是一种逻辑上存在的概念,它的构成很简单:相互引用自成链。如:ViewA的位置设置为ViewB的左侧,ViewB的位置设置为ViewA的右侧,那么它们就形成了一条链,这条链最左侧或顶部的一个元素被称为链头,在链头中可通过layout_constraintHorizontal_chainStyle或layout_constraintVertical_chainStyle属性设置Chain的样式,它支持的样式包括以下几种:
spread:Views被等间距存放(默认样式);
spread_inside: 第一个和最后一个View靠边显示,其他View等间距显示;
packed: Views紧挨着并居中显示;
具体的显示效果可参考下图(图片来自张旭童同学的blog)
使用Chain时注意一下几点:
- 第一个元素需要设置为左对齐或顶部对齐,最后一个元素需要设置为右对齐或底部对齐,否则即便互相引用,也不会以Chain形式展示。
- 链头元素不能作为Chain外其他View的依赖元素,否则无法实现需要的位置关系。如ViewA需要在一条Chain的下面,则不能设置layout_constraintTop_toBottomOf为第一个元素,否则不会产生预期的效果;
前面说了,ConstraintLayout也支持权重,只需要通过layout_constraintHorizontal_weight或layout_constraintVertical_weight来实现,如:
<Button
    android:id="@+id/button"
    android:layout_width="wrap_content"
    android:layout_height="wrap_content"
    android:text="Button"
    app:layout_constraintEnd_toStartOf="@+id/button2"
    app:layout_constraintStart_toStartOf="parent"
    app:layout_constraintTop_toBottomOf="@id/container_layout"
    app:layout_constraintHorizontal_chainStyle="packed"/>

<Button
    android:id="@+id/button2"
    android:layout_width="0dp"
    android:layout_height="wrap_content"
    android:text="Button"
    app:layout_constraintHorizontal_weight="1"
    app:layout_constraintEnd_toStartOf="@+id/button3"
    app:layout_constraintStart_toEndOf="@+id/button"/>

<Button
    android:id="@+id/button3"
    android:layout_width="wrap_content"
    android:layout_height="wrap_content"
    android:text="Button"
    app:layout_constraintEnd_toEndOf="parent"
    app:layout_constraintStart_toEndOf="@+id/button2"/>
这条Chain中button2将占除了button1和button3之外所有空间,需要注意的是,设置权重时,对应的width或height必须设置为0dp, 否则设置的权重无效。
示例
上面已经对的属性进行了介绍,有必要小试牛刀了,实现以下布局:
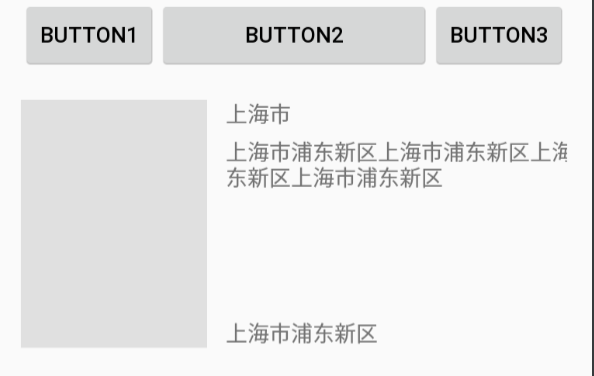
使用LinearLayout和RelativeLayout,最少也需要2层布局才能实现,但是使用ConstraintLayout一层就可实现。
<?xml version="1.0" encoding="utf-8"?>
<android.support.constraint.ConstraintLayout xmlns:android="http://schemas.android.com/apk/res/android"
    xmlns:app="http://schemas.android.com/apk/res-auto"
    android:layout_width="match_parent"
    android:layout_height="match_parent"
    android:paddingLeft="16dp"
    android:paddingRight="16dp">

    <Button
        android:id="@+id/button1"
        android:layout_width="wrap_content"
        android:layout_height="wrap_content"
        android:text="button1"
        app:layout_constraintHorizontal_chainStyle="spread"
        app:layout_constraintRight_toLeftOf="@id/button2"
        app:layout_constraintLeft_toLeftOf="parent"/>

    <Button
        android:id="@+id/button2"
        android:layout_width="0dp"
        android:layout_height="wrap_content"
        android:text="button2"
        app:layout_constraintHorizontal_weight="1"
        app:layout_constraintLeft_toRightOf="@id/button1"
        app:layout_constraintRight_toLeftOf="@id/button3"/>

    <Button
        android:id="@+id/button3"
        android:layout_width="wrap_content"
        android:layout_height="wrap_content"
        android:text="button3"
        app:layout_constraintLeft_toRightOf="@id/button2"
        app:layout_constraintRight_toRightOf="parent"/>
    <View
        android:id="@+id/view4"
        android:layout_width="120dp"
        android:layout_height="0dp"
        android:layout_marginTop="18dp"
        android:background="#e0e0e0"
        app:layout_constraintTop_toBottomOf="@id/button2"
        app:layout_constraintDimensionRatio="3:4"/>
    <TextView
        android:id="@+id/view5"
        android:layout_width="wrap_content"
        android:layout_height="wrap_content"
        android:layout_marginLeft="12dp"
        android:text="上海市"
        app:layout_constraintLeft_toRightOf="@id/view4"
        app:layout_constraintTop_toTopOf="@id/view4"/>
    <TextView
        android:id="@+id/view6"
        android:layout_width="wrap_content"
        android:layout_height="wrap_content"
        android:layout_marginTop="6dp"
        android:layout_marginLeft="12dp"
        android:text="上海市浦东新区上海市浦东新区上海市浦东新区上海市浦东新区上海市浦东新区"
        app:layout_constraintTop_toBottomOf="@id/view5"
        app:layout_constraintLeft_toRightOf="@id/view4"/>
    <TextView
        android:id="@+id/view7"
        android:layout_width="wrap_content"
        android:layout_height="wrap_content"
        android:layout_marginLeft="12dp"
        android:text="上海市浦东新区"
        app:layout_constraintLeft_toRightOf="@id/view4"
        app:layout_constraintBottom_toBottomOf="@id/view4"/>
</android.support.constraint.ConstraintLayout>
总结
虽然ConstraintLayout很强大,但通过真实的应用,感觉还是有点复杂(需要设置的属性太多),所以在编写布局时,还是应该优先考虑RelativeLayout,对于复杂的布局,可考虑使用ConstraintLayout。
