

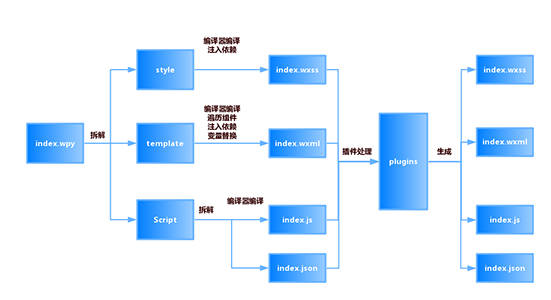
wepy 是腾讯开源的一款小程序框架,主要通过预编译的手段,让开发者采用类 Vue 风格开发。 让我们一起看看, wepy 是如何实现预编译的。先放上一张官网的流程图,后面的分析可以参考该图。
wepy-cli 主要负责 .wpy 文件的编译,目录结构如下:
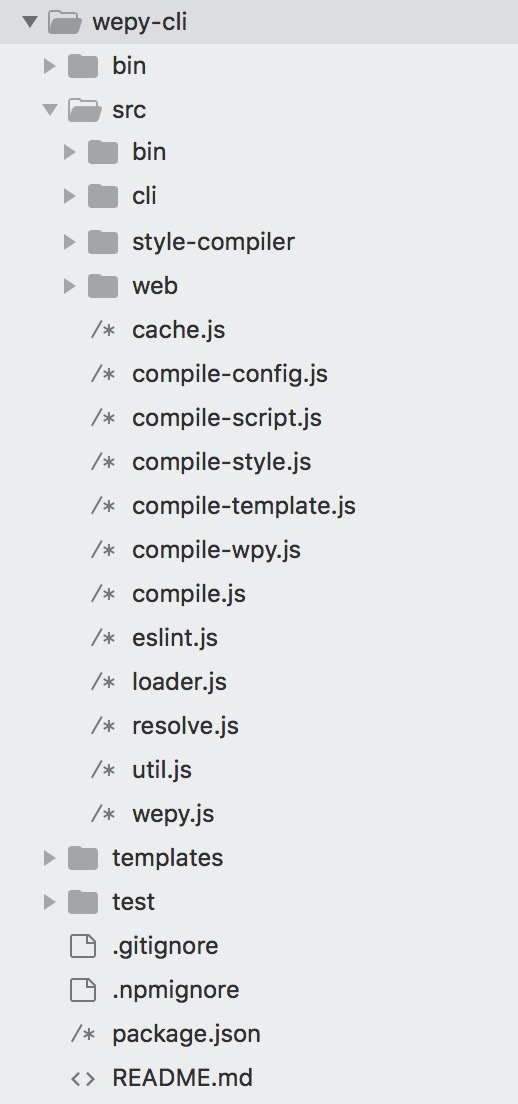
编译的入口是 src/compile.js 中的 compile() 方法,该方法主要是根据文件类型,执行不同的 compiler ,比如 .wpy 文件会走 compile-wpy.js 下的 compile() 方法。
compile(opath) {
  ...
  switch(opath.ext) {
    case ext:
      cWpy.compile(opath);
      break;
    case '.less':
      cStyle.compile('less', opath);
      break;
    case '.sass':
      cStyle.compile('sass', opath);
      break;
    case '.scss':
      cStyle.compile('scss', opath);
      break;
    case '.js':
      cScript.compile('babel', null, 'js', opath);
      break;
    case '.ts':
      cScript.compile('typescript', null, 'ts', opath);
      break;
    default:
      util.output('拷贝', path.join(opath.dir, opath.base));
    ...
  }
}
.wpy文件拆解
compile-wpy.js 下的 compile() 方法,核心调用了 resolveWpy() 方法。
resolveWpy() 方法,主要是将 .wpy 拆解成 rst 对象,并对其中的 template、script 做一些预处理,然后将 template、 script、 style 三部分移交给不同的 compiler 处理。
生成rst对象
通过 xmldom 获取 xml 对象,然后遍历节点,拆解为 rst对象。
import {DOMParser} from 'xmldom';
export default {
  createParser (opath) {
	return new DOMParser({
	  ...
	})
  },
  ...
  resolveWpy () {
    let xml = this.createParser(opath).parseFromString(content);
  }
}
rst对象结构如下:
let rst = {
  moduleId: moduleId,
  style: [],
  template: {
    code: '',
    src: '',
    type: ''
  },
  script: {
    code: '',
    src: '',
    type: ''
  }
};
此外,还对 template 做了如下一些预处理:
pug预编译- 获取文件中的
import,放入rst.template.components中 - 获取
props和events,放入rst.script.code中
compile-template
compile-template.js 中的 compile() 方法,根据 template 的 lang 值,执行不同的 compiler ,比如 wepy-compile-typescript 。编译完成后,执行 compileXML 方法,做了如下的操作:
updateSlot方法: 替换 slot 内容updateBind方法: 在 {{}} 和 attr 上加入组件的前缀,例如:{{width}}->{{$ComponentName$width}}- 把自定义的标签、指令转换为 wxml 语法,例如:
<repeat for="xxx" index="idx" item="xxx" key="xxx"></repeat>
<!-- 转换为 -->
<block wx:for="xxx" wx:for-index="xxx" wx:for-item="xxx" wx:key="xxxx"></block>
compile-style
依旧先是根据 lang 值,先执行不同的 compiler ,比如 wepy-compile-less 。编译完成后,执行 src/style-compiler/scope.js 中的 scopedHandler() 方法,处理 scoped 。
import postcss from 'postcss';
import scopeId from './scope-id';

export default function scopedHandler (id, content) {
  console.log('id is: ', id)
  console.log('css content is: ', content)
  return postcss([scopeId(id)])
    .process(content)
    .then(function (result) {
      console.log('css result is: ', result.css)
      return result.css
    }).catch((e) => {
      return Promise.reject(e)
    })
}
这里主要是利用 add-id 的 postcss 插件,插件源码可参考 src/style-compiler/scope-id.js。根据上面的代码,打印出来的log如下:
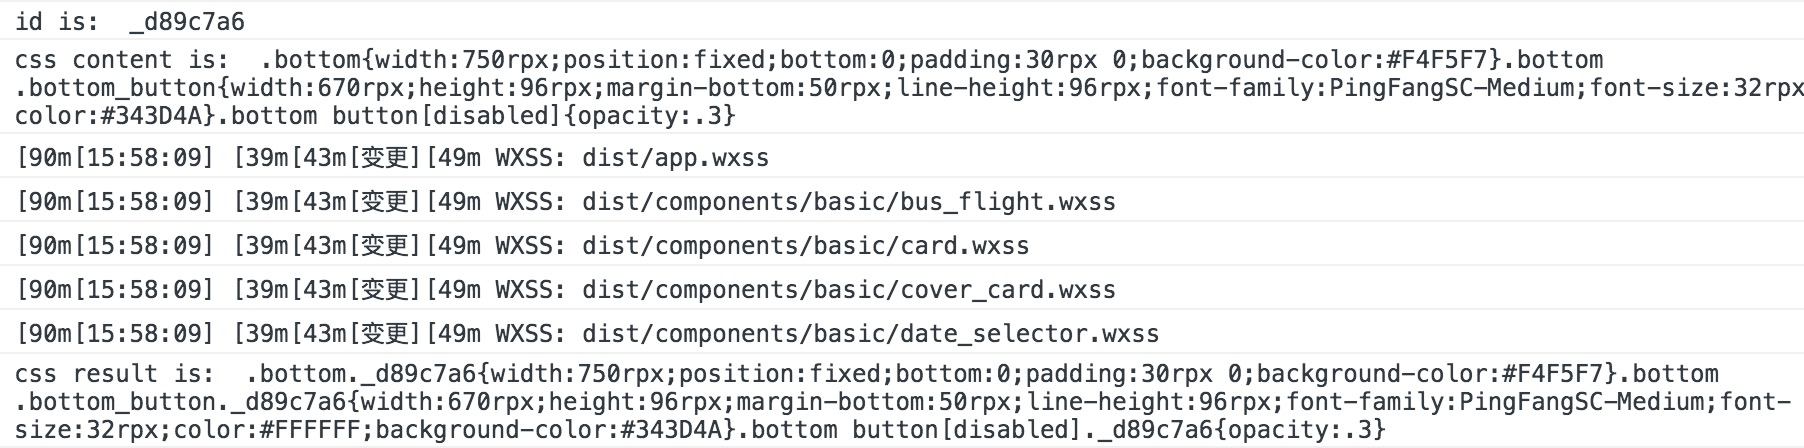
最后,会把 requires 由绝对路径替换为相对路径,并在 wxss 中引入,最终生成的 wxss 文件为:
@import "./../components/demo.wxss";

Page{background:#F4F5F7} ...
compile-script
依旧先是根据 lang 值,执行不同的 compiler。compiler 执行完之后,判断是否是 npm 包,如果不是,依据不同的 type 类型,加入 wepy 初始化的代码。
if (type !== 'npm') {
  if (type === 'page' || type === 'app') {
    code = code.replace(/exports\.default\s*=\s*(\w+);/ig, function (m, defaultExport) {
      if (defaultExport === 'undefined') {
        return '';
      }
      if (type === 'page') {
        let pagePath = path.join(path.relative(appPath.dir, opath.dir), opath.name).replace(/\\/ig, '/');
        return `\nPage(require('wepy').default.$createPage(${defaultExport} , '${pagePath}'));\n`;
      } else {
        appPath = opath;
        let appConfig = JSON.stringify(config.appConfig || {});
        let appCode = `\nApp(require('wepy').default.$createApp(${defaultExport}, ${appConfig}));\n`;
        if (config.cliLogs) {
          appCode += 'require(\'./_wepylogs.js\')\n';
        }
        return appCode;
      }
    });
  }
}
接下来会执行 resolveDeps() 方法,主要是处理 requires。根据 require 文件的类型,拷贝至对应的目录,再把 code 中的 require 代码替换为 相对路径。
处理好的 code 最终会写入 js 文件中,文件存储路径会判断类型是否为 npm。
let target;
if (type !== 'npm') {
  target = util.getDistPath(opath, 'js');
} else {
  code = this.npmHack(opath, code);
  target = path.join(npmPath, path.relative(opath.npm.modulePath, path.join(opath.dir, opath.base)));
}
plugin
根据上面的流程图,可以看出所有的文件生成之前都会经过 Plugin 处理。先来看一下,compiler 中是如何载入 Plugin 的。
let plg = new loader.PluginHelper(config.plugins, {
  type: 'css',
  code: allContent,
  file: target,
  output (p) {
    util.output(p.action, p.file);
  },
  done (rst) {
    util.output('写入', rst.file);
    util.writeFile(target, rst.code);
  }
});
其中,config.plugins 就是在 wepy.config.js 中定义的 plugins。让我们来看一下 PluginHelper 类是如何定义的。
class PluginHelper {
  constructor (plugins, op) {
    this.applyPlugin(0, op);
    return true;
  }
  applyPlugin (index, op) {
    let plg = loadedPlugins[index];

    if (!plg) {
      op.done && op.done(op);
    } else {
      op.next = () => {
        this.applyPlugin(index + 1, op);
      };
      op.catch = () => {
        op.error && op.error(op);
      };
      if (plg)
        plg.apply(op);
    }
  }
}
在有多个插件的时候,不断的调用 next(),最后执行 done()。
编写plugin
wxss 与 css 相比,拓展了尺寸单位,即引入了 rpx 单位。但是设计童鞋给到的设计稿单位一般为 px,那现在我们就一起来编写一个可以将 px 转换为 rpx 的 wepy plugin。
从 PluginHelper 类的定义可以看出,是调用了 plugin 中的 apply() 方法。另外,只有 .wxss 中的 rpx 才需要转换,所以会加一层判断,如果不是 wxss 文件,接着执行下一个 plugin。rpx 转换为 px 的核心是,使用了 postcss-px2units plugin。下面就是设计好的 wepy-plugin-px2units,更多源码可参考 github 地址。
import postcss from 'postcss';
import px2units from 'postcss-px2units';

export default class {

  constructor(c = {}) {
    const def = {
      filter: new RegExp('\.(wxss)$'),
      config: {}
    };

    this.setting = Object.assign({}, def, c);
  }
  apply (op) {

    let setting = this.setting;

    if (!setting.filter.test(op.file)) {
      op.next();
    } else {
      op.output && op.output({
        action: '变更',
        file: op.file
      });

      let prefixer = postcss([ px2units(this.setting.config) ]);

      prefixer.process(op.code, { from: op.file }).then((result) => {
        op.code = result.css;
        op.next();
      }).catch(e => {
        op.err = e;
        op.catch();
      });
    }
  }
}
最后
本文分析的源码以 wepy-cli@1.7.1 版本为准,更多信息可参考 wepy github (即 github 1.7.x 分支)。另外,文中有任何表述不清或不当的地方,欢迎大家批评指正。
本文首发于:github.com/yingye/Blog…
欢迎各位关注我的Blog,正文以issue形式呈现,喜欢请点star,订阅请点watch~
