

Homebrew - Mac 必备软件管理神器
基本市面上的软件都能通过 brew install softwareName 的方式进行安装。例如: git、google-chrmoe...
/usr/bin/ruby -e "$(curl -fsSL https://raw.githubusercontent.com/Homebrew/install/master/install)"
ITerm2 + oh-my-zsh - 终端命令行工具
当然还是通过 brew进行安装 ITerm2
# ITerm2
$ brew install homebrew/cask/iterm2
都安装好后,我们就来配置下终端命令行工具,让它变的超酷起来。
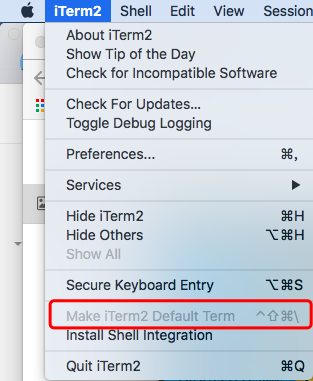
1. iTerm2 -> Make iTerm2 Default Term
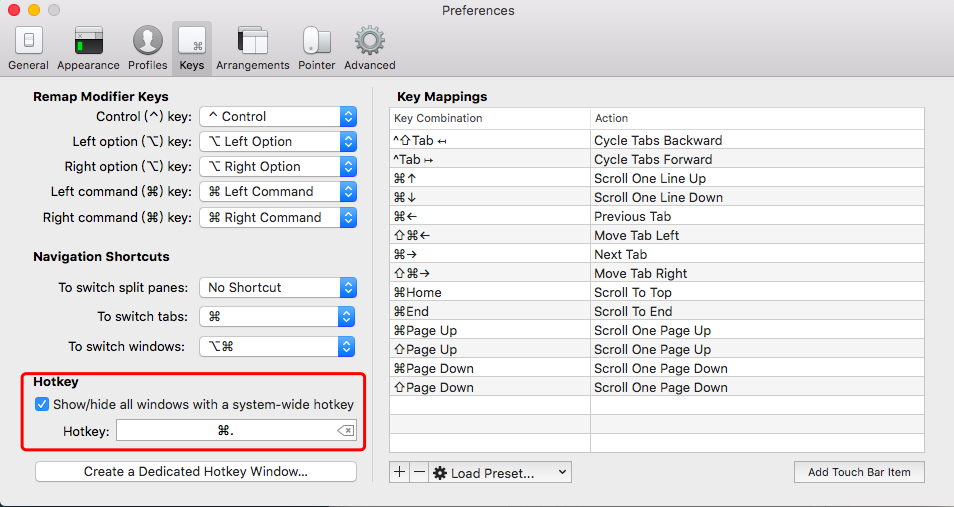
2. 打开偏好设置preference,选中Keys,勾选Hotkey下的Show/hide iTerm2 with a system-wide hotkey,将热键设置为 ⌘+. ,这样你就可以通过 ⌘+. 全局热键来打开或关闭iTerm2窗口,非常方便
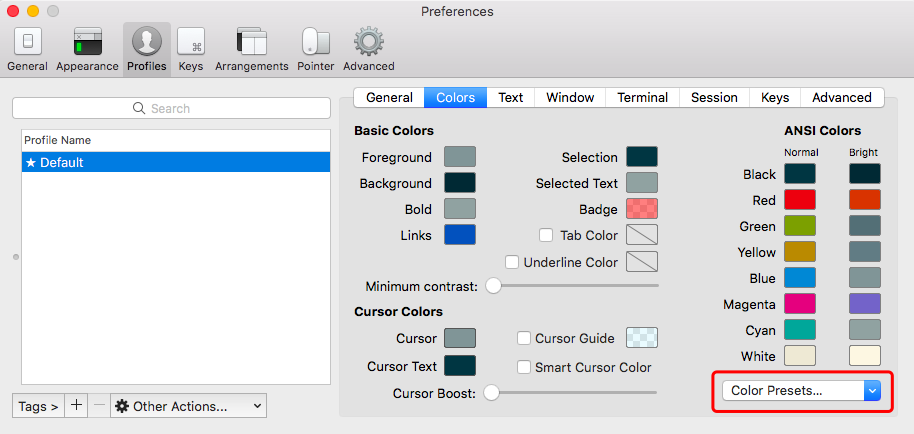
3. 配色方案,选用 solarized,下载解压,然后打开 iTerm2 下的偏好设置 preference ,点开 profiles 下的colors 选项,点击右下角的 Color Presets 选项,选择import ,导入解压到的 solarized 文件下的Solarized Dark.itermcolors
4. 安装 oh-my-zsh
#  oh-my-zsh
$ sh -c "$(curl -fsSL https://raw.github.com/robbyrussell/oh-my-zsh/master/tools/install.sh)"
5. 配置主题
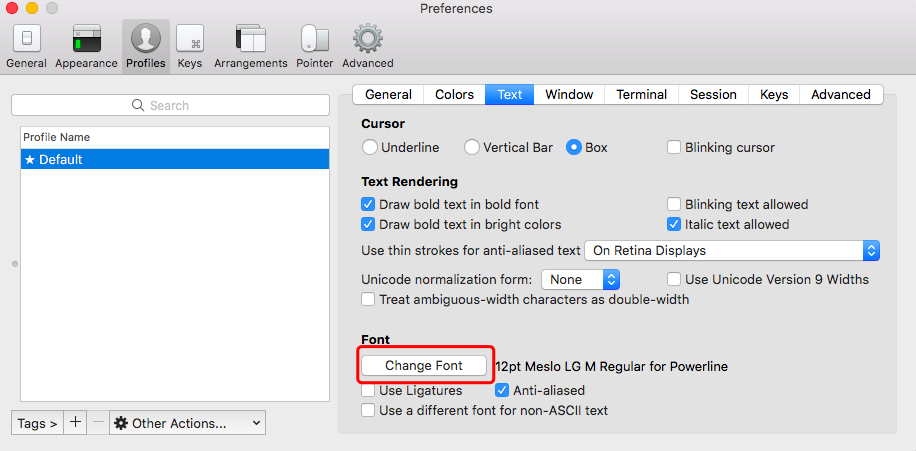
1、 用 vim 编辑隐藏文件 .zshrc, 终端输入vi ~/.zshrc ZSH_THEME="agnoster" 将zsh主题修改为“agnoster” 2、 应用“agnoster”主题需要特殊的字体支持,否则会出现乱码情况, 使用 Meslo 字体,点开链接点击 view raw 下载字体 3、 安装字体到系统字体册 4、 在iTerm2中应用字体 iTerm -> Preferences -> Profiles -> Text -> Change Font) 5、 重新打开iTerm2窗口(或新打开一个iTerm2窗口)即可以看到字体效果
推荐powerlevel9k 主题
“shades-of-purple-iterm2” 主题使用了一段时间,非常舒服,相应的还提供了很多软件同款配色,这里推荐给大家👊
$ git clone https://github.com/bhilburn/powerlevel9k.git ~/.oh-my-zsh/custom/themes/powerlevel9k
然后编辑你的~/.zshrc,设置主题ZSH_THEME="powerlevel9k/powerlevel9k"
6. 自动提示与命令补全
1、克隆仓库到本地 ~/.oh-my-zsh/custom/plugins 路径下
$ git clone https://github.com/zsh-users/zsh-autosuggestions ${ZSH_CUSTOM:-~/.oh-my-zsh/custom}/plugins/zsh-autosuggestions
2、用 vim 编辑 .zshrc 文件,找到插件设置命令,默认是 plugins=(git) ,我们把它修改为plugins=(zsh-autosuggestions git)
PS:当你重新打开终端时可能看不到变化,可能你的字体颜色太淡了,我们把其改亮一些:
cd ~/.oh-my-zsh/custom/plugins/zsh-autosuggestions- 用
vim编辑zsh-autosuggestions.zsh文件,修改ZSH_AUTOSUGGEST_HIGHLIGHT_STYLE='fg=10'
7. 语法高亮效果
$ brew install zsh-syntax-highlighting
在.zshrc文件的末尾添加下面这一段:
source /usr/local/share/zsh-syntax-highlighting/zsh-syntax-highlighting.zsh
然后,加载.zshrc配置
$ source ~/.zshrc
- 这里我使用的是
powerlevel9k 主题, 所以我的首行提示是这样修改的, 在.zshrc文件末尾增加下面一行:
# Powerlevel9k Theme config
POWERLEVEL9K_CONTEXT_TEMPLATE="%n"
或者,所有主题都适用的方式,还是在.zshrc文件里进行配置:
  ZSH_THEME="powerlevel9k/powerlevel9k"
# 隐藏用户名称(user@hostname)
  DEFAULT_USER=`id -un`
# 含有icon的字型,前提你的字体有icon
POWERLEVEL9K_MODE='nerdfont-complete'
# command line 左边提示内容(文件夹路径、文件夹读写状态、版本控制资讯)
POWERLEVEL9K_LEFT_PROMPT_ELEMENTS=(dir dir_writable vcs) # <= left prompt 设了 "dir"
# command line 右边提示内容(状态、时间)
POWERLEVEL9K_RIGHT_PROMPT_ELEMENTS=(status time)
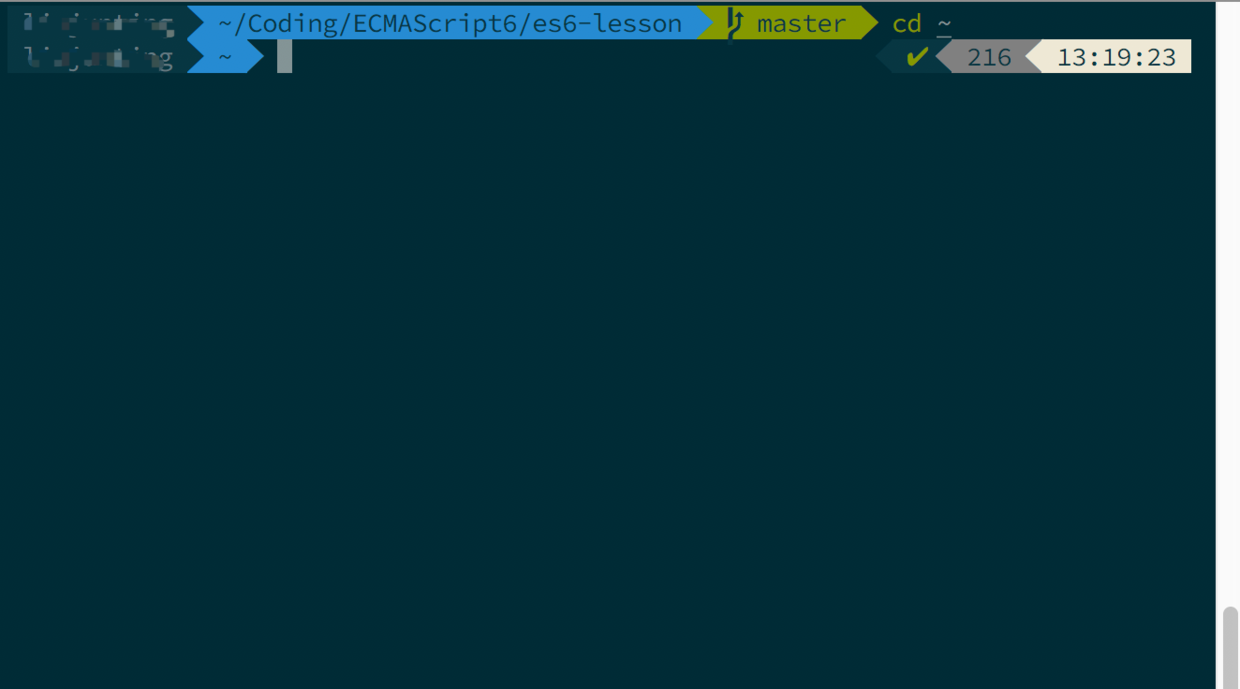
最后显示成果:
Visual Studio Code 终端配置
字体:
- for Source Code Pro: "terminal.integrated.fontFamily": "Source Code Pro for Powerline"
- for Meslo: "terminal.integrated.fontFamily": "Meslo LG M for Powerline"
- the fontsize e.g.: "terminal.integrated.fontSize": 14
主题配色
推荐主题配色
NVM - Node Version Manager
curl -o- https://raw.githubusercontent.com/creationix/nvm/v0.33.11/install.sh | bash
如果重启终端后发现,nvm 未找到此命令, 将下面的源代码行添加到您的配置文件(〜/ .bash_profile,〜/ .zshrc,〜/ .profile或〜/ .bashrc)
export NVM_DIR="$HOME/.nvm"
[ -s "$NVM_DIR/nvm.sh" ] && \. "$NVM_DIR/nvm.sh"  # This loads nvm
[ -s "$NVM_DIR/bash_completion" ] && \. "$NVM_DIR/bash_completion"  # This loads nvm bash_completion
安装Node
# install
$ nvm install 8
# use
$ nvm use default

$ node -v

$ npm -v
NRM -- NPM registry manager
# 全局安装
$ npm install -g nrm
# 查看当前 npm 源列表
$ nrm ls
# 选择 taobao 源
$ nrm use taobao

# 查看 npm 源是否更改
$ npm config get
