

很多时候我们在开发一个Vue项目的时候,用一个Vue实例封装的EventBus来处理事件的传递从而达到组件间状态的共享。但是随着业务的复杂度提升,组件间共享的状态变得难以追溯和维护。因此我们需要将这些共享的状态通过一个全局的单例对象保存下来,在通过指定的方法去更新状态更新组件。
回顾基础知识
既然都说vuex是解决组件间数据通信的一种方式,那我们先来回顾下组件间通信的几种方法:
props传值
这种方法我们可以直接将父组件的值传递给子组件,并在子组件中调用。很明显,props是一种单向的数据绑定,并且子组件不能去修改props的值。在vue1.x中可以通过.async来实现双向绑定,但是这种双向的绑定很难去定位数据错误的来源,在vue2.3.0版本又加回了.async。
// 父组件
<Child name="hahaha" />

// 子组件
<div>{{name}}</div>
// ...
props: ['name']
// ...
$on $emit
如果子组件向父组件传递数据,我们可以通过$emit和$on,在子组件注册事件,在父组件监听事件并作回调。
// 父组件
<Child @getName="getNameCb" />
// ...
getNameCb(name) {
  console.log('name');
}

// 子组件
someFunc() {
  this.$emit('getName', 'hahahah');
}
EventBus
前面两种方式很容易就解决了父子组件的通信问题,但是很难受的是,处理兄弟组件或者是祖孙组件的通信时你需要一层一层的去传递props,一层一层的去$emit。那么其实就可以使用EventBus了,EventBus实际上是一个Vue的实例,我们通过Vue实例的$emit和$on来进行事件的发布订阅。但是问题也很明显,过多的使用EventBus也会造成数据源难以追溯的问题,并且不及时通过$off注销事件的化,也会发生很多奇妙的事情。
import EventBus from '...';

// 某一个组件
// ...
mounted() {
  EventBus.$on('someevent', (data) => {
    // ...
  })
}
// ...

// 某另一个组件
// ...
someFunc() {
  EventBus.$emit('someevent', 'hahahah');
}
// ...
Vuex
接下来就是我们要讲的Vuex了,以上这些问题Vuex都可以解决,Vuex也是Vue官方团队维护的Vue全家桶中的一员,作为Vue的亲儿子,Vuex毫无疑问是非常适合Vue项目的了。但是Vuex也不是完美的,毫无疑问在应用中加一层Store或多或少的都会增加学习和维护的成本,并且说白了一个小项目没几个组件,Vuex只会增加你的代码量,酌情使用吧。下面就进入到我们Vuex源码学习的正文了。
剖析原理
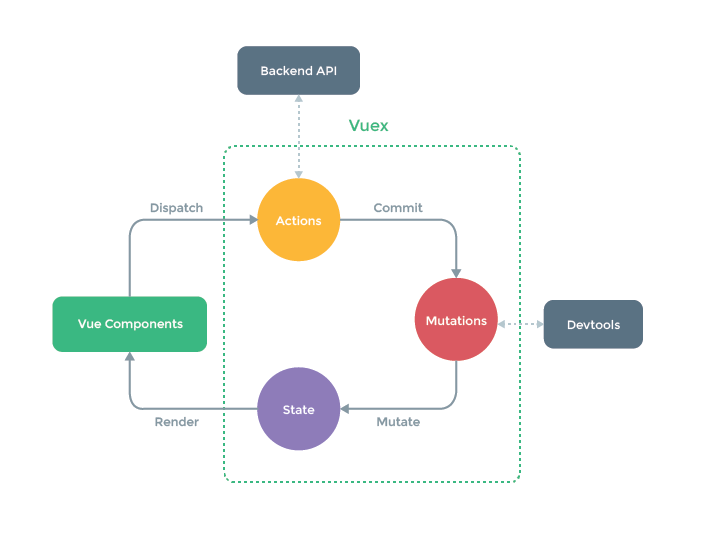
- state:这里的state是一个单一的状态树;
- mutations:在这里将触发同步事件,可以直接修改state;
- actions:通过commit提交mutation,并且可以执行异步操作;
- getters:这张图省略了getter,可以通过getter获取状态,同时也将被转化为vuex内部vue实例(_vm)的computed属性,从而实现响应式;
回顾一下Vuex的设计原理。我们把组件间共享的状态存储到Vuex的state中,并且组件会根据这个state的值去渲染。当需要更新state的时候,我们在组件中调用Vuex提供的dispatch方法去触发action,而在action中去通过commit方法去提交一个mutation,最后通过mutation去直接修改state,组件监听到state的更新最后更新组件。需要注意的有,mutaion不能执行异步操作,异步操作需要放到action中去完成;直接修改state的有且仅有mutation。(具体的使用方法笔者就不去啰嗦了,官方文档写的很详细,还有中文版,为啥不看...)
在笔者看来,Vuex的作用是用来解决组件间状态的共享,使项目更加利于维护,同样也是贯彻单向数据流这个理念。但其实从功能上讲,Vuex也像是一个前端的“数据库”,我们在使用Vuex时很像是后端同学对库的增删改查。
在Vue的项目中,我们也可以去使用Redux等来处理共享的状态,甚至是可以自己简单封装一个工具来处理状态,毕竟引入Vuex对开发同学来说也是有一定成本的。但是归根到底都是单向数据流的思想,一通则百通。
插个题外话,笔者在研究Vue ssr的时候不想去用Vuex做前后端状态共享,于是基于EventBus的思想对Vue实例进行了封装也同样实现了Vuex的功能,有兴趣的同学可以看下。戳这里。
剖析源码
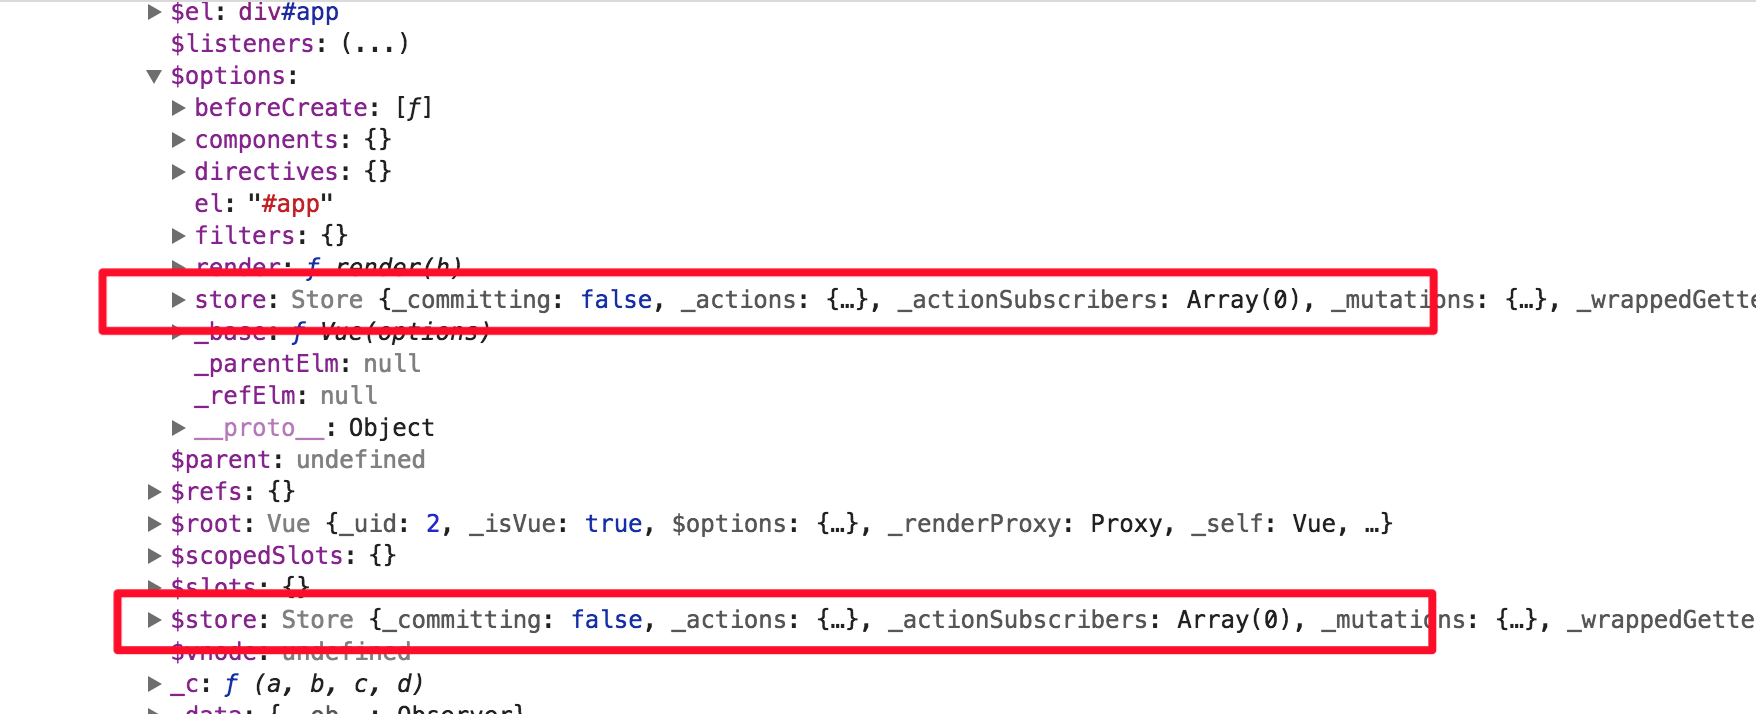
首先我们将挂载完Vuex实例的Vue实例打印出来看看挂载完增加了哪些东西。
项目结构
拿到一个项目的源码我们要先去浏览他它的目录结构:
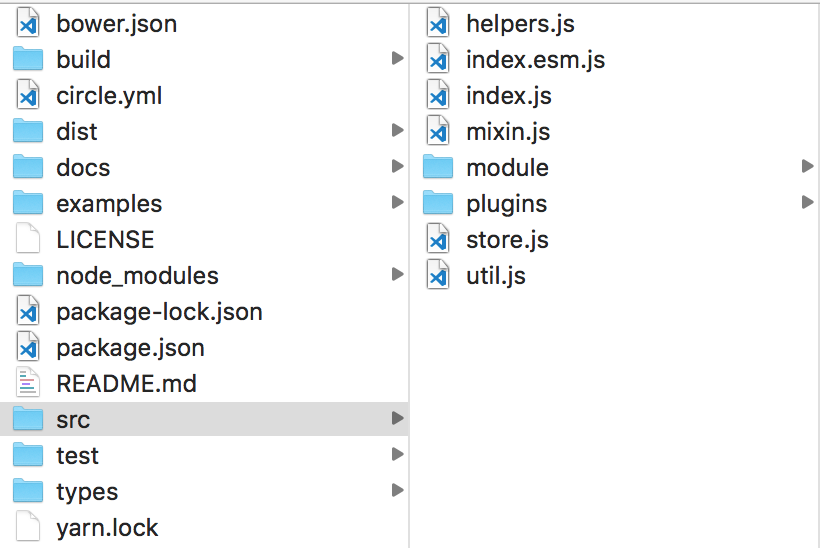
- helpers.js是Vuex的一些基础API,例如mapState、mapActions这些;
- index.js和index.esm.js是我们的入口文件,不同的是index.esm.js采用了EcmaScript Module编写;
- mixin.js是对mixin封装的一个函数;
- module是Vuex中module相关逻辑的源码;
- plugins中封装了我们常用的devtool和log相关的逻辑;
- store.js是主要逻辑,这里封装了一个Store类;
- util.js是对一些工具函数的封装;
应用入口
通常在构建包含Vuex的程序的时候会这么写:
import Vue from 'vue';
import Vuex from 'vuex';

Vue.use(Vuex);

const store = new Vuex({
  state: {...},
  mutations: {...},
  actions: {...},
});

new Vue({
  store,
  template,
}).$mount('#app')
用过redux的小伙伴可以发现Vuex采用的是面向对象化的配置方式,不同于redux那种“偏函数式的初始化”,能更容易的让开发者理解。并且Vuex是以插件的形式安装在Vue实例上。
安装插件
在store.js中定义了一个符合Vue插件机制的导出函数install,并且封装了一个beforeCreate的mixin。
源码位置:/src/store.js /src/mixin.js
// store.js
// ...
// 绑定一个Vue实例;
// 不用将Vue打包进项目便可以使用Vue的提供的一些静态方法;
let Vue
// ...
// Vue 插件机制
export function install (_Vue) {
  if (Vue && _Vue === Vue) {
    if (process.env.NODE_ENV !== 'production') {
      console.error(
        '[vuex] already installed. Vue.use(Vuex) should be called only once.'
      )
    }
    return
  }
  Vue = _Vue
  // 封装mixin挂载$store
  applyMixin(Vue)
}
// mixin.js
export default function (Vue) {
  // 获取版本号
  const version = Number(Vue.version.split('.')[0])
  if (version >= 2) {
    Vue.mixin({ beforeCreate: vuexInit })
  } else {
    // 兼容低版本的Vue
    const _init = Vue.prototype._init
    Vue.prototype._init = function (options = {}) {
      options.init = options.init
        ? [vuexInit].concat(options.init)
        : vuexInit
      _init.call(this, options)
    }
  }
  // 封装mixin;
  // 绑定$store实例;
  // 子组件的$store也始终指向根组件挂载的store实例;
  function vuexInit () {
    const options = this.$options
    // store injection
    if (options.store) {
      // store可能是一个工厂函数,vue ssr中避免状态交叉污染通常会用工厂函数封装store;
      this.$store = typeof options.store === 'function'
        ? options.store()
        : options.store
    } else if (options.parent && options.parent.$store) {
      // 子组件从其父组件引用$store属性,嵌套设置
      this.$store = options.parent.$store
    }
  }
}
这里其实做的很简单就是在beforeCreate钩子中为Vue实例绑定了一个$store属性指向我们定义的Store实例上。此外也可以看到Vuex也采用了很常见的导出一个Vue实例,从而不将Vue打包进项目就能使用Vue提供的一些方法。
实例化Store
实例化Store类,我们先来看Store类的构造函数:
源码位置:/src/store.js
constructor (options = {}) {
    // 如果window上有Vue实例,直接安装插件;
    if (!Vue && typeof window !== 'undefined' && window.Vue) {
      install(window.Vue)
    }
    if (process.env.NODE_ENV !== 'production') {
      assert(Vue, `must call Vue.use(Vuex) before creating a store instance.`)
      assert(typeof Promise !== 'undefined', `vuex requires a Promise polyfill in this browser.`)
      assert(this instanceof Store, `store must be called with the new operator.`)
    }
    // 实例化store时传入的配置项;
    const {
      plugins = [],
      strict = false
    } = options

    // store internal state
    // 收集commit
    this._committing = false
    // 收集action
    this._actions = Object.create(null)
    // action订阅者
    this._actionSubscribers = []
    // 收集mutation
    this._mutations = Object.create(null)
    // 收集getter
    this._wrappedGetters = Object.create(null)
    // 收集module
    this._modules = new ModuleCollection(options)
    this._modulesNamespaceMap = Object.create(null)
    this._subscribers = []
    // 用以处理状态变化的Vue实例
    this._watcherVM = new Vue()
    // 将dispatch和commit调用的this指向Store实例;
    const store = this
    const { dispatch, commit } = this
    this.dispatch = function boundDispatch (type, payload) {
      return dispatch.call(store, type, payload)
    }
    this.commit = function boundCommit (type, payload, options) {
      return commit.call(store, type, payload, options)
    }
    // strict mode
    this.strict = strict
    // 获取state
    const state = this._modules.root.state
    // 主要作用就是生成namespace的map,挂载action、mutation、getter;
    installModule(this, state, [], this._modules.root)
    // 通过vm重设store,新建Vue对象使用Vue内部的响应式实现注册state以及computed
    resetStoreVM(this, state)
    // 使用插件
    plugins.forEach(plugin => plugin(this))
    if (Vue.config.devtools) {
      devtoolPlugin(this)
    }
可以看出整个构造函数中,主要就是声明一些基础的变量,然后最主要的就是执行了intsllModule函数来注册Module和resetStoreVM来使Store具有“响应式”。 至于ModuleCollection相关的代码我们暂且不去深究,知道他就是一个Module的收集器,并且提供了一些方法即可。
接下来看这两个主要的方法,首先是installModule,在这个方法中回去生成命名空间,然后挂载mutation、action、getter:
源码位置:/src/store.js
function installModule (store, rootState, path, module, hot) {
  const isRoot = !path.length
  const namespace = store._modules.getNamespace(path)
  // 生成name 和 Module 的 Map
  if (module.namespaced) {
    store._modulesNamespaceMap[namespace] = module
  }
  if (!isRoot && !hot) {
    const parentState = getNestedState(rootState, path.slice(0, -1))
    const moduleName = path[path.length - 1]
    // 为module注册响应式;
    store._withCommit(() => {
      Vue.set(parentState, moduleName, module.state)
    })
  }
  const local = module.context = makeLocalContext(store, namespace, path)
  // 挂载mutation
  module.forEachMutation((mutation, key) => {
    const namespacedType = namespace + key
    registerMutation(store, namespacedType, mutation, local)
  })
  // 挂载action
  module.forEachAction((action, key) => {
    const type = action.root ? key : namespace + key
    const handler = action.handler || action
    registerAction(store, type, handler, local)
  })
  // 挂载getter
  module.forEachGetter((getter, key) => {
    const namespacedType = namespace + key
    registerGetter(store, namespacedType, getter, local)
  })
  // 递归安装Module
  module.forEachChild((child, key) => {
    installModule(store, rootState, path.concat(key), child, hot)
  })
}

// ...
// 注册mutation
function registerMutation (store, type, handler, local) {
  // 在_mutations中找到对应type的mutation数组
  // 如果是第一次创建,就初始化为一个空数组
  const entry = store._mutations[type] || (store._mutations[type] = [])
  // push一个带有payload参数的包装过的函数
  entry.push(function wrappedMutationHandler (payload) {
    handler.call(store, local.state, payload)
  })
}
// 注册action
function registerAction (store, type, handler, local) {
  // 根据type找到对应的action;
  const entry = store._actions[type] || (store._actions[type] = [])
  // push一个带有payload参数的包装过的函数
  entry.push(function wrappedActionHandler (payload, cb) {
    let res = handler.call(store, {
      dispatch: local.dispatch,
      commit: local.commit,
      getters: local.getters,
      state: local.state,
      rootGetters: store.getters,
      rootState: store.state
    }, payload, cb)
    // 如果 res 不是 promise 对象 ,将其转化为promise对象
    // 这是因为store.dispatch 方法里的 Promise.all()方法。
    if (!isPromise(res)) {
      res = Promise.resolve(res)
    }
    if (store._devtoolHook) {
      return res.catch(err => {
        store._devtoolHook.emit('vuex:error', err)
        throw err
      })
    } else {
      return res
    }
  })
}
// 注册getter
function registerGetter (store, type, rawGetter, local) {
  if (store._wrappedGetters[type]) {
    if (process.env.NODE_ENV !== 'production') {
      console.error(`[vuex] duplicate getter key: ${type}`)
    }
    return
  }
  // 将定义的getter全部存储到_wrappedGetters中;
  store._wrappedGetters[type] = function wrappedGetter (store) {
    return rawGetter(
      local.state, // local state
      local.getters, // local getters
      store.state, // root state
      store.getters // root getters
    )
  }
}
在Vuex的module中,我们是可以拆分很多个module出来的,每一个拆分出来的module又可以当作一个全新的module挂载在父级module上,因此这时候就需要一个path变量来区分层级关系了,我们可以根据这个path来去拿到每一次module下的state、mutation、action等。
接下来是resetStoreVM这个方法,在这个方法中,为store绑定了一个指向新的Vue实例的_vm属性,同时传入了state和computed,computed就是我们在store中设置的getter。
function resetStoreVM (store, state, hot) {
  const oldVm = store._vm

  // bind store public getters
  store.getters = {}
  const wrappedGetters = store._wrappedGetters
  const computed = {}
  // 为每一个getter设置get;
  forEachValue(wrappedGetters, (fn, key) => {
    // use computed to leverage its lazy-caching mechanism
    computed[key] = () => fn(store)
    Object.defineProperty(store.getters, key, {
      get: () => store._vm[key],
      enumerable: true // for local getters
    })
  })

  // use a Vue instance to store the state tree
  // suppress warnings just in case the user has added
  // some funky global mixins
  const silent = Vue.config.silent
  Vue.config.silent = true
  // 为store绑定Vue实例并注册state和computed
  store._vm = new Vue({
    data: {
      $$state: state
    },
    computed
  })
  Vue.config.silent = silent

  // enable strict mode for new vm
  if (store.strict) {
    enableStrictMode(store)
  }
  // 去除绑定旧vm
  if (oldVm) {
    if (hot) {
      // dispatch changes in all subscribed watchers
      // to force getter re-evaluation for hot reloading.
      store._withCommit(() => {
        oldVm._data.$$state = null
      })
    }
    Vue.nextTick(() => oldVm.$destroy())
  }
}
dispatch和commit
在Vuex中有两个重要的操作,一个是dispatch,一个是commit,我们通过dispatch去触发一个action,然后在action中我们通过提交commit去达到更新state的目的。下面就来看看这两部门的源码。
源码位置:/src/store.js
commit (_type, _payload, _options) {
    // check object-style commit
    // 检验类型;
    const {
      type,
      payload,
      options
    } = unifyObjectStyle(_type, _payload, _options)

    const mutation = { type, payload }
    // 找到type对应的mutation方法;
    const entry = this._mutations[type]
    if (!entry) {
      if (process.env.NODE_ENV !== 'production') {
        console.error(`[vuex] unknown mutation type: ${type}`)
      }
      return
    }
    // 执行mutation;
    this._withCommit(() => {
      entry.forEach(function commitIterator (handler) {
        handler(payload)
      })
    })
    // 通知订阅者
    this._subscribers.forEach(sub => sub(mutation, this.state))

    if (
      process.env.NODE_ENV !== 'production' &&
      options && options.silent
    ) {
      console.warn(
        `[vuex] mutation type: ${type}. Silent option has been removed. ` +
        'Use the filter functionality in the vue-devtools'
      )
    }
  }

  dispatch (_type, _payload) {
    // check object-style dispatch
    // 检验值;
    const {
      type,
      payload
    } = unifyObjectStyle(_type, _payload)

    const action = { type, payload }
    // 获取type对应的action;
    const entry = this._actions[type]
    if (!entry) {
      if (process.env.NODE_ENV !== 'production') {
        console.error(`[vuex] unknown action type: ${type}`)
      }
      return
    }
    // 通知action订阅者;
    this._actionSubscribers.forEach(sub => sub(action, this.state))
    // 返回action
    return entry.length > 1
      ? Promise.all(entry.map(handler => handler(payload)))
      : entry[0](payload)
  }
提供的静态方法
Vuex为我们提供了一些静态方法,都是通过调用绑定在Vue实例上的Store实例来操作我们的state、mutation、action和getter等。
源码位置:/src/helpers.js
//返回一个对象
//对象的属性名对应于传入的 states 的属性名或者数组元素
//执行这个函数的返回值根据 val 的不同而不同
export const mapState = normalizeNamespace((namespace, states) => {
  const res = {}
  normalizeMap(states).forEach(({ key, val }) => {
    res[key] = function mappedState () {
      let state = this.$store.state
      let getters = this.$store.getters
      if (namespace) {
        const module = getModuleByNamespace(this.$store, 'mapState', namespace)
        if (!module) {
          return
        }
        state = module.context.state
        getters = module.context.getters
      }
      return typeof val === 'function'
        ? val.call(this, state, getters)
        : state[val]
    }
    // mark vuex getter for devtools
    res[key].vuex = true
  })
  return res
})
// 返回一个对象
// 执行这个函数后将触发指定的 mutation
export const mapMutations = normalizeNamespace((namespace, mutations) => {
  const res = {}
  normalizeMap(mutations).forEach(({ key, val }) => {
    res[key] = function mappedMutation (...args) {
      // Get the commit method from store
      let commit = this.$store.commit
      if (namespace) {
        const module = getModuleByNamespace(this.$store, 'mapMutations', namespace)
        if (!module) {
          return
        }
        commit = module.context.commit
      }
      return typeof val === 'function'
        ? val.apply(this, [commit].concat(args))
        : commit.apply(this.$store, [val].concat(args))
    }
  })
  return res
})

export const mapGetters = normalizeNamespace((namespace, getters) => {
  const res = {}
  normalizeMap(getters).forEach(({ key, val }) => {
    // thie namespace has been mutate by normalizeNamespace
    val = namespace + val
    res[key] = function mappedGetter () {
      if (namespace && !getModuleByNamespace(this.$store, 'mapGetters', namespace)) {
        return
      }
      if (process.env.NODE_ENV !== 'production' && !(val in this.$store.getters)) {
        console.error(`[vuex] unknown getter: ${val}`)
        return
      }
      return this.$store.getters[val]
    }
    // mark vuex getter for devtools
    res[key].vuex = true
  })
  return res
})

export const mapActions = normalizeNamespace((namespace, actions) => {
  const res = {}
  normalizeMap(actions).forEach(({ key, val }) => {
    res[key] = function mappedAction (...args) {
      // get dispatch function from store
      let dispatch = this.$store.dispatch
      if (namespace) {
        const module = getModuleByNamespace(this.$store, 'mapActions', namespace)
        if (!module) {
          return
        }
        dispatch = module.context.dispatch
      }
      return typeof val === 'function'
        ? val.apply(this, [dispatch].concat(args))
        : dispatch.apply(this.$store, [val].concat(args))
    }
  })
  return res
})
// 接受一个对象或者数组,最后都转化成一个数组形式,数组元素是包含key和value两个属性的对象
function normalizeMap (map) {
  return Array.isArray(map)
    ? map.map(key => ({ key, val: key }))
    : Object.keys(map).map(key => ({ key, val: map[key] }))
}
function normalizeNamespace (fn) {  return (namespace, map) => {
    if (typeof namespace !== 'string') {
      map = namespace
      namespace = ''
    } else if (namespace.charAt(namespace.length - 1) !== '/') {
      namespace += '/'
    }
    return fn(namespace, map)
  }
}
结语
笔者没有将全部的源码贴出来逐行分析,只是简单的分析了核心逻辑的源码。总的来说Vuex源码不多,写的很精练也很易懂,希望大家都能抽时间亲自看看源码学习学习。
