基于vue实现的双向数据绑定
- 数据劫持+订阅者-发布者模式;
- 运用Object.defineProperty;
- 每当一个watcher订阅者初次获取vue实例的data的某个属性时,将它添加为这个属性的订阅者,当data的这个属性改变时,会通知订阅者,调用它们各自的update方法;
前话
-
何为数据劫持?
vue通过
Object.defineProperty()来劫持各个属性的setter,getter;每个数据在修改时,会自动调用setter,在获取它时,会自动调用getter。 -
何为发布者-订阅者模式的方式?
- 定义了一种一对多的关系;
- 当一个对象的状态发生改变时,所有依赖它的对象都将得到通知;
- 比如买房子,选购者都去售楼小姐那里登记一下,等有房源的时候,售楼小姐就通知所有登记的选购者过来看房;
-
关于vue的双向数据绑定,以下链接的这篇博文讲的还不错,以下是思路整理和对他的代码进行的一些注释。
<http://www.cnblogs.com/canfoo/p/6891868.html>
将data的属性变成响应式
注:以下data都是指代一个vue实例的属性data;
1.实现一个Dep类(发布者):
//发布者类
function Dep () {
    //subs数组存储订阅者
    this.subs = [];
}
Dep.prototype = {
    //添加订阅者
    addSub: function(sub) {
        this.subs.push(sub);
    },
    //通知所有订阅者执行update方法
    notify: function() {
        this.subs.forEach(function(sub) {
            sub.update();
        });
    }
};
//target为静态属性,Wathcer部分有使用解释;
Dep.target = null;
2. 实现一个Watcher类(订阅者)
- Watcher类用于定义一个订阅者类;
- 构造函数需要传入的参数为一个
vue对象,一个data的属性(这个属性作为发布者),一个回调函数cb; - 这个回调函数
cb就是发布者在notify时,订阅者会执行的回调函数。 - 我们需要在初始化一个
Watcher对象时,并且只在初始化时,将Watcher对象添加进相应data属性的订阅者,所以在构造函数里调用get方法来实现;
function Watcher(vm, exp, cb) {
    this.cb = cb;
    this.vm = vm;
    this.exp = exp;
    //在第一次获取data的属性值时,将自己添加进该属性值订阅器
    this.value = this.get();
}

Watcher.prototype = {
    //发布者notify时调用的回调函数;
    update: function() {
        this.run();
    },
    run: function() {
        var value = this.vm.data[this.exp];
        var oldVal = this.value;
        if (value !== oldVal) {
            this.value = value;
            this.cb.call(this.vm, value, oldVal);
        }
    },
    get: function() {
        Dep.target = this;  // 缓存自己
        var value = this.vm.data[this.exp]  // 执行监听器里的get函数,把自己添加为订阅者
        Dep.target = null;  // 释放自己
        return value;
    }
};
3. 实现一个Observer类(关联发布者和订阅者);
Observer类的作用遍历data的所有属性,设置它们的getter和setter,把data的属性都变成响应式;- 在
getter里,将想要获取该属性的对象添加进订阅者列表; - 在
setter里,通知所有订阅者该属性更改啦~,你们要update啦~
function Observer(data) {
    this.data = data;
    this.walk(data);
}

Observer.prototype = {
    walk: function(data) {
        var self = this;
        Object.keys(data).forEach(function(key) {
            self.defineReactive(data, key, data[key]);
        });
    },
    defineReactive: function(data, key, val) {
        var dep = new Dep();
        //当属性为对象时,要递归遍历;
        var childObj = observe(val);
        //将属性变为响应式
        Object.defineProperty(data, key, {
            enumerable: true,
            configurable: true,
            get: function() {
                if (Dep.target) {
                    //判断订阅者是否是第一次调用get,如果是第一次,将它添加到发布者数组里;
                    dep.addSub(Dep.target);
                }
                return val;
            },
            set: function(newVal) {
                if (newVal === val) {
                    return;
                }
                val = newVal;
                dep.notify();
            }
        });
    }
};

function observe(value, vm) {
    if (!value || typeof value !== 'object') {
        return;
    }
    return new Observer(value);
};
4. 实现一个SelfVue类
- SelfVue类就是自己实现的Vue啦~
- proxyKeys(key)用于实现 vm.xxx -> vm._data.xxx;
function SelfVue (options) {
    var self = this;
    this.vm = this;
    this.data = options.data;

    Object.keys(this.data).forEach(function(key) {
        self.proxyKeys(key);
    });

    observe(this.data);
    new Compile(options.el, this.vm);
    return this;
}

SelfVue.prototype = {
    proxyKeys: function (key) {
        var self = this;
        Object.defineProperty(this, key, {
            enumerable: false,
            configurable: true,
            get: function proxyGetter() {
                return self.data[key];
            },
            set: function proxySetter(newVal) {
                self.data[key] = newVal;
            }
        });
    }
}
5. 编译模板,实现双向数据绑定
-
创建一个
compile.js,用于将我们的vue语句编译成html节点; -
首先构造函数会找到
vue的el属性绑定的html节点; -
nodeToFragment方法:将这个节点内容移动到fragment中; -
compileModel方法用于编译v-model指令- 其中
new Watcher(this.vm, exp, function (value) { self.modelUpdater(node, value);});将自己添加为监听者;node.addEventListener('input', function(e) {...self.vm[exp] = newValue;...})实现从输入框的值改变到data属性值的过程;这里就实现了双向的数据绑定啦~
function Compile(el, vm) {
    this.vm = vm;
    this.el = document.querySelector(el);
    this.fragment = null;
    this.init();
}

Compile.prototype = {
    init: function () {
        if (this.el) {
            this.fragment = this.nodeToFragment(this.el);
            this.compileElement(this.fragment);
            this.el.appendChild(this.fragment);
        } else {
            console.log('Dom元素不存在');
        }
    },
    nodeToFragment: function (el) {
        var fragment = document.createDocumentFragment();
        var child = el.firstChild;
        while (child) {
            // 将Dom元素移入fragment中
            fragment.appendChild(child);
            child = el.firstChild
        }
        return fragment;
    },
    compileElement: function (el) {
        var childNodes = el.childNodes;
        var self = this;
        [].slice.call(childNodes).forEach(function(node) {
            var reg = /\{\{(.*)\}\}/;
            var text = node.textContent;

            if (self.isElementNode(node)) {
                self.compile(node);
            } else if (self.isTextNode(node) && reg.test(text)) {
                self.compileText(node, reg.exec(text)[1]);
            }

            if (node.childNodes && node.childNodes.length) {
                self.compileElement(node);
            }
        });
    },
    compile: function(node) {
        var nodeAttrs = node.attributes;
        var self = this;
        Array.prototype.forEach.call(nodeAttrs, function(attr) {
            var attrName = attr.name;
            if (self.isDirective(attrName)) {
                var exp = attr.value;
                var dir = attrName.substring(2);
                if (self.isEventDirective(dir)) {  // 事件指令
                    self.compileEvent(node, self.vm, exp, dir);
                } else {  // v-model 指令
                    self.compileModel(node, self.vm, exp, dir);
                }
                node.removeAttribute(attrName);
            }
        });
    },
    compileText: function(node, exp) {
        var self = this;
        var initText = this.vm[exp];
        this.updateText(node, initText);
        new Watcher(this.vm, exp, function (value) {
            self.updateText(node, value);
        });
    },
    compileEvent: function (node, vm, exp, dir) {
        var eventType = dir.split(':')[1];
        var cb = vm.methods && vm.methods[exp];

        if (eventType && cb) {
            node.addEventListener(eventType, cb.bind(vm), false);
        }
    },
    compileModel: function (node, vm, exp, dir) {
        var self = this;
        var val = this.vm[exp];
        this.modelUpdater(node, val);
        new Watcher(this.vm, exp, function (value) {
            self.modelUpdater(node, value);
        });

        node.addEventListener('input', function(e) {
            var newValue = e.target.value;
            if (val === newValue) {
                return;
            }
            self.vm[exp] = newValue;
            val = newValue;
        });
    },
    updateText: function (node, value) {
        node.textContent = typeof value == 'undefined' ? '' : value;
    },
    modelUpdater: function(node, value, oldValue) {
        node.value = typeof value == 'undefined' ? '' : value;
    },
    isDirective: function(attr) {
        return attr.indexOf('v-') == 0;
    },
    isEventDirective: function(dir) {
        return dir.indexOf('on:') === 0;
    },
    isElementNode: function (node) {
        return node.nodeType == 1;
    },
    isTextNode: function(node) {
        return node.nodeType == 3;
    }
}
-
这里说下有个坑:
var child = el.firstChild;
        while (child) {
            // 将Dom元素移入fragment中
            fragment.appendChild(child);
            child = el.firstChild
        }
一开始不知道为什么这个while循环可以生效,查了一下mdn才知道:
appendChild()的用法
The
Node.appendChild()method adds a node to the end of the list of children of a specified parent node.If the given child is a reference to an existing node in the document,appendChild()moves it from its current position to the new position (there is no requirement to remove the node from its parent node before appending it to some other node).
如果这个给定的要插入的child是document中已存在的节点中的引用,那么appendChild()方法会把它从它现在的位置转移到新的位置,相当于一个剪切的效果;
- [].slice.call(childNodes)可以将类数组对象转换成数组对象;
- 当一个文本节点前面和后面有换行符的时候,都只当做一个文本节点。
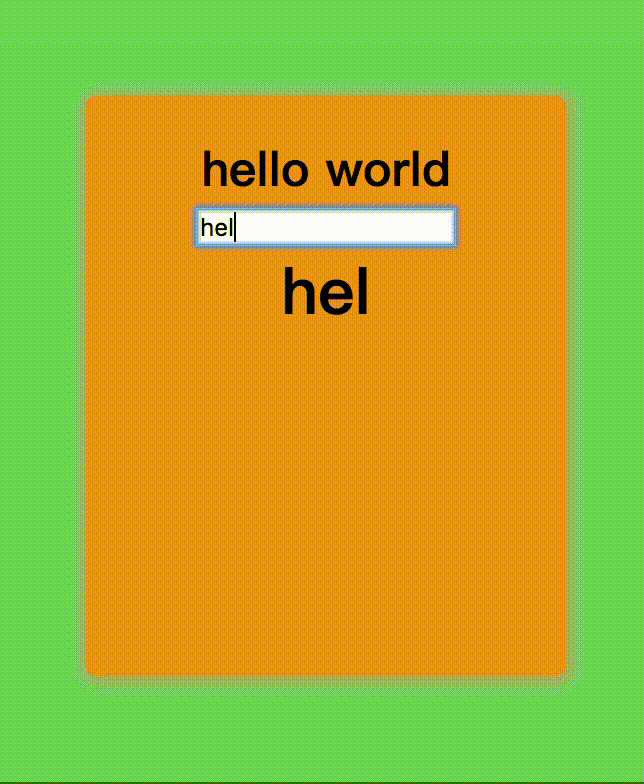
7. 自己实现的效果~
最后楼主也根据以上代码,实现的结果如下:
代码链接: https://github.com/dy21335/Practice/tree/master/MVVM
Last
欢迎大家关注公粽号:CSandCatti
日常推送英语精读,算法题,前端知识~