

背景:
在搭建APP静态TableView界面时,都是每个vc对应创建一个UITableView,然后实现UITableViewDataSource、UITableViewDelegate等方法,这样的开发方式有几大弊端:
1)效率不高,每个界面都得创建,实现协议。
2)cell的点击事件区分时需要一大堆的if/else。
3)界面元素变化时,维护起来非常蛋疼,需要修改好几个地方的if/else。
在分析完微信后,发现微信搭建静态TableView页面时,并不会出现上面几个问题,搭建非常easy,所以决定将学习到的思路分享出来大家一起交流学习。
分析过程中用到的工具:
1.一台越狱的5s
2. dumpdecrypted(砸壳)
3.class-dump(导出头文件)
4.IDA(反汇编)
5.cycript(调试)
逆向的基础知识就不概述了,本文章主要是对微信进行静态分析
一、找到关键类
1.MMTableViewInfo
通过观察多个静态页面的vc,发现vc里没有直接创建UITableView,而是通过MMTableViewInfo这个类创建的,MMTableViewInfo里有个_tableView成员变量,并实现了UITableViewDataSource、UITableViewDelegate,所以无误。下图是MMTableViewInfo头文件截图部分内容:

2.MMTableViewSectionInfo
通过观察,很容易看出MMTableViewInfo中的成员变量_arrSections是_tableView的数据源,调试打印其元素是MMTableViewSectionInfo对象。下图是MMTableViewSectionInfo头文件截图部分内容:

3.MMTableViewCellInfo
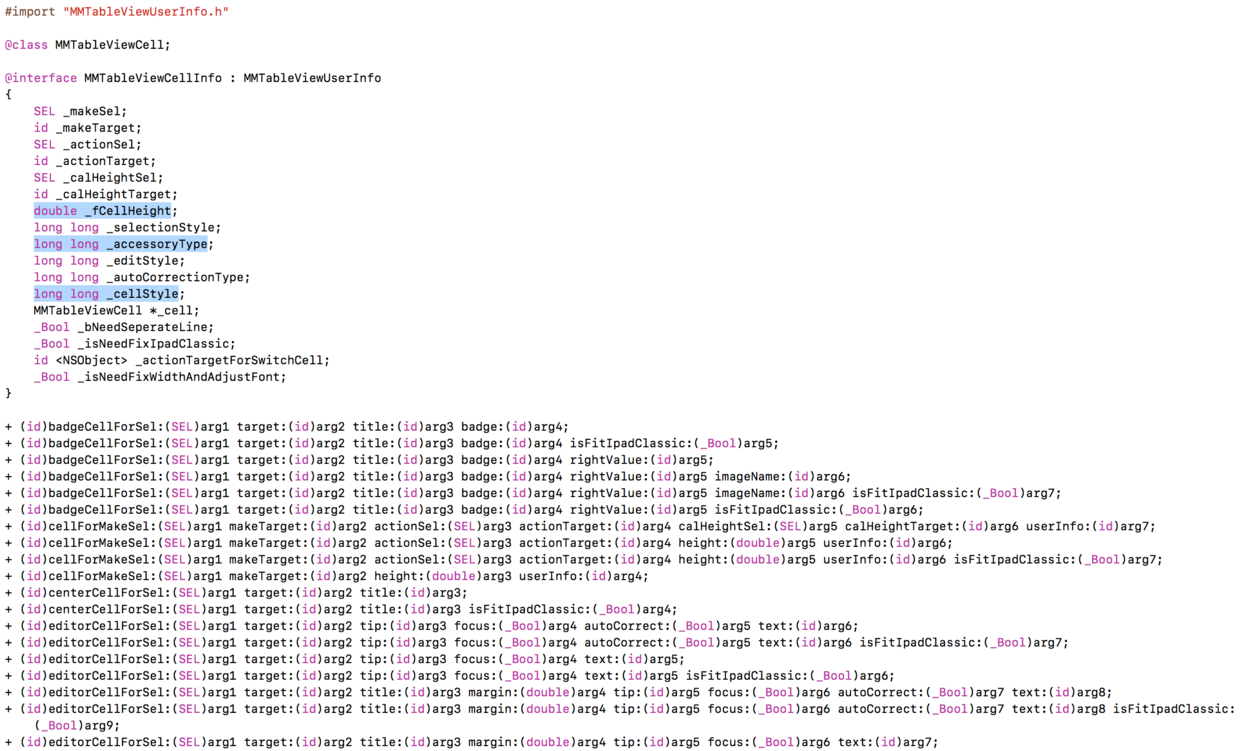
通过观察,猜测MMTableViewSectionInfo中的_arrCells应该是每个section中的cell数组,调试打印其元素是MMTableViewCellInfo对象。下图是MMTableViewCellInfo头文件截图部分内容:
二、通过反向推理,正向梳理逻辑
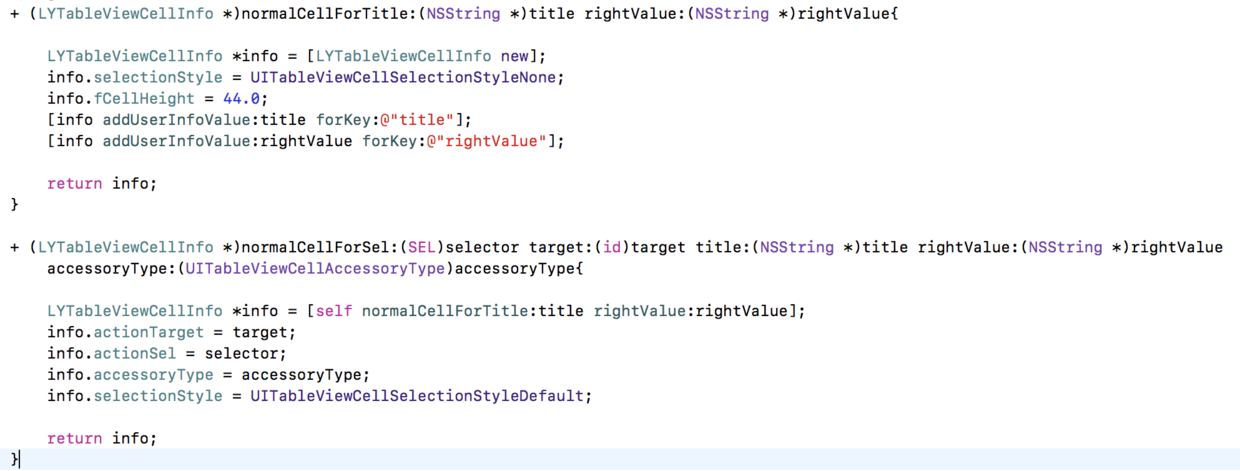
1.观察MMTableViewCellInfo头文件,通过fCellHeight、cellStyle、accessoryType、+ (id)normalCellForTitle:(id)arg1 rightValue:(id)arg2这几个属性和方法,应该可以想到,这个类就是为cell准备数据的。
2.观察MMTableViewSectionInfo头文件,- (void)addCell:(id)arg1;通过该方法添加cellInfo到_arrCells里构成了一个组的数据
3.观察MMTableViewInfo头文件,- (void)addSection:(id)arg1,可以想到是添加sectionInfo到_arrSections里构成了UITableView的数据源
现在知道了三者的构成关系,接下来的重点就是去分析其内部是如何实现的了。
三、分析内部实现
接下来通过IDA反汇编工具,查看每个类具体实现的伪代码
1. MMTableViewCellInfo的实现
先看下伪代码(因封装的方法较多,这里只分析一个方法):
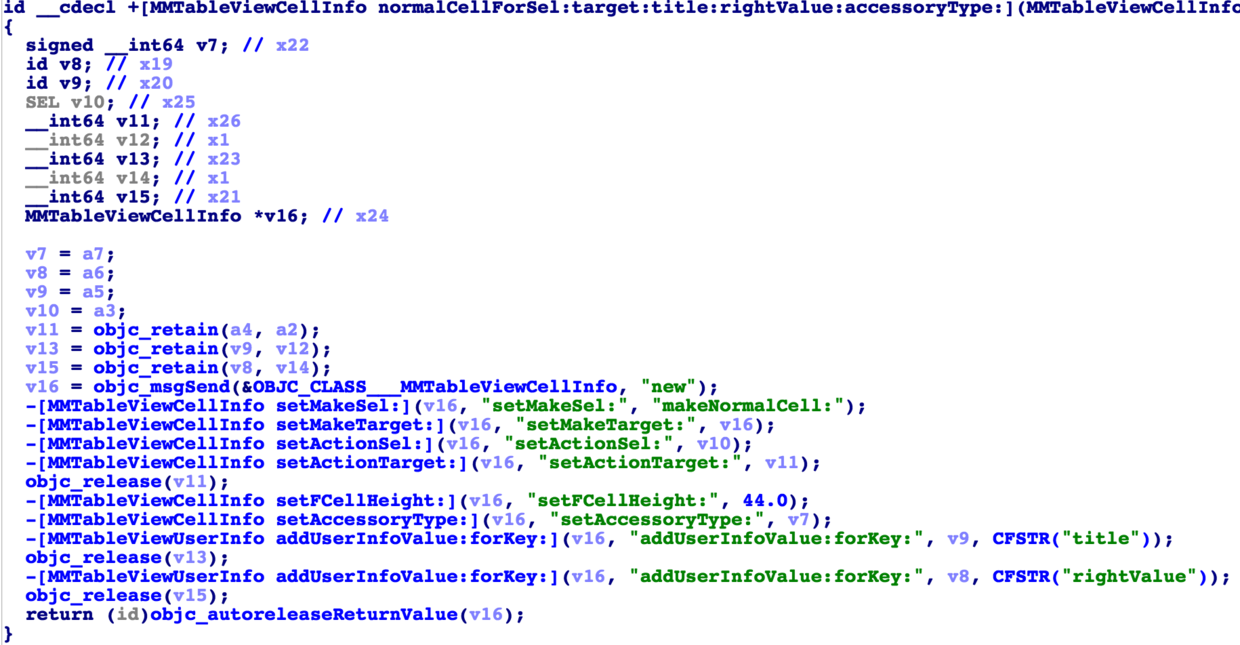
微信对一些信息使用kvc进行存取,比如这里的title(textLabel)和rightValue(detailTextLabel),存取的方法在MMTableViewCellInfo的父类MMTableViewUserInfo里。
2. MMTableViewSectionInfo的实现
这个类的实现相对简单,现在只看cell是如何添加的。
///添加cell
- (void)addCell:(LYTableViewCellInfo *)cell{
    [_arrCells addObject:cell];
}
3. MMTableViewInfo的实现
- (NSInteger)numberOfSectionsInTableView:(UITableView *)tableView{
    return _arrSections.count;
}
- (NSInteger)tableView:(UITableView *)tableView numberOfRowsInSection:(NSInteger)section{
    LYTableViewSectionInfo *sectionInfo = _arrSections[section];
    return [sectionInfo getCellCount];
}
- (CGFloat)tableView:(UITableView *)tableView heightForRowAtIndexPath:(NSIndexPath *)indexPath{
    LYTableViewSectionInfo *sectionInfo = _arrSections[indexPath.section];
    LYTableViewCellInfo *cellInfo = [sectionInfo getCellAt:indexPath.row];
    return cellInfo.fCellHeight;
}
- (UITableViewCell *)tableView:(UITableView *)tableView cellForRowAtIndexPath:(NSIndexPath *)indexPath{

    LYTableViewSectionInfo *sectionInfo = _arrSections[indexPath.section];
    LYTableViewCellInfo *cellInfo = [sectionInfo getCellAt:indexPath.row];

    NSString *iden = [NSString stringWithFormat:@"LYTableViewInfo_%zd_%zd", indexPath.section, indexPath.row];
    LYTableViewCell *cell = [tableView dequeueReusableCellWithIdentifier:iden];
    if (!cell) {
        cell = [[LYTableViewCell alloc] initWithStyle:cellInfo.cellStyle reuseIdentifier:iden];
    }

    cell.accessoryType = cellInfo.accessoryType;
    cell.selectionStyle = cellInfo.selectionStyle;
    cell.textLabel.text = [cellInfo getUserInfoValueForKey:@"title"];//通过LYTableViewCellInfo 父类方法kvc获取到
    cell.detailTextLabel.text = [cellInfo getUserInfoValueForKey:@"rightValue"];//通过LYTableViewCellInfo 父类方法kvc获取到

    return cell;
}
- (void)tableView:(UITableView *)tableView didSelectRowAtIndexPath:(NSIndexPath *)indexPath
{
    [tableView deselectRowAtIndexPath:indexPath animated:YES];

    LYTableViewSectionInfo *sectionInfo = _arrSections[indexPath.section];
    LYTableViewCellInfo *cellInfo = [sectionInfo getCellAt:indexPath.row];

    id target = cellInfo.actionTarget;
    SEL selector = cellInfo.actionSel;

    if (cellInfo.selectionStyle) {
        if ([target respondsToSelector:selector]) {
            [target performSelector:selector withObject:cellInfo withObject:indexPath];//创建cellInfo时,target传递并实现了SEL事件,这里就会发送这个消息,从而实现cell的点击事件
        }
    }
}
该类里的数据来源就是MMTableViewSectionInfo和MMTableViewCellInfo,前面构建好了这两,这里直接就能用了。 看下最简单的调用示例:
#pragma mark - Creat View
- (void)creatTableView{
    _tableViewInfo = [[LYTableViewInfo alloc] initWithFrame:self.view.bounds style:UITableViewStyleGrouped];
    [self.view addSubview:[_tableViewInfo getTableView]];

    //cell数据
    LYTableViewCellInfo *noactionCell = [LYTableViewCellInfo normalCellForTitle:@"无点击事件" rightValue:@"没有"];
    LYTableViewCellInfo *actionCell = [LYTableViewCellInfo normalCellForSel:@selector(actionCellClick) target:self title:@"有点击事件" rightValue:@"" accessoryType:UITableViewCellAccessoryDisclosureIndicator];

    //section数据
    LYTableViewSectionInfo *sectionInfo = [LYTableViewSectionInfo sectionInfoDefaut];

    //添加
    [sectionInfo addCell:noactionCell];
    [sectionInfo addCell:actionCell];
    [_tableViewInfo addSection:sectionInfo];

    //刷新
    [[_tableViewInfo getTableView] reloadData];
}

#pragma mark - Event
- (void)actionCellClick{
    NSLog(@"点击了actionCell");
}
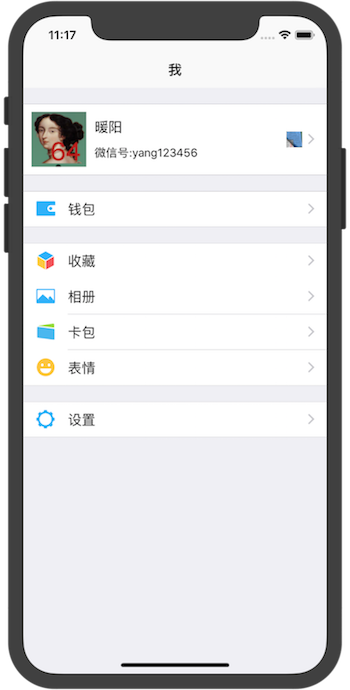
通过上面一段代码实现如下:

总结:
以最简单最基础的案例介绍了微信的构建方式,此方式构建满足了组件的可复用性、可维护性、高效性。 这里只是做最简单介绍,大家可根据自己的业务需求对相应的方法做调整,做扩展。
仓库里两个Demo,一个是最基础的组件,一个是稍微完善的组件 github地址
