

作者:bool周 原文链接:我所理解的 CocoaPods
很久之前读了一遍 Cocoa Pods 官方文档,对 Cocoa Pods 有了一个简单的了解。时隔多日,全忘了。
所以再回顾一下,顺便写一篇总结。文章分为原理和使用两部分,比较长,可以根据自己的需求选择性阅读。
概述
CocoaPods 是开发 OS X 和 iOS 应用程序的一个第三方库的依赖管理工具,使用这个工具可以简化对组件依、更新的过程。新添加一些第三方组件可以直接修改 podfile 然后进行 pod install;更新已有第三方组件,可以修改 podfile 然后进行 pod update;自己开发的组件也可以上传到 CocoaPods 或者私有仓库,供其他人使用。
CocoaPods 是用 ruby 写的,由若干个 gems 组成。也就是说,iOS project 使用 CocoaPods 来进行组件管理,CocoaPods 本身也是一个 project,它使用 gem 进行组件管理。
开始写这篇文章的时候,我想先写使用,再写原理。因为我担心很多人感觉原理晦涩难懂,就放弃看后面了。但构思的时候发现,明白了原理之后,对一些命令的使用会有更深刻的了解。所以还是决定将原理放在前面讲。
基本原理
1.CocoaPods 结构
CocoaPods 是用 Ruby 写的,并由若干个 Ruby 包 (gems) 构成的,源码托管在 GitHub 上。其中主要的几个组件为:
CocoaPods/Specs
这个是一个保存第三方组件 podspec 文件的仓库。第三方组件开发完成之后,会传一份 podspec 文件传到 CocoaPods,这个 Specs 包含了每个第三方组件所有版本的 podspec 文件。当使用某个第三方组件时,如果这些组件支持 CocoaPods,会在 Podfile 中指定 source,例如下面这样:source 'https://github.com/CocoaPods/Specs.git'当执行
pod install或pod update等一些命令时,便会从这个仓库找到组件指定版本的 podspec 文件,然后根据这个 podspec 配置信息去获取组件。CocoaPods/CocoaPods
这是是一个面向用户的组件,每当执行一个 pod 命令时,这个组件都将被激活。该组件包括了所有使用 CocoaPods 涉及到的功能,并且还能通过调用所有其它的 gems 来执行任务。CocoaPods/Core
这个 gem 组件提供支持与 CocoaPods 相关文件的处理,例如 Specification、Podfile 和 Source。当执行pod install等一些命令时。Core 组件会解析第三方组件开发者上传的 podspec 文件和使用者的 podfile,以此确定需要为 project 引入哪些文件。除此之外,当执行与这些文件一些相关的命令时,也由这部分组件处理,例如使用pod spec lint来检测 podspec 文件的有效性。CocoaPods/Xcodeproj
使用这个 gem 组件,你可以用 ruby 来创建并修改 Xcode projects。在 CocoaPods 中它负责所有工程文件的整合。如果你想要写一个脚本来方便的修改工程文件,那么可以单独下载这个 gem 并使用。更多信息可以查看工程的 readme。
2.几个相关文件
Specification
这个文件用来描述第三方组件某个版本的信息。主要包含了组件拉取地址、应该拉取那些文件和项目配置信息。除此之外,还包含一些组件信息,例如组件的名字、版本等。后面章节会详细讲解字段含义和文件书写规范。
Podfile
这个文件用来指定工程中依赖了那些组件。主要包含了依赖的组件名、组件版本、组件地址等。后面章节会详细讲解字段含义和文件书写规范。
Podfile.lock
在第一次执行
pod install时,执行完毕后会生成一个 podfile.lock 文件。这个文件主要标注了项目当前依赖的具体版本。看下面这个文件信息: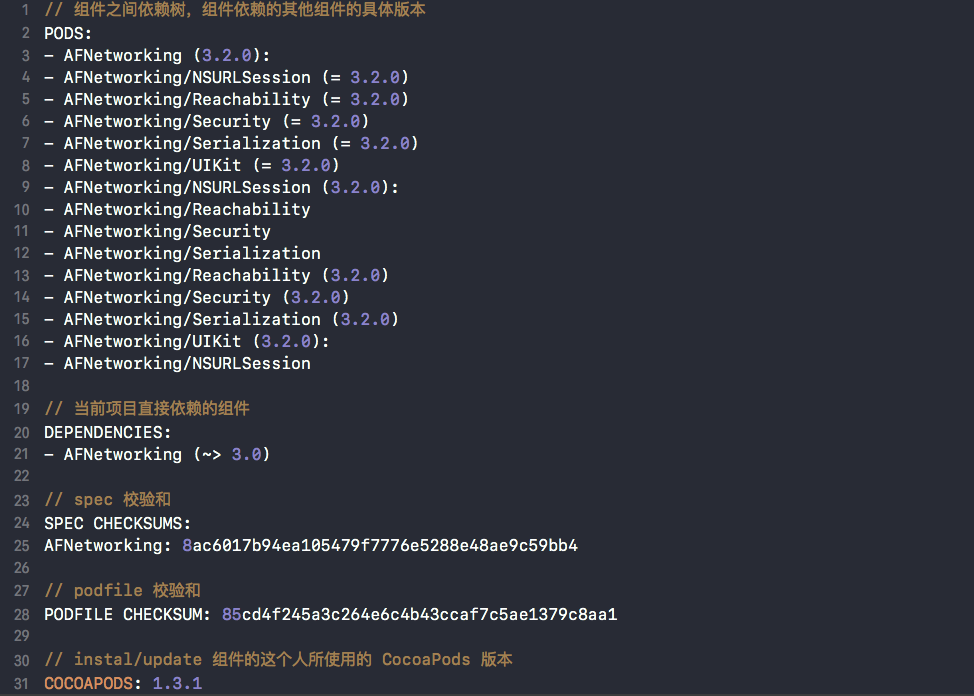
有个问题需要牢记:CocoaPods 强烈建议将 Podfile.lock 文件加入版本管理,这样其他人同步了你的 podfile.lock 文件之后,执行 pod install 时会将按照里面指定给的版本加载,避免多人协作时发生冲突。后面的 pod install vs pod update 会详细讲解 podfile.lock 变更时机。
- Manifest.lock
Manifest.lock 是由 Podfile.lock 生成的一个副本,每次生成或者更新 Podfile.lock,都会更下 Pods 文件夹下面的 Manifest.lock 文件。如果你遇见过这样的错误 沙盒文件与 Podfile.lock 文件不同步 (The sandbox is not in sync with the Podfile.lock),这是因为 Manifest.lock 文件和 Podfile.lock 文件不一致所引起。
3.相互关系
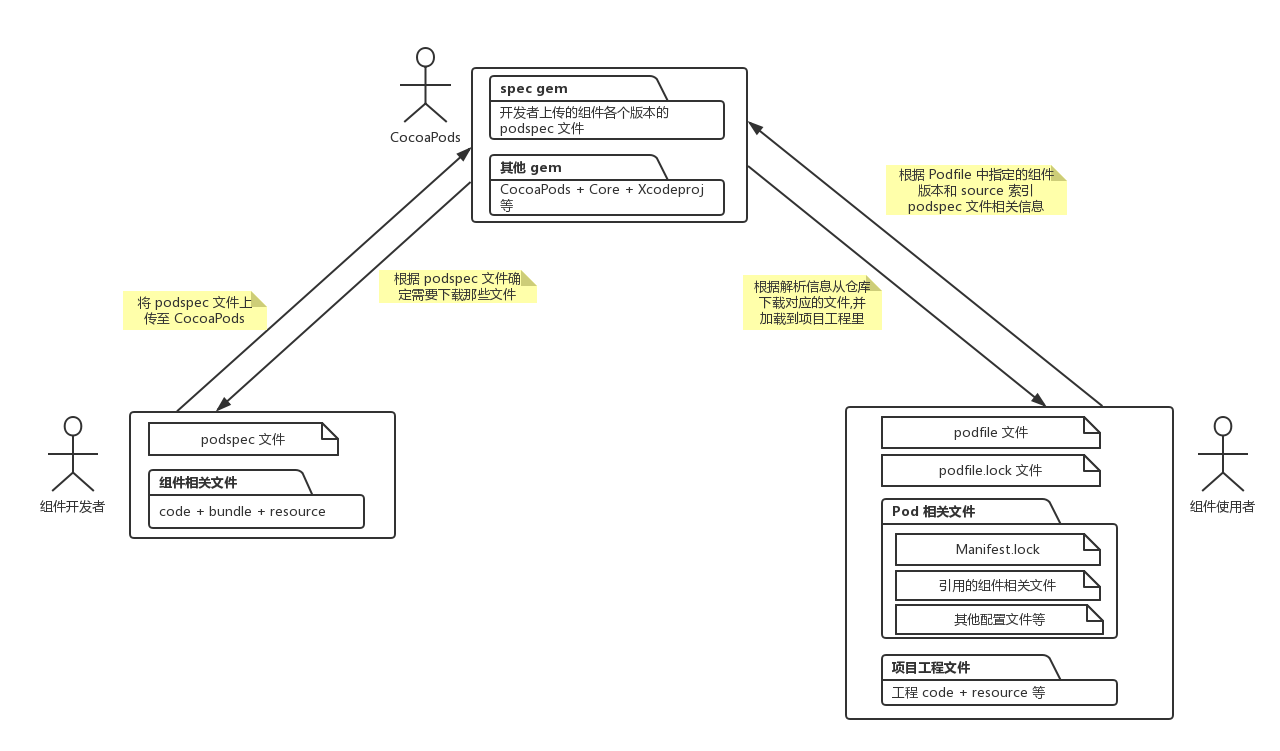
上图为组件开发者、CocoaPods、组件使用者三者的关系。
组件开发者开发完组件之后,会将组件上传到仓库 (Github or other)。然后创建一个 podspec 文件,文件中包含了使用组件时需要加载哪些文件以及从哪里加载。然后会将这个文件上传到 CocoaPods(也可以上传至私人构建的 spec 管理仓库)。
组件使用者想要使用某个组件,会在 Podfile 中指定组件的名字、版本、加载源以及更加详细的信息(例如想要加载某个 commit)。然后执行相关 Pod 命令。
CocoaPods 执行 Pod 命令,然后解析对应的 podspec 文件,确定需要加载的文件信息并将文件加载到项目工程里。并创建 Podfile.lock、Manifest.lock、Pods.xcodeproj 等文件。
4.一次详细的加载过程
前面提到 CocoaPods 是开源的,所以我们可以把源码下载下来进行研究。pod install 这个命令定义在 CocoaPods/Core 这 gem 中。
执行 pod install 命令
所有命令都是通过 Command 类管理的,执行 pod install 时代码如下:
# CocoaPods/lib/cocoapods/command/install.rb
module Pod
  class Command
    class Install < Command

      ...

      def run
        verify_podfile_exists!
        installer = installer_for_config
        installer.repo_update = repo_update?(:default => false)
        installer.update = false
        installer.install!
      end
    end
  end
end
执行时会先生成一个 installer 实例。然后设置 repo_update 属性和 update 属性,最后执行 install 方法。
Podfile 解析
执行 pod install 命令具体细节前,首先要解析 Podfile。这一过程在初始化 installer 实例时就已经开始:
def installer_for_config
  Installer.new(config.sandbox, config.podfile, config.lockfile)
end
pod install 方法定义
pod install 方法定义如下:
# CocoaPods/lib/cocoapods/installer.rb
def install!
  prepare
  resolve_dependencies
  download_dependencies
  validate_targets
  generate_pods_project
  if installation_options.integrate_targets?
    integrate_user_project
  else
    UI.section 'Skipping User Project Integration'
  end
  perform_post_install_actions
end
从方法定义中,可以看出 pod install 的执行分为如下几部:准备阶段、解决依赖冲突、下载依赖文件、校验 target、整合 project 文件、输出执行结果。下面将按照这个步骤逐步分析。
准备阶段
准备阶段代码如下:
# CocoaPods/lib/cocoapods/installer.rb
def prepare
  # Raise if pwd is inside Pods
  if Dir.pwd.start_with?(sandbox.root.to_path)
    message = 'Command should be run from a directory outside Pods directory.'
    message << "\n\n\tCurrent directory is #{UI.path(Pathname.pwd)}\n"
    raise Informative, message
  end
  UI.message 'Preparing' do
    deintegrate_if_different_major_version
    sandbox.prepare
    ensure_plugins_are_installed!
    run_plugins_pre_install_hooks
  end
end
首先会检测目录结构,是否为可执行 pod 命令的目录,如果不是直接输出信息。如果可执行,则做一些准备工作。如果你的 Podfile 中写了一些 hooks,也会在这里执行。
解决依赖冲突
这一阶段的方法定义如下:
# CocoaPods/lib/cocoapods/installer.rb
def resolve_dependencies
 plugin_sources = run_source_provider_hooks
 analyzer = create_analyzer(plugin_sources)

 UI.section 'Updating local specs repositories' do
   analyzer.update_repositories
 end if repo_update?

 UI.section 'Analyzing dependencies' do
   analyze(analyzer)
   validate_build_configurations
   clean_sandbox
 end
 analyzer
end
根据方法定义,我们可以看出这一阶段处理的事情:启动 hooks 并创建一个 analyzer,然后使用这个 analyzer 更新本地 specs 库、处理版本依赖。
首先是创建 analyzer,创建过程中将 Podfile 和 lockfile 等一些文件信息全部传入,并在这个类中将这些文件解析。创建 analyzer 代码如下:
# CocoaPods/lib/cocoapods/installer.rb
def create_analyzer(plugin_sources = nil)
  Analyzer.new(sandbox, podfile, lockfile, plugin_sources).tap do |analyzer|
    analyzer.installation_options = installation_options
    analyzer.has_dependencies = has_dependencies?
  end
end
然后是更新本地 specs 库。从代码中可以看出有一个 repo_update? 判断,也就是说这个标志位真的时候,才会更新本地 specs 库。也就是我们常用的一条命令:
pod repo udpate
最后是处理依赖关系。其中 Podfile、lockfile 也是使用 Analyzer 这个类中解析。下面是解析方法的定义 :
# CocoaPods/lib/cocoapods/installer/analyzer.rb
def analyze(allow_fetches = true)
    validate_podfile! # step1: 解析并校验 podfile
    validate_lockfile_version! # step2: 解析并校验 lockfile 中的库的版本
    @result = AnalysisResult.new # step3: 新建 result 实例
    ...
    @result.specifications  = generate_specifications(resolver_specs_by_target)
    @result.targets         = generate_targets(resolver_specs_by_target)
    @result.sandbox_state   = generate_sandbox_state
    @result.specs_by_target = resolver_specs_by_target.each_with_object({}) do |rspecs_by_target, hash|
      hash[rspecs_by_target[0]] = rspecs_by_target[1].map(&:spec)
    end
    @result.specs_by_source = Hash[resolver_specs_by_target.values.flatten(1).group_by(&:source).map { |source, specs| [source, specs.map(&:spec).uniq] }]
    sources.each { |s| @result.specs_by_source[s] ||= [] }
    @result
  end
最终会将解析结果保存在一个 @result 实例中,进行后面步骤时,会使用这个解析结果。AnalysisResult 类定义如下,注释我就不翻译了,看原味的英文更有助于理解具体意思:
# CocoaPods/lib/cocoapods/installer/analyzer/analysis_result.rb
module Pod
  class Installer
    class Analyzer
      class AnalysisResult
        # @return [SpecsState] the states of the Podfile specs.
        attr_accessor :podfile_state

        # @return [Hash{TargetDefinition => Array<Specification>}] the
        #         specifications grouped by target.
        attr_accessor :specs_by_target

        # @return [Hash{Source => Array<Specification>}] the
        #         specifications grouped by spec repo source.
        attr_accessor :specs_by_source

        # @return [Array<Specification>] the specifications of the resolved
        #         version of Pods that should be installed.
        attr_accessor :specifications

        # @return [SpecsState] the states of the {Sandbox} respect the resolved
        #         specifications.
        attr_accessor :sandbox_state

        # @return [Array<AggregateTarget>] The aggregate targets created for each
        #         {TargetDefinition} from the {Podfile}.
        attr_accessor :targets

        # @return [Hash{TargetDefinition => Array<TargetInspectionResult>}] the
        #         results of inspecting the user targets
        attr_accessor :target_inspections

        # @return [Hash{String=>Symbol}] A hash representing all the user build
        #         configurations across all integration targets. Each key
        #         corresponds to the name of a configuration and its value to
        #         its type (`:debug` or `:release`).
        def all_user_build_configurations
          targets.reduce({}) do |result, target|
            result.merge(target.user_build_configurations)
          end
        end
      end
    end
  end
end
关于 Podfile 的解析过程,有兴趣的可以查看一下 PodfileValidator 类,在目录 CocoaPods/lib/cocoapods/installer/analyzer/podfile_validator.rb。
下载依赖文件
下载依赖文件方法定义如下:
# CocoaPods/lib/cocoapods/installer.rb
def download_dependencies
  UI.section 'Downloading dependencies' do
    create_file_accessors
    install_pod_sources
    run_podfile_pre_install_hooks
    clean_pod_sources
  end
end
这个方法中调用了几个其他方法。作用分别为:创建文件存储器,以便向沙盒里面写入数据;下载数据;启动 hooks;进行清理操作。具体每个方法的定义,可以查看文件源码。这里主要说一下 install_pod_sources 方法。
install_pod_sources 方法定义如下:
# CocoaPods/lib/cocoapods/installer.rb
# Downloads, installs the documentation and cleans the sources of the Pods
# which need to be installed.
#
# @return [void]
#
def install_pod_sources
  @installed_specs = []
  pods_to_install = sandbox_state.added | sandbox_state.changed
  title_options = { :verbose_prefix => '-> '.green }
  root_specs.sort_by(&:name).each do |spec|
    if pods_to_install.include?(spec.name)
      if sandbox_state.changed.include?(spec.name) && sandbox.manifest
        previous = sandbox.manifest.version(spec.name)
        title = "Installing #{spec.name} #{spec.version} (was #{previous})"
      else
        title = "Installing #{spec}"
      end
      UI.titled_section(title.green, title_options) do
        install_source_of_pod(spec.name)
      end
    else
      UI.titled_section("Using #{spec}", title_options) do
        create_pod_installer(spec.name)
      end
    end
  end
end
首先确定需要 install 的组件。这里主要针对新加的组件和变更的组件进行 install,至于这些信息是通过 sandbox_state 获取的。然而 sandbox_state 方法定义如下:
# CocoaPods/lib/cocoapods/installer.rb
def sandbox_state
  analysis_result.sandbox_state
end
这里的 analysis_result 就是我们上一步中解析出的结果,在这里用到了。
第二步创建 title 配置信息,后面针对变更的组件,会用这个配置标记。相信每一位开发者进行 pod install 操作的时候,都会注意到变更的组件自动标记为绿色。
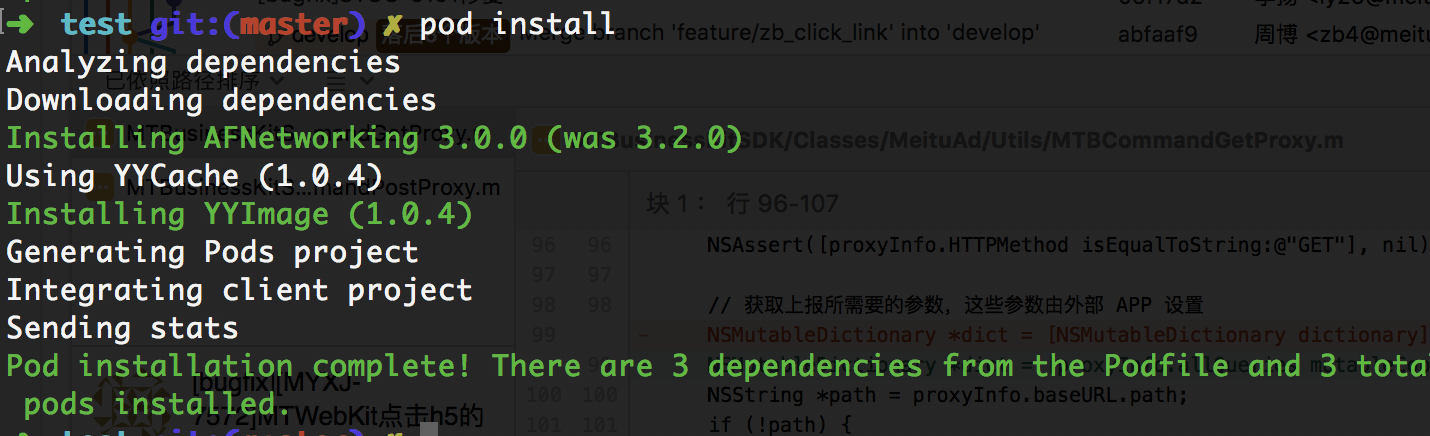
最后一步是下载对应文件。这里分了三种情况:如果组件已经下载且版本号没有发生变化,则直接提示 “Using xxx”,如下图中的 “YYCache” 组件;如果组件已经下载,但是版本号发生了变化,则更新组件并提示 “Installing xxx 版本号 (之前版本号)”,如下图中的 “AFNetworking” 组件;如果组件第一次下载,则进行下载,并提示 “Installing xxx”,如下图中的 “YYImage”。
校验 target
校验 target 代码如下:
# CocoaPods/lib/cocoapods/installer.rb
def validate_targets
  validator = Xcode::TargetValidator.new(aggregate_targets, pod_targets)
  validator.validate!
end

# CocoaPods/lib/cocoapods/installer/xcode/target_validator.rb
def validate!
  verify_no_duplicate_framework_and_library_names
  verify_no_static_framework_transitive_dependencies
  verify_no_pods_used_with_multiple_swift_versions
  verify_framework_usage
end
这个方法中,创建了一个 TargetValidator 实例,并调用 validate() 方法进行校验。这方方法主要分为以下几步:
检测是否有多重引用 framework 或者 library 的情况。因为一个组件可能分成多个 subspec,如果不清楚 subspec 中的依赖关系。使用时可能会出现多重引用的情况。举个例子,下面是 “网易云信“ 的 podspec 文件,以及其中依赖的两个组件的 podspec 文件:
# NIMKit.podspec
Pod::Spec.new do |s|

  ...

  s.subspec 'Full' do |cs|
    cs.source_files = 'NIMKit/NIMKit/**/*.{h,m}'
    cs.dependency 'NIMKit/Core'
    cs.dependency 'NIMSDK', '~> 4.9.0'
  end

  s.subspec 'Lite' do |cs|
    cs.source_files = 'NIMKit/NIMKit/**/*.{h,m}'
    cs.dependency 'NIMKit/Core'
    cs.dependency 'NIMSDK_LITE', '~> 4.9.0'
  end

  s.subspec 'Core' do |os|
  ...
  end

  s.default_subspec = 'Lite'
end

  # NIMSDK.podspec
  Pod::Spec.new do |s|
  ...
  s.vendored_libraries  = '**/Libs/*.a'
  s.vendored_frameworks = '**/NIMSDK.framework','**/NIMAVChat.framework'
  ...
 end

    # NIMSDK_LITE.podspec
Pod::Spec.new do |s|
 ...
  s.vendored_libraries  = 'NIMSDK/Libs/*.a'
  s.vendored_frameworks = '**/NIMSDK.framework'
 ...
end
然后我这样去引用:
pod 'NIMKit', :subspecs => ['Lite','Full']因为两个 spec 中都引用了 NIMKit framework,所以执行 `pod install` 的时候就会出现如下问题:
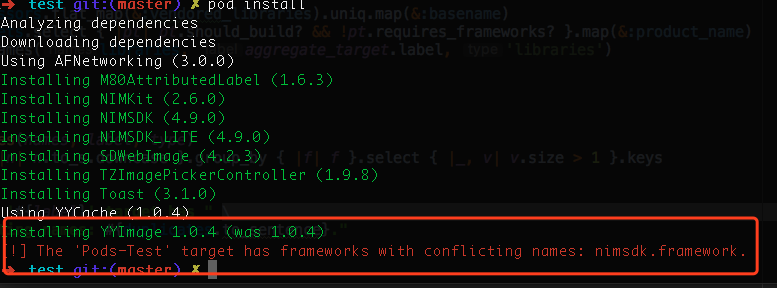
> 这里还是不太理解,可能表述有误。如果清楚请指出,我加以改正。
处理静态库传递依赖问题。如果 A 组件依赖 B 组件,B 组件中含有通过vendored_libraries加载的静态库.a或framewrok。如果
Podfile中不使用use_frameworks!,不会出现任何问题;如果使用use_frameworks!,那么打包的framework会将vendored_libraries库中的内容包含进来,这就出现了符号冲突的问题了。如果出现了这种问题,CocoaPods 会报出如下错误:The 'pod-name' target has transitive dependencies that include static binaries: (static_libs.to_sentence)因为在 swift 中必须使用 `use_frameworks`,所以 swift 中经常会遇到这种问题。解决办法就是修改 `podspec` 和 `Podfile` 两个文件:
podspec:
  s.dependency 'xxx', '~> 15.2.0'

  s.pod_target_xcconfig = {
    'FRAMEWORK_SEARCH_PATHS' => '$(inherited) $(PODS_ROOT)/xxx',
    'OTHER_LDFLAGS'          => '$(inherited) -undefined dynamic_lookup'
  }
podfile:
  pre_install do |installer|
    # workaround for https://github.com/CocoaPods/CocoaPods/issues/3289
    def installer.verify_no_static_framework_transitive_dependencies; end
  end
校验不同 target 所引用的代码中,如果包含 swift,所使用的 swift 版本是否相同。如果不同则会报出如下错误:
The following pods are integrated into targets that do not have the same Swift version:{error_messages.join}
当在 swift 中使用时,校验是否在
Podfile中是否添加了use_frameworks!。如果不添加便会报错。例如:Podfile
source 'https://github.com/CocoaPods/Specs.git'
  platform :ios, '8.0'
  # ignore all warnings from all pods
  inhibit_all_warnings!

  target 'SwiftTest' do
     pod 'AFNetworking','3.0'
     pod 'Alamofire', '~> 4.6'
       pod 'YYCache'
     pod 'YYImage'
     pod 'YYImage'
  end
对上述 `Podfile` 文件,执行 `pod install` 时便会报出如下错误:[!] Pods written in Swift can only be integrated as frameworks; add `use_frameworks!` to your Podfile or target to opt into using it. The Swift Pod being used is: Alamofire
ps: 在 CocoaPods 1.5 中,已经支持 swift 使用静态库,具体可查看 CocoaPods 1.5.0 — Swift Static Libraries . 写这篇文章的时候还未支持。
整合 project 文件
依赖文件下载完毕之后,会将这些文件打包成 Pods.xcodeproj。这一过程方法定义如下:
 # CocoaPods/lib/cocoapods/installer.rb
 # Generate the 'Pods/Pods.xcodeproj' project.
#
def generate_pods_project(generator = create_generator)
  UI.section 'Generating Pods project' do
    generator.generate!
    @pods_project = generator.project
    run_podfile_post_install_hooks
    generator.write
    generator.share_development_pod_schemes
    write_lockfiles
  end
end
这里会通过 generator 实例执行 generate! 方法。我们主要说一下这个方法:
# CocoaPods/lib/cocoapods/installer/xcode/pods_project_generator.rb
def generate!
  prepare
  install_file_references
  install_libraries
  integrate_targets
  set_target_dependencies
end
这个方法做了这样几件事:
- 生成一个
Pods.xcodeproj工程 - 将下载的依赖文件加入工程
- 将下载的 Library 加入工程
- 处理 target 依赖
这一系列过程的操作,主要依赖于前面所提到的 CocoaPods/Xcodeproj 组件。
执行下载过程
这是最后一个阶段,会下载每个组件的具体源文件,并输出最终的执行结果。方法定义如下:
 # CocoaPods/lib/cocoapods/installer.rb
  # Performs any post-installation actions
#
def perform_post_install_actions
  unlock_pod_sources
  run_plugins_post_install_hooks
  warn_for_deprecations
  warn_for_installed_script_phases
  lock_pod_sources
  print_post_install_message
end
这一过程一般是最慢的一个过程。偷懒一下,其中的过程方法我就不一一讲解了。看一下最后输出信息这个方法吧:
def print_post_install_message
  podfile_dependencies = podfile.dependencies.uniq.size
  pods_installed = root_specs.size
  title_options = { :verbose_prefix => '-> '.green }
  UI.titled_section('Pod installation complete! ' \
                    "There #{podfile_dependencies == 1 ? 'is' : 'are'} #{podfile_dependencies} " \
                    "#{'dependency'.pluralize(podfile_dependencies)} from the Podfile " \
                    "and #{pods_installed} total #{'pod'.pluralize(pods_installed)} installed.".green,
                    title_options)
end
也就是我们常见的输出结果:

执行一次 pod install 的过程到此结束了。如果你大致读一遍源码,执行 pod install 再遇到问题时,可以快速断定问题原因并修复。pod update 和 pod install 还是有一些差别的,有兴趣的同学可以读一下 pod update 的源码。我这里就不在写了,就算你读不吐我都快写吐了。
CocoaPods 使用
1.安装 CocoaPods
这里假设你什么都没有安装,从 0 开始。如果你已经安装了某些东西,可以跳过。
安装 rvm
curl -L get.rvm.io | bash -s stable

source ~/.bashrc

source ~/.bash_profile
查看 rvm 版本
rvm -vrvm 1.29.3 (latest) by Michal Papis, Piotr Kuczynski, Wayne E. Seguin [https://rvm.io]
查看可安装 Ruby 版本
rvm list known
安装一个版本,我一般选最高,这里是 2.4.1
rvm install 2.4.1因为你后面可能会稀里糊涂装很多版本,所以设置这个版本为默认版本
rvm use 2.4.1 --default
- 更换 Ruby 源。因为国内被墙,所以需要切换。之前很多教程中说使用 ruby.taobao.org,但是淘宝源已经停止维护,现在建议使用 gems.ruby-china.org。
- 安装 CocoaPods
  // 安装 CocoaPods
  sudo gem install cocoapods

  // 安装本地库,需要等待很长时间
  pod setup
- 如果安装了多个 Xcode,需要选择一个。
sudo xcode-select -switch /Applications/Xcode.app/Contents/Developer- 检测是否安装好,search 一个组件,能 search 到证明安装好了
pod search [一个组件]- CocoaPods 版本操作
// 查看当前安装的所有 CocoaPods 版本
gem list –local | grep cocoapods
// 当前使用 pod 版本
pod –version
// 更新到最新稳定版本
sudo gem install cocoapods
// 更新到一个 pre-release 版本
sudo gem install cocoapods –pre
// 安装指定版本
sudo gem install cocoapods -v [版本号]
// 移除 CocoaPods,如果你安装多个,会列出一个 list 让你选择删除那个。如果只安装一个,也会给你提示,问你是否确定删除。
sudo gem uninstall cocopods
// 移除指定版本
sudo gem uninstall cocopods -v [版本号]
// 使用指定版本执行命令
pod 1.3.1 install
2.使用 CocoaPods
- 基础操作
// 打开一新的工程,执行命令
pod init
// Podfile 中添加
pod ‘AFNetworking’
// install
pod install- 想要看到 install 详细过程
pod install –verbose- 更新某一个组件
// 不添加组件名则更新所有
pod update [组件名]- 更新本地依赖
pod repo update- 不想在 install/update 时更新本地依赖。这样执行 `pod install` 会快一些。但是如果 github 或者私有仓库上面有了最新版本,本地搜到的还是旧版本。如果 `Podfile` 中使用新的版本号,这样是无法执行成功的。
// –verbose 可省略
pod install –verbose –no-repro-update
pod update –verbose –no-repro-update
- 校验本地 lib repo 的有效性
pod lib lint –allow-warnings- 校验 spec 文件
pod spec lint- 自定义组件时,将组件的 spec 文件上传到远端仓库。
// [reponame] 一般可以在路径 ~/.cocoapods/repo 下查看,选择你需要的 name.
pod repo push [reponame] [name.podspec] –verbose –sources=master,[reponame] –use-libraries –allow-warningsPodfile 书写规范
Podfile Syntax Reference v1.4.0
source 'https://github.com/CocoaPods/Specs.git' # 组件依赖文件所存放仓库,根据需求可引入多个
source 'https://github.com/artsy/Specs.git'


platform :ios, '8.0'            #
inhibit_all_warnings!           # 忽视引用的代码中的警告

workspace 'CocoaPodsDemo'       # 指定生成的 workspace 名字

def common_pods                 # 如果有多个 target,可以将公共部分进行 def 定义再引入
    pod 'xxx'
end

target 'CocoaPodsDemo' do
    project 'DemoProject'       # 可用于指定实际的工程

    use_frameworks!             # 是否以 framework 形式引入。swift 必须有这个关键字

    common_pods              # 公共引入的组件

    pod 'SSipArchive', :inhibit_warnings => true   # 屏蔽某个 pod 的 warning

    pod 'AFNetworking', '3.2'   # 使用 3.2 版本
    pod 'YYCache', '~> 0.3'     # pod update 时最高升级到 < 1.0,不包括 1.0

   # Build 环境配置
   pod 'PonyDebugger', :configurations => ['Debug', 'Beta']
   pod 'PonyDebugger', :configuration => 'Debug'

   # 使用具体的某个 subspec
   pod 'QueryKit/Attribute'
   pod 'QueryKit', :subspecs => ['Attribute', 'QuerySet']

   # 引用本地组件
   pod 'AFNetworking', :path => '~/Documents/AFNetworking'

   # 使用具体仓库
   pod 'AFNetworking', :git => 'https://github.com/gowalla/AFNetworking.git'
   # 使用具体仓库具体分支
   pod 'AFNetworking', :git => 'https://github.com/gowalla/AFNetworking.git', :branch => 'dev'
   # 使用具体仓库的某个 tag
   pod 'AFNetworking', :git => 'https://github.com/gowalla/AFNetworking.git', :tag => '0.7.0'
   # 使用具体仓库的某个 commit
   pod 'AFNetworking', :git => 'https://github.com/gowalla/AFNetworking.git', :commit => '082f8319af'

    # 使用指定路径的 spec 文件
   pod 'JSONKit', :podspec => 'https://example.com/JSONKit.podspec'


   target 'ShowsApp' do
     pod 'ShowsKit'

      # Has its own copy of ShowsKit + ShowTVAuth
       target 'ShowsTV' do
       pod 'ShowTVAuth'
       end

      # Has its own copy of Specta + Expecta
      # and has access to ShowsKit via the app
     # that the test target is bundled into
      target 'ShowsTests' do
       # inherit! 有三种类型:':complete' 继承父级所有行为;':none' 什么行为都不继承;':search_paths' 继承父级的 search paths
        inherit! :search_paths
        pod 'Specta'
        pod 'Expecta'
      end
   end
end

# hook 配置, 在 preparing 阶段后,install 之前
pre_install do |installer|

end

# hook 配置,在 pod install 之后,可用于修改工程配置等
post_install do |installer|
  installer.pods_project.targets.each do |target|
    target.build_configurations.each do |config|
      config.build_settings['GCC_ENABLE_OBJC_GC'] = 'supported'
    end
  end
end
Podspec 书写规范
Podspec Syntax Reference v1.4.0
Pod::Spec.new do |spec|

# 组件基本信息配置
#
   # 组件名
  spec.name         = 'Reachability'
  # 组件版本号,命名规则遵循 [semantic versioning](https://semver.org/)
  spec.version      = '3.1.0'
  # 许可证
  spec.license      = { :type => 'BSD' }
  # 仓库主页
  spec.homepage     = 'https://github.com/tonymillion/Reachability'
  # 一个作者用 spec.author = 'Darth Vader'
  spec.authors      = { 'Tony Million' => 'tonymillion@gmail.com' }
  # 组件概述
  spec.summary      = 'ARC and GCD Compatible Reachability Class for iOS and OS X.'
  # 组件源码地址
  spec.source       = { :git => 'https://github.com/tonymillion/Reachability.git', :tag => 'v3.1.0' }

# 组件平台支持
#
  # 支持单平台使用
  spec.platform = :osx, '10.8'
  spec.platform = :ios

  # 支持多平台使用
  spec.ios.deployment_target = '6.0'
  spec.osx.deployment_target = '10.8'

# Build settings
#
  spec.dependency 'AFNetworking', '~> 1.0'    # 组件依赖的第三方库
  spec.requires_arc = false                   # 是否要求 ARC 环境
  spec.requires_arc = ['Classes/*ARC.m', 'Classes/ARC.mm']
  spec.frameworks = 'QuartzCore', 'CoreData'  # 组件引用的 framework spec.weak_frameworks = 'Twitter', 'SafariServices' # 组件弱引用的 framework
  spec.libraries = 'xml2', 'z'                # 组件引用的 library
  ... 更多请看官方文档

# File patterns
#
  spec.source_files = 'Classes/**/*.{h,m}'          # 接入方使用组件时,引入的源文件,正则匹配
  spec.public_header_files = 'Headers/Public/*.h'   # 引入的共有头文件
  spec.private_header_files = 'Headers/Private/*.h' # 引入的私有头文件
  spec.vendored_frameworks = 'MyFramework.framework'# 引入的 framework
  spec.vendored_libraries = 'libProj4.a'            # 引入的 library
  # 以 bundle 形式引入的资源
  spec.resource_bundles = {
    'MapBox' => ['MapView/Map/Resources/*.png'],
    'OtherResources' => ['MapView/Map/OtherResources/*.png']
  }
  # 直接引入资源
  spec.resources = ['Images/*.png', 'Sounds/*']
  ... 更多请看官方文档

# Subspecs
#
  # 将组件分为多个子组件,接入方可以根据需求只接入几个子组件,减少包体积
  subspec 'Twitter' do |sp|
      sp.source_files = 'Classes/Twitter'
  end
  # 测试组件
  spec.test_spec do |test_spec|
    test_spec.source_files = 'NSAttributedString+CCLFormatTests.m'
    test_spec.dependency 'Expecta'
  end
  # 默认子组件。也就是当接入方不作区分时,直接使用组件名引入时,所引入子组件
  spec.default_subspec = 'Core'

# 多平台支持
#
  spec.ios.source_files = 'Classes/ios/**/*.{h,m}'
  spec.osx.source_files = 'Classes/osx/**/*.{h,m}'
Cocopods 基本使用内容就这些。具体可以查看官方文档中 Reference 这一章节。
一些问题
这里是一些经常遇到的问题。不是很全面,希望对你有帮助。
1.项目使用了 CocoaPods 之后,为什么要以 Workspace 形式打开
因为执行 pod install 之后,下载完的文件会通过使用 CocoaPods/Xcodeproj 合成一个 Project。Xcode 通过使用 Workspace 管理多个 Project,使各个 Project 之间可以相互引用。为了使工程中的文件能够引用组件中的文件,所以这里需要以 Workspace 形式打开。
2.pod install vs. pod update
这是 官方文档 中描述的一个经典问题。
pod install: 优先安装 Podfile 中改变的组件,并优先遵循 Podfile 中的版本号,其次遵循 Podfile.lock 中的版本号。如果使用的 Podfile 中版本号,会将新的版本号更新到 Podfile.lock 中。
pod update [PODNAME]: 会根据当前 Podfile 规则更新组件。如果 Podfile 中没有指定版本号,并不会遵循 Podfile.lock,而是会拉取最新版本,并更新 Podfile.lock。
官方建议:
- 新添加一个 pod 时,使用
pod install,不要使用pod update去下载一个新的组件,避免跟新其他 pod 的版本。 - 更新 pod 版本时,使用
pod update [PODNAME]。 - 没有必要的话,不要使用全局更新
pod update,避免不必要的更新。
3.校验 podspec 文件出现问题(pod spec lint)
swift 版本问题
问题:
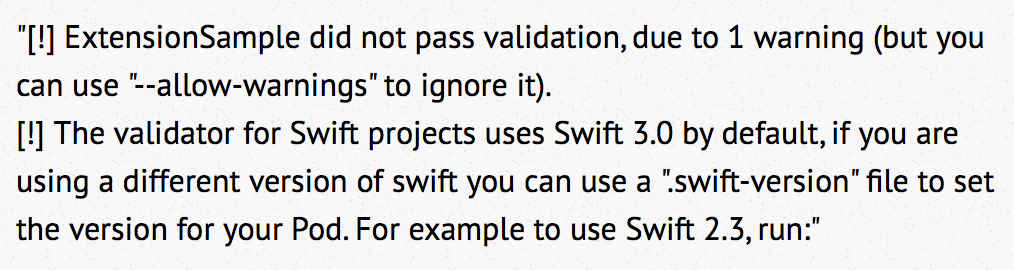
解决方案:
2.3, run终端输入:echo “2.3” > .swift-version
验证出现警告问题
pod spec lint xxx.podspec --allow-warning
找不到头文件
pod spec lint --allow-warnings --use-libraries
当然 CocoaPods 还有很多问题,这里就不一一列举了,如果遇到问题自行 Google 吧,很多问题都已经有了答案。
总结
CocoaPods 的相关知识,就总结到这里。花时间如仔细研究一下,还是能学到很多东西的。这样在今后的项目开发中遇到问题后,可以快速定位并解决,提高开效率。
参考文献
1.CocoaPods 官方文档
2.CocoaPods Under The Hood
