vue+node项目部署上线

3,038 阅读12分钟

在线地址: cl8023.com github

云服务器

阿里云 or 腾讯云

  • 阿里云服务器品牌:ECS(Elastic Compute Service)
  • 腾讯云服务器品牌:VCM(Cloud Virtual Machine)

腾讯云or阿里云

两者都可以,具体可以根据自己的需求,都说阿里云稳定,腾讯云便宜,我自己买时发现两者入门级的价格都差不多,就买了阿里云的,以下即以阿里云的服务器操作。(腾讯云服务器操作应该也类似)

购买阿里云服务器ECS

入门级最低配即可,一年300多,每月几十块钱,也可以月付,那样就贵点。

中间有些选项默认就可,镜像选择 公共镜像-CentOS-7.4 64位(最新的) 图中密码用来之后远程登陆服务器使用。

登陆服务器

阿里网页登陆

在 管理控制台-实例 中可以看到刚刚购买的服务器

点击远程连接,出现登陆界面,第一次进入会弹出一个密码,记住这个密码(只会出现一次),之后登陆输入这个密码即可进入阿里云服务器ECS系统。

客户端工具远程登陆

  1. Mac 终端中输入:SSH root@服务器IP地址(公) (SSH root@192.18.222.12) 回车 输入购买服务器时设置的实例密码即可
  2. Windows
  • 下载工具 Xshell
  • 打开Xshell - 文件 - 新建,终端选项选择编码:Unicode(UTF-8)
  • 连接成功

配置环境

Linux 常用命令:

  1. wget:一个从网络上自动下载文件的自由工具,支持通过 HTTP、HTTPS、FTP 三个最常见的 TCP/IP协议 下载,并可以使用 HTTP 代理。"wget" 这个名称来源于 “World Wide Web” 与 “get” 的结合。
  2. tar:压缩解压命令
    • -c:建立压缩档案
    • -x:解压
    • -t:查看内容
    • -r:向压缩归档文件末尾追加文件
    • -u:更新原压缩包中的文件 这五个是独立的命令,压缩解压都要用到其中一个,可以和别的命令连用但只能用其中一个。下面的参数是根据需要在压缩或解压档案时可选的。
    • -z:有gzip属性的
    • -j:有bz2属性的
    • -Z:有compress属性的
    • -v:显示所有过程
    • -O:将文件解开到标准输出 下面的参数 -f 是必须的
    • -f:使用档案名称,最后一个参数,后面只能接档案名
  3. ln:为某一个文件或目录在另一个位置建立一个同步的链接 常用:ln -s 源文件 目标文件
  4. makdir:创建目录
  5. mv:为文件或目录改名、或将文件或目录移入其它位置
  6. rm:删除文件
    • -f:忽略不存在的文件,从不给出提示
    • -r:将参数中列出的全部目录和子目录均递归的删除
  7. yum:提供了查找、安装、删除某一个、一组甚至全部软件包的命令
  8. ls:显示当前目录下文件, ls -f 隐藏文件也显示
  9. netstat -tpln:查看进程端口
  10. kill -9 PID号:关闭进程
  11. cp:拷贝

Linux 目录: 
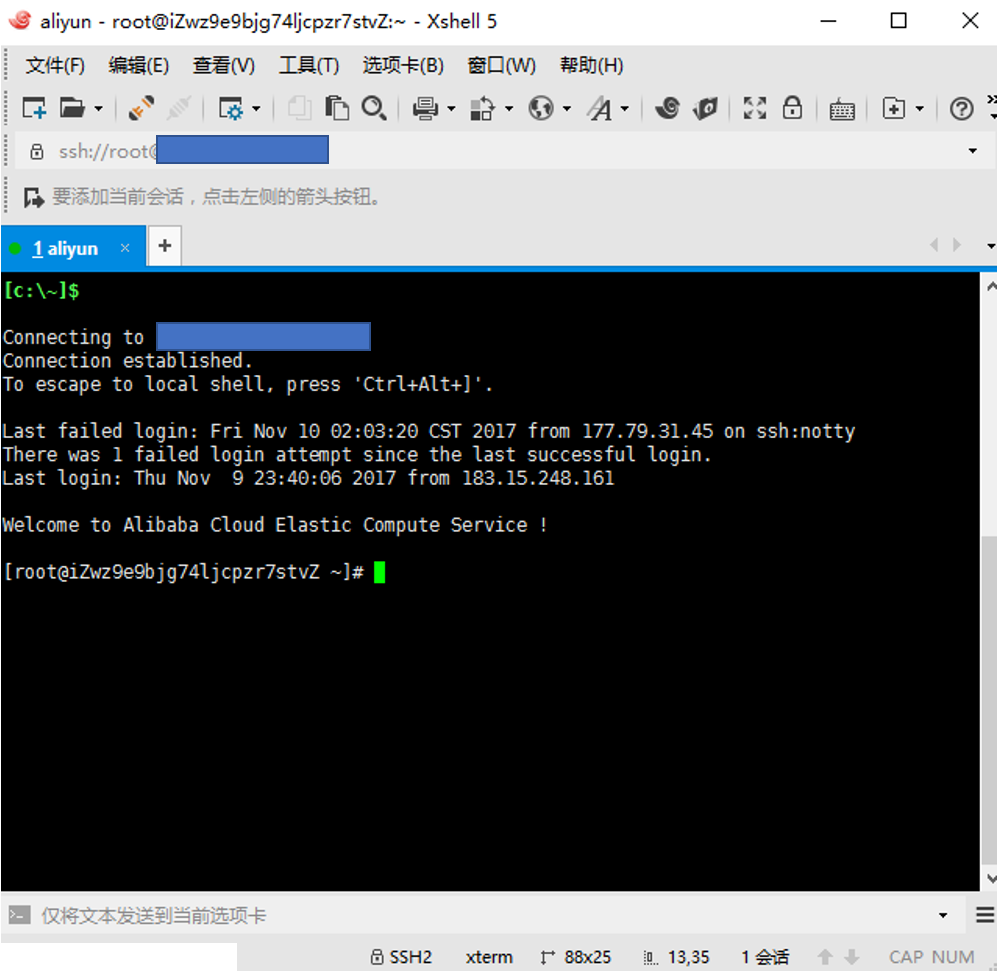
前面进入Linux系统后,一般会在 root(~) 目录下 [root@xxxxxxxxxxx ~]#, cd ..可以即回到根目录,ls查看当前目录下文件

[root@xxxxxxxxxxx ~]#
[root@xxxxxxxxxxx ~]# cd ..
[root@xxxxxxxxxxx /]#
[root@xxxxxxxxxxx /]# ls
bin  boot  dev  etc  home  lib  lib64  lost+found  media  mnt  opt  proc  root  run  sbin  srv  sys  tmp  usr  var
[root@xxxxxxxxxxx /]# cd root
[root@xxxxxxxxxxx ~]#

安装NodeJs

阿里云帮助文档:部署Node.js项目(CentOS)

安装MySQL

主要参考

1. 下载安装包

为了下载到最新的版本,先到官网上找到下载链接 MySQL下载地址

先用浏览器或其他下载工具创建下载任务(如x86,64-bit),然后在下载中找到下载链接复制下来就可以把它删了。

  • 进入root目录:cd /root (也可以其他目录)
  • 下载安装包: wget https://cdn.mysql.com//Downloads/MySQL-5.7/mysql-5.7.20-linux-glibc2.12-x86_64.tar.gz
  • 下载完成后 ls 可以看到下载的安装包
[root@xxxxxxxxxxx ~]# ls
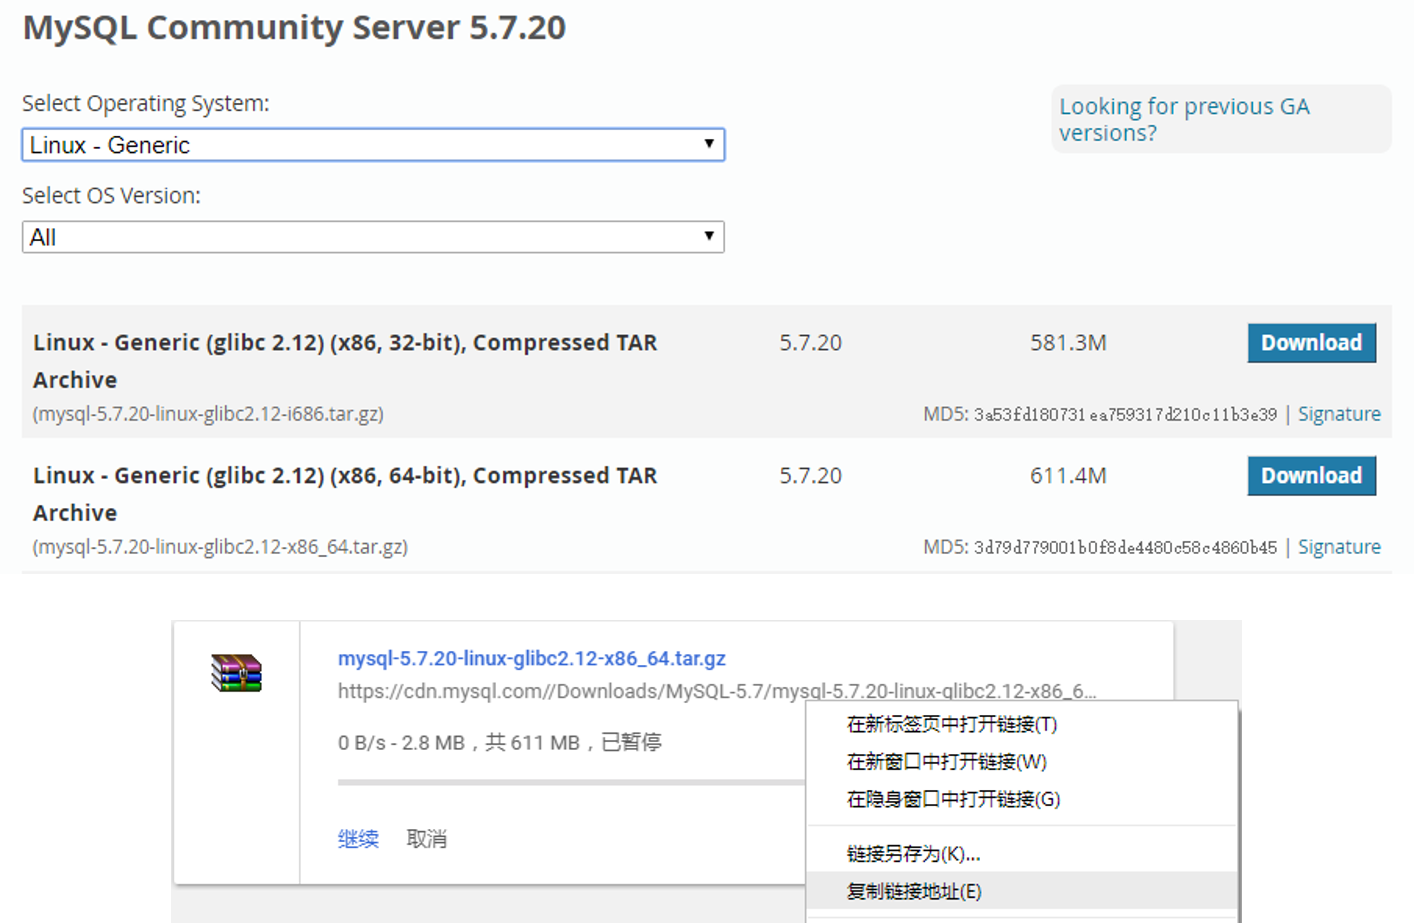
mysql-5.7.20-linux-glibc2.12-x86_64.tar.gz ......

2. 解压文件

tar -xzvf mysql-5.7.19-linux-glibc2.12-x86_64.tar.gz -C /usr/local/

[root@xxxxxxxxxxx ~]# ls
mysql-5.7.20-linux-glibc2.12-x86_64 (解压得到的目录)
mysql-5.7.20-linux-glibc2.12-x86_64.tar.gz

// 拷贝解压到目录到 /usr/local 目录下,并改名为 mysql
[root@xxxxxxxxxxx ~]# cp mysql-5.7.20-linux-glibc2.12-x86_64 /usr/local/mysql -r
[root@xxxxxxxxxxx ~]# cd /usr/local/mysql
[root@xxxxxxxxxxx mysql]# ls
bin  COPYING  docs  include  lib  man  README  share  support-files

3. 添加系统mysql组和mysql用户

[root@xxxxxxxxxxx ~]# groupadd mysql #建立一个mysql的组
[root@xxxxxxxxxxx ~]# useradd -r -g mysql mysql #建立mysql用户,并且把用户放到mysql组

4. 在 mysql 下添加 data 目录

[root@xxxxxxxxxxx mysql]# mkdir data

5. 更改mysql目录下所有的目录及文件夹所属组合用户

[root@xxxxxxxxxxx mysql]# cd /usr/local/
[root@xxxxxxxxxxx local]# chown -R mysql mysql/
[root@xxxxxxxxxxx local]# chgrp -R mysql mysql/
[root@xxxxxxxxxxx local]# cd mysql/
[root@xxxxxxxxxxx mysql]# ls -l
total 56
drwxr-xr-x  2 mysql mysql  4096 Nov  9 16:00 bin
-rw-r--r--  1 mysql mysql 17987 Nov  9 16:00 COPYING
drwxr-xr-x  6 mysql mysql  4096 Nov  9 18:41 data
drwxr-xr-x  2 mysql mysql  4096 Nov  9 16:00 docs
drwxr-xr-x  3 mysql mysql  4096 Nov  9 16:01 include
drwxr-xr-x  5 mysql mysql  4096 Nov  9 16:01 lib
drwxr-xr-x  4 mysql mysql  4096 Nov  9 16:00 man
-rw-r--r--  1 mysql mysql  2478 Nov  9 16:00 README
drwxr-xr-x 28 mysql mysql  4096 Nov  9 16:00 share
drwxr-xr-x  2 mysql mysql  4096 Nov  9 18:06 support-files

6. 安装和初始化数据库

很多老的教程中都是运行 ./scripts/mysql_install_db --user=mysql 进行安装,但在新版本的mysql中已经没了 scripts 目录, mysql_install_db 放在了 bin 目录下

[root@xxxxxxxxxxx mysql]# cd bin
[root@xxxxxxxxxxx bin]# ./mysqld --initialize --user=mysql --basedir=/usr/local/mysql/--datadir=/usr/local/mysql/data/


2017-11-09T09:09:52.826209Z 0 [Warning] TIMESTAMP with implicit DEFAULT value is deprecated. Please use --explicit_defaults_for_timestamp server option (see documentation for more details).
2017-11-09T09:09:54.885578Z 0 [ERROR] Can't find error-message file '/usr/local/mysql/--datadir=/usr/local/mysql/data/share/errmsg.sys'. Check error-message file location and 'lc-messages-dir' con
figuration directive.2017-08-31T08:50:24.709286Z 0 [Warning] InnoDB: New log files created, LSN=45790
2017-11-09T09:09:55.105938Z 0 [Warning] InnoDB: Creating foreign key constraint system tables.
2017-11-09T09:09:55.218562Z 0 [Warning] No existing UUID has been found, so we assume that this is the first time that this server has been started. Generating a new UUID: c0844cc4-c52d-11e7-b74f-00163e0ae84e.
2017-11-09T09:09:55.221300Z 0 [Warning] Gtid table is not ready to be used. Table 'mysql.gtid_executed' cannot be opened.
2017-11-09T09:09:55.221784Z 1 [Note] A temporary password is generated for root@localhost: uf)qP3+C?jpJ

解决:(无视警告)

[root@xxxxxxxxxxx bin]# ./mysqld --initialize --user=mysql --basedir=/usr/local/mysql/ --datadir=/usr/local/mysql/data/ --lc_messages_dir=/usr/local/mysql/share --lc_messages=en_US

7. 配置my.cnf

进入 /usr/local/mysql/support-files/ 目录下,查看是否存在my-default.cnf 文件,如果存在直接 copy 到 /etc/my.cnf 文件中

[root@xxxxxxxxxxx mysql]# cp -a ./support-files/my-default.cnf /etc/my.cnf

如果不存在 my-default.cnf 文件, 则在 /etc/ 目录下创建 my.cnf

[root@xxxxxxxxxxx bin]# cd /etc
[root@xxxxxxxxxxx etc]# vim my.cnf

写入内容

#[mysql]
#basedir=/usr/local/mysql/
#datadir=/usr/local/mysql/data/

8. 启动服务

[root@xxxxxxxxxxx mysql]# cd bin/
[root@xxxxxxxxxxx bin]# ./mysqld_safe --user=mysql &

9. 将mysqld服务加入开机自启动项

[root@xxxxxxxxxxx bin]# cd ../support-files
[root@xxxxxxxxxxx support-files]# cp mysql.server /etc/init.d/mysql
[root@xxxxxxxxxxx support-files]# chmod +x /etc/init.d/mysql
-- 把mysql注册为开机启动的服务
[root@xxxxxxxxxxx support-files]# chkconfig --add mysql

10. 启动服务

[root@xxxxxxxxxxx bin]# service mysql start

若报错 ERROR! The server quit without updating PID file

[root@xxxxxxxxxxx mysql]# rm  /etc/my.cnf
rm: remove regular file '/etc/my.cnf'? y
[root@xxxxxxxxxxx mysql]# /etc/init.d/mysql start
Starting MySQL.Logging to '/usr/local/mysql/data/dbserver.err'.
 SUCCESS!
[root@xxxxxxxxxxx mysql]# service mysql start
Starting MySQL SUCCESS!

11. 登录mysql

[root@xxxxxxxxxxx bin]# ./mysql -u root -p
密码是第6步产生的密码

如果出现错误:

ERROR 1045 (28000): Access denied for user 'root'@'localhost' (using password: NO)

重改密码

[root@xxxxxxxxxxx bin]# /etc/init.d/mysql stop
[root@xxxxxxxxxxx bin]# mysqld_safe --user=mysql --skip-grant-tables --skip-networking &
[root@xxxxxxxxxxx bin]# mysql -u root mysql
mysql> UPDATE user SET Password=PASSWORD('newpassword') where USER='root';

// 上面语句若出错,换为
update mysql.user set authentication_string=password('newpassword') where user='root'

mysql> FLUSH PRIVILEGES;
mysql> quit

[root@xxxxxxxxxxx bin]# /etc/init.d/mysqld restart
[root@xxxxxxxxxxx bin]# mysql -uroot -p
Enter password:

mysql>

12. 设置远程登录权限

mysql>  grant all privileges on *.* to'root' @'%' identified by 'root';
Query OK, 0 rows affected, 1 warning (0.00 sec)

mysql> flush privileges;
Query OK, 0 rows affected (0.06 sec)

mysql> quit
Bye

13. 进程关闭

若以上步骤中出现其他错误,可以看看 mysql 是否关闭了,先关闭端口,然后在试试

[root@xxxxxxxxxxx ~]# netstat -tpln
Active Internet connections (only servers)
Proto Recv-Q Send-Q Local Address           Foreign Address         State       PID/Program name
tcp        0      0 0.0.0.0:22              0.0.0.0:*               LISTEN      1105/sshd
tcp6       0      0 :::3306                 :::*                    LISTEN      25599/mysqld
[root@xxxxxxxxxxx ~]# kill -9 25599

14. 本地连接数据库

我本地使用的是 Navicat for MySQL

远程连接数据库

远程连接数据库后,创建数据表(可以导出本地数据表,然后Navicat中导入到服务器MySQL中)

上传文件

打包文件

项目根目录下运行

npm run build

等待命令运行结束后,会发现目录下多了 dist 文件夹,这个文件夹就是我们等下要放到服务器中的。

文件传输

  1. 下载文件传输工具 Xftp
  2. 打开 Xftp 新建连接,类似Xshell,选项中勾选 “使用UTF-8编码(E)”
    Xftp连接
    连接成功后可以看到左侧是本地文件目录,右侧是服务器文件目录,可以很方便的来回拖放文件。
  3. 创建目录文件 /root/projec/myblog (目录层级、名称随意,这里我以次为项目目录)
  4. 将刚刚的 dist 文件夹复制到 /root/project/myblog 目录下,前端资源就OK了
  5. 将 server 文件夹也复制到 /root/project/myblog 目录下

初始化项目

Xshell 连接服务器

// 进入项目目录
[root@izwz9e9bjg74ljcpzr7stvz ~]# cd /root/project/myblog
[root@izwz9e9bjg74ljcpzr7stvz myblog]# ls
dist server

初始化创建 package.json,这一步也可以在本地创建编辑好后上传到服务器目录即可

[root@izwz9e9bjg74ljcpzr7stvz myblog]# npm init
This utility will walk you through creating a package.json file.
It only covers the most common items, and tries to guess sensible defaults.

See `npm help json` for definitive documentation on these fields
and exactly what they do.

Use `npm install <pkg>` afterwards to install a package and
save it as a dependency in the package.json file.

Press ^C at any time to quit.
package name: (myblog) 
version: (1.0.0) 
description: 
entry point: (index.js) 
test command: 
git repository: 
keywords: 
author: 
license: (ISC) 
About to write to /root/project/test/myblog/package.json:

{
  "name": "myblog",
  "version": "1.0.0",
  "description": "",
  "main": "index.js",
  "scripts": {
    "test": "echo \"Error: no test specified\" && exit 1"
  },
  "author": "",
  "license": "ISC"
}


Is this ok? (yes) yes

// 全部回车即可
[root@izwz9e9bjg74ljcpzr7stvz myblog]# ls
dist  package.json  server

// 打开 package.json 编辑(也可在 Xftp 中右键文件编辑)
[root@izwz9e9bjg74ljcpzr7stvz myblog]# vim package.json

    {
        "name": "my-blog",
        "version": "1.0.0",
        "description": "A Vue.js project",
        "author": "ChenLiang <236338364@qq.com>",
        "private": true,
        "scripts": {
            "dev": "node build/dev-server.js",
            "start": "node build/dev-server.js",
            "build": "node build/build.js"
        },
        "dependencies": {
            "body-parser": "^1.17.2",
            "cookie-parser": "^1.4.3",
            "express": "^4.16.2",
            "express-session": "^1.15.5",
            "formidable": "^1.1.1",
            "highlight.js": "^9.12.0",
            "marked": "^0.3.6",
            "mysql": "^2.14.0",
            "node-sass": "^4.5.3",
            "node-uuid": "^1.4.8"
        },
        "engines": {
            "node": ">= 4.0.0",
            "npm": ">= 3.0.0"
        },
        "browserslist": [
            "> 1%",
            "last 2 versions",
            "not ie <= 8"
        ]
    }

保存退出,运行

[root@izwz9e9bjg74ljcpzr7stvz myblog]# npm install

安装"dependencies"中项目运行需要的所有依赖

修改资源路径

进入文件夹 server,打开 index.js

[root@izwz9e9bjg74ljcpzr7stvz server]# vim index.js

const routerApi = require('./router');
const path = require('path');
const bodyParser = require('body-parser');
const express = require('express');
const app = express();
const cookieParser = require('cookie-parser');
const session = require('express-session');

app.use(bodyParser.json());
app.use(bodyParser.urlencoded({extended: false}));
app.use(cookieParser());
app.use(session({
    secret: '8023',
    // cookie: {maxAge: 60000},
    resave: false,
    saveUninitialized: true
}));

// 部署上线时读取静态文件
app.use(express.static(path.join(__dirname, '../dist')));

// 后端api路由
app.use('/api', routerApi);

// 监听端口
app.listen(80);
console.log('success listen at port:80......');

设置静态资源路径,并修改监听端口为80(HTTP端口),api.js 中文件路径相关的也要更改为 ../dist/static.....,嫌麻烦的也可以直接将 server 文件夹移到 dist 下就不用这么麻烦改了。

开放 80 端口

登陆阿里云,进入控制管理台 -> 云服务器 ECS -> 安全组 -> 配置规则 -> 快速创建规则

开放80端口

启动服务

[root@izwz9e9bjg74ljcpzr7stvz server]# node index.js
success listen at port:80......

浏览器打开 服务器IP:80(如:263.182.35.68:80),如无意外,即正常运行访问啦。

绑定域名

进入域名管理后台,解析域名,添加解析

域名绑定

添加主机 @.xxx.com 可以通过 xxx.com 直接访问 绑定成功后,直接输入域名即可访问。

安装 pm2

pm2 是一个带有负载均衡功能的Node应用的进程管理器.

上面我们以 node index.js 启动了项目,当我们退出 Xshell 时,进程就会关闭,无法在访问到项目,而 pm2 就是 解决这种问题的,以 pm2 启动项目后,退出 Xshell 后依然可以正常访问。

// 安装 pm2
[root@izwz9e9bjg74ljcpzr7stvz /]# npm install -g pm2

// 以 -g 全局安装的插件都在 node 安装目录 bin 文件下,
[root@izwz9e9bjg74ljcpzr7stvz bin]# ls
cnpm  node  npm  npx  pm2  pm2-dev  pm2-docker  pm2-runtime

bin 下都是命令语句,为了可以在任何目录都可以使用命令,我们将此文件夹加入环境变量

  1. 查看环境变量 [root@izwz9e9bjg74ljcpzr7stvz ~]# echo $PATH
  2. 永久添加环境变量(影响所有用户)
[root@izwz9e9bjg74ljcpzr7stvz ~]# vim /etc/profile
// 在文档最后,添加:
# node
export NODE_HOME=/root/node-v8.9.1-linux-x64
export PATH=$PATH:$NODE_HOME/bin

保存,退出,然后运行

[root@izwz9e9bjg74ljcpzr7stvz ~]# source /etc/profile

pm2 启动项目

[root@izwz9e9bjg74ljcpzr7stvz ~]# cd /root/project/myblog/server
// 启动进程
[root@izwz9e9bjg74ljcpzr7stvz server]# pm2 start index.js
// 停止进程
[root@izwz9e9bjg74ljcpzr7stvz server]# pm2 stop index.js
// 查看进程
[root@izwz9e9bjg74ljcpzr7stvz server]# pm2 list

刷新页面404

HTML5 History 模式,最后有nginx的配置。

Linux中文乱码 (修改默认编码)

如文件或文件夹含有中文字符时,可能会读取乱码,读取不到文章,需要修改系统默认编码 修改默认编码

Nginx 服务器

上面我们是直接以 node 启动一个服务器,监听 80 端口,这样我们就可以直接以 IP 地址或域名的方式访问,也可以监听其他端口如3000,这样我们就得在地址后加上 : 端口号,显然这样很麻烦,且一般 node 程序基本不监听 80 端口,还可能同时运行几个 node 项目,监听不同的端口,通过二级域名来分别访问。 这里就用到 Nginx 来实现反向代理。(node 利用 node-http-proxy 包也可以实现反向代理,有兴趣自己了解)

Nginx安装

Nginx依赖下面3个包:

  1. SSL功能需要openssl库,下载地址 www.openssl.org/
  2. rewrite模块需要pcre库,下载地址 www.pcre.org/
  3. gzip模块需要zlib库,下载地址 www.zlib.net/
  4. Nginx安装包

进入任意目录下载以上压缩包(版本号改为最新即可):

[root@izwz9e9bjg74ljcpzr7stvz download]# wget http://www.zlib.net/zlib-1.2.11.tar.gz
[root@izwz9e9bjg74ljcpzr7stvz download]# wget https://ftp.pcre.org/pub/pcre/pcre-8.41.tar.gz
[root@izwz9e9bjg74ljcpzr7stvz download]# wget https://www.openssl.org/source/openssl-fips-2.0.16.tar.gz
[root@izwz9e9bjg74ljcpzr7stvz download]# wget http://nginx.org/download/nginx-1.13.7.tar.gz
[root@izwz9e9bjg74ljcpzr7stvz download]# ls
pcre-8.41.tar.gz   zlib-1.2.11.tar.gz
nginx-1.13.7.tar.gz  openssl-fips-2.0.16.tar.gz

解压压缩包:

[root@izwz9e9bjg74ljcpzr7stvz download]# tar zxvf zlib-1.2.11.tar.gz
[root@izwz9e9bjg74ljcpzr7stvz download]# tar tar zxvf pcre-8.41.tar.gz
[root@izwz9e9bjg74ljcpzr7stvz download]# tar zxvf openssl-fips-2.0.16.tar.gz
[root@izwz9e9bjg74ljcpzr7stvz download]# tar zxvf nginx-1.13.7.tar.gz

先安装3个依赖包,分别进入各自解压目录

// 看清各个目录下的是 configure 还是 config
[root@izwz9e9bjg74ljcpzr7stvz zlib-1.2.11]# ./configuer && make && make install
[root@izwz9e9bjg74ljcpzr7stvz pcre-8.41]# ./configuer && make && make install
[root@izwz9e9bjg74ljcpzr7stvz openssl-fips-2.0.16]# ./config && make && make install
[root@izwz9e9bjg74ljcpzr7stvz nginx-1.13.7]# ./configure --with-pcre=../pcre-8.41/ --with-zlib=../zlib-1.2.11/ --with-openssl=../openssl-fips-2.0.16/
[root@izwz9e9bjg74ljcpzr7stvz nginx-1.13.7]# make && make install

安装 C++ 编译环境 (上面安装过程中如若有报错,可以看看是不是因为没有安装这个,可提前安装)

yum install gcc-c++

运行Nginx

安装好的Nginx路径在 /usr/local/nginx

[root@izwz9e9bjg74ljcpzr7stvz ~]# cd /usr/local/nginx
[root@izwz9e9bjg74ljcpzr7stvz nginx]# ls
client_body_temp  conf  fastcgi_temp  html  logs  nginx.conf  proxy_temp  sbin  scgi_temp  uwsgi_temp

配置文件路径:

/usr/local/nginx/conf/nginx.conf

运行Nginx:

[root@izwz9e9bjg74ljcpzr7stvz ~]# cd /usr/local/nginx/sbin
[root@izwz9e9bjg74ljcpzr7stvz sbin]# ./nginx
// 查看是否运行成功
[root@izwz9e9bjg74ljcpzr7stvz sbin]# netstat -ntlp
Active Internet connections (only servers)
Proto Recv-Q Send-Q Local Address           Foreign Address         State       PID/Program name
tcp        0      0 0.0.0.0:80              0.0.0.0:*               LISTEN      3525/nginx: master

浏览器输入 IP 地址或域名即可见到欢迎页面。

使用server命令启动nginx服务

现在nginx启动、关闭比较麻烦,关闭要找到PID号,然后杀死进程,启动要进入到 /usr/local/nginx/sbin 目录下使用命令,为此我们通过设置System V脚本来使用server命令启动、关闭、重启nginx服务。

  1. 在 /etc/init.d 目录下创建nginx启动脚本文件
    [root@izwz9e9bjg74ljcpzr7stvz ~]# cd /etc/init.d
    [root@izwz9e9bjg74ljcpzr7stvz init.d]# vim nginx
    
  2. 将以下代码复制粘贴进去,然后保存。 注意 NGINX_BIN、CONFIGFILE、PIDFILE 三个目录要对应好,默认是对应好的。在网上找了好多相关脚本代码,都有很多问题,好像是和 CentOS 版本有关,下面脚本我在 CentOS 7 下使用正常。
    #! /bin/sh
    # chkconfig: 2345 55 25
    # Description: Startup script for nginx webserver on Debian. Place in /etc/init.d and
    # run 'update-rc.d -f nginx defaults', or use the appropriate command on your
    # distro. For CentOS/Redhat run: 'chkconfig --add nginx'
    
    ### BEGIN INIT INFO
    # Provides:          nginx
    # Required-Start:    $all
    # Required-Stop:     $all
    # Default-Start:     2 3 4 5
    # Default-Stop:      0 1 6
    # Short-Description: starts the nginx web server
    # Description:       starts nginx using start-stop-daemon
    ### END INIT INFO
    
    # Author:   licess
    # website:  http://lnmp.org
    
    PATH=/usr/local/sbin:/usr/local/bin:/sbin:/bin:/usr/sbin:/usr/bin
    NAME=nginx
    NGINX_BIN=/usr/local/nginx/sbin/$NAME
    CONFIGFILE=/usr/local/nginx/conf/$NAME.conf
    PIDFILE=/usr/local/nginx/logs/$NAME.pid
    
    case "$1" in
        start)
            echo -n "Starting $NAME... "
    
            if netstat -tnpl | grep -q nginx;then
                echo "$NAME (pid `pidof $NAME`) already running."
                exit 1
            fi
    
            $NGINX_BIN -c $CONFIGFILE
    
            if [ "$?" != 0 ] ; then
                echo " failed"
                exit 1
            else
                echo " done"
            fi
            ;;
    
        stop)
            echo -n "Stoping $NAME... "
    
            if ! netstat -tnpl | grep -q nginx; then
                echo "$NAME is not running."
                exit 1
            fi
    
            $NGINX_BIN -s stop
    
            if [ "$?" != 0 ] ; then
                echo " failed. Use force-quit"
                exit 1
            else
                echo " done"
            fi
            ;;
    
        status)
            if netstat -tnpl | grep -q nginx; then
                PID=`pidof nginx`
                echo "$NAME (pid $PID) is running..."
            else
                echo "$NAME is stopped"
                exit 0
            fi
            ;;
    
        force-quit)
            echo -n "Terminating $NAME... "
    
            if ! netstat -tnpl | grep -q nginx; then
                echo "$NAME is not running."
                exit 1
            fi
    
            kill `pidof $NAME`
    
            if [ "$?" != 0 ] ; then
                echo " failed"
                exit 1
            else
                echo " done"
            fi
            ;;
    
        restart)
            $0 stop
            sleep 1
            $0 start
            ;;
    
        reload)
            echo -n "Reload service $NAME... "
    
            if netstat -tnpl | grep -q nginx; then
                $NGINX_BIN -s reload
                echo " done"
            else
                echo "$NAME is not running, can't reload."
                exit 1
            fi
            ;;
    
        configtest)
            echo -n "Test $NAME configure files... "
    
            $NGINX_BIN -t
            ;;
    
        *)
            echo "Usage: $0 {start|stop|force-quit|restart|reload|status|configtest}"
            exit 1
            ;;
    
    esac
    
  3. 修改脚本权限
    chmod a+x /etc/init.d/nginx
    
  4. 注册成服务
    chkconfig --add nginx
    
  5. 设置开机启动
    chkconfig nginx on
    

这样就可以在任意目录通过service启动、关闭nginx

[root@izwz9e9bjg74ljcpzr7stvz ~]# service nginx start
[root@izwz9e9bjg74ljcpzr7stvz ~]# service nginx stop
[root@izwz9e9bjg74ljcpzr7stvz ~]# service nginx restart

配置nginx.conf反向代理多个node项目

  1. 启动多个node项目,分别监听不同端口,如
    • 项目1,监听端口3000,为博客项目,域名访问 www.cl8023.com 或 cl8023.com
    • 项目2,监听端口8023,为游戏项目,域名访问 game.cl8023.com
  2. 在阿里云服务区控制台开放端口3000和8023,(80端口是必须的,nginx监听)
  3. 绑定二级域名 game.cl8023.com,添加域名解析
    • 记录类型:A
    • 主机记录:game
    • 解析线路:默认
    • 记录纸:IP地址
    • TTL至:10分钟(默认)
  4. 修改nginx配置
    进入目录 /usr/local/nginx/conf 修改配置文件nginx.conf
    [root@izwz9e9bjg74ljcpzr7stvz ~]# cd /usr/local/nginx/conf
    [root@izwz9e9bjg74ljcpzr7stvz conf]# ls
    fastcgi.conf          fastcgi_params          koi-utf  mime.types          nginx.conf          scgi_params          uwsgi_params          win-utf
    fastcgi.conf.default  fastcgi_params.default  koi-win  mime.types.default  nginx.conf.default  scgi_params.default  uwsgi_params.default
    [root@izwz9e9bjg74ljcpzr7stvz conf]# vim nginx.conf
    // server 内容替换为
        server {
            listen 80;
            server_name game.cl8023.com;
            location / {
                proxy_set_header   Host      $http_host;
                proxy_pass         http://127.0.0.1:8023;
                proxy_redirect     off;
                proxy_set_header   X-Real-IP       $remote_addr;
                proxy_set_header   X-Forwarded-For $proxy_add_x_forwarded_for;
            }
        }
    
        server {
            listen 80;
            server_name cl8023.com www.cl8023.com;
            # 解决刷新404的问题
            location /blog {
                try_files $uri $uri/ /index.html;
            }
            location / {
                proxy_set_header   Host      $http_host;
                proxy_pass         http://127.0.0.1:3000;
                proxy_redirect     off;
                proxy_set_header   X-Real-IP       $remote_addr;
                proxy_set_header   X-Forwarded-For $proxy_add_x_forwarded_for;
            }
        }
    
    若只配置一个server,game.cl8023.com、cl8023.com、www.cl8023.com 都将可以访问到这个端口。想要反响代理更多端口,可再增加server,也可以将server单独出来为一个文件,如game-8023.conf,blog-3000.conf,然后在nginx.conf中引入文件地址即可
    http {
        ......
        include ./vhost/game-8023.conf; 
        include ./vhost/blog-3000.conf;
        ......
    }
    
  5. 重启nginx
    [root@izwz9e9bjg74ljcpzr7stvz ~]# service nginx restart
    

无误的话便可以使用不同的域名访问不同的项目。