

在第一篇中的例子和概念介绍中我们对 Advice 有了一个初步的认知。在Spring AOP中,Advice的作用就是用来描述 Spring AOP 围绕方法调用而注入的切面行为。
本篇文章将从源码的角度来看一看 Advice 到底是什么样的?又是怎么完成通知的?
Advice 接口
package org.aopalliance.aop;

/**
 * Tag interface for Advice. Implementations can be any type
 * of advice, such as Interceptors.
 * @author Rod Johnson
 * @version $Id: Advice.java,v 1.1 2004/03/19 17:02:16 johnsonr Exp $
 */
public interface Advice {

}
Advice 接口的定义是在 org.aopalliance.aop 包下面的;从上面的代码中我们可以知道,Advice 接口并没有提供任何的方法;类似的接口定义还有java 中的如Serializable接口,这类接口一般称之为标识接口;标识接口对实现它的类没有任何的语义要求,仅仅是充当一个标示的作用,用来表明实现它的类属于一个特定的类型(从这种标识性角度来说,和注解其实挺像的);
Spring AOP中通过定义和使用这样一个统一的接口,为的就是能够为切面增强的织入功能做更多的细化和扩展。下面就对常见的三个Advice进行分析。
BeforeAdvice
public interface BeforeAdvice extends Advice {
}
这个接口也是一个标识接口。看下 BeforeAdvice 的继承关系:

MethodBeforeAdvice 是 BeforeAdvice 为待增强的目标方法设置的前置增强接口。
public interface MethodBeforeAdvice extends BeforeAdvice {
    void before(Method method, Object[] args, Object target) throws
    Throwable;
}
MethodBeforeAdvice 中提供了一个回调函数 before(...) ;
作为回调函数,before 方法的实现在 Advice 中被配置到目标方法后,会在调用目标方法时被回调。来看下before方法的几个参数:
- Method method :( method being invoked)这个参数是目标方法的反射对象;
- Object[] args :(arguments to the method)目标方法的输入参数;
- Object target :(target of the method invocation)方法调用的目标
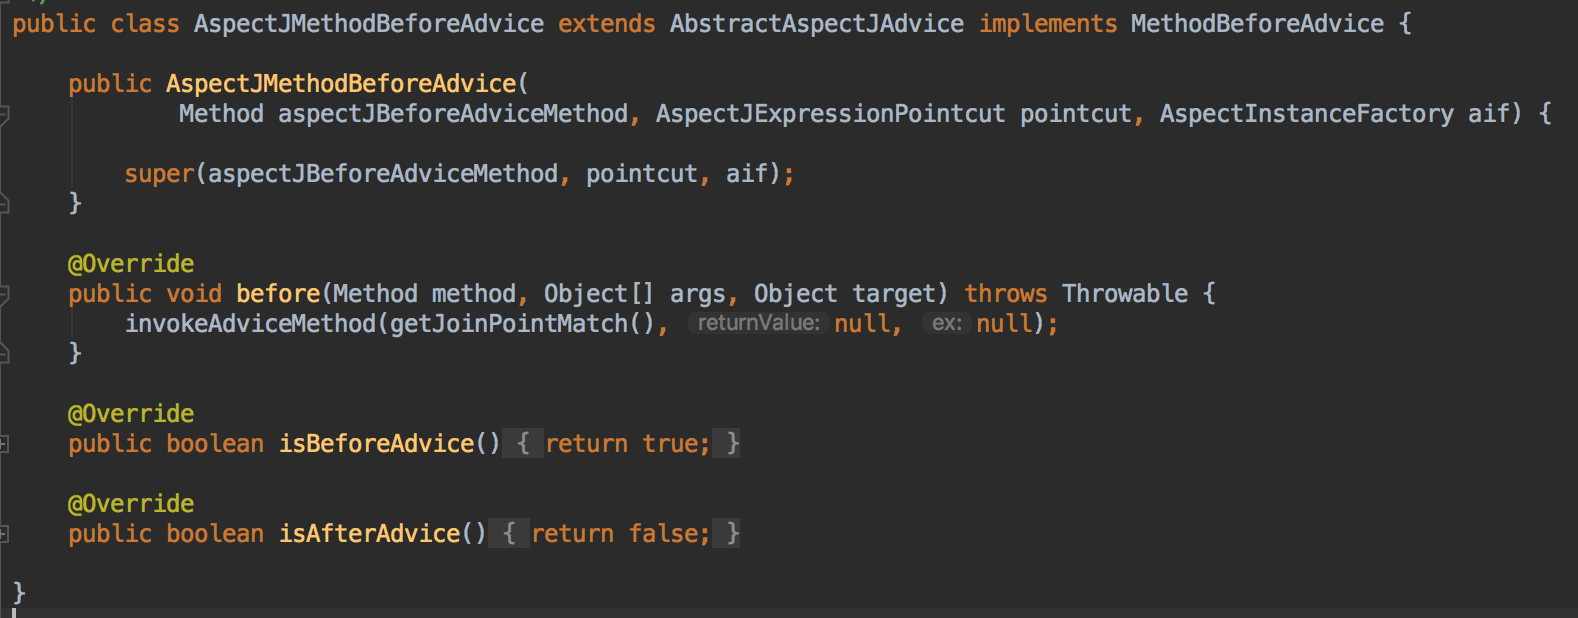
AspectJMethodBeforeAdvice
AspectJMethodBeforeAdvice 继承了 AbstractAspectJAdvice 抽象类,并实现了 MethodBeforeAdvice 接口。从 AspectJMethodBeforeAdvice 类中代码可以得知,AspectJMethodBeforeAdvice 重写 before 方法的实现是 通过调用父类的 invokeAdviceMethod 方法完成的。也就是说Spring AOP 的Advice包装了AspectJ的before方法。
Spring AOP的实现后面再说,我们先自己来实现一个简单的通知。
自定义 Advice实现 MethodBeforeAdvice
定义我们自己的 GlmapperBeforeMethodAdvice ;这里实现 MethodBeforeAdvice 接口,然后重写 before 这个方法。
/**
 * @description: 自定义的 GlmapperBeforeMethodAdvice
 * @email: <a href="glmapper_2018@163.com"></a>
 * @author: glmapper@leishu
 * @date: 18/6/23
 */
public class GlmapperBeforeMethodAdvice implements
MethodBeforeAdvice,MethodInterceptor {

    private static final Logger LOGGER =
    LoggerFactory.getLogger(GlmapperBeforeMethodAdvice.class.getSimpleName());
    @Override
    public void before(Method method, Object[] args, Object target)
    throws Throwable {
        LOGGER.info("invoke BeforeAdvice successfully...");
    }

    @Override
    public Object invoke(MethodInvocation invocation) throws Throwable {
        Object result=invocation.proceed();
        return result;
    }
}
OK,有了这个 GlmapperBeforeMethodAdvice ,再来看看怎么用它;同样本篇文章所使用的案例均使用前一篇博客中的那个脚手架来完成。
<!--我们的目标类-->
<bean id="goodsService"
    class="com.glmapper.framerwork.service.impl.GoodsServiceImpl"/>
<!--我们自定义的Advice-->
<bean id="glmapperBeforeMethodAdvice"
    class="com.glmapper.framerwork.Advice.GlmapperBeforeMethodAdvice">
</bean>

<!-- 声明切入点adviser -->
<bean id="adviser"
    class="org.springframework.aop.support.RegexpMethodPointcutAdvisor">
    <!--这里使用我们自定义的advice-->
	<property name="advice" ref="glmapperBeforeMethodAdvice"></property>
	<!-- pattern指定queryAll方法作为切入点; \. 这个是转义使用-->
	<property name="pattern"
	    value="com\.glmapper\.framerwork\.service\.impl\.GoodsServiceImpl\.queryAll">
	</property>
</bean>

<!-- 定义代理对象 返回实例是目标对象 target属性指定的goodsService对象-->
<bean id="proxyService"
class="org.springframework.aop.framework.ProxyFactoryBean">
	<property name="target">
	    <ref bean="goodsService" />
	</property>

	<!--源码内固定的属性private String[] interceptorNames;  -->
	<property name="interceptorNames">
	    <value>adviser</value>
	</property>
</bean>
客户端部分,通过SpringContextUtil来拿代理对象;
@RequestMapping("/initPage")
public ModelAndView initPage(HttpServletRequest request,
		HttpServletResponse response, ModelAndView view) {
    //获取代理bean
    GoodsService proxyService= (GoodsService) SpringContextUtil.getBean("proxyService");
    //调用
    List<Goods> goods = proxyService.queryAll(10,10);
    view.addObject("goodsList", goods);
    view.setViewName("goodslist");
    return view;
}
日志输出满足我们的期望(如下):

同样的,在GlmapperBeforeMethodAdvice基础上再实现 AfterReturningAdvice 接口,重写afterReturning方法,就能实现后置通知。
@Override
public void afterReturning(Object returnValue, Method method, Object[]
args, Object target) throws Throwable {
    LOGGER.info("invoke AfterAdvice successfully...");
}
这个方式在聊一聊 AOP :表现形式与基础概念中有说道。
Advice 在 Aop 中的实现原理
这里感觉没什么好说的,上面的案例其实就是Spring提供给我们使用的接口。因为MethodBeforeAdvice等都是继承自 AbstractAspectJAdvice 这个抽象类;我们就来看下这个抽象类里面的一些核心逻辑吧。我们按照AspectJMethodBeforeAdvice这里这个类里面before提供的线索来一步步分析。
首先在AspectJMethodBeforeAdvice里before方法中调用的是这个逻辑:
/**
 * Invoke the advice method.
 * @param jpMatch the JoinPointMatch that matched this execution join point
 * @param returnValue the return value from the method execution (may be null)
 * @param ex the exception thrown by the method execution (may be null)
 * @return the invocation result
 * @throws Throwable in case of invocation failure
 */
protected Object invokeAdviceMethod(JoinPointMatch jpMatch, Object
returnValue, Throwable ex) throws Throwable {
	return invokeAdviceMethodWithGivenArgs(argBinding(getJoinPoint(),
	jpMatch, returnValue, ex));
}
这里 argBinding 方法的作用是获取方法执行连接点上的参数,并将一组参数输出给Advice方法。
继续来看invokeAdviceMethodWithGivenArgs这个方法:
protected Object invokeAdviceMethodWithGivenArgs(Object[] args) throws
Throwable {
    //保存一份参数副本
    Object[] actualArgs = args;
    //验证下参数是否不存在
    if (this.aspectJAdviceMethod.getParameterTypes().length == 0) {
    	actualArgs = null;
    }
    try {
        //设置下方法的访问权限
    	ReflectionUtils.makeAccessible(this.aspectJAdviceMethod);
    	// invoke执行;这里先通过aspectInstanceFactory对像拿到我们的目标对象实例,然后再进行invoke调用执行
    	return this.aspectJAdviceMethod.invoke(this.aspectInstanceFactory.getAspectInstance(), actualArgs);
    }
    catch (IllegalArgumentException ex) {
    	throw new AopInvocationException("Mismatch on arguments to advice method [" +
    			this.aspectJAdviceMethod + "]; pointcut expression [" +
    			this.pointcut.getPointcutExpression() + "]", ex);
    }
    catch (InvocationTargetException ex) {
    	throw ex.getTargetException();
    }
}
上面这段代码其实就是通过反射的方式执行了我们的目标方法。我们再回过头来看下我们的目标方法到底在哪里去进行增强的;这里我们通过配置文件来看:
<!-- 代理对象 返回实例是目标对象 target属性指定的AOPservice对象-->
<bean id="proxyService"
class="org.springframework.aop.framework.ProxyFactoryBean">
	<property name="target">
		<ref bean="goodsService" />
	</property>

	<!--源码内固定的属性private String[] interceptorNames;  -->
	<property name="interceptorNames">
		<value>adviser</value>
	</property>
</bean>
代理对象proxyService实现上是ProxyFactoryBean产生的;这里就不在阐述BeanFactory和FactoryBean的区别了。
从上面的配置文件我们可以简单的了解到,代理对象实际上是我们目标对象+adviser共同组成;而在adviser里面又包括了我们的通知。
ProxyFactoryBean继承了FactoryBean,我们知道FactoryBean也是用来生成bean的,但是它生成的bean是通过其getObject方法来获取的。OK,那我们来看下ProxyFactoryBean的getObject方法:
/**
 * Return a proxy. Invoked when clients obtain beans from this factory bean.
 * Create an instance of the AOP proxy to be returned by this factory.
 * The instance will be cached for a singleton, and create on each call to
 * {@code getObject()} for a proxy.
 * @return a fresh AOP proxy reflecting the current state of this factory
 */
@Override
public Object getObject() throws BeansException {
    //初始化Advisor链
    initializeAdvisorChain();
    //如果是单例,则获取单例对象
    if (isSingleton()) {
    	return getSingletonInstance();
    }
    else {
    	if (this.targetName == null) {
    		logger.warn("Using non-singleton proxies with singleton targets is often undesirable. " +
    				"Enable prototype proxies by setting the 'targetName' property.");
    	}
    	return newPrototypeInstance();
    }
}
返回一个代理。当客户端从这个工厂bean获取bean时调用。创建该工厂返回的AOP代理的一个实例。该实例将被缓存为一个单例,并在每次调用时创建。
initializeAdvisorChain:创建 advisor(拦截器)链。每次添加新的 prototype 实例时,源自 BeanFactory 的 Advisor 都将被刷新。通过工厂 API 以编程方式添加的拦截器不受此类更改的影响。(译注);其实就是根据我们配置的interceptorNames来初始化我们的advisor(拦截器)链,用来增强我们的目标调用方法。
下面是getSingletonInstance这个方法:
/**
 * Return the singleton instance of this class's proxy object,
 * lazily creating it if it hasn't been created already.
 * @return the shared singleton proxy
 */
private synchronized Object getSingletonInstance() {
    if (this.singletonInstance == null) {
        //创建目标对象的代理
    	this.targetSource = freshTargetSource();
    	if (this.autodetectInterfaces && getProxiedInterfaces().length == 0 && !isProxyTargetClass()) {
        	// Rely on AOP infrastructure to tell us what interfaces to proxy.
        	//获取目标类
        	Class<?> targetClass = getTargetClass();
        	if (targetClass == null) {
        		throw new FactoryBeanNotInitializedException("Cannot determine target class for proxy");
        	}
        	setInterfaces(ClassUtils.getAllInterfacesForClass(targetClass, this.proxyClassLoader));
    	}
    	// Initialize the shared singleton instance.
    	super.setFrozen(this.freezeProxy);
    	this.singletonInstance = getProxy(createAopProxy());
    }
    return this.singletonInstance;
}
上面代码最核心的是getProxy这个方法,这里方式有两个方式,一个是cglib,另外一种是jdk动态代理:
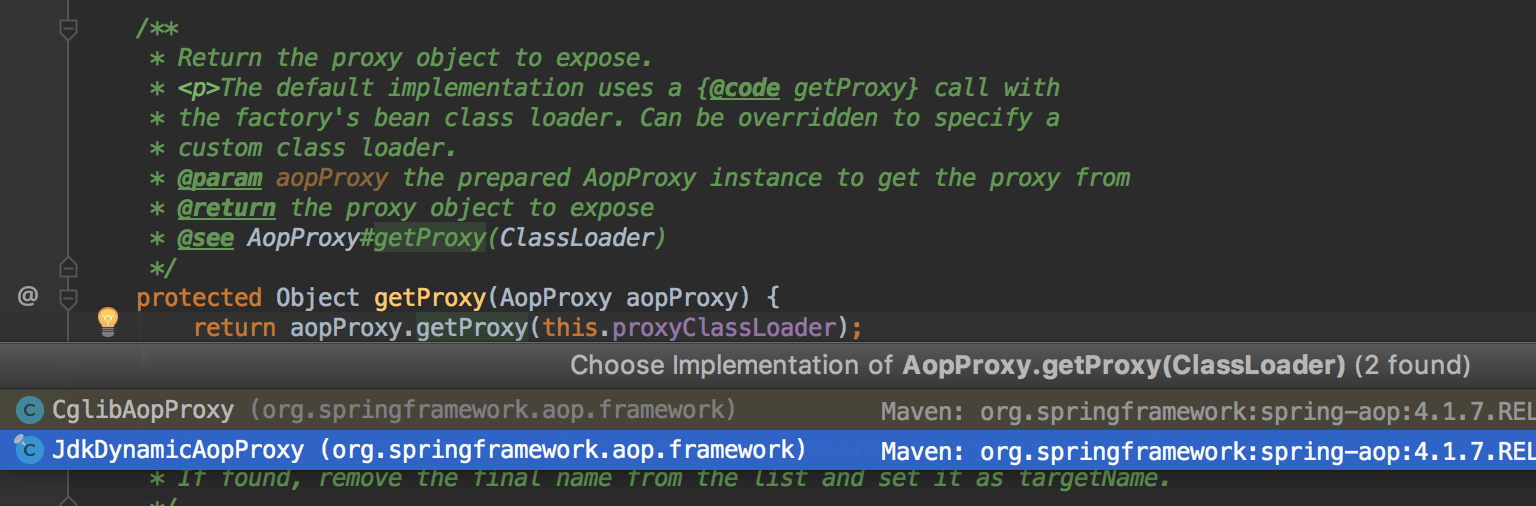
这里我们以默认的动态代理的方式来说:(org.springframework.aop.framework.JdkDynamicAopProxy类中)
@Override
public Object getProxy(ClassLoader classLoader) {
    if (logger.isDebugEnabled()) {
    	logger.debug("Creating JDK dynamic proxy: target source is " +
    	this.advised.getTargetSource());
    }
    Class<?>[] proxiedInterfaces =
    AopProxyUtils.completeProxiedInterfaces(this.advised);
    findDefinedEqualsAndHashCodeMethods(proxiedInterfaces);
    return Proxy.newProxyInstance(classLoader, proxiedInterfaces, this);
}
这个方法返回的就是指定接口的代理类实例,该接口将方法调用分派给指定的调用处理程序。
到此整个AOP代理生成逻辑就完了。
总结一下就是我们的代理类中其实包括了我们AOP增强的那部分逻辑的,这个其实从上面的配置文件中就很清楚的可以看出来;所以从Adivce介个角度来说,它其实会被抱在advisor中,然后在被传递到代理对象中,代理对象除了拥有我们目标对象的能力之外,还包括了Adivce的能力;通过这种方式就实现了增强。
关于Advice就到这里了,下一章会来单独说一下 PointCut 。
