

changelog
2020.04.20 修复若干bugs; 优化部分动画; 优化交互方式。
前言
近日项目有个新需求,需要对视频或音频进行多段裁剪然后拼接。例如,一段视频长30分钟,我需要将5-10分钟、17-22分钟、24-29分钟这三段拼接到一起成一整段视频。裁剪在前端,拼接在后端。
网上简单找了找,基本都是客户端内的工具,没有纯网页的裁剪。既然没有,那就动手写一个。
代码已上传到GitHub
欢迎Star github.com/fengma1992/…
废话不多,下面就来看看怎么设计的。
效果图
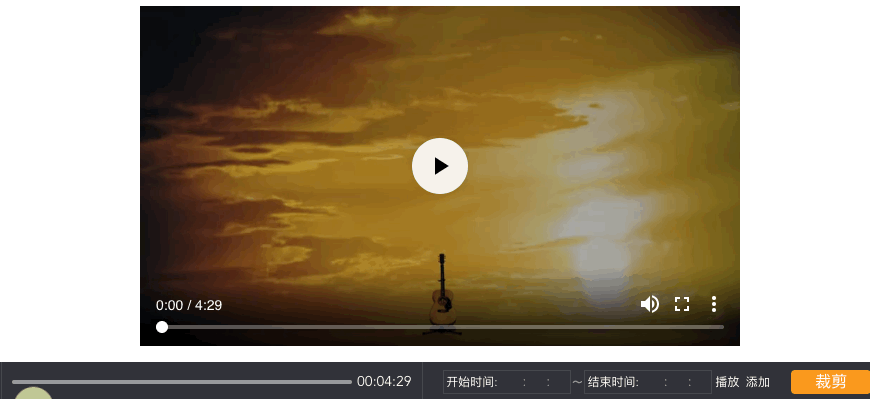
图中底部的功能块为裁剪工具组件,上方的视频为演示用,当然也能是音频。
功能特点:
- 支持鼠标拖拽输入与键盘数字输入两种模式;
- 支持预览播放指定裁剪片段;
- 左侧鼠标输入与右侧键盘输入联动;
- 鼠标移动时自动捕捉高亮拖拽条;
- 确认裁剪时自动去重;
*注:项目中的图标都替换成了文字
思路
整体来看,通过一个数据数组cropItemList来保存用户输入数据,不管是鼠标拖拽还是键盘输入,都来操作cropItemList实现两侧数据联动。最后通过处理cropItemList来输出用户想要的裁剪。
cropItemList结构如下:
cropItemList: [
    {
        startTime: 0, // 开始时间
        endTime: 100, // 结束时间
        startTimeArr: [hoursStr, minutesStr, secondsStr], // 时分秒字符串
        endTimeArr: [hoursStr, minutesStr, secondsStr], // 时分秒字符串
        startTimeIndicatorOffsetX: 0, // 开始时间在左侧拖动区X偏移量
        endTimeIndicatorOffsetX: 100, // 结束时间在左侧拖动区X偏移量
    }
]
第一步
既然是多段裁剪,那么用户得知道裁剪了哪些时间段,这通过右侧的裁剪列表来呈现。
列表
列表存在三个状态:
- 无数据状态

- 有一条数据

- 有多条数据
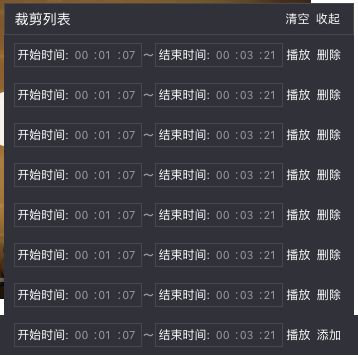
v-for去循环cropItemList,那么就会出现下图的状况:
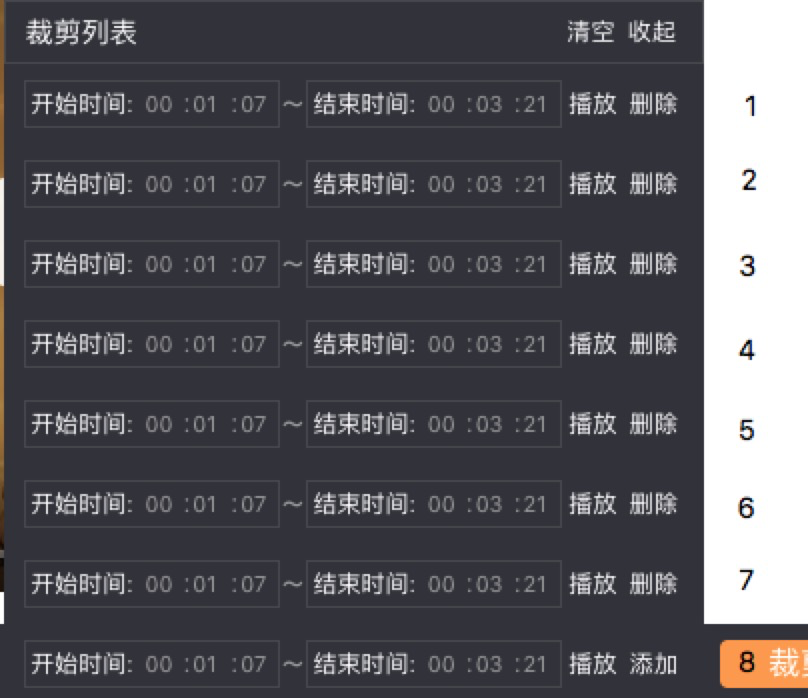
cropItemList逆序生成一个renderList并循环renderList的0 -> listLength - 2条即可。
<template v-for="(item, index) in renderList">
    <div v-if="index < listLength -1"
         :key="index"
         class="crop-time-item">
         ...
         ...
    </div>
</template>
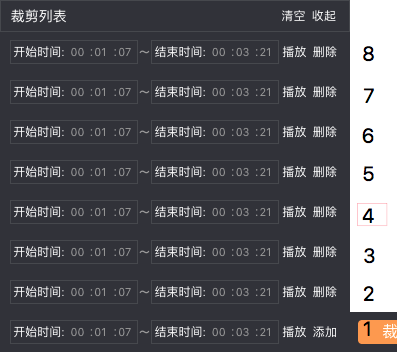
下图为最终效果:
时分秒输入
这个其实就是写三个input框,设type="text"(设成type=number输入框右侧会有上下箭头),然后通过监听input事件来保证输入的正确性并更新数据。监听focus事件来确定是否需要在cropItemList为空时主动添加一条数据。
<div class="time-input">
    <input type="text"
       :value="renderList[listLength -1]
        && renderList[listLength -1].startTimeArr[0]"
       @input="startTimeChange($event, 0, 0)"
       @focus="inputFocus()"/>
    :
    <input type="text"
       :value="renderList[listLength -1]
        && renderList[listLength -1].startTimeArr[1]"
       @input="startTimeChange($event, 0, 1)"
       @focus="inputFocus()"/>
    :
    <input type="text"
       :value="renderList[listLength -1]
        && renderList[listLength -1].startTimeArr[2]"
       @input="startTimeChange($event, 0, 2)"
       @focus="inputFocus()"/>
</div>
播放片段
点击播放按钮时会通过playingItem记录当前播放的片段,然后向上层发出play事件并带上播放起始时间。同样还有pause和stop事件,来控制媒体暂停与停止。
<CropTool :duration="duration"
          :playing="playing"
          :currentPlayingTime="currentTime"
          @play="playVideo"
          @pause="pauseVideo"
          @stop="stopVideo"/>
/**
 * 播放选中片段
 * @param index
 */
playSelectedClip: function (index) {
    if (!this.listLength) {
        console.log('无裁剪片段')
        return
    }
    this.playingItem = this.cropItemList[index]
    this.playingIndex = index
    this.isCropping = false

    this.$emit('play', this.playingItem.startTime || 0)
}
这里控制了开始播放,那么如何让媒体播到裁剪结束时间的时候自动停止呢?
监听媒体的timeupdate事件并实时对比媒体的currentTime与playingItem的endTime,达到的时候就发出pause事件通知媒体暂停。
if (currentTime >= playingItem.endTime) {
    this.pause()
}
至此,键盘输入的裁剪列表基本完成,下面介绍鼠标拖拽输入。
第二步
下面介绍如何通过鼠标点击与拖拽输入。
1、确定鼠标交互逻辑
-
新增裁剪
鼠标在拖拽区点击后,新增一条裁剪数据,开始时间与结束时间均为
mouseup时进度条的时间,并让结束时间戳跟随鼠标移动,进入编辑状态。 -
确认时间戳
编辑状态,鼠标移动时,时间戳根据鼠标在进度条的当前位置来随动,鼠标再次点击后确认当前时间,并终止时间戳跟随鼠标移动。
-
更改时间
非编辑状态,鼠标在进度条上移动时,监听
mousemove事件,在接近任意一条裁剪数据的开始或结束时间戳时高亮当前数据并显示时间戳。鼠标mousedown后选中时间戳并开始拖拽更改时间数据。mouseup后结束更改。
2、确定需要监听的鼠标事件
鼠标在进度条区域需要监听三个事件:mousedown、mousemove、mouseup。
在进度条区存在多种元素,简单可分成三类:
- 鼠标移动时随动的时间戳
- 存在裁剪片段时的开始时间戳、结束时间戳、浅蓝色的时间遮罩
- 进度条本身
首先mousedown和mouseup的监听当然是绑定在进度条本身。
this.timeLineContainer.addEventListener('mousedown', e => {
        const currentCursorOffsetX = e.clientX - containerLeft
        lastMouseDownOffsetX = currentCursorOffsetX
        // 检测是否点到了时间戳
        this.timeIndicatorCheck(currentCursorOffsetX, 'mousedown')
    })

this.timeLineContainer.addEventListener('mouseup', e => {

    // 已经处于裁剪状态时,鼠标抬起,则裁剪状态取消
    if (this.isCropping) {
        this.stopCropping()
        return
    }

    const currentCursorOffsetX = this.getFormattedOffsetX(e.clientX - containerLeft)
    // mousedown与mouseup位置不一致,则不认为是点击,直接返回
    if (Math.abs(currentCursorOffsetX - lastMouseDownOffsetX) > 3) {
        return
    }

    // 更新当前鼠标指向的时间
    this.currentCursorTime = currentCursorOffsetX * this.timeToPixelRatio

    // 鼠标点击新增裁剪片段
    if (!this.isCropping) {
        this.addNewCropItemInSlider()

        // 新操作位置为数组最后一位
        this.startCropping(this.cropItemList.length - 1)
    }
})
mousemove这个,当非编辑状态时,当然是监听进度条来实现时间戳随动鼠标。而当需要选中开始或结束时间戳来进入编辑状态时,我最初设想的是监听时间戳本身,来达到选中时间戳的目的。而实际情况是:当鼠标接近开始或结束时间戳时,一直有一个鼠标随动的时间戳挡在前面,而且因为裁剪片段理论上可以无限增加,那我得监听2*裁剪片段个mousemove。
基于此,只在进度条本身监听mousemove,通过实时比对鼠标位置和时间戳位置来确定是否到了相应位置, 当然得加一个throttle节流。
this.timeLineContainer.addEventListener('mousemove', e => {
    throttle(() => {
        const currentCursorOffsetX = e.clientX - containerLeft
        // mousemove范围检测
        if (currentCursorOffsetX < 0 || currentCursorOffsetX > containerWidth) {
            this.isCursorIn = false
            // 鼠标拖拽状态到达边界直接触发mouseup状态
            if (this.isCropping) {
                this.stopCropping()
                this.timeIndicatorCheck(currentCursorOffsetX < 0 ? 0 : containerWidth, 'mouseup')
            }
            return
        }
        else {
            this.isCursorIn = true
        }

        this.currentCursorTime = currentCursorOffsetX * this.timeToPixelRatio
        this.currentCursorOffsetX = currentCursorOffsetX
        // 时间戳检测
        this.timeIndicatorCheck(currentCursorOffsetX, 'mousemove')
        // 时间戳移动检测
        this.timeIndicatorMove(currentCursorOffsetX)
    }, 10, true)()
})
3、实现拖拽与时间戳随动
首先是时间戳捕获,当mousemove时,将所有裁剪片段遍历,检测鼠标当前位置是否靠近裁剪片段的时间戳,当鼠标位置和时间戳位置相差小于2则认为是靠近(2个像素的范围)。
    /**
     * 检测鼠标是否接近
     * @param x1
     * @param x2
     */
    const isCursorClose = function (x1, x2) {
        return Math.abs(x1 - x2) < 2
    }
检测为true则高亮时间戳及时间戳对应的片段,通过cropItemHoverIndex变量来记录当前鼠标hover的时间戳,
同时,鼠标mousedown可选中hover的时间戳并进行拖动。
下面是时间戳检测和时间戳拖动检测代码
timeIndicatorCheck (currentCursorOffsetX, mouseEvent) {
    // 在裁剪状态,直接返回
    if (this.isCropping) {
        return
    }

    // 鼠标移动,重设hover状态
    this.startTimeIndicatorHoverIndex = -1
    this.endTimeIndicatorHoverIndex = -1
    this.startTimeIndicatorDraggingIndex = -1
    this.endTimeIndicatorDraggingIndex = -1
    this.cropItemHoverIndex = -1

    this.cropItemList.forEach((item, index) => {
        if (currentCursorOffsetX >= item.startTimeIndicatorOffsetX
            && currentCursorOffsetX <= item.endTimeIndicatorOffsetX) {
            this.cropItemHoverIndex = index
        }

        // 默认始末时间戳在一起时优先选中截止时间戳
        if (isCursorClose(item.endTimeIndicatorOffsetX, currentCursorOffsetX)) {
            this.endTimeIndicatorHoverIndex = index
            // 鼠标放下,开始裁剪
            if (mouseEvent === 'mousedown') {
                this.endTimeIndicatorDraggingIndex = index
                this.currentEditingIndex = index
                this.isCropping = true
            }
        } else if (isCursorClose(item.startTimeIndicatorOffsetX, currentCursorOffsetX)) {
            this.startTimeIndicatorHoverIndex = index
            // 鼠标放下,开始裁剪
            if (mouseEvent === 'mousedown') {
                this.startTimeIndicatorDraggingIndex = index
                this.currentEditingIndex = index
                this.isCropping = true
            }
        }
    })
},

timeIndicatorMove (currentCursorOffsetX) {
    // 裁剪状态,随动时间戳
    if (this.isCropping) {
        const currentEditingIndex = this.currentEditingIndex
        const startTimeIndicatorDraggingIndex = this.startTimeIndicatorDraggingIndex
        const endTimeIndicatorDraggingIndex = this.endTimeIndicatorDraggingIndex
        const currentCursorTime = this.currentCursorTime

        let currentItem = this.cropItemList[currentEditingIndex]
        // 操作起始位时间戳
        if (startTimeIndicatorDraggingIndex > -1 && currentItem) {
            // 已到截止位时间戳则直接返回
            if (currentCursorOffsetX > currentItem.endTimeIndicatorOffsetX) {
                return
            }
            currentItem.startTimeIndicatorOffsetX = currentCursorOffsetX
            currentItem.startTime = currentCursorTime
        }

        // 操作截止位时间戳
        if (endTimeIndicatorDraggingIndex > -1 && currentItem) {
            // 已到起始位时间戳则直接返回
            if (currentCursorOffsetX < currentItem.startTimeIndicatorOffsetX) {
                return
            }
            currentItem.endTimeIndicatorOffsetX = currentCursorOffsetX
            currentItem.endTime = currentCursorTime
        }
        this.updateCropItem(currentItem, currentEditingIndex)
    }
}
第三步
裁剪完成后下一步当然是把数据丢给后端啦。
把用户当🍠(#红薯#)
用户使用的时候小手一抖,多点了一下添加按钮,或者有帕金森,怎么都拖不准,就可能会有数据一样或存在重合部分的裁剪片段。那么我们就得过滤掉重复并将存在重合部分的裁剪合成一段。
还是直接看代码方便
/**
 * cropItemList排序并去重
 */
cleanCropItemList () {
    let cropItemList = this.cropItemList

    // 1. 依据startTime由小到大排序
    cropItemList = cropItemList.sort(function (item1, item2) {
        return item1.startTime - item2.startTime
    })

    let tempCropItemList = []
    let startTime = cropItemList[0].startTime
    let endTime = cropItemList[0].endTime
    const lastIndex = cropItemList.length - 1

    // 遍历,删除重复片段
    cropItemList.forEach((item, index) => {
        // 遍历到最后一项,直接写入
        if (lastIndex === index) {
            tempCropItemList.push({
                startTime: startTime,
                endTime: endTime,
                startTimeArr: formatTime.getFormatTimeArr(startTime),
                endTimeArr: formatTime.getFormatTimeArr(endTime),
            })
            return
        }
        // currentItem片段包含item
        if (item.endTime <= endTime && item.startTime >= startTime) {
            return
        }
        // currentItem片段与item有重叠
        if (item.startTime <= endTime && item.endTime >= endTime) {
            endTime = item.endTime
            return
        }
        // currentItem片段与item无重叠,向列表添加一项,更新记录参数
        if (item.startTime > endTime) {
            tempCropItemList.push({
                startTime: startTime,
                endTime: endTime,
                startTimeArr: formatTime.getFormatTimeArr(startTime),
                endTimeArr: formatTime.getFormatTimeArr(endTime),
            })
            // 标志量移到当前item
            startTime = item.startTime
            endTime = item.endTime
        }
    })

    return tempCropItemList
}
第四步
使用裁剪工具: 通过props及emit事件实现媒体与裁剪工具之间的通信。
<template>
    <div id="app">
        <video ref="video" src="https://pan.prprpr.me/?/dplayer/hikarunara.mp4"
        controls
        width="600px">
        </video>
        <CropTool :duration="duration"
                  :playing="playing"
                  :currentPlayingTime="currentTime"
                  @play="playVideo"
                  @pause="pauseVideo"
                  @stop="stopVideo"/>
    </div>
</template>

<script>
    import CropTool from './components/CropTool.vue'

    export default {
        name: 'app',
        components: {
            CropTool,
        },
        data () {
            return {
                duration: 0,
                playing: false,
                currentTime: 0,
            }
        },
        mounted () {
            const videoElement = this.$refs.video
            videoElement.ondurationchange = () => {
                this.duration = videoElement.duration
            }
            videoElement.onplaying = () => {
                this.playing = true
            }
            videoElement.onpause = () => {
                this.playing = false
            }
            videoElement.ontimeupdate = () => {
                this.currentTime = videoElement.currentTime
            }
        },
        methods: {
            seekVideo (seekTime) {
                this.$refs.video.currentTime = seekTime
            },
            playVideo (time) {
                this.seekVideo(time)
                this.$refs.video.play()
            },
            pauseVideo () {
                this.$refs.video.pause()
            },
            stopVideo () {
                this.$refs.video.pause()
                this.$refs.video.currentTime = 0
            },
        },
    }
</script>
总结
写博客比写代码难多了,感觉很混乱的写完了这个博客。
几个小细节
列表增删时的高度动画

UI提了个需求,最多展示10条裁剪片段,超过了之后就滚动,还得有增删动画。本来以为直接设个max-height完事,结果发现
CSS的transition动画只有针对绝对值的height有效,这就有点小麻烦,因为裁剪条数是变化的,那么高度也是在变化的。设绝对值该怎么办呢。。。
这里通过HTML中tag的attribute属性data-count来告诉CSS我现在有几条裁剪,然后让CSS根据data-count来设置列表高度。
<!--超过10条数据也只传10,让列表滚动-->
<div
    class="crop-time-body"
    :data-count="listLength > 10 ? 10 : listLength -1">
</div>
.crop-time-body {
    overflow-y: auto;
    overflow-x: hidden;
    transition: height .5s;

    &[data-count="0"] {
        height: 0;
    }

    &[data-count="1"] {
        height: 40px;
    }

    &[data-count="2"] {
        height: 80px;
    }

    ...
    ...

    &[data-count="10"] {
        height: 380px;
    }
}
mousemove时事件的currentTarget问题
因为存在DOM事件的捕获与冒泡,而进度条上面可能有别的如时间戳、裁剪片段等元素,mousemove事件的currentTarget可能会变,导致取鼠标距离进度条最左侧的offsetX可能有问题;而如果通过检测currentTarget是否为进度条也存在问题,因为鼠标移动的时候一直有个时间戳在随动,导致偶尔一段时间都触发不了进度条对应的mousemove事件。
解决办法就是,页面加载完成后取得进度条最左侧距页面最左侧的距离,mousemove事件不取offsetX,转而取基于页面最左侧的clientX,然后两者相减就得到了鼠标距离进度条最左侧的像素值。代码在上文中的添加mousemove监听里已写。
时间格式化
因为裁剪工具很多地方需要将秒转换为00:00:00格式的字符串,因此写了一个工具函数:输入秒,输出一个包含dd,HH,mm,ss四个key的Object,每个key为长度为2的字符串。用ES8的String.prototype.padStart()方法实现。
export default function (seconds) {
    const date = new Date(seconds * 1000);
    return {
        days: String(date.getUTCDate() - 1).padStart(2, '0'),
        hours: String(date.getUTCHours()).padStart(2, '0'),
        minutes: String(date.getUTCMinutes()).padStart(2, '0'),
        seconds: String(date.getUTCSeconds()).padStart(2, '0')
    };

}
欢迎斧正
GitHub:github.com/fengma1992/…
