

需求
在之前做的 WEB 单页应用在切换效果上有些生硬,而且页面的缓存和更新在体验上达不到预期的效果。虽然 vue 的 keep-alive 能达到将组件进行缓存,但是在做一些特殊的需求的时候,如把新打开的页面(组件)进行缓存,当点击返回的时候就将该缓存的页面(组件)进行销毁,就像模拟 App 中体验的效果一样,而且在类似于打开商品详情的时候是使用的同一个组件,不同的路由。并且在商品详情中继续打开商品详情。在一般的路由配置和组件复用的貌似达不到这种效果。而且也不可能将所有的详情页路由进行配置。
几个问题。
要实现这么一个需求就遇到了以下几个问题。
- 模拟 app 切换的效果。
- 组件复用动态前端路由。
- 页面(组件)按需求进行缓存和销毁。
- 缓存的页面(组件)进行数据更新。
- 浏览器前进后退按钮对前端路由的影响。
- 手机端滑动手势对前端路由的影响。
最终还是差不多实现了这个效果,虽然不是很完善。
主要是基于 vue vue-router
直接使用的 vue-cli 进行示例文件构建
这插件是 【控制切换效果】 和 【按需缓存页面】 以及 【动态路由管理】 功能
具体需要实现完整的效果还需要参考示例配置文件
插件地址: vue-app-effect
示例配置: Examples
示例演示: Demo
这里就不放效果图了直接扫二维码真实体验 微信演示:
如果觉得有用的话,记得点个 Star 。

配置指南
安装插件
$ npm install vue-app-effect -S
配置插件
vue 入口文件 main.js 配置插件后 就会附加一个 vnode-cache 缓存组件,用法和 keep-alive 一样。
另外还会在 window 对象上挂上一个 $VueAppEffect 对象,用于存储操作路由的一些记录。
import VnodeCache from 'vue-app-effect'                         // 引入插件
import router from './router'                                   // 必须要有 router

Vue.use(VnodeCache, {
  router,
  tabbar: ['/tabbar1', '/tabbar2', '/tabbar3', '/tabbar4'],     // 导航路由
  common: '/common'                                             // 公共页面路由
})
路由配置
vue 路由文件 router.js
// tabBar 容器
import TabCon from '@/Components/TabCon/index'
Vue.use(Router)
// 按需配置,动态路由不需要配置入路由组
export default new Router({
  routes: [{
    path: '/',
    component: TabCon,
    redirect: '/tabbar1',
    children: [ {
      path: '/tabbar1',
      name: '/tabbar1',
      component: Movie
    }, {
      path: '/tabbar2',
      name: '/tabbar2',
      component: Singer
    }, {
      path: '/tabbar3',
      name: '/tabbar3',
      component: Rank
    }, {
      path: '/tabbar4',
      name: '/tabbar4',
      component: Song
    }]
  }, {
    path: '/common',
    name: '/common',
    component: Common
  }]
})
App.vue 配置
动态加载的路由和组件需要有动画效果,而且是按需缓存,页面点击返回后销毁组件,使用插件的缓存组件 vnode-cache
<template>
  <div id="app">
    <transition :name="transitionName" :css="!!direction">
      <vnode-cache>
        <router-view class="router-view"></router-view>
      </vnode-cache>
    </transition>
    <TabBar v-show="isTab"></TabBar>
  </div>
</template>
import TabBar from '@/ComponentsLayout/TabBar/index'
export default {
  name: 'App',              // 每个组件建议带上名字
  components: {
    TabBar
  },
  data () {
    return {
      transitionName: '',   // 切换效果类名
      direction: '',        // 前进还是返回动作
      isTab: true           // 是否显示 tabbar
    }
  },
  created () {
    // 监听前进事件
    this.$direction.on('forward', (direction) => {
      this.transitionName = direction.transitionName
      this.direction = direction.type
      this.isTab = direction.isTab
    })
    // 监听返回事件
    this.$direction.on('reverse', (direction) => {
      this.transitionName = direction.transitionName
      this.direction = direction.type
      this.isTab = direction.isTab
    })
  }
}
TabBar 容器配置
TabBar 里面的页面需要一直被缓存下来,并不在按需缓存的效果中,而且切换也没有滑动效果。这里直接使用 keep-alive
<template>
  <div>
    <keep-alive>
      <router-view class="tab-router-view"></router-view>
    </keep-alive>
  </div>
</template>
复用组件配置
复用组件需要在 router.js 中进行配置
// 需要被复用的组件
import MovieDetail from '@/ComponentsDetails/MovieDetail/index'
import SingerDetail from '@/ComponentsDetails/SingerDetail/index'

// 每个动态注册的路由重复使用的组件
Router.prototype.extends = {
  MovieDetail,
  SingerDetail
}
跳转到动态路由并且加载复用组件时候
methods: {
    goDetailMv (index, name) {  // 传参
      // 创建一个新路由
      let newPath = `/movie/${index}`
      let newRoute = [{
        path: newPath,
        name: newPath,
        component: {extends: this.$router.extends.MovieDetail}
      }]
      // 判断路由是否存在
      let find = this.$router.options.routes.findIndex(item => item.path === newPath)
      // 不存在 添加一个新路由
      if (find === -1) {
        this.$router.options.routes.push(newRoute[0])
        this.$router.addRoutes(newRoute)
      }
      // 然后跳转
      this.$router.replace({
        name: newPath,
        params: { id: index, name: name }
      })
    }
}
路由跳转的方法
这是一个很严肃的问题。关系到整个效果切换在各个浏览器中的切换兼容。
通常 我们都是使用 this.$router.push() 去跳转,这跳转方法会给 浏览器的 history 对象中添加记录,于是浏览器的前进和后退按钮就会生效,会在无意间产生一些错误的路由跳转操作。
最典型的就是 safari 的侧滑前进和返回功能,会影响整个切换的效果,偶尔会导致错乱。
如果不使用 replace 方法而使用 push 的话就会产生 history 历史记录,浏览器的前进后退按钮会生效。
解决方法就是 不使用 this.$router.push() 去做产生浏览器的 history 记录。使用this.$router.replace() 这个方法去跳转,不会给浏览器的 history中添加记录,就不会有上面因为前进后退产生的问题。这样就牺牲了部分浏览器的特性,但是在微信浏览器中就不会显示底部两个前进后退按钮。这也是一种补偿吧,大多数的移动网站在微信浏览器中出现的次数还是比较多的。
当然没有浏览器的后退按钮,那么返回功能就集中在应用中的后退按钮上,以下是使用 this.$router.replace() 推荐的返回按钮写法。
<div class="back-btn">
  <div @click="back"></div>
</div>
methods: {
    back () {
      window.$VueAppEffect.paths.pop()
      this.$router.replace({
        name: window.$VueAppEffect.paths.concat([]).pop()  // 不影响原对象取到要返回的路由
      })
    }
}
在导航器中也推荐使用 replace 方式
<template>
  <div id="tab-bar">
    <div class="container border-half-top">
      <router-link class="bar" :to="'/movie'" replace>  <!--this.$router.replace() 声明式写法 -->
        <div class="button"></div>
      </router-link>
      <router-link class="bar" :to="'/singer'" replace> <!--this.$router.replace() 声明式写法 -->
        <div class="button"></div>
      </router-link>
      <router-link class="bar" :to="'/rank'" replace>   <!--this.$router.replace() 声明式写法 -->
        <div class="button"></div>
      </router-link>
      <router-link class="bar" :to="'/song'" replace>   <!--this.$router.replace() 声明式写法 -->
        <div class="button"></div>
      </router-link>
    </div>
  </div>
</template>
布局结构配置
布局结构直接影响切换效果。
布局结构请参考 示例配置: Examples 中的 css 这里就不写了。
切换效果
可以重新覆盖一下样式,但是类名不能改变
.vue-app-effect-out-enter-active,
.vue-app-effect-out-leave-active,
.vue-app-effect-in-enter-active,
.vue-app-effect-in-leave-active {
  will-change: transform;
  transition: all 500ms cubic-bezier(0.075, 0.82, 0.165, 1) ;
  bottom: 50px;
  top: 0;
  position: absolute;
  backface-visibility: hidden;
  perspective: 1000;
}
.vue-app-effect-out-enter {
  opacity: 0;
  transform: translate3d(-70%, 0, 0);
}
.vue-app-effect-out-leave-active {
  opacity: 0 ;
  transform: translate3d(70%, 0, 0);
}
.vue-app-effect-in-enter {
  opacity: 0;
  transform: translate3d(70%, 0, 0);
}
.vue-app-effect-in-leave-active {
  opacity: 0;
  transform: translate3d(-70%, 0, 0);
}
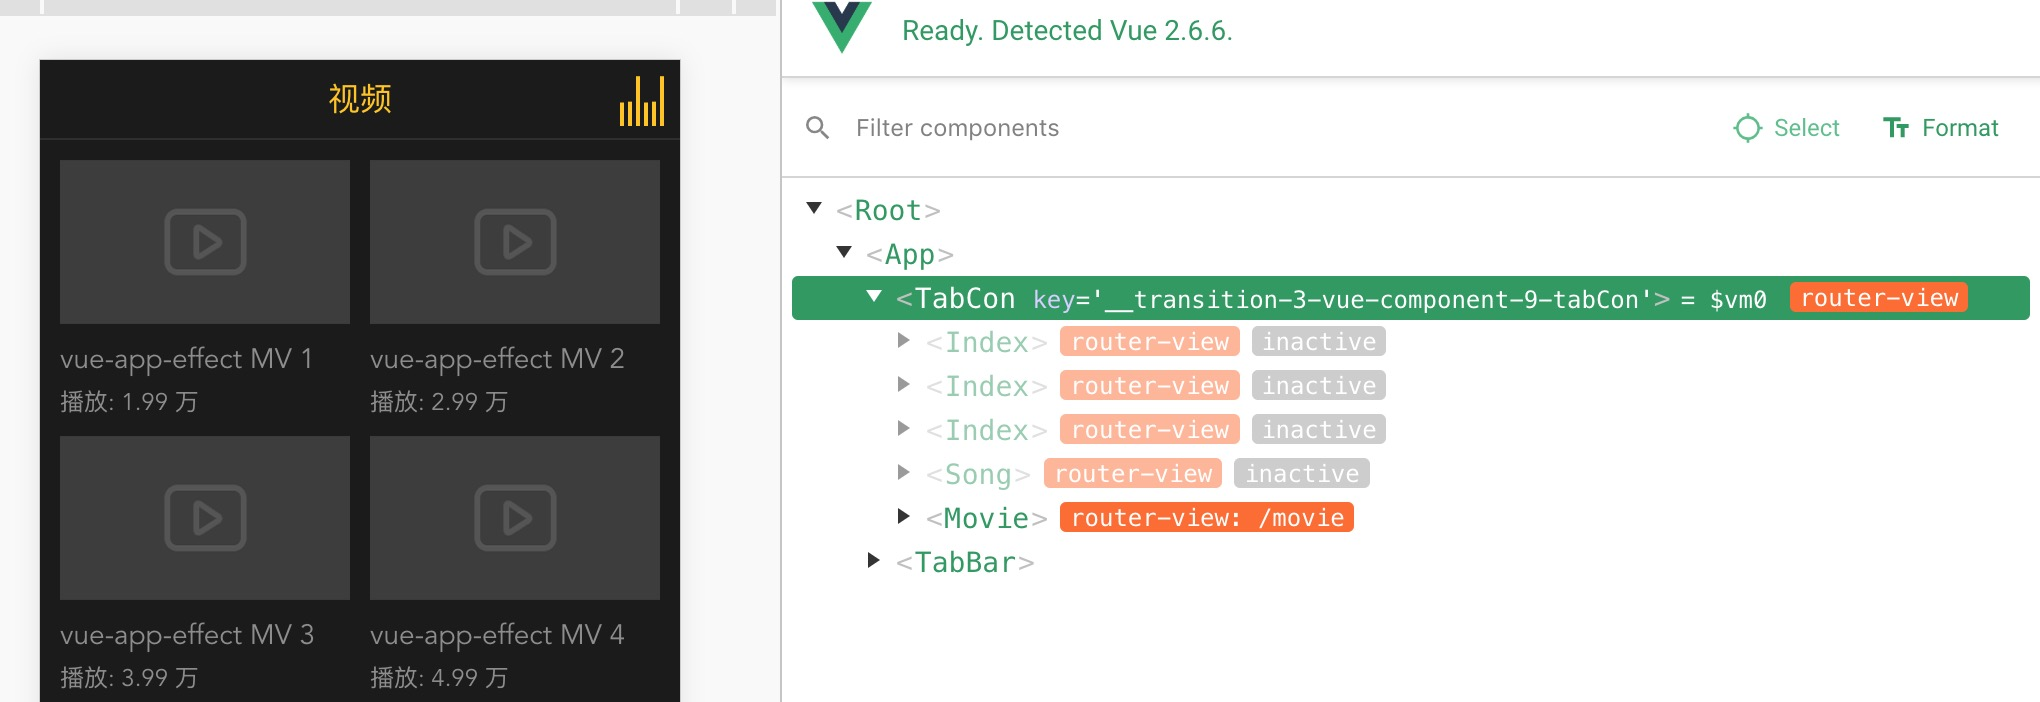
组件带 name 的好处
能在开发工具中有效的显示组件的 name
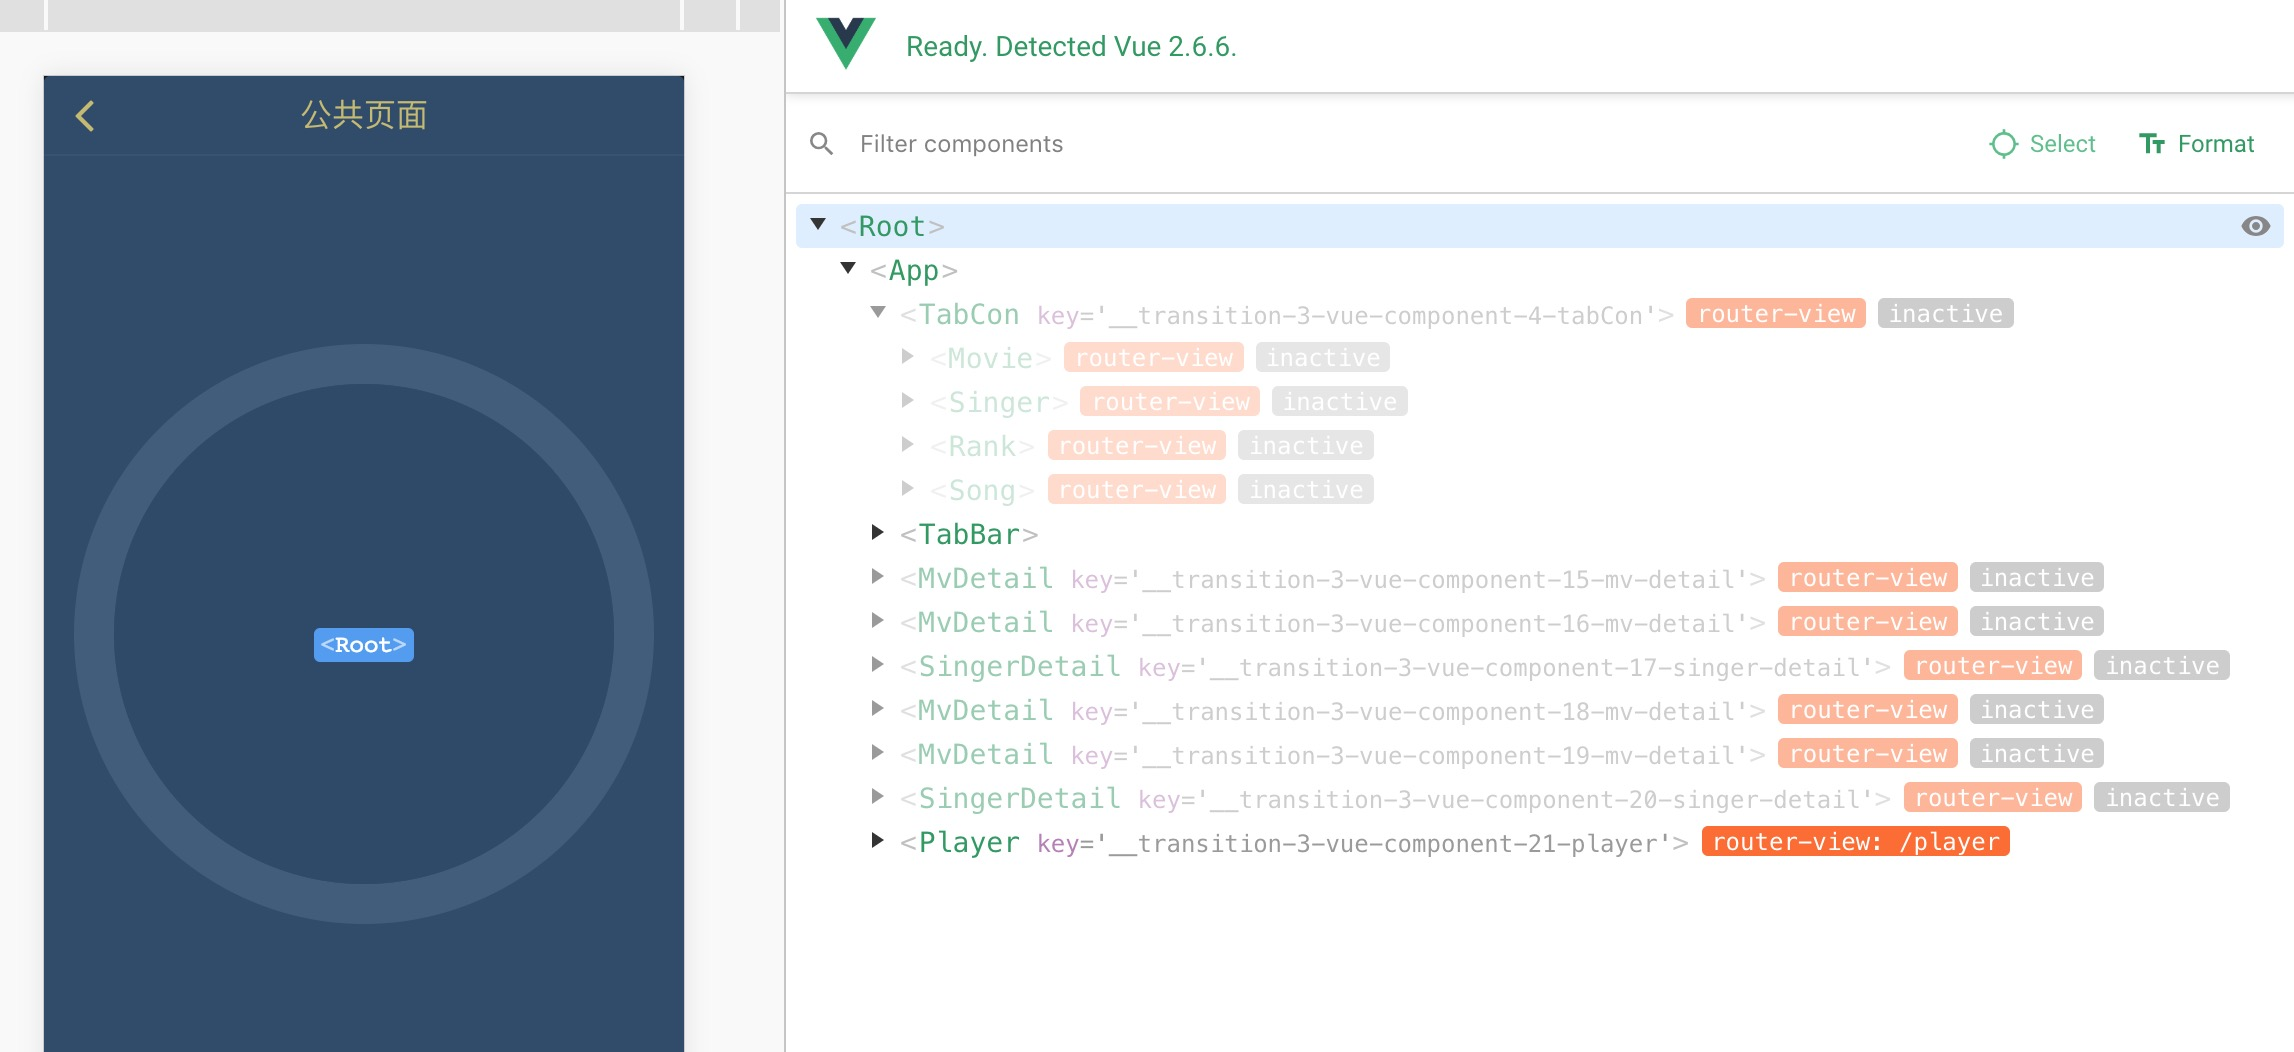
如果没有 name 会显示当前组件的文件名 例如:
├── Movie
│   └── index.vue      // 组件
├── Singer
│   └── index.vue      // 组件
那么在开发工具中都会显示为 Index
以下部分是描述如何实现该效果
实现过程
问题一:需要一个存储器来存储当前加载的路由历史记录
方案:
在 vux 的源码中是通过 在 vuex 的 store 中注册一个模块,然后在 window.sessionStorage 中存储数据记录。在路由守卫 router.beforeEach() router.afterEach() 进行路由前进后退判断, 然后通过 bus 进行事件提交状态来动态的给 <transition> 组件添加一个css的过度效果。
解决: 用store 和 window.sessionStorage 感觉有些麻烦,这里直接采用全局 window 对象在上面挂载一个状态管理的对象 $VueAppEffect 用来存储操作中产生的一些记录。
设计路由存储器
因为程序始终是运行在浏览器中,可以直接在 window 对象上挂载一个对象即可,简单方便。
window.$VueAppEffect = {
  '/movie/23':1,                    // 新增动态路由名称,值为层级
  // '/play':999999,                // 公共组件,层级为最高级。不计入 count 默认无
  'count':1,                        // 新增路由总量
  'paths':['/movie','/movie/23'],   // 给返回按钮使用的路由记录默认会将导航路由的期中一个添加在最前。
}
问题二:需要重新设计一个缓存组件,根据当前状态动态缓存和销毁组件。
解决: 实现一个类似于<keep-alive> 一样功能的组件,该组件会根据操作记录动态的销毁和缓存内容。
抽象组件
这个东西的看起来跟组件一样是一对标签,但是它不会渲染出实际的 dom 常用的有两个<keep-alive> <transition> 内部具体样子大概是这样的
name: '',
abstract: true,
props: {},
data() {
  return {}
},
computed: {},
methods: {},
created () {},
destroyed () {},
render () {}
抽象组件也有生命周期函数 但是没有html部分和css部分,而且有一个render() 方法, 这个方法主要是返回一个处理结果。
VNode基类
关于这个看可以看这篇文章 VNode基类
创建一个抽象组件
将组件单独成一个文件,然后再建立一个index文件
├── src
│   └── index.js            // 入口安装文件
│   └── vnode-cache.js      // 组件文件
先建立 index.js
import VnodeCache from './vnode-cache'
export default {
  install: (Vue, {router, tabbar, common='' } = {}) => {
  // 判断参数的完整性 必须要有 router 和导航路由配置数组
  if (!router || !tabbar) {
    console.error('vue-app-effect need options: router, tabbar')
    return
  }

  // 监听页面主动刷新,主动刷新等于重新载入 app
  window.addEventListener('load', () => {
    router.replace({path: '/'})
  })

  // 创建状态记录对象
  window.$VueAppEffect = {
    'count':0,
    'paths':[]
  }
  // 如果有公共页面再配置
  if(common){
    window.$VueAppEffect[common] = 9999999
  }

  // 利用 bus 进行事件派发和监听
  const bus = new Vue()

  /**
  * 判断当前路由加载执行的方法为 push 还是 replace
  * 根据路由守卫 router.beforeEach() router.afterEach() 进行加载和
  * 销毁组件的判断,并且使用 bus 进行发送加载和销毁组件的事件派发
  * 额外处理触摸事件返回的内容
  **/

  // 挂载 vnode-cache 组件
  Vue.component('vnode-cache', VnodeCache(bus, tabbar))
  Vue.direction = Vue.prototype.$direction = {
    on: (event, callback) => {
      bus.$on(event, callback)
    }
  }
}
然后实现路由守卫监测操作记录(上面/* */ 注释中的部分),判断是否是加载或者返回,并通过 bus 进行事件派发。
// 处理路由当前的执行方法和 ios 侧滑返回事件
let isPush = false
let endTime = Date.now()
let methods = ['push', 'go', 'replace', 'forward', 'back']
document.addEventListener('touchend', () => {
  endTime = Date.now()
})
methods.forEach(key => {
  let method = router[key].bind(router)
  router[key] = function (...args) {
    isPush = true
    method.apply(null, args)
  }
})
// 前进与后退判断
router.beforeEach((to, from, next)=>{
  // 如果是外链直接跳转
  if (/\/http/.test(to.path)) {
    window.location.href = to.path
    return
  }
  // 不是外链的情况下
  let toIndex = Number(window.$VueAppEffect[to.path])       // 得到去的路由层级
  let fromIndex = Number(window.$VueAppEffect[from.path])   // 得到来的路由层级
  fromIndex = fromIndex ? fromIndex : 0
  // 进入新路由 判断是否为 tabBar
  let toIsTabBar = tabbar.findIndex(item => item === to.path)
  // 不是进入 tabBar 路由 --------------------------
  if (toIsTabBar === -1) {
    // 层级大于0 即非导航层级
    if (toIndex > 0) {
      // 判断是不是返回
      if (toIndex > fromIndex) { // 不是返回
        bus.$emit('forward',{
            type:'forward',
            isTab:false,
            transitionName:'vue-app-effect-in'
        })
        window.$VueAppEffect.paths.push(to.path)
      } else {                  // 是返回
        // 判断是否是ios左滑返回
        if (!isPush && (Date.now() - endTime) < 377) {
          bus.$emit('reverse', {
            type:'',
            isTab:false,
            transitionName:'vue-app-effect-out'
          })
        } else {
          bus.$emit('reverse', {
            type:'reverse',
            isTab:false,
            transitionName:'vue-app-effect-out'
          })
        }
      }
    // 是返回
    } else {
      let count = ++ window.$VueAppEffect.count
      window.$VueAppEffect.count = count
      window.$VueAppEffect[to.path] = count
      bus.$emit('forward', {
        type:'forward',
        isTab:false,
        transitionName:'vue-app-effect-in'
      })
      window.$VueAppEffect.paths.push(to.path)
    }
  // 是进入 tabbar 路由 ---------------------------------------
  } else {
    // 先删除当前的 tabbar 路由
    window.$VueAppEffect.paths.pop()
    // 判断是否是ios左滑返回
    if (!isPush && (Date.now() - endTime) < 377) {
      bus.$emit('reverse', {
        type:'',
        isTab:true,
        transitionName:'vue-app-effect-out'
      })
    } else {
      bus.$emit('reverse', {
        type:'reverse',
        isTab:true,
        transitionName:'vue-app-effect-out'
      })
    }
    window.$VueAppEffect.paths.push(to.path)
  }
  next()
})

router.afterEach(function () {
  isPush = false
})

// 挂载 vnode-cache 组件
最后实现 vnode-cache.js 这里主要实现了 根据 bus 派发的事件主动销毁组件。
export default (bus,tabbar) => {
  return {
    name: 'vnode-cache',
    abstract: true,
    props: {},
    data: () {
      return {
        routerLen: 0,       // 当前路由总量
        tabBar: tabbar,     // 导航路由数组
        route: {},          // 需要被监测的路由对象
        to: {},             // 当前跳转的路由
        from: {},           // 上一个路由
        paths: []           // 记录路由操作记录数组
      }
    },
    // 检测路由的变化,记录上一个和当前路由并保存路由的全路径做为标识。
    watch: {
      route (to, from) {
        this.to = to
        this.from = from
        let find = this.tabBar.findIndex(item => item === this.$route.fullPath)
        if (find === -1) {
          this.paths.push(to.fullPath)              // 不是tabbar就保存下来
          this.paths = [...new Set(this.paths)]     // 去重
        }
      }
    },
    // 创建缓存对象集
    created () {
      this.cache = {}
      this.routerLen = this.$router.options.routes.length   // 保存 route 长度
      this.route = this.$route                              // 保存route
      this.to = this.$route                                 // 保存route
      bus.$on('reverse', () => { this.reverse() })          // 监听返回事件并执行对应操作
    },
    // 组件被销毁清除所有缓存
    destroyed () {
      for (const key in this.cache) {
        const vnode = this.cache[key]
        vnode && vnode.componentInstance.$destroy()
      }
    },
    methods: {
      // 返回操作的时候清除上一个路由的组件缓存
      reverse () {
        let beforePath = this.paths.pop()
        let routes = this.$router.options.routes
        // 查询是不是导航路由
        let isTabBar = this.tabBar.findIndex(item => item === this.$route.fullPath)
        // 查询当前路由在路由列表中的位置
        let routerIndex = routes.findIndex(item => item.path === beforePath)
        // 当不是导航路由,并且不是默认配置路由  清除对应历史记录
        if (isTabBar === -1 && routerIndex >= this.routerLen) {
          delete  window.$VueAppEffect[beforePath]
          window.$VueAppEffect.count -= 1
        }
        // 当不是导航的时候 删除上一个缓存
        let key = isTabBar === -1 ? this.$route.fullPath : ''
        if (this.cache[key]) {
          this.cache[beforePath].componentInstance.$destroy()
          delete this.cache[beforePath]
        }
      }
    },
    // 缓存 vnode
    render () {
      this.router = this.$route
      // 得到 vnode
      const vnode = this.$slots.default ? this.$slots.default[0] : null
      // 如果 vnode 存在
      if (vnode) {
        // tabbar判断如果是 直接保存/tab-bar
        let findTo = this.tabBar.findIndex(item => item === this.$route.fullPath)
        let key = findTo === -1 ? this.$route.fullPath : '/tab-bar'
        // 判断是否缓存过了
        if (this.cache[key]) {
          vnode.componentInstance = this.cache[key].componentInstance
        } else {
          this.cache[key] = vnode
        }
        vnode.data.keepAlive = true
      }
      return vnode
    }
  }
}
最后是将 css 效果代码直接打包进了 index.js 文件中,这里偷了个懒,因为代码不是很多,所以只有使用的是 js 动态创建 style 标签的方式
// 插入 transition 效果文件 偷懒不用改打包文件---------------------
const CSS = `
.vue-app-effect-out-enter-active,
.vue-app-effect-out-leave-active,
.vue-app-effect-in-enter-active,
.vue-app-effect-in-leave-active {
  will-change: transform;
  transition: all 500ms cubic-bezier(0.075, 0.82, 0.165, 1) ;
  bottom: 50px;
  top: 0;
  position: absolute;
  backface-visibility: hidden;
  perspective: 1000;
}
.vue-app-effect-out-enter {
  opacity: 0;
  transform: translate3d(-70%, 0, 0);
}
.vue-app-effect-out-leave-active {
  opacity: 0 ;
  transform: translate3d(70%, 0, 0);
}
.vue-app-effect-in-enter {
  opacity: 0;
  transform: translate3d(70%, 0, 0);
}
.vue-app-effect-in-leave-active {
  opacity: 0;
  transform: translate3d(-70%, 0, 0);
}`
let head = document.head || document.getElementsByTagName('head')[0]
let style = document.createElement('style')
style.type = 'text/css'
if (style.styleSheet){
  style.styleSheet.cssText = CSS;
}else {
  style.appendChild(document.createTextNode(CSS))
}
head.appendChild(style)
到这里就结束了 关于浏览器前进后退等方式的处理已经再配置中写出,这里推荐几款窗口滚动插件,更好的配合实现 app 的应用效果,下拉刷新,上拉加载等。
better-scroll 体积比较大,功能比较全,效果还好
总结
这个其实就是利用 路由守卫,和 bus 以及 自定义一个缓存组件进行动态管理路由的配合配置过程,做这个的目的也就是为了提高单页应用的用户体验度,特别是再微信浏览器中,ios 系统下操作 history 历史记录窗口底部会出现两个箭头。切换效果的实现 让单页应用更像 WebApp 。
