

开篇
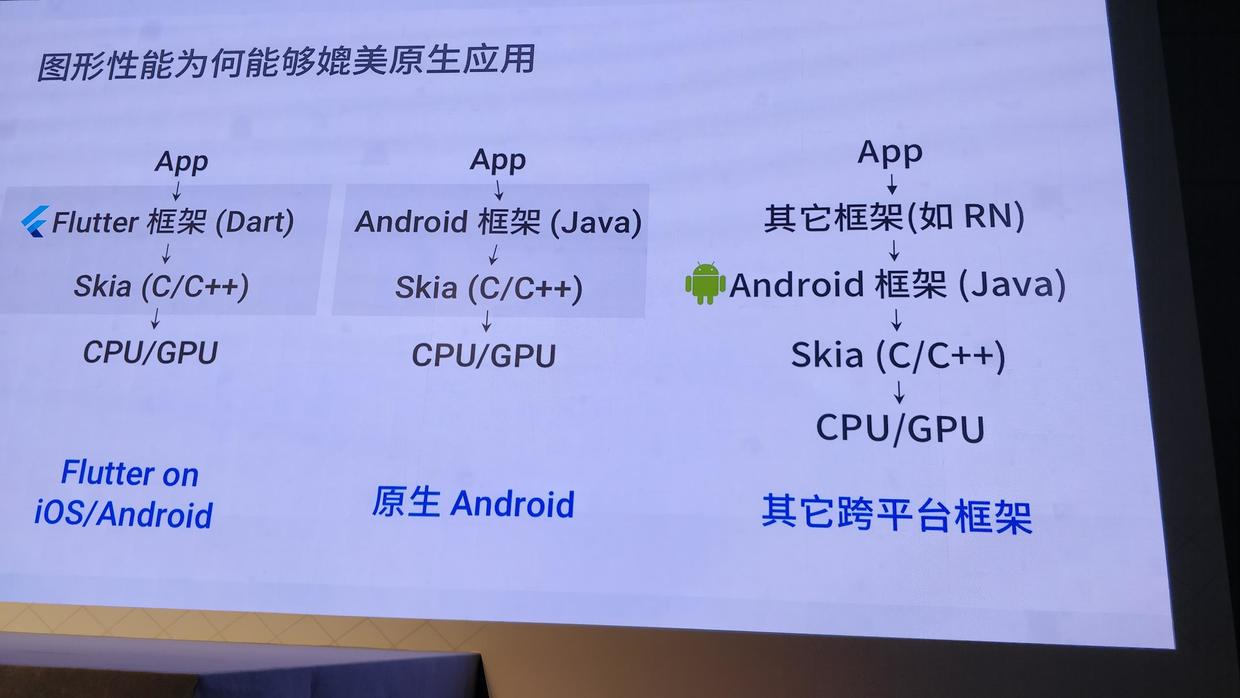
开局一张图,其他全靠_?
目前flutter框架还比较新,又是谷歌家的东西,所以网上的文章基本都是讲安卓和flutter混合开发的,没有iOS和Flutter混合开发的比较详细的步骤实操。
混编的前提是你的电脑必须有flutter环境,不会配的请先谷歌教程配置完后再来查看此混编教程。
正题
因为本文要讲的是iOS,所以正常情况下的环境是macOS + Xcode + flutter环境(v0.8.2-beta);再加上flutter 需要的的dart语言编辑器 Android Studio 、IntelliJ IDEA 或 Visual Studio Code (VS Code) ;因为flutter是多平台,所以也要安装安卓相关的SDK。
本教程是基于flutter环境版本v0.8.2-beta
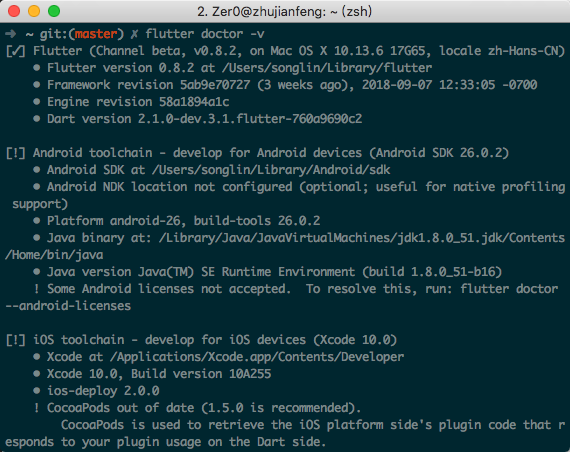
环境配好后,命令行输入:flutter doctor -v , 确保Flutter 、 Android toolchain 、iOS toolchain 、 Connected devices (连接中的设备,这个列表是你打开你Xcode虚拟机或者安卓虚拟机的时候才会有) 都不是[✗]这个符号,则说明你的环境OK了 【也要注意编辑器的flutter环境】
Xcode工程项目配置
Xcode项目的开始
最权威的教程当然是flutter自家的混编wiki,iOS部分我英文理解能力不是很好,实际操作的时候也按照教程操作了一遍,再和网上教程总结了一遍,一路踏坑而出。
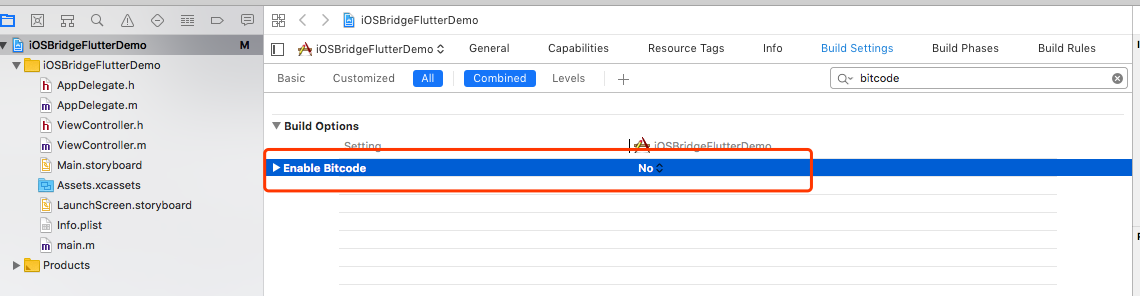
- Flutter混合开发还不支持bit code,所以在iOS工程检查项目并关闭bit code
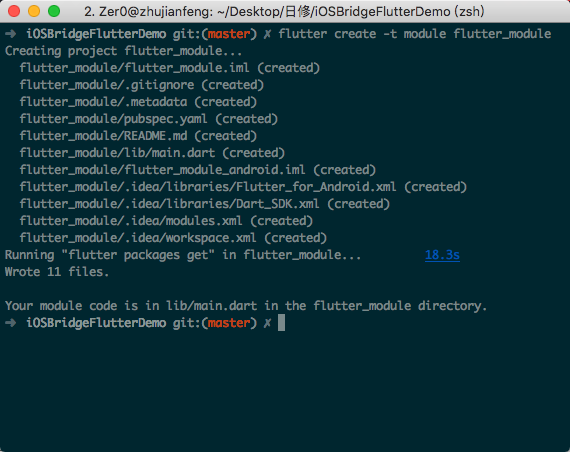
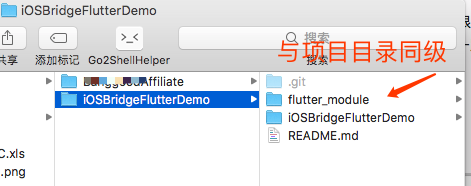
- flutter module创建 (不要耦合近Xcode项目中,最好放到与项目目录同级)
这里因为使用的是flutter环境(v0.8.2-beta),应该也是很新的分支。看网上说明flutter的master才是最新的分支。先用beta创建module,如果创建不成功再切换master分支进行创建
如果创建不成功,请切换master分支试一下;执行
flutter channel master
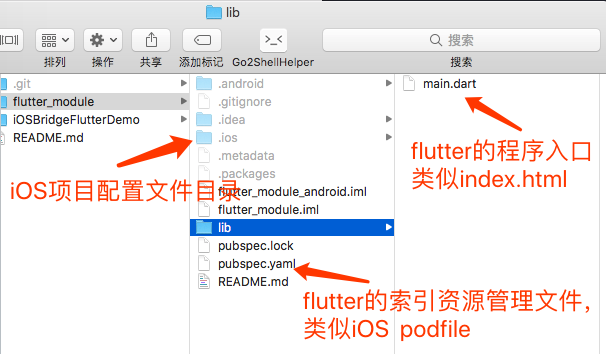
- flutter module 重要文件分析 (部分是隐藏文件,记得查看全部)
-
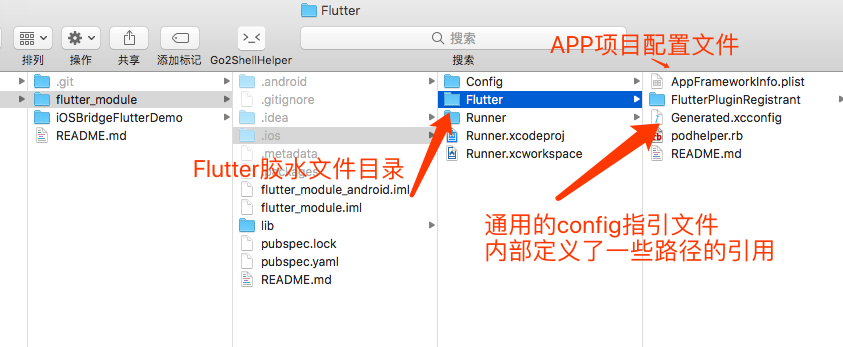
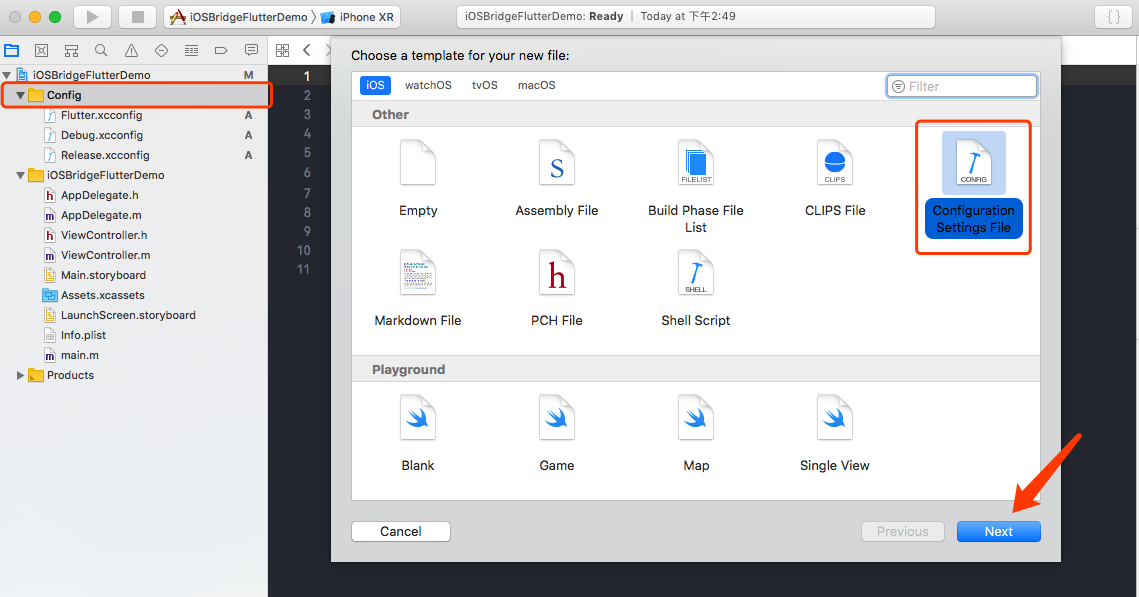
创建Xcode项目中的Config文件,引向flutter module
新建
Config目录,管理Xcode工程的配置衔接文件,分别创建Flutter.xcconfig、Debug.xcconfig、Release.xcconfig三个配置文件;其中Flutter.xcconfig是指向外目录flutter module的Generated.xcconfig文件路径引用文件,其他两个代表Xcode的环境配置文件。
- 三个文件的引入内容 (所引用的都是绝对路径,最终都是指引到
Generated.xcconfig)
In Flutter.xcconfig:
#include "../../flutter_module/.ios/Flutter/Generated.xcconfig"
ENABLE_BITCODE=NO
In Debug.xcconfig:
#include "Flutter.xcconfig"
In Release.xcconfig:
#include "Flutter.xcconfig"
FLUTTER_BUILD_MODE=release
这里有个值得注意的地方,如果你是使用的pod管理你的项目,则
Debug.xcconfig、Release.xcconfig都需要添加一行pod的引用
- Xcode project环境配置选择
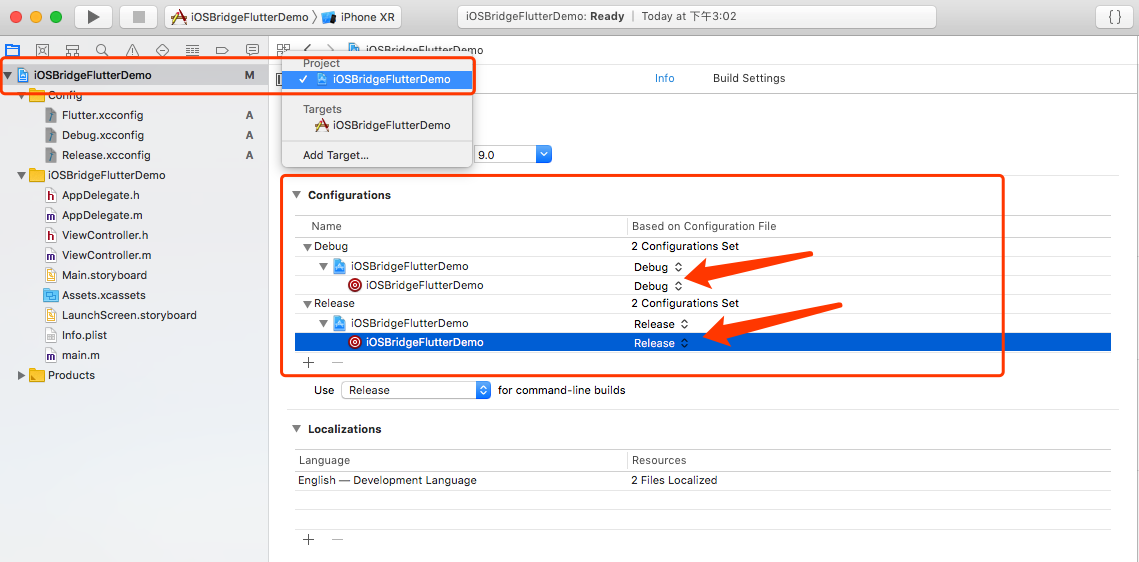
- 最重要: 引入
xcode-backend.sh
在iOS工程里添加运行脚本 "$FLUTTER_ROOT/packages/flutter_tools/bin/xcode_backend.sh" build,并且确保Run Script这一行在"Target dependencies" 或者 "Check Pods Manifest.lock"后面。
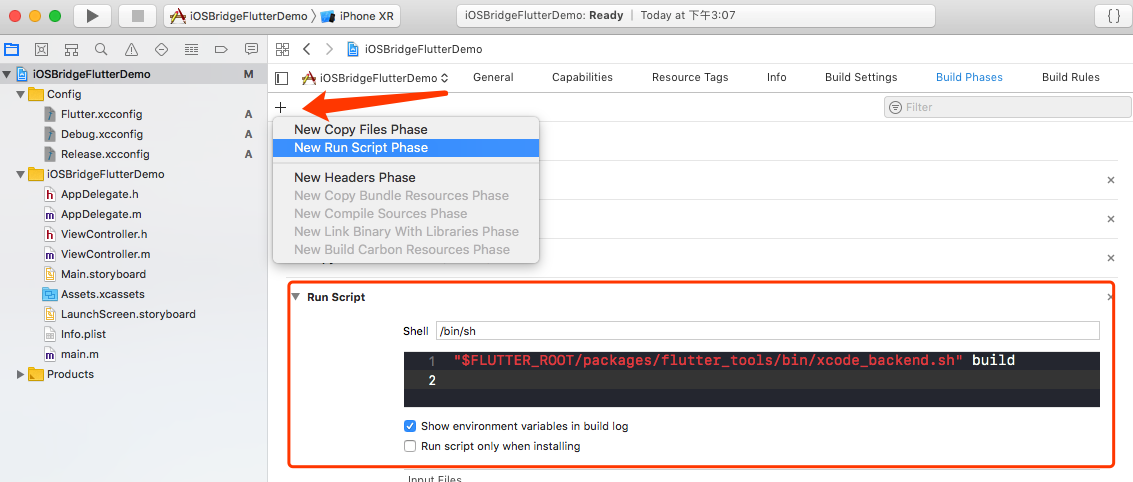
此时点击Xcode的运行,会执行到xcode-backend.sh脚本;此时在iOS工程目录,也会生成一个Flutter文件夹,里面是Flutter工程的产物(这个就是flutter最终与Native交互的产物)
- 添加flutter编译产物
右键项目 - Add Files to 'xxx' 【Options先选Create groups】,选择Flutter目录
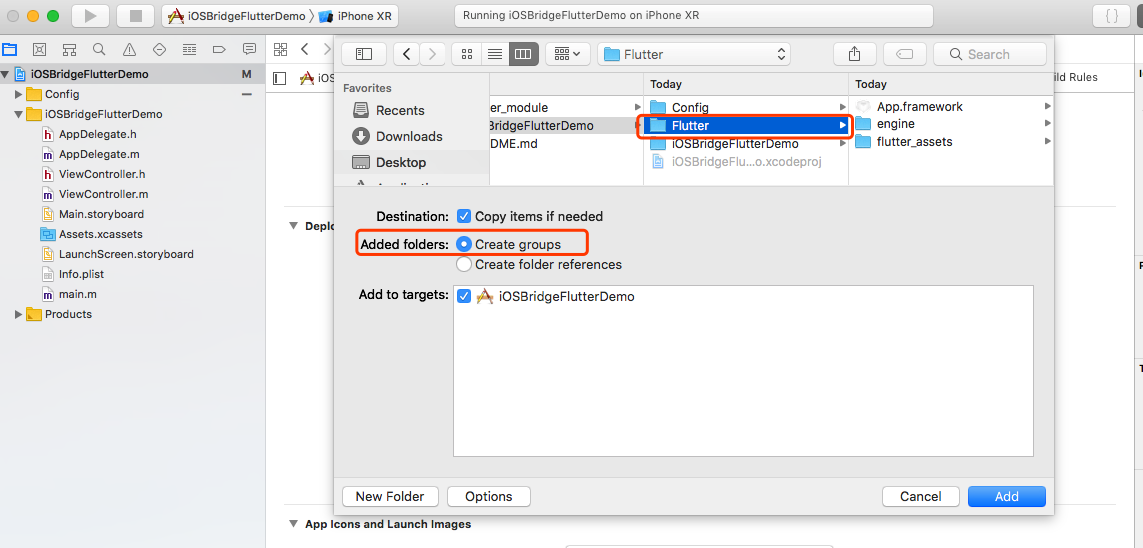
但是flutter_assets 并不能使用Create groups 的方式添加,只能使用Creat folder references 的方式添加进Xcode项目内,否则跳转flutter会页面渲染失败(页面空白)。
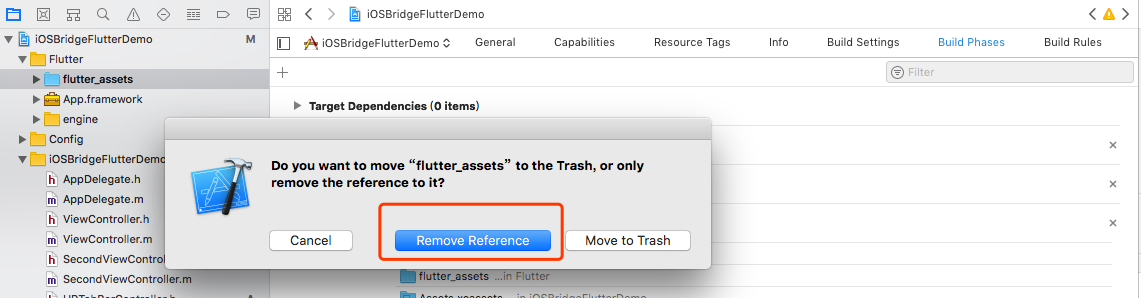
flutter_assets,文件夹再Add Files to 'xxx',选择Creat folder references ;最终如下图
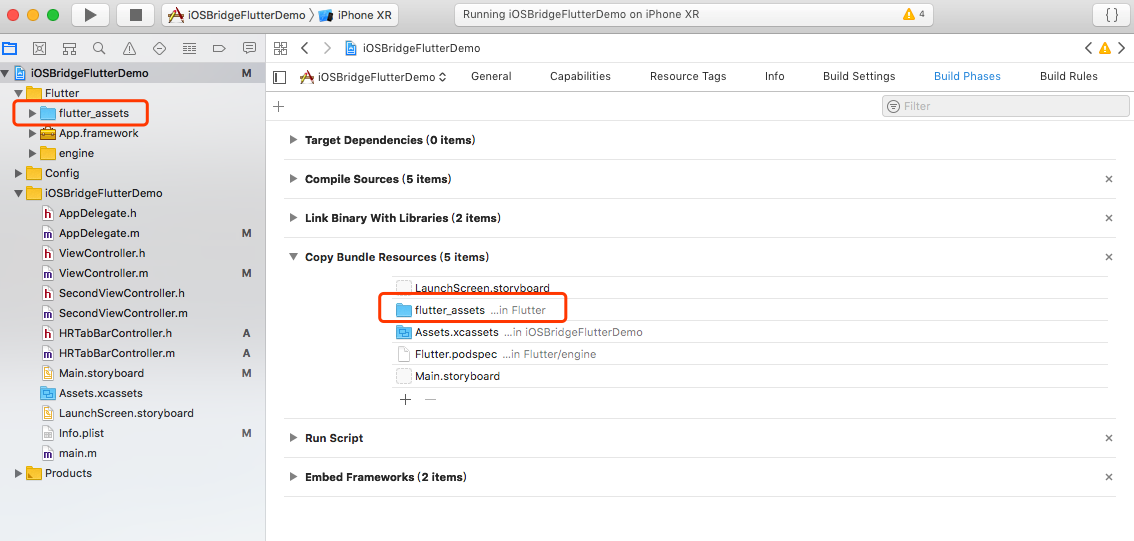
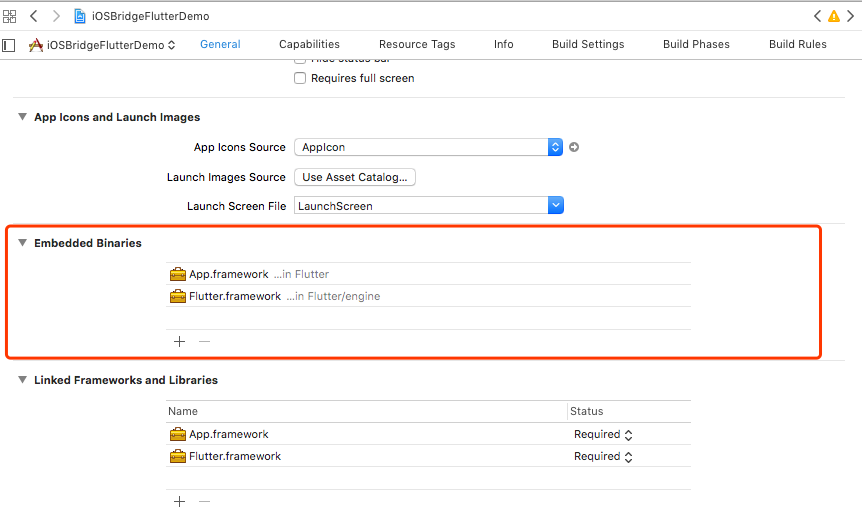
将iOS工程目录下的Flutter文件夹添加到工程,然后确保文件夹下的两个framework添加到Embeded Binaries里
至此,Xcode与Flutter之间混编配置完成,两个项目文件已经关联上了。这时候你就可以修改main.dart 文件内容,重新编译运行Xcode 则APP.framework自动会被编译成最新的flutter代码。
项目中使用pod管理情况
一、旧项目没使用pod管理,混编后又想pod管理
- 1、先删除Xcode工程项目中的Run Script
- 2、
pod init - 3、在生成的pod file文件写你要增加的第三方框架,如
pod 'AFNetworking’ - 4、
pod install - 5、(使用.xcworkspace打开项目)重新配置Run Script
- 6、修改
Debug.xcconfig、Release。xcconfig都需要增加一行pod config文件引用:(自己查看自己的Pods目录文件路径, release就使用.release.xcconfig)
#include "Flutter.xcconfig"
// 下面为pod引入需要增加的一行
#include "Pods/Target Support Files/Pods-iOSBridgeFlutterDemo/Pods-iOSBridgeFlutterDemo.debug.xcconfig"
- 7、项目重新编译,Success
二、如果旧项目已经使用pod管理
- 如果项目ignore Pods文件夹, 则走一方法中的1、4、5、6、7步骤
- 如果项目Pods文件夹存在,则走一方法中的6、7步骤
PS: 每次pod update或者pod install都会报错,因为Run Script的原因,所以每次添加或更新pod都得删除Run Script更新pod再添加回Run Script(1、4、6、7步骤);这些繁琐的操作不知道有没有办法避免,知道的朋友可以回复一下?不吝赐教,谢谢!
Xcode 与 Flutter 交互
AppDelegate 改造
改造AppDelegate.h,使其继承FlutterAppDelegate:
#import <Flutter/Flutter.h>

@interface AppDelegate : FlutterAppDelegate <UIApplicationDelegate, FlutterAppLifeCycleProvider>

@end
改造AppDelegate.m :
#import "AppDelegate.h"

@interface AppDelegate ()

@end

@implementation AppDelegate
{
  FlutterPluginAppLifeCycleDelegate *_lifeCycleDelegate;
}

- (instancetype)init {
    if (self = [super init]) {
        _lifeCycleDelegate = [[FlutterPluginAppLifeCycleDelegate alloc] init];
    }
    return self;
}

- (BOOL)application:(UIApplication*)application
didFinishLaunchingWithOptions:(NSDictionary*)launchOptions {
    return [_lifeCycleDelegate application:application didFinishLaunchingWithOptions:launchOptions];
}

- (void)applicationDidEnterBackground:(UIApplication*)application {
    [_lifeCycleDelegate applicationDidEnterBackground:application];
}

- (void)applicationWillEnterForeground:(UIApplication*)application {
    [_lifeCycleDelegate applicationWillEnterForeground:application];
}

- (void)applicationWillResignActive:(UIApplication*)application {
    [_lifeCycleDelegate applicationWillResignActive:application];
}

- (void)applicationDidBecomeActive:(UIApplication*)application {
    [_lifeCycleDelegate applicationDidBecomeActive:application];
}

- (void)applicationWillTerminate:(UIApplication*)application {
    [_lifeCycleDelegate applicationWillTerminate:application];
}

- (void)application:(UIApplication*)application
didRegisterUserNotificationSettings:(UIUserNotificationSettings*)notificationSettings {
    [_lifeCycleDelegate application:application
didRegisterUserNotificationSettings:notificationSettings];
}

- (void)application:(UIApplication*)application
didRegisterForRemoteNotificationsWithDeviceToken:(NSData*)deviceToken {
    [_lifeCycleDelegate application:application
didRegisterForRemoteNotificationsWithDeviceToken:deviceToken];
}

- (void)application:(UIApplication*)application
didReceiveRemoteNotification:(NSDictionary*)userInfo
fetchCompletionHandler:(void (^)(UIBackgroundFetchResult result))completionHandler {
    [_lifeCycleDelegate application:application
       didReceiveRemoteNotification:userInfo
             fetchCompletionHandler:completionHandler];
}

- (BOOL)application:(UIApplication*)application
            openURL:(NSURL*)url
            options:(NSDictionary<UIApplicationOpenURLOptionsKey, id>*)options {
    return [_lifeCycleDelegate application:application openURL:url options:options];
}

- (BOOL)application:(UIApplication*)application handleOpenURL:(NSURL*)url {
    return [_lifeCycleDelegate application:application handleOpenURL:url];
}

- (BOOL)application:(UIApplication*)application
            openURL:(NSURL*)url
  sourceApplication:(NSString*)sourceApplication
         annotation:(id)annotation {
    return [_lifeCycleDelegate application:application
                                   openURL:url
                         sourceApplication:sourceApplication
                                annotation:annotation];
}

- (void)application:(UIApplication*)application
performActionForShortcutItem:(UIApplicationShortcutItem*)shortcutItem
  completionHandler:(void (^)(BOOL succeeded))completionHandler NS_AVAILABLE_IOS(9_0) {
    [_lifeCycleDelegate application:application
       performActionForShortcutItem:shortcutItem
                  completionHandler:completionHandler];
}

- (void)application:(UIApplication*)application
handleEventsForBackgroundURLSession:(nonnull NSString*)identifier
  completionHandler:(nonnull void (^)(void))completionHandler {
    [_lifeCycleDelegate application:application
handleEventsForBackgroundURLSession:identifier
                  completionHandler:completionHandler];
}

- (void)application:(UIApplication*)application
performFetchWithCompletionHandler:(void (^)(UIBackgroundFetchResult result))completionHandler {
    [_lifeCycleDelegate application:application performFetchWithCompletionHandler:completionHandler];
}

- (void)addApplicationLifeCycleDelegate:(NSObject<FlutterPlugin>*)delegate {
    [_lifeCycleDelegate addDelegate:delegate];
}

#pragma mark - Flutter
    // Returns the key window's rootViewController, if it's a FlutterViewController.
    // Otherwise, returns nil.
- (FlutterViewController*)rootFlutterViewController {
    UIViewController* viewController = [UIApplication sharedApplication].keyWindow.rootViewController;
    if ([viewController isKindOfClass:[FlutterViewController class]]) {
        return (FlutterViewController*)viewController;
    }
    return nil;
}

- (void)touchesBegan:(NSSet*)touches withEvent:(UIEvent*)event {
    [super touchesBegan:touches withEvent:event];

    // Pass status bar taps to key window Flutter rootViewController.
    if (self.rootFlutterViewController != nil) {
        [self.rootFlutterViewController handleStatusBarTouches:event];
    }
}

@end
Flutter主动,Native被动 (MethodChannel)
Flutter 代码: 引入import 'package:flutter/services.dart';
请用下面代码替换class _MyHomePageState extends State<MyHomePage> 这个类内容
class _MyHomePageState extends State<MyHomePage> {

  // 创建一个给native的channel (类似iOS的通知)
  static const methodChannel = const MethodChannel('com.pages.your/native_get');

  int _counter = 0;

  void _incrementCounter() {
    setState(() {
      _counter++;

      print('flutter的log打印:现在输出count=$_counter');
      // 当个数累积到3的时候给客户端发参数
      if(_counter == 3) {
        _toNativeSomethingAndGetInfo();
      }

      // 当个数累积到5的时候给客户端发参数
      if(_counter == 1002) {
        Map<String, String> map = { "title": "这是一条来自flutter的参数" };
        methodChannel.invokeMethod('toNativePush',map);
      }

      // 当个数累积到8的时候给客户端发参数
      if(_counter == 1005) {
        Map<String, dynamic> map = { "content": "flutterPop回来","data":[1,2,3,4,5]};
        methodChannel.invokeMethod('toNativePop',map);
      }
    });
  }

  // 给客户端发送一些东东 , 并且拿到一些东东
  Future<Null> _toNativeSomethingAndGetInfo() async {
    dynamic result;
    try {
      result = await methodChannel.invokeMethod('toNativeSomething','大佬你点击了$_counter下');
    } on PlatformException {
      result = 100000;
    }
    setState(() {
      // 类型判断
      if (result is int) {
        _counter = result;
      }

    });
  }

  @override
  Widget build(BuildContext context) {

    return new Scaffold(
//      appBar: new AppBar(
//        // Here we take the value from the MyHomePage object that was created by
//        // the App.build method, and use it to set our appbar title.
//        title: new Text(widget.title),
//      ),
      body: new Center(
        child: new Column(
          mainAxisAlignment: MainAxisAlignment.center,
          children: <Widget>[
            new Text(
              'You have pushed the button this many times:',
            ),
            new Text(
              '$_counter',
              style: Theme.of(context).textTheme.display1,
            ),
          ],
        ),
      ),
      floatingActionButton: new FloatingActionButton(
        onPressed: _incrementCounter,
        tooltip: 'Increment',
        child: new Icon(Icons.add),
      ), // This trailing comma makes auto-formatting nicer for build methods.
    );
  }
}
Native 代码:
- (void)pushFlutterViewController {
        FlutterViewController* flutterViewController = [[FlutterViewController alloc] initWithProject:nil nibName:nil bundle:nil];
        flutterViewController.navigationItem.title = @"Flutter Demo";
            __weak __typeof(self) weakSelf = self;

        // 要与main.dart中一致
        NSString *channelName = @"com.pages.your/native_get";

            FlutterMethodChannel *messageChannel = [FlutterMethodChannel methodChannelWithName:channelName binaryMessenger:flutterViewController];

            [messageChannel setMethodCallHandler:^(FlutterMethodCall * _Nonnull call, FlutterResult  _Nonnull result) {
                // call.method 获取 flutter 给回到的方法名,要匹配到 channelName 对应的多个 发送方法名,一般需要判断区分
                // call.arguments 获取到 flutter 给到的参数,(比如跳转到另一个页面所需要参数)
                // result 是给flutter的回调, 该回调只能使用一次
                NSLog(@"flutter 给到我:\nmethod=%@ \narguments = %@",call.method,call.arguments);

                if ([call.method isEqualToString:@"toNativeSomething"]) {
                    UIAlertView *alertView = [[UIAlertView alloc] initWithTitle:@"flutter回调" message:[NSString stringWithFormat:@"%@",call.arguments] delegate:self cancelButtonTitle:@"确定" otherButtonTitles:nil];
                    [alertView show];

                    // 回调给flutter
                    if (result) {
                        result(@1000);
                    }
                } else if ([call.method isEqualToString:@"toNativePush"]) {
                    ThirdViewController *testVC = [[ThirdViewController alloc] init];
                    testVC.parames = call.arguments;
                    [weakSelf.navigationController pushViewController:testVC animated:YES];
                } else if ([call.method isEqualToString:@"toNativePop"]) {
                    [weakSelf.navigationController popViewControllerAnimated:YES];
                }
            }];

        [self.navigationController pushViewController:flutterViewController animated:YES];
    }
Native主动,Flutter被动 (EventChannel)
一般用于flutter初始化需要从客户端获取一些参数作为渲染条件;类似iOS这边的KVO,监听flutter是否已经在监听,监听的时候回调到代理【这步其实还是flutter监听的时候,内部发了一个通知,iOS这边收到并回调】,iOS Native处理代理,并回调给flutter所需要参数
Flutter 代码 (class中):
  // 注册一个通知
  static const EventChannel eventChannel = const EventChannel('com.pages.your/native_post');

  // 渲染前的操作,类似viewDidLoad
  @override
  void initState() {
    super.initState();

    // 监听事件,同时发送参数12345
    eventChannel.receiveBroadcastStream(12345).listen(_onEvent,onError: _onError);
  }

  String naviTitle = '你好,大佬' ;
  // 回调事件
  void _onEvent(Object event) {
    setState(() {
      naviTitle =  event.toString();
    });
  }
  // 错误返回
  void _onError(Object error) {

  }
Native代码:
- (void)pushFlutterViewController_EventChannel {
        FlutterViewController* flutterViewController = [[FlutterViewController alloc] initWithProject:nil nibName:nil bundle:nil];
        flutterViewController.navigationItem.title = @"EventChannel Demo";
        // 要与main.dart中一致
        NSString *channelName = @"com.pages.your/native_post";

        FlutterEventChannel *evenChannal = [FlutterEventChannel eventChannelWithName:channelName binaryMessenger:flutterViewController];
        // 代理
        [evenChannal setStreamHandler:self];

        [self.navigationController pushViewController:flutterViewController animated:YES];
    }

#pragma mark - <FlutterStreamHandler>
    // // 这个onListen是Flutter端开始监听这个channel时的回调,第二个参数 EventSink是用来传数据的载体。
    - (FlutterError* _Nullable)onListenWithArguments:(id _Nullable)arguments
                                           eventSink:(FlutterEventSink)events {

        // arguments flutter给native的参数
        // 回调给flutter, 建议使用实例指向,因为该block可以使用多次
        if (events) {
            events(@"我是标题");
        }
        return nil;
    }

    /// flutter不再接收
    - (FlutterError* _Nullable)onCancelWithArguments:(id _Nullable)arguments {
        // arguments flutter给native的参数
        return nil;
 }
交互总结
这两种方式都差不多,一个使用的时候使用block,一个使用的时候使用delegate;最终回调给flutter的都是通过block。
MethodChannel 使用block,上下文更加明确;同一个channel name可以根据flutter给回的call.method、call.arguments更加灵活的处理回调handle, 回调只能使用一次(意思就是就算你创建一个实例指向block,单block回调只能使用一次,回调之后flutter block那边不再接收);
EventChannel 使用delegate,代码层次更鲜明;同一个channel name只能通过判断arguments参数处理回调handle, 回调可以使用多次(创建一个实例指向block,该block可以向flutter发送多次);
BasicMessageChannel 请自行学习。
疑问
创建使用FlutterViewController Xcode的Memory一直在增加到一个水平,分类重写- (void)dealloc 也没有进来,估计是内存泄漏了。于是去查了官方的Issues ,确实有几个关联:
- Flutter SSL Memory Leaks #20409
- Unable to release FlutterViewController even when there is nothing referencing it. #21347
Native 简单push FlutterViewController, pop回,内存到达一个阶段后不降,FlutterViewController不会执行dealloc方法。不知道这谁知道有没有解决方案?不吝赐教,谢谢!
