

前言
我们在日常使用各种app的时候,会发现原来越多下面这类型的矢量图标动画。图标动画是material design所推荐的图标效果。当然对我来说,炫酷的效果就是我学习矢量图标动画的一个很充分理由。
VectorDrawable
SVG和VectorDrawable
- 矢量图:矢量图和传统的png、jpg等图片格式,是典型的渔和鱼的区别。矢量图存储的是图片画出来的方法,而不是像素点的排列,所以无论矢量图放大多少倍,只要按照等比例缩放后的路径把图标画出来即可,不存在马赛克的问题。我们电脑中显示的文字就是这么一个原理。
- svg是最常见的矢量图格式,而在Android里面,我们使用的是VectorDrawable。
- 一般来说,矢量图的生成是不需要我们去关心的,如果需要自己去找矢量图的话,可以去iconfont找一找。
- SVG2VectorDrawable是一个很有用的AndroidStudio上面的插件,帮助我们把svg转化为vectorDrawable。
VectorDrawable文件和svg指令
了解一些svg指令,知道矢量图是怎么画出来的,对我们以后的开发有好处,我们可以从一个简单的VecotrDrawable文件入手。

<?xml version="1.0" encoding="utf-8"?>
<!--res/drawable/vd_check.xml-->
<vector xmlns:android="http://schemas.android.com/apk/res/android"
    android:width="100dp"
    android:height="100dp"
    android:viewportHeight="24"
    android:viewportWidth="24">
    <path
        android:name="check"
        android:pathData="M4,10 L9,16 L20,4"
        android:strokeColor="#35931d"
        android:strokeWidth="3" />
</vector>
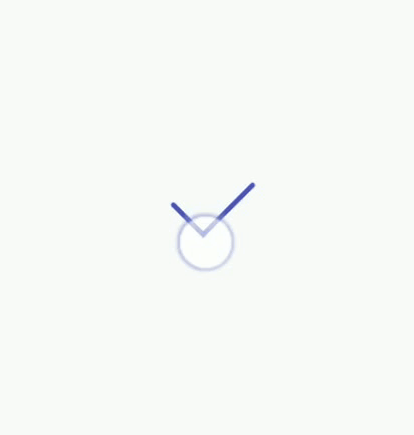
这个绿色和谐的小勾是我用上面的vd_check文件画出来的,我们来解读下这个文件:
- vector标签:表示这是一个矢量图。
- viewportHeight/viewWidth:矢量图的长宽,之后画图也是按此长宽来画。图标的左上角是(0,0),右下角是(viewWidth,viewHeight)。
- group标签:group有一些path没有的属性,如果要用这些属性做动画,那就只能path外嵌套多一层group标签了。
- name:动画会通过name寻找到此对象。
- rotation|scaleX|pivotX..:这些属性都很熟悉了吧
- path标签:连续的线或面,矢量图就是有一个或多个path组成的。
- name:动画会通过name寻找到此对象。
- storkeColor: 线段的颜色。
- strokeWidth: 线段的宽度。
- strokeAlpha: 线段的透明度。
- strokeLineCap: 线段末端的样式 butt(断开)|round(圆角)|square(直角)
- fillColor: 填充的颜色。
- fillAlpha:填充透明度。
- pathData属性:pathData是Path的一个属性,他里面便是用来描绘path的svg语言。我们只需要认识几个关键词就可以看懂了。
| 关键字 | 解释 |
|---|---|
| M x,y | 把画笔移动到从(x,y)这个点。一般代表着一段path的开始。 |
| L x,y | 画一条连接到(x,y)的线段。 |
| Q x1,y1 x,y | 贝塞尔二阶曲线。经过(x1,y1)到达(x,y)。 |
| C x1,y1 x2,y2 x,y | 贝赛尔三阶线。经过(x1,y1)和(x2,y2)到达(x,y)。 |
| Z | 闭合path。画一段到起点的线段。 |
现在回过头看和谐小勾的pathData,就很简单了:
M4,10 L9,16 L20,4
从(4,10)开始,画一条到(9,16)的线段,再画一条到(20,4)的线段。一顿一拉,绿色小勾跃然纸上。
当然,如果遇到比小勾更加复杂的情况,比如一个完美的心形,或者广州塔的图标,那还是乖乖的找ui帮你生成svg比较好。
animated-vector
既然我们有了矢量图,那就让矢量图动起来吧。说起做动画,当然是属性动画来一发啦!
- group和path各有一些独自的属性,所以按需去嵌套group吧。
- 注意加name属性,我们的动画会通过name去找到对应的作用对象。 这是我修改后的vector,增加了一个group。
<?xml version="1.0" encoding="utf-8"?><!--vd_check.xml-->
<!--vd_check.xml-->
<vector xmlns:android="http://schemas.android.com/apk/res/android"
    android:width="100dp"
    android:height="100dp"
    android:viewportHeight="24"
    android:viewportWidth="24">
    <group
        android:name="g_rotation"
        android:pivotX="12"
        android:pivotY="12"
        android:rotation="0">
            <path
                android:name="check"
                android:pathData="M4,10 L9,16 L20,4"
                android:strokeAlpha="1.0"
                android:strokeColor="@color/colorPrimary"
                android:strokeLineCap="round"
                android:strokeWidth="1" />
    </group>
</vector>
我们要加什么动画呢?嗯、、旋转,透明度,颜色,我全都要!
<?xml version="1.0" encoding="utf-8"?>
<!--/res/animator/rotation_round.xml-->
<objectAnimator xmlns:android="http://schemas.android.com/apk/res/android"
    android:duration="1000"
    android:propertyName="rotation"
    android:valueFrom="0"
    android:valueTo="360" />
<?xml version="1.0" encoding="utf-8"?>
<!--/res/animator/alpha_animator.xml-->
<set xmlns:android="http://schemas.android.com/apk/res/android"
    android:ordering="sequentially">
    <objectAnimator
        android:duration="500"
        android:propertyName="strokeAlpha"
        android:valueFrom="1f"
        android:valueTo="0f" />
    <objectAnimator
        android:duration="500"
        android:propertyName="strokeAlpha"
        android:valueFrom="0f"
        android:valueTo="1f" />
</set>
<?xml version="1.0" encoding="utf-8"?>
<!--res/animator/stroke_color_animator.xml-->
<objectAnimator xmlns:android="http://schemas.android.com/apk/res/android"
    android:propertyName="strokeColor"
    android:valueFrom="@color/colorPrimary"
    android:valueTo="@color/colorAccent"
    android:duration="1000"/>
AnimatedVector华丽登场,把vector和动画文件黏合在一起。使用起来很简单,先通过drawable属性指定vector,然后通过target标签把动画和对象绑定在一起。
<?xml version="1.0" encoding="utf-8"?>
<!--avd_check.xml-->
<animated-vector xmlns:android="http://schemas.android.com/apk/res/android"
    android:drawable="@drawable/vd__check">
    <target
        android:name="g_rotation"
        android:animation="@animator/rotation_around" />
    <target
        android:name="check"
        android:animation="@animator/stroke_color_animator" />
    <target
        android:name="check"
        android:animation="@animator/alpha_animator" />
</animated-vector>
最后需要在代码中触发。把avd_check.xml当做图片赋给ImageView,需要调用动画时,得到ImageView的drawable,强转为Animatable后,调用start()方法。
 <ImageView
   android:id="@+id/img_check"
   android:layout_width="48dp"
   android:layout_height="48dp"
   app:srcCompat="@drawable/avd_check" />
··· img_check.setOnClickListener { val drawable = img_check.drawable (drawable as Animatable).start() } ···
然后效果就出来了。

当然,如果你只是求方便的话,动画不需要单独写一个文件,直接写在target标签里面也是可以的。
trimPath 路径裁剪
trimPath其实和上面的动画一模一样,只是运用了几个矢量图标特有的属性而已。我们先来看看trimPath能做什么。

trimPath一共有三个相关的属性:trimPathStart,trimPathEnd,trimPathOffset,都是float类型的数值,数值范围从0到1。分别表示path从哪里开始,到哪里结束,距离起点多远。至于怎么用,就看我们的想象力了。
接下来,用我们的小勾来做下实验吧。
照旧也是需要写一个动画文件
<?xml version="1.0" encoding="utf-8"?>
<!--trim_path_animator.xml-->
<objectAnimator xmlns:android="http://schemas.android.com/apk/res/android"
    android:duration="1000"
    android:interpolator="@android:interpolator/linear"
    android:propertyName="trimPathEnd"
    android:valueFrom="0.0"
    android:valueTo="1.0"
    android:valueType="floatType" />
修改一下animatedVector文件
<?xml version="1.0" encoding="utf-8"?><!--avd_check.xml-->
<animated-vector xmlns:android="http://schemas.android.com/apk/res/android"
    android:drawable="@drawable/vd__check">
    <target
        android:name="check"
        android:animation="@animator/trim_path_animator" />
</animated-vector>
bang!

ps:pathTrim只能对一条完整的path做动画,如果你的pathdata是有断开的,比如(省略坐标):“M,L,L M,L Z”,出现了两个m,那path就会分成了两段,这时候pathTrim只会作用于第一条线段了。
Morphing paths
重头戏来了,path变幻。我们想一想,既然strokeAplha,rotation这些属性都能做动画,那pathData这个属性,肯定也能做动画啦。于是有了下面这些效果。
简单来说就是给属性动画里面的valueFrom和valueTo分别写两条不一样的path,那path就会自动变幻了。 需要注意的是,两条path的绘制指令需要在数量和结构上都相同。比如第一条path的指令(省略了坐标)是"M,L,L,C,Z",那第二条path的指令也应该是"M,L,L,C,Z"这种形式。
好,我们可以来试一试手。由于现在的勾的指令太少了,不好发挥我的小宇宙,所以我多加了几个指令。而目标,就是把小勾变成小圆圈吧。于是乎我就创造了以下两条path。他们都用了一个m指令和4个c指令(是的,c只能也能画直线的)。 为了方便管理,我把这两个path都放在一个xml里面了。
<?xml version="1.0" encoding="utf-8"?>
<resources>
    <string name="check_path">M4,10 C10,16 10,16 10,16 C13,13 13,13 13,13 C16,10 16,10 16,10 C20,6 20,6 20,6</string>
    <string name="circle_path">M4,12 C4,7.6 7.6,4 12,4 C16.4,4 20,7.6 20,12 C20,16.4 16.4,20 12,20 C 7.6,20 4,16.4 4,12</string>
</resources>
然后也是动画和animatedVector:
<?xml version="1.0" encoding="utf-8"?>
<objectAnimator xmlns:android="http://schemas.android.com/apk/res/android"
    android:duration="500"
    android:interpolator="@android:interpolator/linear"
    android:propertyName="pathData"
    android:valueFrom="@string/check_path"
    android:valueTo="@string/circle_path"
    android:valueType="pathType" />
<?xml version="1.0" encoding="utf-8"?><!--avd_check.xml-->
<animated-vector xmlns:android="http://schemas.android.com/apk/res/android"
    android:drawable="@drawable/vd__check">
    <target
        android:name="check"
        android:animation="@animator/path_animator" />
</animated-vector>
接下来,噔噔噔噔噔。
但是你会发现,我的勾变成圆之后,再也变不回来了,动画不能倒过来做。于是乎我们需要引入最后一个概念,animatedSelecotr。
animated-selector
animated-selector允许定义有多个vector,根据不同状态使用不同的vector,并且通过animated-vector定义不同vector之前切换的动画。 所以我们接下来的步骤是:
- 定义两个vector:勾和圆
- 定义两个animated-vector:勾转化为圆,圆转化为勾
- 定义animated-selector把上述的文件组合起来。
动手动手: 圆的vector文件。和勾的大同小异。注意,我把name改成了circle。
<?xml version="1.0" encoding="utf-8"?><!--vd_circle.xml-->
<vector xmlns:android="http://schemas.android.com/apk/res/android"
    android:width="100dp"
    android:height="100dp"
    android:viewportHeight="24"
    android:viewportWidth="24">
    <path
        android:name="circle"
        android:pathData="@string/circle_path"
        android:strokeAlpha="1.0"
        android:strokeColor="@color/colorPrimary"
        android:strokeLineCap="round"
        android:strokeWidth="1" />
</vector>
圆和勾的相互转化,需要两个文件。由于勾转化为圆已经在上面写过了(avd_check.xml,为了更名副其实,已经改名为avd_check2circl.xml)。这里是圆转化为勾。可以看到,动画是可以直接写在animated-vector里面的。
<?xml version="1.0" encoding="utf-8"?>
<!--huan -->
<animated-vector xmlns:android="http://schemas.android.com/apk/res/android"
    xmlns:aapt="http://schemas.android.com/aapt"
    android:drawable="@drawable/vd_circle">
    <target android:name="circle">
        <aapt:attr name="android:animation">
            <objectAnimator xmlns:android="http://schemas.android.com/apk/res/android"
                android:duration="500"
                android:interpolator="@android:interpolator/fast_out_slow_in"
                android:propertyName="pathData"
                android:valueFrom="@string/circle_path"
                android:valueTo="@string/check_path"
                android:valueType="pathType" />
        </aapt:attr>
    </target>
</animated-vector>
接下来就剩下animated-selector了。
- 两个item分别指定两个vector,并且通过state_checked表示两种状态。实际上还有stated_checkable,state_selected等系统定义的状态,也可以执行定义新的状态变量。
- transition则是表示不同vector之间转换的动画。属性很清晰明了,fromid和toId表示变换前后的两个item的id。drawable是antemator-vector。
<?xml version="1.0" encoding="utf-8"?>
<animated-selector xmlns:android="http://schemas.android.com/apk/res/android">
    <item
        android:id="@+id/check"
        android:drawable="@drawable/vd__check"
        android:state_checked="true" />
    <item
        android:id="@+id/circle"
        android:drawable="@drawable/vd_circle"
        android:state_checked="false" />

    <transition
        android:drawable="@drawable/avd_check2circle"
        android:fromId="@id/check"
        android:toId="@id/circle" />

    <transition
        android:drawable="@drawable/avd_circle2check"
        android:fromId="@id/circle"
        android:toId="@id/check" />
</animated-selector>
使用的时候需要放在app:srcCompat里面。
  <ImageView
    android:id="@+id/img_check_selector"
    android:layout_width="48dp"
    android:layout_height="48dp"
    app:srcCompat="@drawable/asl_check" />
然后再代码中通过setImageState方法设置不同的状态,图标就会自行变化了。
  img_check_selector.setOnClickListener {
            isCheckSelect = !isCheckSelect
            img_check_selector.setImageState(intArrayOf(if (isCheckSelect) android.R.attr.state_checked else -android.R.attr.state_checked), true)
        }

app:srcCompat
srcCompat是专门针对vector drawable的,所以最好还是使用srcCompat代替android:src。
后语
到这里,我们可以看到矢量图标动画的强大之处,无视马赛克,充满想象力,让我们的app更生动,更符合Material Design。但是也有vector Drawable的生成麻烦,编写各种animated-selector,animated-vector文件繁琐等缺点。只能说有得就有失了。
与其感慨路难行,不如马上出发。
*最后的最后,感谢大家的阅读,欢迎留言。 *
参考资料
- adp-delightful-details:牛逼的图标动画库,本文中使用了他的一些图标效果。
- An Introduction to Icon Animation Techniques
- Android高级动画(2)
