

这是【从零撸美团】系列文章第四篇。 项目地址:github.com/cachecats/L…
Android从零撸美团(一) - 统一管理 Gradle 依赖 提取到单独文件中
Android从零撸美团(二) - 仿美团下拉刷新自定义动画
Android从零撸美团(三) - Android多标签tab滑动切换 - 自定义View快速实现高度定制封装
仿美团开源项目整体架构和首页其实早就完成了,前段时间家里各种事情搞得心力交瘁,停更了一段时间。甚至一度动摇继续这个项目的决心,因为最近在学前端,在技术的深度和广度之间一直纠结摇摆不定。一个声音是继续完成这个项目,把安卓玩的更深入一些;另一个声音是赶紧学前端吧,抓紧拓展技术栈,不要在这个项目上浪费太多精力。
思来想去还是继续完成项目吧,自己开的项目跪着也要走完 〒▽〒
最后确定了继续写项目和学前端同时进行的战略方针~
老规矩,先上图,再 分析原理 --> 准备材料 --> 具体实现 三步走一步步的搞定。
一、分析
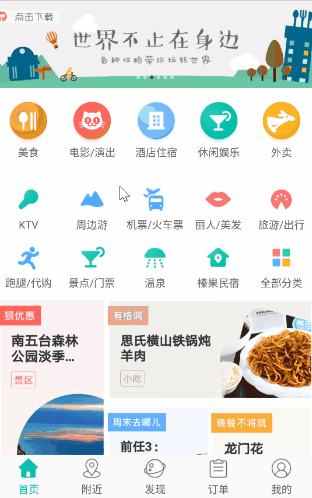
相比于普通的应用,美团、去哪儿这样的平台性 App 的首页还是相当复杂的,简直想把全世界都包进去~
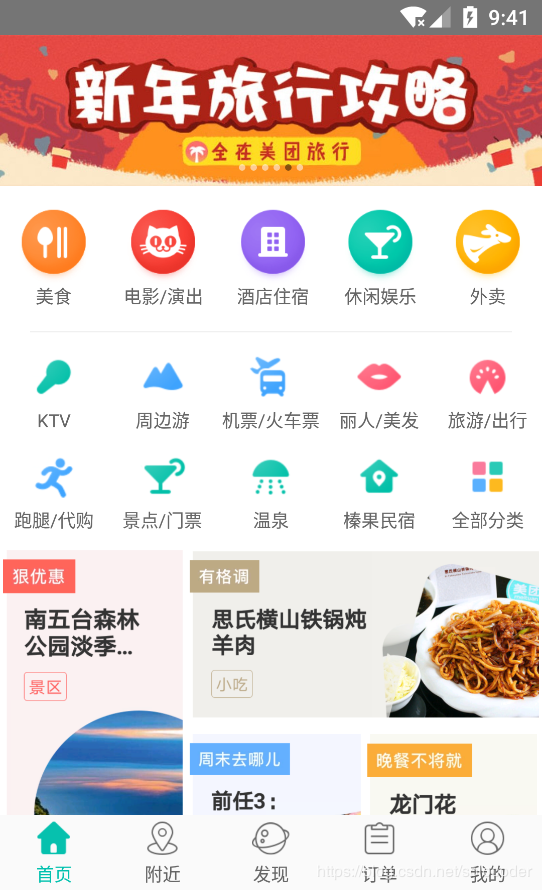
刚开始看可能觉得眼花缭乱,但仔细观察,可以把它抽象成六个模块:
- 最上面的轮播广告条,里面包含若干个广告图片自动无限轮播。暂时称之为 Banner(注意这几个模块起的英文名对应着代码中的模块名)。
- 轮播条下面的美食、电影/演出、酒店住宿、休闲娱乐、外卖等五个大模块入口,暂时称之为大模块 BigModule。
- 再往下类似 GridView 的两排小图标,KTV、周边游……暂时称之为小模块 SmallModule。
- 小模块下面四张广告图片,乍一看是没有规则的瀑布布局,其实是互相对齐的简单规则布局。暂时称之为 HomeAdsView。
- 最后就是列表 RecyclerView 了,显示附近团购信息。
- 还有一个不太明显的,上拉刷新下拉加载更多,也算一个模块吧。
抽丝剥茧后就是这六个模块啦,是不是一下清爽很多?
实现思路
轮播条选用了第三方的库:Banner, 有 5.2k 颗 star,非常优秀的库。
大模块 BigModule 采用代码中动态添加 View 的方式实现,好处在于能快速响应变化,假如需求变成一行放4个图标,只需要在 java 文件中改一句代码就好,不用修改资源文件。
两行小模块 SmallModule 是 RecyclerView 实现的 GridView。
四张广告图片 HomeAdsView 是封装的自定义 View,高度封装优点是完全解耦,简化了主页的布局,使用配置简单,后期维护方便。
最下面的列表用的是 RecyclerView,BaseRecyclerViewAdapterHelper 作为辅助。
下拉刷新组件用的是 SmartRefreshLayout
二、准备
主页中用到了三个框架,在 app/build.gradle 下添加如下依赖:
//Banner
implementation "com.youth.banner:banner:1.4.10"
//BaseRecyclerViewAdapterHelper
implementation "com.github.CymChad:BaseRecyclerViewAdapterHelper:2.9.30"
//SmartRefreshLayout
implementation "com.scwang.smartrefresh:SmartRefreshLayout:1.0.4"
注:AndroidStudio 3.0 以上用 implementation,3.0以下用 compile。
项目中还用到了很多其他库,如 Dagger、RxJava、ButterKnife、Glide 等,就不一一贴出来了,具体的使用方式请自行查阅资料或看本项目源码 github.com/cachecats/L…
三、实现
项目采用 MVP 架构,主页代码在 app/home 目录下的 HomeFragment 和 HomeFragmentPresenter 中。
布局文件是 fragment_home.xml,布局代码如下:
<?xml version="1.0" encoding="utf-8"?>
<LinearLayout xmlns:android="http://schemas.android.com/apk/res/android"
    xmlns:app="http://schemas.android.com/apk/res-auto"
    android:layout_width="match_parent"
    android:layout_height="match_parent"
    android:background="@color/white"
    android:orientation="vertical">

    <!--下拉刷新组件-->
    <com.scwang.smartrefresh.layout.SmartRefreshLayout
        android:id="@+id/smartRefreshLayout_home"
        android:layout_width="match_parent"
        android:layout_height="match_parent">

        <ScrollView
            android:layout_width="match_parent"
            android:layout_height="match_parent">

            <LinearLayout
                android:layout_width="match_parent"
                android:layout_height="match_parent"
                android:orientation="vertical">

                <!--Banner轮播条-->
                <com.youth.banner.Banner
                    android:id="@+id/home_banner"
                    android:layout_width="match_parent"
                    android:layout_height="100dp"
                    app:image_scale_type="center_crop"
                    app:scroll_time="500" />

                <!--5个大模块布局-->
                <LinearLayout
                    android:id="@+id/ll_big_module_fragment_home"
                    android:layout_width="match_parent"
                    android:layout_height="wrap_content"
                    android:layout_marginBottom="15dp"
                    android:layout_marginTop="15dp"
                    android:orientation="horizontal" />

                <!--分割线-->
                <View
                    android:layout_width="match_parent"
                    android:layout_height="1dp"
                    android:layout_marginLeft="20dp"
                    android:layout_marginRight="20dp"
                    android:background="@color/dividerColorF0" />

                <!--两行小模块布局 RecyclerView实现的GridView -->
                <android.support.v7.widget.RecyclerView
                    android:id="@+id/recyclerview_little_module"
                    android:layout_width="match_parent"
                    android:layout_height="wrap_content"
                    android:layout_marginBottom="10dp" />

                <!--四个广告封装的自定义View-->
                <com.cachecats.meituan.widget.HomeAdsView
                    android:id="@+id/home_ads_view"
                    android:layout_width="match_parent"
                    android:layout_height="wrap_content" />

                <!--团购列表-->
                <android.support.v7.widget.RecyclerView
                    android:id="@+id/recycler_view_shops"
                    android:layout_width="match_parent"
                    android:layout_height="wrap_content" />

            </LinearLayout>
        </ScrollView>
    </com.scwang.smartrefresh.layout.SmartRefreshLayout>
</LinearLayout>
布局解析
最外层用 LinearLayout 包裹,接下来是下拉刷新组件 SmartRefreshLayout,因为要实现整个主页的刷新。然后是滚动组件 ScrollView,因为要整体滑动。由于 ScrollView 里只能包含一个子 View,所以在里面又包了层 LinearLayout 。接下来就是五个分模块的具体布局啦。
1. Banner轮播条
添加Banner依赖后,在布局文件中添加 Banner布局,并设置控件高度、图片裁剪模式、滚动时间等参数,然后在 HomeFragment 中初始化:
public void initBanner() {
        //设置banner的各种属性
        banner.setBannerStyle(BannerConfig.CIRCLE_INDICATOR)
                .setImageLoader(new GlideImageLoader())
                .setImages(presenter.getBannerImages()) //从Presenter中取出图片资源
                .setBannerAnimation(Transformer.Default)
                .isAutoPlay(true)
                .setDelayTime(3000)
                .setIndicatorGravity(BannerConfig.CENTER)
                .start();
    }
HomeFragmentPresenter
   /**
     * 获取Banner的图片资源
     *
     * @return
     */
    @Override
    public List<Integer> getBannerImages() {
        List<Integer> mBannerImages = new ArrayList<>();
        mBannerImages.add(R.mipmap.banner1);
        mBannerImages.add(R.mipmap.banner2);
        mBannerImages.add(R.mipmap.banner3);
        mBannerImages.add(R.mipmap.banner4);
        mBannerImages.add(R.mipmap.banner5);
        mBannerImages.add(R.mipmap.banner6);
        return mBannerImages;
    }
另外如果想增加体验的话,可以在生命周期的 onStart 方法中开启自动播放,在 onStop 方法中关闭自动播放。
    @Override
    public void onStart() {
        super.onStart();
        //增加banner的体验
        banner.startAutoPlay();
    }

    @Override
    public void onStop() {
        super.onStop();
        //增加banner的体验
        banner.stopAutoPlay();
    }
Banner 的官方文档中有详细使用方法。
2. 大模块 BigModule 实现
在主页布局中用一个 LinearLayout 作为占位,并确定这个模块的位置。具体的内容在代码中动态添加,方便后期维护修改。
因为做了高度的封装,所以代码多些,但用起来很方便。
先上代码吧:
HomeFragment 是 View 层,按 MVP 分层思想,不应包含具体的逻辑,所以只向外暴露一个共有方法,用于添加自定义 View IconTitleView 到 占位的 LinearLayout 上
    /**
     * 往根布局上添加View
     */
    @Override
    public void addViewToBigModule(IconTitleView iconTitleView) {
        llBigModule.addView(iconTitleView);
    }
具体的添加逻辑在 HomeFragmentPresenter 中:
    //大模块的图片数组
    private static final int[] bigModuleDrawables = {
            R.mipmap.homepage_icon_light_food_b,
            R.mipmap.homepage_icon_light_movie_b,
            R.mipmap.homepage_icon_light_hotel_b,
            R.mipmap.homepage_icon_light_amusement_b,
            R.mipmap.homepage_icon_light_takeout_b,
    };

    //大模块的标题数组
    private static final String[] bigMudoleTitles = {
            "美食", "电影/演出", "酒店住宿", "休闲娱乐", "外卖"
    };

    /**
     * 初始化banner下面的5个大模块
     */
    private void initBigModule() {
        for (int i = 0; i < 5; i++) {
            IconTitleView iconTitleView = IconTitleView.newInstance(mContext, bigModuleDrawables[i], bigMudoleTitles[i]);
            // 设置宽高和权重weight,使每个View占用相同的宽度
            LinearLayout.LayoutParams lp = new LinearLayout.LayoutParams(
                    LinearLayout.LayoutParams.WRAP_CONTENT,
                    LinearLayout.LayoutParams.WRAP_CONTENT, 1.0f);
            iconTitleView.setLayoutParams(lp);

            // 往根布局上添加View
            mFragment.addViewToBigModule(iconTitleView);

            //给View添加点击事件
            int finalI = i;
            iconTitleView.setOnClickListener((view) -> {
                Logger.d(bigMudoleTitles[finalI]);
                ToastUtils.show(bigMudoleTitles[finalI]);
            });
        }
    }
图片和对应的文字都是写好的,分别放在 bigModuleDrawables 和 bigMudoleTitles 数组中。
这个模块放了五个图标,所以用了 for 循环五次,每次按下标取出上面两个数组中存入的图片和文字资源,通过
IconTitleView iconTitleView = IconTitleView.newInstance(mContext, bigModuleDrawables[i], bigMudoleTitles[i]);
实例化一个 IconTitleView 对象,并添加到 LinearLayout上:
// 往根布局上添加View
mFragment.addViewToBigModule(iconTitleView);
注意这几行代码:
// 设置宽高和权重weight,使每个View占用相同的宽度
LinearLayout.LayoutParams lp = new LinearLayout.LayoutParams(
        LinearLayout.LayoutParams.WRAP_CONTENT,
        LinearLayout.LayoutParams.WRAP_CONTENT, 1.0f);
iconTitleView.setLayoutParams(lp);
一定要给每个 iconTitleView 设置权重,这样才会让5个图标占用相同的宽度。
自定义 View IconTitleView 的实现:
package com.cachecats.meituan.widget;

import android.content.Context;
import android.support.annotation.Nullable;
import android.util.AttributeSet;
import android.view.View;
import android.widget.ImageView;
import android.widget.LinearLayout;
import android.widget.TextView;

import com.bumptech.glide.Glide;
import com.cachecats.meituan.R;

import butterknife.BindView;
import butterknife.ButterKnife;

/**
 * 上图片下标题的简单分模块布局自定义View
 */

public class IconTitleView extends LinearLayout {

    @BindView(R.id.iv_icon_title)
    ImageView iv;
    @BindView(R.id.tv_icon_title)
    TextView tv;

    private Context context;

    public IconTitleView(Context context) {
        this(context, null, 0);
        this.context = context;
    }

    public IconTitleView(Context context, @Nullable AttributeSet attrs) {
        this(context, attrs, 0);
    }

    public IconTitleView(Context context, @Nullable AttributeSet attrs, int defStyleAttr) {
        super(context, attrs, defStyleAttr);

        View view = View.inflate(context, R.layout.view_icon_title, this);
        ButterKnife.bind(view);

    }

    public static IconTitleView newInstance(Context context, int imageResource, String title) {
        IconTitleView iconTitleView = new IconTitleView(context);
        iconTitleView.setImageView(imageResource);
        iconTitleView.setTitleText(title);
        return iconTitleView;
    }

    private void setImageView(int drawable) {
        Glide.with(context).load(drawable).into(iv);
    }

    private void setTitleText(String title) {
        tv.setText(title);
    }
}
IconTitleView的布局:
<?xml version="1.0" encoding="utf-8"?>
<LinearLayout xmlns:android="http://schemas.android.com/apk/res/android"
    android:layout_width="match_parent"
    android:layout_height="wrap_content"
    android:orientation="vertical"
    android:gravity="center"
    >

    <ImageView
        android:id="@+id/iv_icon_title"
        android:layout_width="50dp"
        android:layout_height="50dp"
        />

    <TextView
        android:id="@+id/tv_icon_title"
        android:layout_width="wrap_content"
        android:layout_height="wrap_content"
        android:textColor="@color/gray666"
        android:textSize="12sp"
        />

</LinearLayout>
这个是组合自定义View,比较简单,就不多说啦。
3. 两行图标的小模块 SmallModule
RecyclerView 实现的 GridView 布局,直接上代码吧。
    /**
     * 初始化小模块的RecyclerView
     */
    private void initLittleModuleRecyclerView() {

        GridLayoutManager gridLayoutManager = new GridLayoutManager(getActivity(), 5);
        //设置LayoutManager
        littleModuleRecyclerView.setLayoutManager(gridLayoutManager);
        //设置分割器
        littleModuleRecyclerView.addItemDecoration(new HomeGridDecoration(12));
        //设置动画
        littleModuleRecyclerView.setItemAnimator(new DefaultItemAnimator());

        //设置Adapter
        List<IconTitleModel> iconTitleModels = presenter.getIconTitleModels();
        LittleModuleAdapter littleModuleAdapter = new LittleModuleAdapter(
                R.layout.view_icon_title_small, iconTitleModels);

        littleModuleRecyclerView.setAdapter(littleModuleAdapter);
        //设置item点击事件
        littleModuleAdapter.setOnItemClickListener(new BaseQuickAdapter.OnItemClickListener() {
            @Override
            public void onItemClick(BaseQuickAdapter adapter, View view, int position) {
                ToastUtils.show(iconTitleModels.get(position).getTitle());
            }
        });

    }
LittleModuleAdapter.java
public class LittleModuleAdapter extends BaseQuickAdapter<IconTitleModel, BaseViewHolder> {

    private List<IconTitleModel> list;

    public LittleModuleAdapter(int layoutResId, @Nullable List<IconTitleModel> data) {
        super(layoutResId, data);
        list = data;
    }

    @Override
    protected void convert(BaseViewHolder helper, IconTitleModel item) {
        //设置图片
        helper.setImageResource(R.id.iv_icon_title, item.getIconResource());
        //设置标题
        helper.setText(R.id.tv_icon_title, item.getTitle());
    }
}
都是 RecyclerView 的基本知识,就不再赘述了。
4. 四个广告封装的 HomeAdsView
HomeAdsView.java
public class HomeAdsView extends LinearLayout {

    @BindView(R.id.ads_1)
    ImageView ads1;
    @BindView(R.id.ads_2)
    ImageView ads2;
    @BindView(R.id.ads_3)
    ImageView ads3;
    @BindView(R.id.ads_4)
    ImageView ads4;

    public HomeAdsView(Context context) {
        this(context, null, 0);
    }

    public HomeAdsView(Context context, @Nullable AttributeSet attrs) {
        this(context, attrs, 0);
    }

    public HomeAdsView(Context context, @Nullable AttributeSet attrs, int defStyleAttr) {
        super(context, attrs, defStyleAttr);
        View view = View.inflate(context, R.layout.view_home_ads, this);
        ButterKnife.bind(view);
    }

    @OnClick({R.id.ads_1, R.id.ads_2, R.id.ads_3, R.id.ads_4})
    public void onViewClicked(View view) {
        switch (view.getId()) {
            case R.id.ads_1:
                onAdsClickListener.onAds1Click();
                break;
            case R.id.ads_2:
                onAdsClickListener.onAds2Click();
                break;
            case R.id.ads_3:
                onAdsClickListener.onAds3Click();
                break;
            case R.id.ads_4:
                onAdsClickListener.onAds4Click();
                break;
        }
    }

    /**
     * 设置广告的资源id,从左到右从上到下依次排列
     * 加载本地图片
     *
     * @param list
     */
    public void setAdsResource(List<Integer> list) {
        if (list == null || list.size() != 4) {
            return;
        }
        Glide.with(this).load(list.get(0)).into(ads1);
        Glide.with(this).load(list.get(1)).into(ads2);
        Glide.with(this).load(list.get(2)).into(ads3);
        Glide.with(this).load(list.get(3)).into(ads4);
    }

    /**
     * 设置广告的资源id,从左到右从上到下依次排列
     * 加载网络图片
     *
     * @param list
     */
    public void setAdsUrl(List<String> list) {
        if (list == null || list.size() != 4) {
            return;
        }
        Glide.with(this).load(list.get(0)).into(ads1);
        Glide.with(this).load(list.get(1)).into(ads2);
        Glide.with(this).load(list.get(2)).into(ads3);
        Glide.with(this).load(list.get(3)).into(ads4);
    }

    private OnAdsClickListener onAdsClickListener;

    public interface OnAdsClickListener {
        void onAds1Click();

        void onAds2Click();

        void onAds3Click();

        void onAds4Click();
    }

    public void setOnAdsClickListener(OnAdsClickListener onAdsClickListener) {
        this.onAdsClickListener = onAdsClickListener;
    }
}
view_home_ads.xml
<?xml version="1.0" encoding="utf-8"?>
<LinearLayout xmlns:android="http://schemas.android.com/apk/res/android"
    android:layout_width="match_parent"
    android:layout_height="match_parent"
    android:orientation="horizontal">

    <ImageView
        android:id="@+id/ads_1"
        android:layout_width="120dp"
        android:layout_height="240dp"
        android:src="@mipmap/ads_1"
        android:layout_margin="2dp"
        android:scaleType="fitStart"
        />

    <LinearLayout
        android:layout_width="0dp"
        android:layout_height="240dp"
        android:layout_weight="1"
        android:orientation="vertical">

        <ImageView
            android:id="@+id/ads_2"
            android:layout_width="match_parent"
            android:layout_height="0dp"
            android:layout_weight="1"
            android:src="@mipmap/ads_2"
            android:layout_margin="2dp"
            android:scaleType="fitStart"
            />

        <LinearLayout
            android:layout_width="match_parent"
            android:layout_height="0dp"
            android:layout_weight="1">

            <ImageView
                android:id="@+id/ads_3"
                android:layout_width="0dp"
                android:layout_height="match_parent"
                android:layout_weight="1"
                android:src="@mipmap/ads_3"
                android:layout_margin="2dp"
                android:scaleType="fitStart"
                />

            <ImageView
                android:id="@+id/ads_4"
                android:layout_width="0dp"
                android:layout_height="match_parent"
                android:layout_weight="1"
                android:src="@mipmap/ads_4"
                android:layout_margin="2dp"
                android:scaleType="fitStart"
                />

        </LinearLayout>
    </LinearLayout>
</LinearLayout>
向外暴露设置图片资源和Url地址的方法,并提供点击事件接口。用起来很简单:
private void initAds() {
        homeAdsView.setOnAdsClickListener(new HomeAdsView.OnAdsClickListener() {
            @Override
            public void onAds1Click() {
                ToastUtils.show("Ads1");
            }

            @Override
            public void onAds2Click() {
                ToastUtils.show("Ads2");
            }

            @Override
            public void onAds3Click() {
                ToastUtils.show("Ads3");
            }

            @Override
            public void onAds4Click() {
                ToastUtils.show("Ads4");
            }
        });
    }
因为图片是写死的,这里只实现了点击事件回调。
5.团购信息列表
这个也是个普通的 RecyclerView,里面牵扯到数据库操作,就不在这里贴代码啦。
注意个问题,RecyclerView 和 ScrollView 滑动会有冲突,需要特殊处理下,处理方法:
LinearLayoutManager lm = new LinearLayoutManager(getActivity(), LinearLayoutManager.VERTICAL, false) {
            @Override
            public boolean canScrollVertically() {
                return false;
            }
        };
 rvShopList.setLayoutManager(lm);
通过设置 LinearLayoutManager 禁止RecyclerView 垂直方向上滑动。
6.下拉刷新加载更多
用 SmartRefreshLayout 实现的,它的官方文档写的很详细,本文重点在于解读主页,具体框架使用就不多说啦。
以上就是对美团首页布局分析及实现的过程,前四个模块说的比较详细,牵扯到自定义View的封装。其实不封装直接写也行,但为了后期维护起来不被人骂,还是多花点精力封装下吧。
团购信息列表和下拉刷新主要是普通的 RecyclerView 用法和框架整合,这类文章比较多,不明白的可以自行查阅相关资料。
源码地址:github.com/cachecats/L…
欢迎下载,欢迎 star,欢迎点赞~
