

写在开头
okHttp目前可以称的上是Android主流网络框架,甚至连谷歌官方也将网络请求的实现替换成okHttp.
网上也有很多人对okHttp的源码进行了分析,不过基于每个人的分析思路都不尽相同,读者看起来的收获也各不相同,所以我还是整理了下思路,写了点自己的分析感悟。
本文基于okhttp3.11.0版本分析
基本用法
String url = "http://www.baidu.com";
//'1. 生成OkHttpClient实例对象'
OkHttpClient okHttpClient = new OkHttpClient();
//'2. 生成Request对象'
Request request = new Request.Builder()
    .url(url)
    .post(RequestBody.create(MediaType.parse("application/json; charset=utf-8"),"test content"))
    .build();
Call call = okHttpClient.newCall(request);

call.enqueue(new Callback() {
    @Override
    public void onFailure(@NonNull Call call, @NonNull IOException e) {
    }

    @Override
    public void onResponse(@NonNull Call call, @NonNull Response response)  {

    }
});
整体流程
借用别人的一张流程图来概括一下okHttp的请求走向 原图出处
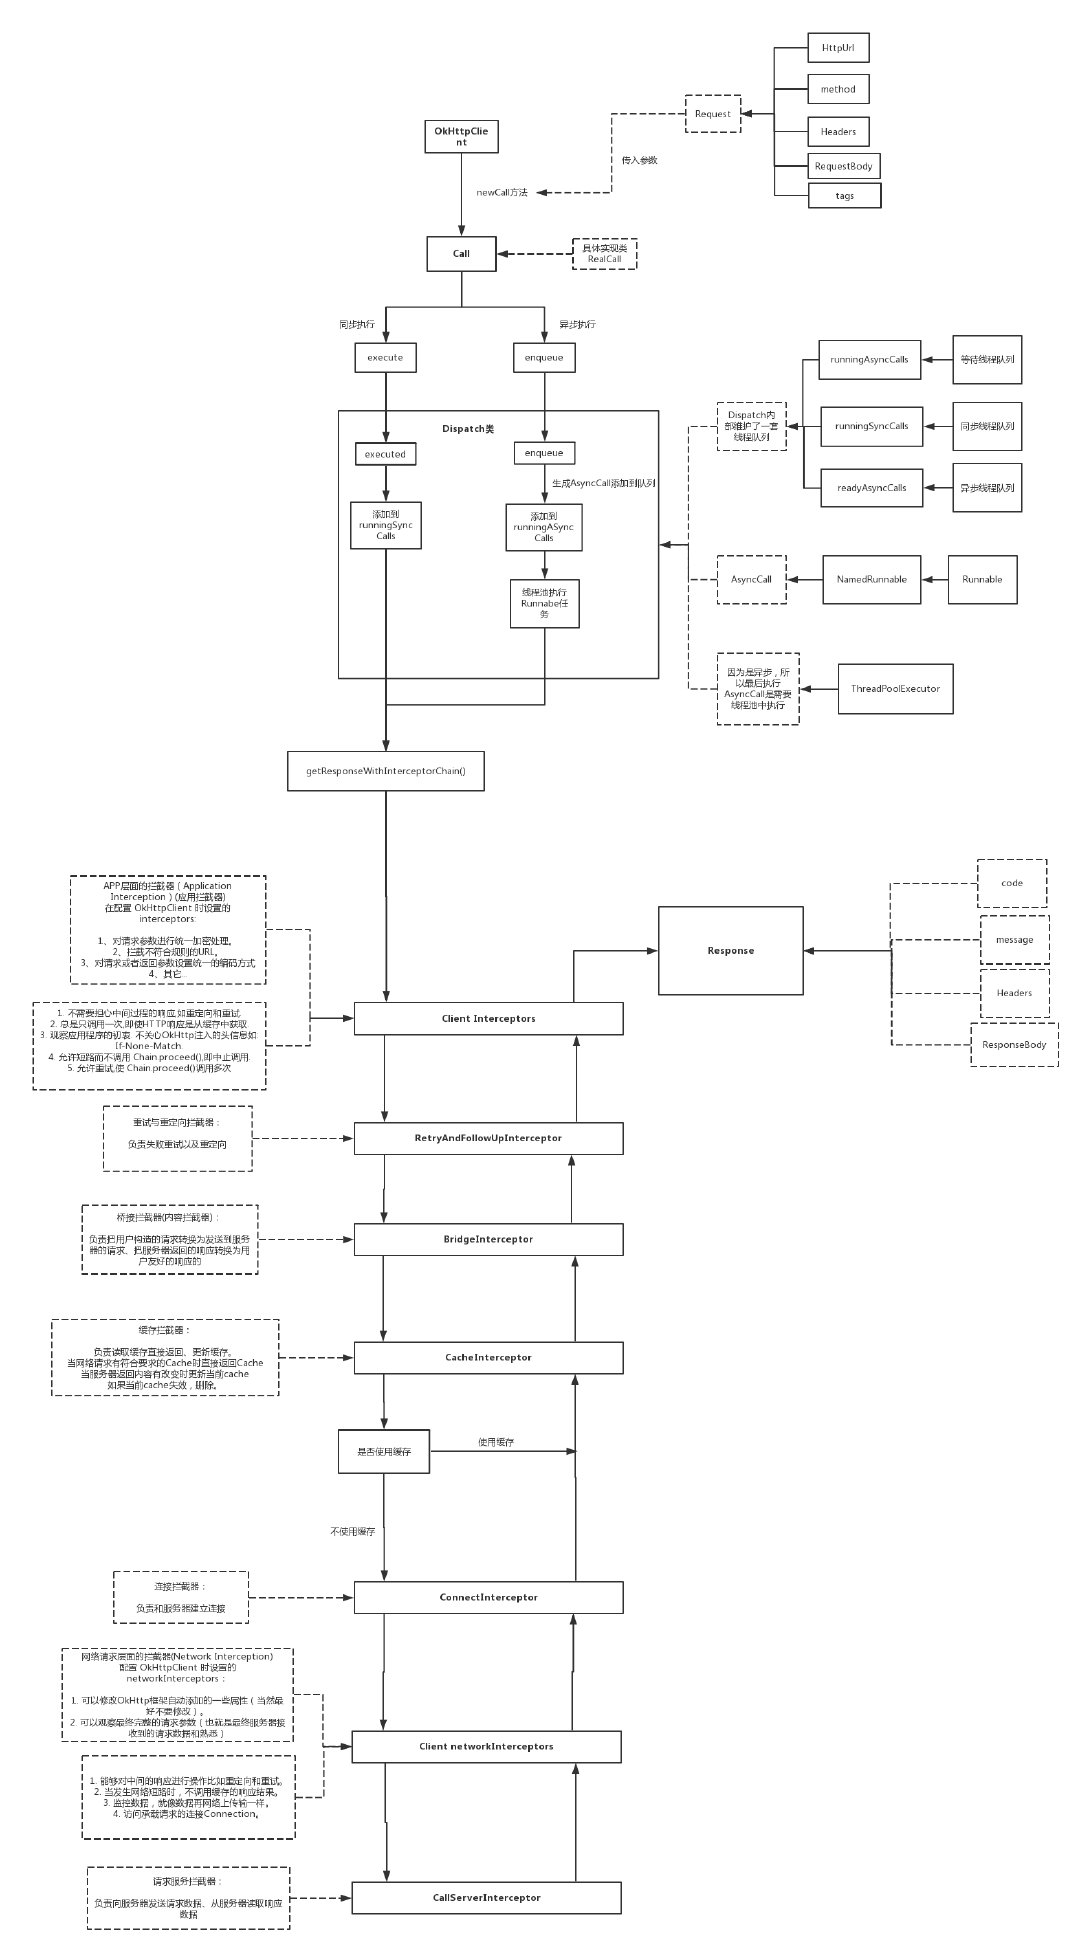
okHttp的整体流程大致分为以下几个阶段
-
创建请求对象 (url, method,body)-->request-->Call
-
请求事件队列,线程池分发 enqueue-->Runnable-->ThreadPoolExecutor
-
递归
Interceptor拦截器,发送请求。 InterceptorChain -
请求回调,数据解析。 Respose-->(code,message,requestBody)
创建请求对象
其中 Request维护请求对象的属性
public final class Request {
    final HttpUrl url;
    final String method;
    final Headers headers;
    final @Nullable RequestBody body;
    //请求的标记,在okHttp2.x的时候,okHttpClint提供Cancel(tag)的方法来批量取消请求
    //不过在3.x上批量请求的api被删除了,要取消请求只能在Callback中调用 call.cancel()
    //因此这个tags参数只能由开发者自己编写函数来实现批量取消请求的操作
    final Map<Class<?>, Object> tags;
}
请求响应的包装接口Call
public interface Call extends Cloneable {
	Request request();
	Response execute() throws IOException;
	void enqueue(Callback responseCallback);
	void cancel();
}
请求事件队列,线程池分发
Call的实现类RealCall和AsyncCall
  @Override
  public void enqueue(Callback responseCallback) {
    synchronized (this) {
      if (executed) throw new IllegalStateException("Already Executed");
      executed = true;
    }
    captureCallStackTrace();
    eventListener.callStart(this);
    client.dispatcher().enqueue(new AsyncCall(responseCallback));
  }

//其中AsyncCall是RealCall的一个内部类,继承自Runnable,这样就能通过线程池来回调AsyncCall的execute函数

final class AsyncCall extends NamedRunnable {
    @Override
    protected void execute() {
        boolean signalledCallback = false;
        try {
            //getResponseWithInterceptorChain 拦截链的逻辑,也是发起请求的真正入口
            Response response = getResponseWithInterceptorChain();
            if (retryAndFollowUpInterceptor.isCanceled()) {
                signalledCallback = true;
                responseCallback.onFailure(RealCall.this, new IOException("Canceled"));
            } else {
                signalledCallback = true;
                responseCallback.onResponse(RealCall.this, response);
            }
        } catch (IOException e) {
            ...
        }
        ...
    }
}
递归Interceptor拦截器,发送请求
Response getResponseWithInterceptorChain() throws IOException {
    // Build a full stack of interceptors.
    List<Interceptor> interceptors = new ArrayList<>();
 	//用户自定义的拦截器(注意addAll 所以可以添加多个自定义的拦截器)
    interceptors.addAll(client.interceptors());
    //重试与重定向拦截器
    interceptors.add(retryAndFollowUpInterceptor);
    //内容拦截器
    interceptors.add(new BridgeInterceptor(client.cookieJar()));
    //缓存拦截器
    interceptors.add(new CacheInterceptor(client.internalCache()));
    //网络连接拦截器
    interceptors.add(new ConnectInterceptor(client));
    if (!forWebSocket) {
      //用户自定义的网络拦截器
      interceptors.addAll(client.networkInterceptors());
    }
    //服务请求的拦截器
    interceptors.add(new CallServerInterceptor(forWebSocket));

    Interceptor.Chain chain = new RealInterceptorChain(interceptors, null, null, null, 0,
        originalRequest, this, eventListener, client.connectTimeoutMillis(),
        client.readTimeoutMillis(), client.writeTimeoutMillis());

    return chain.proceed(originalRequest);
  }
okHttp的核心部分就是这个Interceptor拦截链,每个Interceptor各自负责一部分功能,内部通过递归的方式遍历每一个Interceptor拦截器。递归逻辑在RealInterceptorChain类下
public final class RealInterceptorChain implements Interceptor.Chain {

    //拦截器递归的入口
    public Response proceed(Request request, StreamAllocation streamAllocation,
               HttpCodec httpCodec, RealConnection connection) throws IOException {
     ...
    //拦截器递归的核心代码,根据interceptors列表执行每一个拦截器的intercept函数
    RealInterceptorChain next = new RealInterceptorChain(interceptors, streamAllocation, httpCodec,
        connection, index + 1, request, call, eventListener, connectTimeout, readTimeout,
        writeTimeout);
    Interceptor interceptor = interceptors.get(index);
    Response response = interceptor.intercept(next);

    ....
    return response;
  }
}
递归结束后会获得请求响应,那么说明我们的request行为就在这个拦截链中,接下来我们先看看负责网络请求的那部分拦截器,从类名上就能比较容易的看出 ConnectInterceptor和 CallServerInterceptor这两个拦截器的主要工作。
网络连接拦截器ConnectInterceptor
public final class ConnectInterceptor implements Interceptor {

    @Override
    public Response intercept(Chain chain) throws IOException {
        RealInterceptorChain realChain = (RealInterceptorChain) chain;
        Request request = realChain.request();
        StreamAllocation streamAllocation = realChain.streamAllocation();

        // We need the network to satisfy this request. Possibly for validating a conditional GET.
        boolean doExtensiveHealthChecks = !request.method().equals("GET");
        HttpCodec httpCodec = streamAllocation.newStream(client, chain, doExtensiveHealthChecks);
        RealConnection connection = streamAllocation.connection();

        return realChain.proceed(request, streamAllocation, httpCodec, connection);
    }
}
其中有几个对象说明一下
-
**StreamAllocation:**内存流的存储空间,这个对象可以直接从realChain中直接获取,说明在之前的拦截链中就已经赋值过
-
HttpCodec(Encodes HTTP requests and decodes HTTP responses): 对请求的编码以及对响应数据的解码
-
**realChain.proceed():**通知下一个拦截器执行
接下来看创建HttpCodec对象的newStream函数中做了些什么
//HttpCodec httpCodec = streamAllocation.newStream(client, chain, doExtensiveHealthChecks);

public HttpCodec newStream(
      OkHttpClient client, Interceptor.Chain chain, boolean doExtensiveHealthChecks) {

    ...
    try {
      //findHealthyConnection内部通过一个死循环查找一个可用的连接,优先使用存在的可用连接,否则就通过	   //线程池来生成,其中多处使用 synchronized关键字,防止因为多并发导致问题
      RealConnection resultConnection = findHealthyConnection(connectTimeout, readTimeout,
          writeTimeout, pingIntervalMillis, connectionRetryEnabled, doExtensiveHealthChecks);
      HttpCodec resultCodec = resultConnection.newCodec(client, chain, this);

      synchronized (connectionPool) {
        codec = resultCodec;
        return resultCodec;
      }
    } catch (IOException e) {
      throw new RouteException(e);
    }
  }
沿着代码往下走,你会发现实际上负责网络连接功能的类是一个叫RealConnection的类,该类中有一个connect的函数
RealConnection#connect
 public void connect(int connectTimeout, int readTimeout, int writeTimeout,
      int pingIntervalMillis, boolean connectionRetryEnabled, Call call,
      EventListener eventListener) {
    ...

    while (true) {
      try {
        if (route.requiresTunnel()) {
          //这个函数最终还是会走到connectSocket()函数中
          connectTunnel(connectTimeout, readTimeout, writeTimeout, call, eventListener);
          if (rawSocket == null) {
            // We were unable to connect the tunnel but properly closed down our resources.
            break;
          }
        } else {
          connectSocket(connectTimeout, readTimeout, call, eventListener);
        }
      }
      ...
  }

  //最终调用的还是Socket对象来创建网络连接,包括connectTimeout,readTimeout等参数也是这个时候真正设置的。
网络请求拦截器 CallServerInterceptor
This is the last interceptor in the chain. It makes a network call to the server.
直接看CallServerInterceptor的intercept函数
@Override
public Response intercept(Chain chain) throws IOException{
    //下面的各参数都是之前几个拦截器所生成的
    RealInterceptorChain realChain = (RealInterceptorChain) chain;
    HttpCodec httpCodec = realChain.httpStream();
    StreamAllocation streamAllocation = realChain.streamAllocation();
    RealConnection connection = (RealConnection) realChain.connection();
    Request request = realChain.request();

    //发送请求头,也是网络请求的开始
    httpCodec.writeRequestHeaders(request);

    Response.Builder responseBuilder = null;
    //请求不是get,并且有添加了请求体,写入请求体信息
    if (HttpMethod.permitsRequestBody(request.method()) && request.body() != null) {
      //如果请求头中有Expect:100-continue这么一个属性
      //会先发送一个header部分给服务器,并询问服务器是否支持Expect:100-continue 这么一个扩展域
      //okhttp3提供这么个判断是为了兼容http2的连接复用行为的
      if ("100-continue".equalsIgnoreCase(request.header("Expect"))) {
        //刷新缓存区,可以理解为向服务端写入数据
        httpCodec.flushRequest();
        realChain.eventListener().responseHeadersStart(realChain.call());
        responseBuilder = httpCodec.readResponseHeaders(true);
      }

      //写入请求body
      if (responseBuilder == null) {
        realChain.eventListener().requestBodyStart(realChain.call());
        long contentLength = request.body().contentLength();
        CountingSink requestBodyOut =
            new CountingSink(httpCodec.createRequestBody(request, contentLength));
        BufferedSink bufferedRequestBody = Okio.buffer(requestBodyOut);

        request.body().writeTo(bufferedRequestBody);
        bufferedRequestBody.close();
        realChain.eventListener()
            .requestBodyEnd(realChain.call(), requestBodyOut.successfulCount);
      }
      ...
    httpCodec.finishRequest();

    //响应相关的代码
    ...
}
写入请求body的核心代码
//将请求体写入到BufferedSink中,而BufferedSink是另外一个类库Okio中的类
CountingSink requestBodyOut =
            new CountingSink(httpCodec.createRequestBody(request, contentLength));
BufferedSink bufferedRequestBody = Okio.buffer(requestBodyOut);
request.body().writeTo(bufferedRequestBody);


//httpCodec.finishRequest 最终会调用 sink.flush(),sink是BufferedSink的对象,BufferedSink在底层
//会将其内的数据推给服务端,相当于是一个刷新缓冲区的功能
httpCodec.finishRequest();
响应相关的代码
if (responseBuilder == null) {
    realChain.eventListener().responseHeadersStart(realChain.call());
  	//读取响应头,实际的返回流存放位置在okio库下的buffer对象中,读取过程中做了判断,只有当code==100时才会	 //有返回,不然抛出异常并拦截,所以下面这段代码肯定有响应头返回,不然直到超时也不会回调
    responseBuilder = httpCodec.readResponseHeaders(false);
}

Response response = responseBuilder
            .request(request)
    .handshake(streamAllocation.connection().handshake())
    .sentRequestAtMillis(sentRequestMillis)
    .receivedResponseAtMillis(System.currentTimeMillis())
    .build();

int code = response.code();
if (code == 100) {
    //如果服务端响应码为100,需要我们再次请求,注意这里的100是响应码和之前的100不同
    //之前的100是headerLine的标识码
    responseBuilder = httpCodec.readResponseHeaders(false);

    response = responseBuilder
        .request(request)
        .handshake(streamAllocation.connection().handshake())
        .sentRequestAtMillis(sentRequestMillis)
        .receivedResponseAtMillis(System.currentTimeMillis())
        .build();

    code = response.code();
}

if (forWebSocket && code == 101) {
    //Connection is upgrading, but we need to ensure interceptors see a
    //non-null response body.
    response = response.newBuilder()
        .body(Util.EMPTY_RESPONSE)
        .build();
} else {
    //读取响应body
    response = response.newBuilder()
        .body(httpCodec.openResponseBody(response))
        .build();
}
return response;
读取响应body HttpCodec#openResponseBody
public ResponseBody openResponseBody(Response response) throws IOException {
    ...
    Source source = newFixedLengthSource(contentLength);
	return new RealResponseBody(contentType, contentLength, Okio.buffer(source));
    ...
}

//openResponseBody将Socket的输入流InputStream对象交给OkIo的Source对象,然后封装成RealResponseBody(该类是ResponseBody的子类)作为Response的body.

//具体读取是在RealResponseBody父类ResponseBody中,其中有个string()函数

//响应主体存放在内存中,然后调用source.readString来读取服务器的数据。需要注意的是该方法最后调用closeQuietly来关闭了当前请求的InputStream输入流,所以string()方法只能调用一次,再次调用的话会报错
public final String string() throws IOException {
    BufferedSource source = source();
    try {
        Charset charset = Util.bomAwareCharset(source, charset());
        return source.readString(charset);
    } finally {
        Util.closeQuietly(source);
    }
}
请求回调,数据解析
拿到请求回调的Response之后,再回到我们最开始调用的代码,
String url = "http://www.baidu.com";
//'1. 生成OkHttpClient实例对象'
OkHttpClient okHttpClient = new OkHttpClient();
//'2. 生成Request对象'
Request request = new Request.Builder()
    .url(url)
    .post(RequestBody.create(MediaType.parse("application/json; charset=utf-8"),"test content"))
    .build();
Call call = okHttpClient.newCall(request);

call.enqueue(new Callback() {
    @Override
    public void onFailure(@NonNull Call call, @NonNull IOException e) {
    }

    @Override
    public void onResponse(@NonNull Call call, @NonNull Response response)  {
        Headers responseHeaders = response.headers();
        for (int i = 0, size = responseHeaders.size(); i < size; i++) {
            System.out.println(responseHeaders.name(i) + ": " + responseHeaders.value(i));
        }
        System.out.println(response.body().string());
    }
});
我们可以从Response对象中获取所有我们所需要的数据,包括header,body.至此,okHttp的网络请求的大致流程已经分析完成,至于还有部分没有讲到的拦截器就不再本文缀述了.有兴趣的可以看下文末的参考连接或者自行谷歌。
参考文章
Okhttp之CallServerInterceptor简单分析
Android技能树 — 网络小结之 OkHttp超超超超超超超详细解析
OkHttp3.0解析 —— 从源码的角度谈谈发起网络请求时做的操作
扩展阅读
关于Http的请求头 Expect:100-Continue
Expect请求头部域,用于指出客户端要求的特殊服务器行为。若服务器不能理解或者满足
Expect域中的任何期望值,则必须返回417(Expectation Failed)状态,或者如果请求
有其他问题,返回4xx状态。

Expect:100-Continue握手的目的,是为了允许客户端在发送请求内容之前,判断源服务器是否愿意接受
请求(基于请求头部)。
Expect:100-Continue握手需谨慎使用,因为遇到不支持HTTP/1.1协议的服务器或者代理时会引起问题。
http2比起http1.x的有点主要体现在以下几点
- 新的数据格式, http基于文件协议解析,http2基于二进制协议解析,
- 连接共享,多路复用(MultiPlexing)
- header压缩,减小header的体积,使得请求更快
- 压缩算法从gzip改成HPACK的算法,防破解
- 重置连接表现更好,http1.x取消请求的是直接断开连接,http2则是断开某个连接的stream流
- 更安全的SSL
