

目录介绍
- 1.Notification简单概述
- 2.Notification通知用途
- 3.Notification的基本操作
- 3.1 Notification创建必要的属性
- 3.2 Notification简单创建步骤
- 3.3 关于setSmallIcon()与setLargeIcon()区别
- 3.4 Notification的Action属性【交互作用】
- 3.5 更新Notification
- 3.6 取消Notification
- 3.7 设置flag属性
- 3.8 设置Notification的通知效果
- 3.9 设置自定义Notification通知栏布局
- 4.Notification相关属性说明
- 4.1 PendingIntent说明
- 4.2 创建返回栈PendingIntent
- 4.3 注意要点
- 5.部分源码分析思考
- 5.1 RemoteView是什么?
- 5.2 查看源码,了解Notification如何创建布局
- 6.关于Android8.0通知栏适配
- 6.1 Android O(8.0)通知的改变
- 6.2 报错内容和解决方案
- 6.3 最终解决方案
- 7.关于其他
好消息
- 已经解决了8.0以上通知栏不能显示问题。封装成了lib库,欢迎大家下载。已经放到正式项目运行多时!
- 项目地址链接:github.com/yangchong21…
- 本篇文章已授权微信公众号 guolin_blog (郭霖)独家发布
- 项目截图说明
1.Notification简单概述
- Notification,是一种具有全局效果的通知,可以在系统的通知栏中显示。当 APP 向系统发出通知时,它将先以图标的形式显示在通知栏中。用户可以下拉通知栏查看通知的详细信息。通知栏和抽屉式通知栏均是由系统控制,用户可以随时查看。
2.Notification通知用途
- 常见的用途
- 显示接收到短消息、及时消息等信息(如QQ、微信、新浪、短信)
- 显示客户端的推送消息,如广告、优惠、版本更新、推荐新闻等,常用的第三方 SDK 有: JPush 、 个推 、 信鸽 、 网易云信(偏重 IM ) 、 阿里云推送
- 显示正在进行的事物,例如:后台运行的程序,如音乐播放进度、下载进度等
- 前两点可以归结为与用户交互,第三点是实时的任务提醒,但不可否认的是,第三点也会与用户交互。
3.Notification的基本操作
-
3.1 Notification创建必要的属性,必须设置
-
3.1.1 必须添加的属性
-
小图标,通过 setSmallIcon() 方法设置
-
标题,通过 setContentTitle() 方法设置
-
内容,通过 setContentText() 方法设置
-
3.2 Notification创建步骤
-
3.2.1 Notification 的创建主要涉及到 Notification.Builder 、 Notification 、 NotificationManager Notification.Builer : 使用建造者模式构建 Notification 对象。由于 Notification.Builder 仅支持 Android 4.1及之后的版本,为了解决兼容性问题, Google 在 Android Support v4 中加入了 - NotificationCompat.Builder 类。对于某些在 Android 4.1 之后才特性,即使 NotificationCompat.Builder 支持该方法,在之前的版本中也不能运行。
-
Notification : 通知对应类,保存通知相关的数据。- NotificationManager 向系统发送通知时会用到。
-
NotificationManager : NotificationManager 是通知管理类,它是一个系统服务。调用 NotificationManager 的 notify() 方法可以向系统发送通知。
-
3.2.2 Notification创建步骤与代码
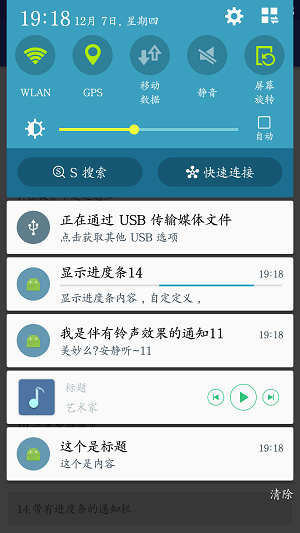
// 创建一个NotificationManager的引用 NotificationManager mNotificationManager = (NotificationManager) this.getSystemService(Context.NOTIFICATION_SERVICE); // 定义Notification的各种属性 Notification.Builder mBuilder = new Notification.Builder(this.getApplicationContext()) .setSound(android.provider.Settings.System.DEFAULT_NOTIFICATION_URI) // .setSmallIcon(R.mipmap.ic_launcher) //设置通知的图标 .setTicker("有新消息呢") //设置状态栏的标题 .setContentTitle("这个是标题") //设置标题 .setContentText("这个是内容") //消息内容 .setDefaults(Notification.DEFAULT_ALL) //设置默认的提示音 .setPriority(Notification.PRIORITY_DEFAULT) //设置该通知的优先级 .setOngoing(false) //让通知左右滑的时候不能取消通知 .setPriority(Notification.PRIORITY_DEFAULT) //设置该通知的优先级 .setWhen(System.currentTimeMillis()) //设置通知时间,默认为系统发出通知的时间,通常不用设置 .setAutoCancel(true); //打开程序后图标消失 //处理点击Notification的逻辑 Intent resultIntent = new Intent(this, TestActivity.class); resultIntent.addFlags(Intent.FLAG_ACTIVITY_NEW_TASK); //添加为栈顶Activity resultIntent.putExtra("what",5); PendingIntent resultPendingIntent = PendingIntent.getActivity(this,5,resultIntent,PendingIntent.FLAG_UPDATE_CURRENT); mBuilder.setContentIntent(resultPendingIntent); //发送 mNotificationManager.notify(1, mBuilder.build()); //结束广播 //mNotificationManager.cancel(1); -
3.3 关于setSmallIcon()与setLargeIcon()区别
-
在 NotificationCompat.Builder 中有设置通知的大小图标的两个方法。这两个方法有什么区别呢?
-
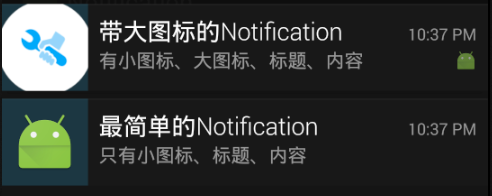
当 setSmallIcon() 与 setLargeIcon() 同时存在时, smallIcon 显示在通知的右下角, largeIcon 显示在左侧
-
当只设置 setSmallIcon() 时, smallIcon 显示在左侧。看下图你就明白了。
-
对于部分 ROM ,可能修改过源码,如 MIUI 上通知的大图标和小图标是没有区别的。
-
效果如图所示:
-
3.4 Notification的Action属性
-
设置一个 Action ,这样就可以直接跳转到 App 的某个 Activity 、启动一个 Service 或者发送一个 Broadcast。否则,Notification 仅仅只能起到通知的效果,而不能与用户交互。
-
具体代码如下所示:
//创建intent Intent resultIntent = new Intent(this, TestActivity.class); resultIntent.addFlags(Intent.FLAG_ACTIVITY_NEW_TASK); //添加为栈顶Activity resultIntent.putExtra("what",5); PendingIntent resultPendingIntent = PendingIntent.getActivity(this,5,resultIntent,PendingIntent.FLAG_UPDATE_CURRENT); //发送pendingIntent mBuilder.setContentIntent(resultPendingIntent); -
3.5 更新Notification
-
更新通知很简单,只需要再次发送相同 ID 的通知即可,如果之前的通知还未被取消,则会直接更新该通知相关的属性;如果之前的通知已经被取消,则会重新创建一个新通知。更新通知跟发送通知使用相同的方式。
-
3.6 取消Notification
-
取消通知有如下 5 种方式:
-
点击通知栏的清除按钮,会清除所有可清除的通知
-
设置了 setAutoCancel() 或 FLAG_AUTO_CANCEL 的通知,点击该通知时会清除它
-
通过 NotificationManager 调用 cancel(int id) 方法清除指定 ID 的通知
-
通过 NotificationManager 调用 cancel(String tag, int id) 方法清除指定 TAG 和 ID 的通知
-
通过 NotificationManager 调用 cancelAll() 方法清除所有该应用之前发送的通知
-
注意事项
-
如果你是通过 NotificationManager.notify(String tag, int id, Notification notify) 方法创建的通知,那么只能通过 NotificationManager.cancel(String tag, int id) 方法才能清除对应的通知,调用NotificationManager.cancel(int id) 无效。
-
3.7 设置flag属性
-
设置FLAG_NO_CLEAR表示
-
设置通知不能被状态栏的清除按钮给清除掉,也不能被手动清除,但能通过 cancel() 方法清除
-
代码:
private void sendNotification9() { Notification.Builder mBuilder = new Notification.Builder(this.getApplicationContext()) .setSound(android.provider.Settings.System.DEFAULT_NOTIFICATION_URI) .setSmallIcon(R.mipmap.ic_launcher) //设置通知的图标 .setTicker("有新消息呢9") //设置状态栏的标题 .setContentTitle("这个是标题9") //设置标题 .setContentText("这个是内容9") //消息内容 .setDefaults(Notification.DEFAULT_ALL) //设置默认的提示音 .setOngoing(false) //让通知左右滑的时候不能取消通知 .setAutoCancel(true); //打开程序后图标消失 Notification notification = mBuilder.build(); //设置 Notification 的 flags = FLAG_NO_CLEAR //FLAG_NO_CLEAR 表示该通知不能被状态栏的清除按钮给清除掉,也不能被手动清除,但能通过 cancel() 方法清除 //flags 可以通过 |= 运算叠加效果 notification.flags |= Notification.FLAG_NO_CLEAR; //获取NotificationManager 对象 mNotificationManager.notify(9, notification); } //取消通知: if(mNotificationManager!=null){ mNotificationManager.cancelAll(); } -
3.8 设置Notification的通知效果
-
Notification 有震动、响铃、呼吸灯三种响铃效果,可以通过 setDefaults(int defualts) 方法来设置。 Default 属性有以下四种,一旦设置了 Default 效果,自定义的效果就会失效。楼主在这里踩了坑,愣是调了半天没找到为什么自定义效果会消失,忘大家慎之。
//设置系统默认提醒效果,一旦设置默认提醒效果,则自定义的提醒效果会全部失效。具体可看源码//添加默认震动效果,需要申请震动权限//<uses-permission android:name="android.permission.VIBRATE" /> Notification.DEFAULT_VIBRATE //添加系统默认声音效果,设置此值后,调用setSound()设置自定义声音无效 Notification.DEFAULT_SOUND //添加默认呼吸灯效果,使用时须与 Notification.FLAG_SHOW_LIGHTS 结合使用,否则无效 Notification.DEFAULT_LIGHTS //添加上述三种默认提醒效果 Notification.DEFAULT_ALL -
除了以上几种设置 Notification 默认通知效果,还可以通过以下几种 FLAG 设置通知效果。
//提醒效果常用 Flag//三色灯提醒,在使用三色灯提醒时候必须加该标志符 Notification.FLAG_SHOW_LIGHTS //发起正在运行事件(活动中) Notification.FLAG_ONGOING_EVENT //让声音、振动无限循环,直到用户响应 (取消或者打开) Notification.FLAG_INSISTENT //发起Notification后,铃声和震动均只执行一次 Notification.FLAG_ONLY_ALERT_ONCE //用户单击通知后自动消失 Notification.FLAG_AUTO_CANCEL //只有调用NotificationManager.cancel()时才会清除 Notification.FLAG_NO_CLEAR //表示正在运行的服务 Notification.FLAG_FOREGROUND_SERVICE -
设置默认提醒
// 添加默认声音提醒 builder.setDefaults(Notification.DEFAULT_SOUND); // 添加默认呼吸灯提醒,自动添加FLAG_SHOW_LIGHTS builder.setDefaults(Notification.DEFAULT_LIGHTS); -
设置铃声属性,用的很少
private void sendNotification11() { Notification.Builder builder = new Notification.Builder(this) .setSmallIcon(R.mipmap.ic_launcher) .setContentTitle("我是伴有铃声效果的通知11") .setContentText("美妙么?安静听~11") //调用系统默认响铃,设置此属性后setSound()会无效 //.setDefaults(Notification.DEFAULT_SOUND) //调用系统多媒体裤内的铃声 //.setSound(Uri.withAppendedPath(MediaStore.Audio.Media.INTERNAL_CONTENT_URI,"2")); //调用自己提供的铃声,位于 /res/values/raw 目录下 .setSound(Uri.parse("android.resource://com.yc.cn.ycnotification/" + R.raw.hah)); //另一种设置铃声的方法 //Notification notify = builder.build(); //调用系统默认铃声 //notify.defaults = Notification.DEFAULT_SOUND; //调用自己提供的铃声 //notify.sound = Uri.parse("android.resource://com.yc.cn.ycnotification/"+R.raw.sound); //调用系统自带的铃声 //notify.sound = Uri.withAppendedPath(MediaStore.Audio.Media.INTERNAL_CONTENT_URI,"2"); //mManager.notify(11,notify); mNotificationManager.notify(11, builder.build()); } -
设置震动属性
private void sendNotification12() { //震动也有两种设置方法,与设置铃声一样,在此不再赘述 long[] vibrate = new long[]{0, 500, 1000, 1500}; Notification.Builder builder = new Notification.Builder(this) .setSmallIcon(R.mipmap.ic_launcher) .setContentTitle("我是伴有震动效果的通知") .setContentText("颤抖吧,逗比哈哈哈哈哈~") //使用系统默认的震动参数,会与自定义的冲突 //.setDefaults(Notification.DEFAULT_VIBRATE) //自定义震动效果 .setVibrate(vibrate); //另一种设置震动的方法 //Notification notify = builder.build(); //调用系统默认震动 //notify.defaults = Notification.DEFAULT_VIBRATE; //调用自己设置的震动 //notify.vibrate = vibrate; //mManager.notify(3,notify); mNotificationManager.notify(12, builder.build()); } -
3.9 设置自定义Notification通知栏布局
-
代码如下,注意,这里只取部分代码,完整代码可以下载github的完整项目:github.com/yangchong21…
.setContent(getRemoteViews())                                              // 设置通知栏的布局
//创建自定义布局
private RemoteViews getRemoteViews() {
    RemoteViews remoteViews = new RemoteViews(getPackageName(), R.layout.notification_mobile_play);
    // 设置 点击通知栏的上一首按钮时要执行的意图
    remoteViews.setOnClickPendingIntent(R.id.btn_pre, getActivityPendingIntent(11));
    // 设置 点击通知栏的下一首按钮时要执行的意图
    remoteViews.setOnClickPendingIntent(R.id.btn_next, getActivityPendingIntent(12));
    // 设置 点击通知栏的播放暂停按钮时要执行的意图
    remoteViews.setOnClickPendingIntent(R.id.btn_start, getActivityPendingIntent(13));
    // 设置 点击通知栏的根容器时要执行的意图
    remoteViews.setOnClickPendingIntent(R.id.ll_root, getActivityPendingIntent(14));
    remoteViews.setTextViewText(R.id.tv_title, "标题");    // 设置通知栏上标题
    remoteViews.setTextViewText(R.id.tv_artist, "艺术家");  // 设置通知栏上艺术家
    return remoteViews;
}
4.Notification相关属性说明
-
4.1 PendingIntent说明
-
4.1.1 PendingIntent基本说明
-
PendingIntent 是一种特殊的 Intent ,字面意思可以解释为延迟的 Intent ,用于在某个事件结束后执行特定的 Action 。从上面带 Action 的通知也能验证这一点,当用户点击通知时,才会执行。
-
PendingIntent 是 Android 系统管理并持有的用于描述和获取原始数据的对象的标志(引用)。也就是说,即便创建该PendingIntent对象的进程被杀死了,这个PendingItent对象在其他进程中还是可用的。 日常使用中的短信、闹钟等都用到了 PendingIntent。
-
4.1.2 PendingIntent三种获取方式
//获取一个用于启动 Activity 的 PendingIntent 对象public static PendingIntent getActivity(Context context, int requestCode, Intent intent, int flags); //获取一个用于启动 Service 的 PendingIntent 对象public static PendingIntent getService(Context context, int requestCode, Intent intent, int flags); //获取一个用于向 BroadcastReceiver 广播的 PendingIntent 对象public static PendingIntent getBroadcast(Context context, int requestCode, Intent intent, int flags) -
4.1.3 PendingIntent具有几种flag
FLAG_CANCEL_CURRENT:如果当前系统中已经存在一个相同的 PendingIntent 对象,那么就将先将已有的 PendingIntent 取消,然后重新生成一个 PendingIntent 对象。 FLAG_NO_CREATE:如果当前系统中不存在相同的 PendingIntent 对象,系统将不会创建该 PendingIntent 对象而是直接返回 null 。 FLAG_ONE_SHOT:该 PendingIntent 只作用一次。 FLAG_UPDATE_CURRENT:如果系统中已存在该 PendingIntent 对象,那么系统将保留该 PendingIntent 对象,但是会使用新的 Intent 来更新之前 PendingIntent 中的 Intent 对象数据,例如更新 Intent 中的 Extras 。 -
4.2 创建返回栈PendingIntent
-
4.2.1 添加返回栈代码 默认情况下,从通知启动一个Activity,按返回键会回到主屏幕。 但某些时候有按返回键仍然留在当前应用的需求,这就要用到TaskStackBuilder了。
Notification.Builder mBuilder = new Notification.Builder(context) .setSound(android.provider.Settings.System.DEFAULT_NOTIFICATION_URI) .setSmallIcon(R.mipmap.ic_launcher) .setContentTitle("广播接受者标题,小杨") .setContentText("广播接受者内容,扯犊子") .setAutoCancel(true); Log.i(TAG, "onReceive: intent" + intent.getClass().getName()); Intent resultIntent = new Intent(context, MainActivity.class); TaskStackBuilder stackBuilder = TaskStackBuilder.create(context); //将该Activity添加为栈顶 stackBuilder.addParentStack(MainActivity.class); stackBuilder.addNextIntent(resultIntent); PendingIntent resultPendingIntent = stackBuilder.getPendingIntent(0, PendingIntent.FLAG_UPDATE_CURRENT); mBuilder.setContentIntent(resultPendingIntent); NotificationManager mNotificationManager = (NotificationManager) context.getSystemService(Context.NOTIFICATION_SERVICE); mNotificationManager.notify(1, mBuilder.build()); -
4.3 注意要点
-
如果用户的手机使静音模式,那么设置铃声或者震动效果将会失效
5.部分源码分析思考
-
5.1 RemoteView是什么?
-
5.1.1 什么是RemoteView?
-
为啥Notification不会设计成和普通View一样的使用方式?理由很简单!状态栏不是单单由你的应用程序管理.状态栏是由Android系统管理的.你需要显示Notification就必须和系统打交道.必须通过Notification服务才能显示你的Notification.所以设计成用一个Notification实例代表一个Notification,然后通过notificationManager.notify函数提交给Notification服务.
-
5.1.2 Notification服务是什么?是一个独立的线程!
-
又扯出一个问题.跨线程显示View.该怎么显示?不是在本应用程序显示View.这里就要借用RemoteView.
-
RemoteView理解成对一个View的封装,然后把RemoteView提交给其他线程.其他线程接收到RemoteView并且解析里面View的信息把它显示出来.
-
5.1.3 在使用系统自带的Notification系统会创建一个默认的RemoteView!
-
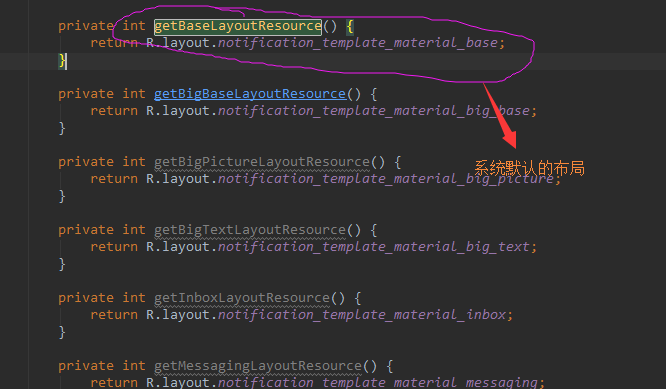
系统默认使用R.layout.notification_template_material_base生产一个RemoteView. 至于这里的布局是怎么查到的,请看下面源码分析
-
5.2 查看源码,了解Notification如何创建布局
-
5.2.1 首先看Notification中build代码
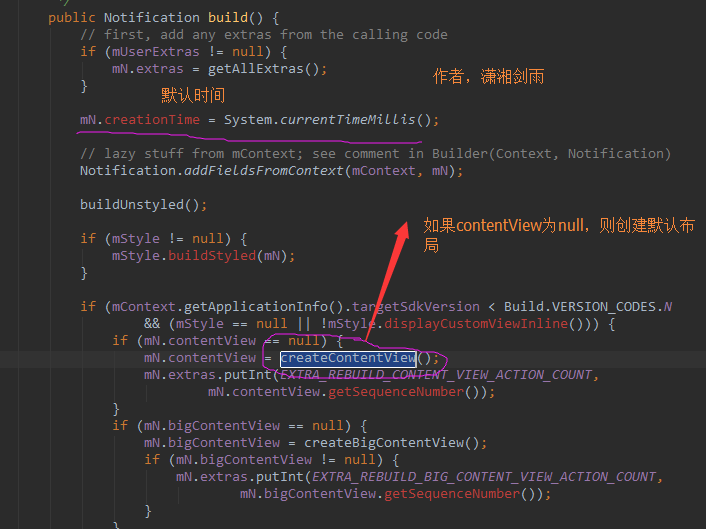
-
5.2.2 然后看上图中的createContentView()方法
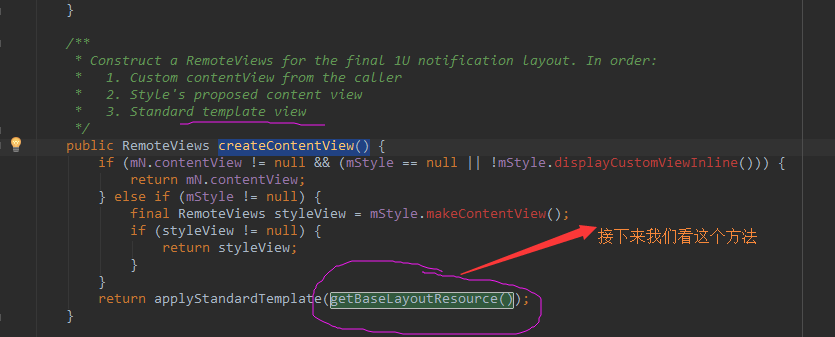
-
5.2.3 然后看上图中的createContentView()方法
6.关于Android8.0通知栏适配
6.1 Android O(8.0)通知的改变
- NotificationChannel是android8.0新增的特性,如果App的targetSDKVersion>=26,没有设置channel通知渠道的话,就会导致通知无法展示。
- Android O 引入了 通知渠道(Notification Channels),以提供统一的系统来帮助用户管理通知,如果是针对 android O 为目标平台时,必须实现一个或者多个通知渠道,以向用户显示通知。比如聊天软件,为每个聊天组设置一个通知渠道,指定特定声音、灯光等配置。
6.2 报错内容和解决方案
- 报错内容:Failed to post notification on channel “null” Target Api is 26
- 解决方案:
- 第一种:临时方案,google也考虑到适配问题,临时兼容方案是targetSDKVersion低于26
- 第二种:创建channel
6.3 最终解决方案
- 6.3.1 创建NotificationChannel步骤
- 创建NotificationChannel对象,指定Channel的id、name和通知的重要程度
- 使用NotificationMannager的createNotificationChannel方法来添加Channel。
if (Build.VERSION.SDK_INT >= Build.VERSION_CODES.O) { //android 8.0以上需要特殊处理,也就是targetSDKVersion为26以上 createNotificationChannel(); } @TargetApi(Build.VERSION_CODES.O) private void createNotificationChannel() { NotificationChannel channel = new NotificationChannel(CHANNEL_ID, CHANNEL_NAME, NotificationManager.IMPORTANCE_DEFAULT); channel.canBypassDnd();//是否绕过请勿打扰模式 channel.enableLights(true);//闪光灯 channel.setLockscreenVisibility(VISIBILITY_SECRET);//锁屏显示通知 channel.setLightColor(Color.RED);//闪关灯的灯光颜色 channel.canShowBadge();//桌面launcher的消息角标 channel.enableVibration(true);//是否允许震动 channel.getAudioAttributes();//获取系统通知响铃声音的配置 channel.getGroup();//获取通知取到组 channel.setBypassDnd(true);//设置可绕过 请勿打扰模式 channel.setVibrationPattern(new long[]{100, 100, 200});//设置震动模式 channel.shouldShowLights();//是否会有灯光 getManager().createNotificationChannel(channel); }- 设置通知重要性级别
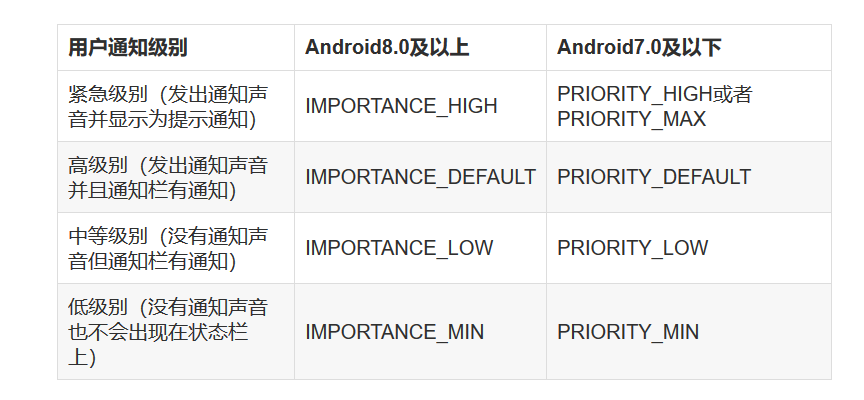
- 该级别必须要在 NotificationChannel的构造函数中指定,总共要五个级别;范围是从NotificationManager.IMPORTANCE_NONE(0) ~ NotificationManager.IMPORTANCE_HIGH(4)
- 如果要支持 Android 7.1(API 25)及以下的设备,还得调用NotificationCompat 的 setPriority 方法来设置
- 6.3.2 用户通知级别
- Android 8.0 及以上是使用NotificationManager.IMPORTANCE_,
- Android 7.1 及以下是使用NotificationCompat.PRIORITY_它们都是定义的常量
6.4 封装的代码
- 如下所示
public class NotificationUtils extends ContextWrapper {


    public static final String CHANNEL_ID = "default";
    private static final String CHANNEL_NAME = "Default_Channel";
    private NotificationManager mManager;
    private int[] flags;

    public NotificationUtils(Context base) {
        super(base);
        if (Build.VERSION.SDK_INT >= Build.VERSION_CODES.O) {
            //android 8.0以上需要特殊处理,也就是targetSDKVersion为26以上
            createNotificationChannel();
        }
    }

    @TargetApi(Build.VERSION_CODES.O)
    private void createNotificationChannel() {
        //第一个参数:channel_id
        //第二个参数:channel_name
        //第三个参数:设置通知重要性级别
        //注意:该级别必须要在 NotificationChannel 的构造函数中指定,总共要五个级别;
        //范围是从 NotificationManager.IMPORTANCE_NONE(0) ~ NotificationManager.IMPORTANCE_HIGH(4)
        NotificationChannel channel = new NotificationChannel(CHANNEL_ID, CHANNEL_NAME,
                NotificationManager.IMPORTANCE_DEFAULT);
        channel.canBypassDnd();//是否绕过请勿打扰模式
        channel.enableLights(true);//闪光灯
        channel.setLockscreenVisibility(VISIBILITY_SECRET);//锁屏显示通知
        channel.setLightColor(Color.RED);//闪关灯的灯光颜色
        channel.canShowBadge();//桌面launcher的消息角标
        channel.enableVibration(true);//是否允许震动
        channel.getAudioAttributes();//获取系统通知响铃声音的配置
        channel.getGroup();//获取通知取到组
        channel.setBypassDnd(true);//设置可绕过 请勿打扰模式
        channel.setVibrationPattern(new long[]{100, 100, 200});//设置震动模式
        channel.shouldShowLights();//是否会有灯光
        getManager().createNotificationChannel(channel);
    }

    /**
     * 获取创建一个NotificationManager的对象
     * @return                          NotificationManager对象
     */
    public NotificationManager getManager() {
        if (mManager == null) {
            mManager = (NotificationManager) getSystemService(Context.NOTIFICATION_SERVICE);
        }
        return mManager;
    }

    /**
     * 清空所有的通知
     */
    public void clearNotification(){
        getManager().cancelAll();
    }

    /**
     * 建议使用这个发送通知
     * 调用该方法可以发送通知
     * @param notifyId                  notifyId
     * @param title                     title
     * @param content                   content
     */
    public void sendNotification(int notifyId, String title, String content , int icon) {
        Notification build;
        if (Build.VERSION.SDK_INT >= Build.VERSION_CODES.O) {
            //android 8.0以上需要特殊处理,也就是targetSDKVersion为26以上
            //通知用到NotificationCompat()这个V4库中的方法。但是在实际使用时发现书上的代码已经过时并且Android8.0已经不支持这种写法
            Notification.Builder builder = getChannelNotification(title, content, icon);
            build = builder.build();
        } else {
            NotificationCompat.Builder builder = getNotificationCompat(title, content, icon);
            build = builder.build();
        }
        if (flags!=null && flags.length>0){
            for (int a=0 ; a<flags.length ; a++){
                build.flags |= flags[a];
            }
        }
        getManager().notify(notifyId, build);
    }

    /**
     * 调用该方法可以发送通知
     * @param notifyId                  notifyId
     * @param title                     title
     * @param content                   content
     */
    public void sendNotificationCompat(int notifyId, String title, String content , int icon) {
        NotificationCompat.Builder builder = getNotificationCompat(title, content, icon);
        Notification build = builder.build();
        if (flags!=null && flags.length>0){
            for (int a=0 ; a<flags.length ; a++){
                build.flags |= flags[a];
            }
        }
        getManager().notify(notifyId, build);
    }


    private NotificationCompat.Builder getNotificationCompat(String title, String content, int icon) {
        NotificationCompat.Builder builder;
        if (Build.VERSION.SDK_INT >= Build.VERSION_CODES.O) {
            builder = new NotificationCompat.Builder(getApplicationContext(), CHANNEL_ID);
        } else {
            //注意用下面这个方法,在8.0以上无法出现通知栏。8.0之前是正常的。这里需要增强判断逻辑
            builder = new NotificationCompat.Builder(getApplicationContext());
            builder.setPriority(PRIORITY_DEFAULT);
        }
        builder.setContentTitle(title);
        builder.setContentText(content);
        builder.setSmallIcon(icon);
        builder.setPriority(priority);
        builder.setOnlyAlertOnce(onlyAlertOnce);
        builder.setOngoing(ongoing);
        if (remoteViews!=null){
            builder.setContent(remoteViews);
        }
        if (intent!=null){
            builder.setContentIntent(intent);
        }
        if (ticker!=null && ticker.length()>0){
            builder.setTicker(ticker);
        }
        if (when!=0){
            builder.setWhen(when);
        }
        if (sound!=null){
            builder.setSound(sound);
        }
        if (defaults!=0){
            builder.setDefaults(defaults);
        }
        //点击自动删除通知
        builder.setAutoCancel(true);
        return builder;
    }


    @RequiresApi(api = Build.VERSION_CODES.O)
    private Notification.Builder getChannelNotification(String title, String content, int icon){
        Notification.Builder builder = new Notification.Builder(getApplicationContext(), CHANNEL_ID);
        Notification.Builder notificationBuilder = builder
                //设置标题
                .setContentTitle(title)
                //消息内容
                .setContentText(content)
                //设置通知的图标
                .setSmallIcon(icon)
                //让通知左右滑的时候是否可以取消通知
                .setOngoing(ongoing)
                //设置优先级
                .setPriority(priority)
                //是否提示一次.true - 如果Notification已经存在状态栏即使在调用notify函数也不会更新
                .setOnlyAlertOnce(onlyAlertOnce)
                .setAutoCancel(true);
        if (remoteViews!=null){
            //设置自定义view通知栏
            notificationBuilder.setContent(remoteViews);
        }
        if (intent!=null){
            notificationBuilder.setContentIntent(intent);
        }
        if (ticker!=null && ticker.length()>0){
            //设置状态栏的标题
            notificationBuilder.setTicker(ticker);
        }
        if (when!=0){
            //设置通知时间,默认为系统发出通知的时间,通常不用设置
            notificationBuilder.setWhen(when);
        }
        if (sound!=null){
            //设置sound
            notificationBuilder.setSound(sound);
        }
        if (defaults!=0){
            //设置默认的提示音
            notificationBuilder.setDefaults(defaults);
        }
        if (pattern!=null){
            //自定义震动效果
            notificationBuilder.setVibrate(pattern);
        }
        return notificationBuilder;
    }


    private boolean ongoing = false;
    private RemoteViews remoteViews = null;
    private PendingIntent intent = null;
    private String ticker = "";
    private int priority = Notification.PRIORITY_DEFAULT;
    private boolean onlyAlertOnce = false;
    private long when = 0;
    private Uri sound = null;
    private int defaults = 0;
    private long[] pattern = null;

    /**
     * 让通知左右滑的时候是否可以取消通知
     * @param ongoing                   是否可以取消通知
     * @return
     */
    public NotificationUtils setOngoing(boolean ongoing){
        this.ongoing = ongoing;
        return this;
    }

    /**
     * 设置自定义view通知栏布局
     * @param remoteViews               view
     * @return
     */
    public NotificationUtils setContent(RemoteViews remoteViews){
        this.remoteViews = remoteViews;
        return this;
    }

    /**
     * 设置内容点击
     * @param intent                    intent
     * @return
     */
    public NotificationUtils setContentIntent(PendingIntent intent){
        this.intent = intent;
        return this;
    }

    /**
     * 设置状态栏的标题
     * @param ticker                    状态栏的标题
     * @return
     */
    public NotificationUtils setTicker(String ticker){
        this.ticker = ticker;
        return this;
    }


    /**
     * 设置优先级
     * 注意:
     * Android 8.0以及上,在 NotificationChannel 的构造函数中指定,总共要五个级别;
     * Android 7.1(API 25)及以下的设备,还得调用NotificationCompat 的 setPriority方法来设置
     *
     * @param priority                  优先级,默认是Notification.PRIORITY_DEFAULT
     * @return
     */
    public NotificationUtils setPriority(int priority){
        this.priority = priority;
        return this;
    }

    /**
     * 是否提示一次.true - 如果Notification已经存在状态栏即使在调用notify函数也不会更新
     * @param onlyAlertOnce             是否只提示一次,默认是false
     * @return
     */
    public NotificationUtils setOnlyAlertOnce(boolean onlyAlertOnce){
        this.onlyAlertOnce = onlyAlertOnce;
        return this;
    }

    /**
     * 设置通知时间,默认为系统发出通知的时间,通常不用设置
     * @param when                      when
     * @return
     */
    public NotificationUtils setWhen(long when){
        this.when = when;
        return this;
    }

    /**
     * 设置sound
     * @param sound                     sound
     * @return
     */
    public NotificationUtils setSound(Uri sound){
        this.sound = sound;
        return this;
    }


    /**
     * 设置默认的提示音
     * @param defaults                  defaults
     * @return
     */
    public NotificationUtils setDefaults(int defaults){
        this.defaults = defaults;
        return this;
    }

    /**
     * 自定义震动效果
     * @param pattern                  pattern
     * @return
     */
    public NotificationUtils setVibrate(long[] pattern){
        this.pattern = pattern;
        return this;
    }

    /**
     * 设置flag标签
     * @param flags                     flags
     * @return
     */
    public NotificationUtils setFlags(int... flags){
        this.flags = flags;
        return this;
    }

}
项目地址链接:github.com/yangchong21…
关于其他内容介绍
01.关于博客汇总链接
02.关于我的博客
- 我的个人站点:www.yczbj.org,www.ycbjie.cn
- github:github.com/yangchong21…
- 知乎:www.zhihu.com/people/yang…
- 简书:www.jianshu.com/u/b7b2c6ed9…
- csdn:my.csdn.net/m0_37700275
- 喜马拉雅听书:www.ximalaya.com/zhubo/71989…
- 开源中国:my.oschina.net/zbj1618/blo…
- 泡在网上的日子:www.jcodecraeer.com/member/cont…
- 邮箱:yangchong211@163.com
- 阿里云博客:yq.aliyun.com/users/artic… 239.headeruserinfo.3.dT4bcV
- segmentfault头条:segmentfault.com/u/xiangjian…
