

前言
最近项目中用到了DialogFragment,用起来很方便,但是坑比较多,于是自己研究了下源码,理清楚DialogFragment中Dialog和Fragment的关系,以及DialogFragment的原理。
DialogFragment的使用方法
1、重写onCreateDialog方法创建AlertDialog
1.1 简单的AlertDialog
public class FireMissilesDialogFragment extends DialogFragment {
    @Override
    public Dialog onCreateDialog(Bundle savedInstanceState) {
        // Use the Builder class for convenient dialog construction
        AlertDialog.Builder builder = new AlertDialog.Builder(getActivity());
        builder.setMessage(R.string.dialog_fire_missiles)
               .setPositiveButton(R.string.fire, new DialogInterface.OnClickListener() {
                   public void onClick(DialogInterface dialog, int id) {
                       // FIRE ZE MISSILES!
                   }
               })
               .setNegativeButton(R.string.cancel, new DialogInterface.OnClickListener() {
                   public void onClick(DialogInterface dialog, int id) {
                       // User cancelled the dialog
                   }
               });
        // Create the AlertDialog object and return it
        return builder.create();
    }
}
1.2 自定义布局的AlertDialog
如果想让对话框具有自定义布局,请创建一个布局,然后通过调用 AlertDialog.Builder 对象上的 setView() 将其添加到 AlertDialog。
@Override
public Dialog onCreateDialog(Bundle savedInstanceState) {
    AlertDialog.Builder builder = new AlertDialog.Builder(getActivity());
    // Get the layout inflater
    LayoutInflater inflater = getActivity().getLayoutInflater();

    // Inflate and set the layout for the dialog
    // Pass null as the parent view because its going in the dialog layout
    builder.setView(inflater.inflate(R.layout.dialog_signin, null))//R.layout.dialog_sign 自定义布局
    // Add action buttons
           .setPositiveButton(R.string.signin, new DialogInterface.OnClickListener() {
               @Override
               public void onClick(DialogInterface dialog, int id) {
                   // sign in the user ...
               }
           })
           .setNegativeButton(R.string.cancel, new DialogInterface.OnClickListener() {
               public void onClick(DialogInterface dialog, int id) {
                   LoginDialogFragment.this.getDialog().cancel();
               }
           });
    return builder.create();
}
1.3 DialogFragment与所在的Acitivty交互
当用户触摸对话框的某个操作按钮或从列表中选择某一项时,DialogFragment 可能会执行必要的操作,如果想将事件传递给打开该对话框的 Activity 或Fragment。 可以为每种点击事件定义一种方法。
public class NoticeDialogFragment extends DialogFragment {


    @Override
    public Dialog onCreateDialog(Bundle savedInstanceState) {
        // Build the dialog and set up the button click handlers
        AlertDialog.Builder builder = new AlertDialog.Builder(getActivity());
        builder.setMessage(R.string.dialog_fire_missiles)
               .setPositiveButton(R.string.fire, new DialogInterface.OnClickListener() {
                   public void onClick(DialogInterface dialog, int id) {
                       //将点击Positive事件传递给所在的Activity
                       mListener.onDialogPositiveClick(NoticeDialogFragment.this);
                   }
               })
               .setNegativeButton(R.string.cancel, new DialogInterface.OnClickListener() {
                   public void onClick(DialogInterface dialog, int id) {
                       //将点击Negative 事件传递给所在的Activity
                       mListener.onDialogNegativeClick(NoticeDialogFragment.this);
                   }
               });
        return builder.create();
    }

//定义一个监听的接口,DialogFragment所在的Activity实现这个接口

    public interface NoticeDialogListener {
        public void onDialogPositiveClick(DialogFragment dialog);
        public void onDialogNegativeClick(DialogFragment dialog);
    }

    // Use this instance of the interface to deliver action events
    NoticeDialogListener mListener;

    // Override the Fragment.onAttach() method to instantiate the NoticeDialogListener
    @Override
    public void onAttach(Activity activity) {
        super.onAttach(activity);
        try {
            mListener = (NoticeDialogListener) activity;
            //获取DialogFragment所在的Activity,执行mListener方法时会自动调用Actvity中相应的方法
        } catch (ClassCastException e) {

            throw new ClassCastException(activity.toString()
                    + " must implement NoticeDialogListener");
        }
    }
    ...
}
DialgFragment所在的Acitivity如下
public class MainActivity extends FragmentActivity
                          implements NoticeDialogFragment.NoticeDialogListener{
    ...

    public void showNoticeDialog() {
        // 创建DialogFragment的实例来显示
        DialogFragment dialog = new NoticeDialogFragment();
        dialog.show(getSupportFragmentManager(), "NoticeDialogFragment");
    }

//当DialogFragment中发生相应的点击事件时会自动调用到这里面的两个方法。
    @Override
    public void onDialogPositiveClick(DialogFragment dialog) {
        // 用户点击DialogFragment中的positive按钮
        ...
    }

    @Override
    public void onDialogNegativeClick(DialogFragment dialog) {
        // 用户点击DialogFragment中的 negative 按钮
        ...
    }
2.重写onCreateView
有时候需要弹出框,但是不需要AlertDialog里面的功能,就可以重写onCreateView实现自己的布局
 @Nullable
    @Override
    public View onCreateView(@NonNull LayoutInflater inflater, @Nullable ViewGroup container, @Nullable Bundle savedInstanceState) {
        View view = inflater.inflate(R.layout.message_share_websit_dialog, container);
        initView(view);
        return view;
    }
3 以弹出框方式显示对话框和全屏Fragment方式显示对话框
有时候在大尺寸的手机或者pad上可以将DialogFragment作为弹出框形式展示,在小屏幕的手机上作为一个普通Fragment的形式展示。
public class CustomDialogFragment extends DialogFragment {

    @Override
    public View onCreateView(LayoutInflater inflater, ViewGroup container,
            Bundle savedInstanceState) {
        // Inflate the layout to use as dialog or embedded fragment
        return inflater.inflate(R.layout.purchase_items, container, false);
    }

    /** The system calls this only when creating the layout in a dialog. */
    @Override
    public Dialog onCreateDialog(Bundle savedInstanceState) {
        // The only reason you might override this method when using onCreateView() is
        // to modify any dialog characteristics. For example, the dialog includes a
        // title by default, but your custom layout might not need it. So here you can
        // remove the dialog title, but you must call the superclass to get the Dialog.
        Dialog dialog = super.onCreateDialog(savedInstanceState);
        dialog.requestWindowFeature(Window.FEATURE_NO_TITLE);
        return dialog;
    }
}
以下代码可根据屏幕尺寸决定将片段显示为对话框还是全屏 UI:
public void showDialog() {
    FragmentManager fragmentManager = getSupportFragmentManager();
    CustomDialogFragment newFragment = new CustomDialogFragment();

    if (mIsLargeLayout) {
        // 如果时大屏幕的设备,显示为弹出框方式
        newFragment.show(fragmentManager, "dialog");
    } else {
        // 如果是小屏幕的手机,显示为全屏的Fragment
        FragmentTransaction transaction = fragmentManager.beginTransaction();
        // 设置动画效果
        transaction.setTransition(FragmentTransaction.TRANSIT_FRAGMENT_OPEN);
        //获取android.R.id.content布局,并将newFragment加入到布局中
        transaction.add(android.R.id.content, newFragment)
                   .addToBackStack(null).commit();
    }
}
DialogFragment中源码分析
DialogFragment的继承结构
    public class DialogFragment extends Fragment
            implements DialogInterface.OnCancelListener, DialogInterface.OnDismissListener
可以看出DialogFragment继承了Fragment是在Fragment基础之上封装的,因此DialogFragment既可以作为Dialog来使用也可以作为单独的Fragment来使用。
问题1:DialogFragment既然继承了Fragment为什么会显示成一个Dialog的形式?
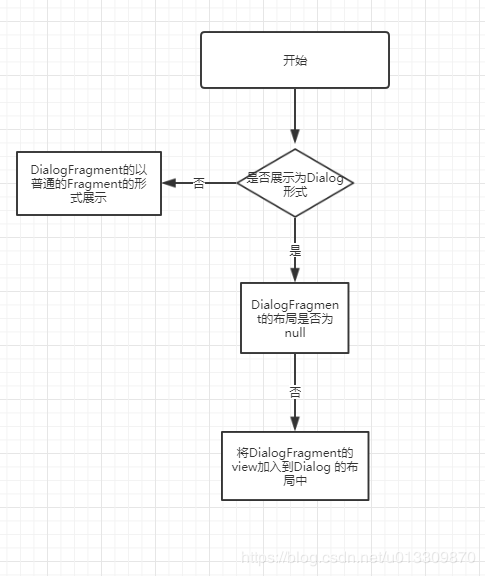
在DialogFragment内部定义了一个Dialog mDialog;当我们重写了onCreateDialog()方法时,mDialog就是在onCreateDialog()中返回的Dialog,否则就会默认返回一个Dialog。如果我们重写了onCreateView方法就将该布局加入到Dialog中。这个方法可以在onActivityCreated中找到
@Override
    public void onActivityCreated(Bundle savedInstanceState) {
        super.onActivityCreated(savedInstanceState);
        if (!mShowsDialog) {
            return;//如果不显示为Dialog形式的话不做任何处理直接返回。
        }
        View view = getView();
        //获取dialogFragment的布局,这个布局就是我们在onCreateView中找到的布局。
        if (view != null) {
            if (view.getParent() != null) {
                throw new IllegalStateException(
                        "DialogFragment can not be attached to a container view");
            }
            mDialog.setContentView(view);//如果布局不为null的话,将我们定义的布局加入到mDialog中。
        }
        final Activity activity = getActivity();
        if (activity != null) {
            mDialog.setOwnerActivity(activity);
        }
        mDialog.setCancelable(mCancelable);
        mDialog.setOnCancelListener(this);
        mDialog.setOnDismissListener(this);
        if (savedInstanceState != null) {
            Bundle dialogState = savedInstanceState.getBundle(SAVED_DIALOG_STATE_TAG);
            if (dialogState != null) {
                mDialog.onRestoreInstanceState(dialogState);
            }
        }
    }
对应的流程图:
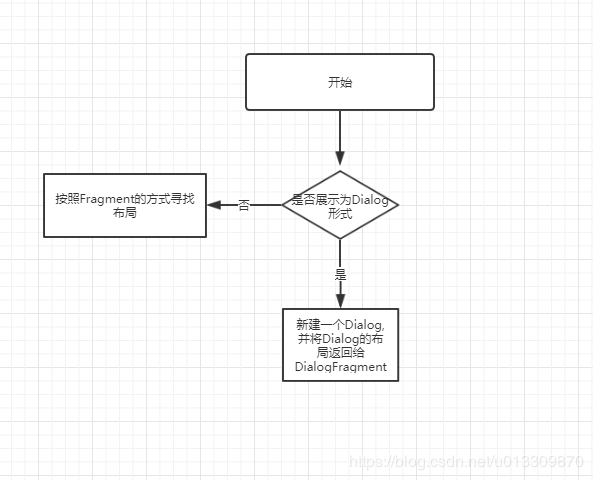
onGetLayoutInflater重写了Fragment中获取显示布局的过程,这个过程也决定了最后DialogFragment最后显示的效果。
@Override
    public LayoutInflater onGetLayoutInflater(Bundle savedInstanceState) {
        if (!mShowsDialog) {
        //如果不显示Dialog的话直接调用Fragment中的onGetLayoutInflater方法
            return super.onGetLayoutInflater(savedInstanceState);
        }
        mDialog = onCreateDialog(savedInstanceState);//否则新建dialog

        if (mDialog != null) {
            setupDialog(mDialog, mStyle);//设置Dialog的样式

            return (LayoutInflater) mDialog.getContext().getSystemService(
                    Context.LAYOUT_INFLATER_SERVICE);//返回dialog的布局
        }
        return (LayoutInflater) mHost.getContext().getSystemService(
                Context.LAYOUT_INFLATER_SERVICE);
    }
创建Dialog,如果重写了该方法就返回我们定义的Dialog,否则返回默认的Dialog.
  @NonNull
    public Dialog onCreateDialog(Bundle savedInstanceState) {
        return new Dialog(getActivity(), getTheme());
    }
流程图如下:
问题2 DialogFragment展示
DialogFragment的展示也有不同的方式,实际两种方式本质上是一样的,都是需要得到FragmentTransaction来对DialogFragment的进行管理。
public void show(FragmentManager manager, String tag) {
        mDismissed = false;
        mShownByMe = true;
        FragmentTransaction ft = manager.beginTransaction();
        //获取FragmentTransaction并将
       //当前DialogFragment的实例加入到FragmentTransaction中
        ft.add(this, tag);
        ft.commit();//提交
    }

    public int show(FragmentTransaction transaction, String tag) {
        mDismissed = false;
        mShownByMe = true;
        transaction.add(this, tag);
        mViewDestroyed = false;
        mBackStackId = transaction.commit();
        return mBackStackId;
    }
问题3 DialogFragment消失
DialogFragment的消失函数有onDismiss和dismiss两个,都调用了dismissInternal(boolean allowStateLoss) 方法,但是传入的参数不同;allowStateLoss代表是否允许不保存DialogFragment的状态。
传入自定的Dialog,调用 dismissInternal(true);不保存DialogFragment的状态。
    public void onDismiss(DialogInterface dialog) {
        if (!mViewDestroyed) {
            dismissInternal(true);
        }
    }
dismissInternal(false);保存DialogFragment的状态
    @Override
    public void dismiss() {
         dismissInternal(false);
    }
具体的消失逻辑在dismissInternal(boolean allowStateLoss)实现下面具体分析源码
void dismissInternal(boolean allowStateLoss) {
        if (mDismissed) {
            return;//如果当前的DialogFragment的已经消失了,就直接返回
        }
        mDismissed = true;
        mShownByMe = false;
        if (mDialog != null) {
            mDialog.dismiss();//如果mDialog不为null那么想将mDialog消失
        }
        mViewDestroyed = true;
        if (mBackStackId >= 0) {//如果mBackStackId >0则将BackStack中所有的mBackStackId之前的DialogFragment都弹出栈
            getFragmentManager().popBackStack(mBackStackId,
                    FragmentManager.POP_BACK_STACK_INCLUSIVE);
            mBackStackId = -1;
        } else {
            FragmentTransaction ft = getFragmentManager().beginTransaction();
            ft.remove(this);//从FragmentTransaction中移除当前的DialogFragment
            if (allowStateLoss) {
                ft.commitAllowingStateLoss();//如果允许不保存状态执行
            } else {
                ft.commit();//提交
            }
        }
    }
由上可知,DialogFragment的消失其实有两步,首先看自带的mDialog是不是null如果不是null则先将mDialog消失,然后再移除DialogFragment。 连接:blog.csdn.net/u013309870/…
