

期待已久的新教程上线啦!解锁React Native开发新姿势,一网打尽React Native最新与最热技术,点我Get!!!
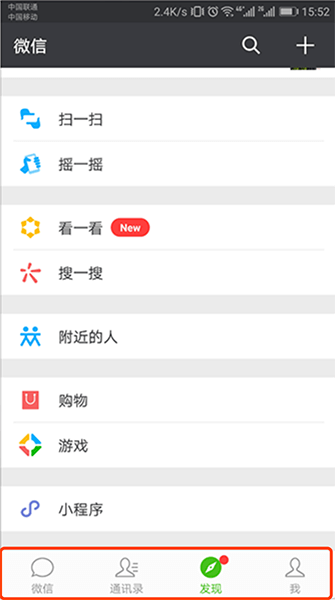
createBottomTabNavigator相当于iOS里面的TabBarController,屏幕下方的标签栏。如图:
createBottomTabNavigator API
createBottomTabNavigator(RouteConfigs, BottomTabNavigatorConfig):
RouteConfigs(必选):路由配置对象是从路由名称到路由配置的映射,告诉导航器该路由呈现什么。BottomTabNavigatorConfig(可选):配置导航器的路由(如:默认首屏,navigationOptions,paths等)样式(如,转场模式mode、头部模式等)。
从createBottomTabNavigator API上可以看出createBottomTabNavigator支持通过RouteConfigs和 BottomTabNavigatorConfig两个参数来创建createBottomTabNavigator导航器。
RouteConfigs
RouteConfigs支持三个参数screen、path以及navigationOptions;
screen(必选):指定一个 React 组件作为屏幕的主要显示内容,当这个组件被TabNavigator加载时,它会被分配一个navigationprop。path(可选):用来设置支持schema跳转时使用,具体使用会在下文的有关Schema章节中讲到;navigationOptions(可选):用以配置全局的屏幕导航选项如:title、headerRight、headerLeft等;
BottomTabNavigatorConfig
- tabBarComponent:指定createBottomTabNavigator的TabBar组件,如果不指定在iOS上默认使用
TabBarBottom,在Android平台上默认使用TabBarTop。TabBarBottom与TabBarTop都是react-navigation所支持的组件,要自定义TabBar可以重写这两个组件也可以根据需要自己实现一个;
- tabBarOptions: 配置TaBar下文会详细讲解;
- initialRouteName : 默认页面组件,createBottomTabNavigator显示的第一个页面;
- order: 定义tab顺序的routeNames数组。
- paths: 提供routeName到path config的映射,它覆盖routeConfigs中设置的路径。
- backBehavior: 后退按钮是否会导致标签切换到初始tab? 如果是,则设切换到初始tab,否则什么也不做。 默认为切换到初始tab。
tabBarOptions(tab配置)
- activeTintColor: 设置TabBar选中状态下的标签和图标的颜色;
- inactiveTintColor: 设置TabBar非选中状态下的标签和图标的颜色;
- showIcon: 是否展示图标,默认是false;
- showLabel: 是否展示标签,默认是true;
- upperCaseLabel - 是否使标签大写,默认为true。
- tabStyle: 设置单个tab的样式;
- indicatorStyle: 设置 indicator(tab下面的那条线)的样式;
- labelStyle: 设置TabBar标签的样式;
- iconStyle: 设置图标的样式;
- style: 设置整个TabBar的样式;
- allowFontScaling: 设置TabBar标签是否支持缩放,默认支持;
- safeAreaInset:覆盖的forceInset prop,默认是{ bottom: 'always', top: 'never' },可选值:top | bottom | left | right ('always' | 'never');
eg:
tabBarOptions: {
  labelStyle: {
    fontSize: 12,
  },
  tabStyle: {
    width: 100,
  },
  style: {
    backgroundColor: 'blue',
  },
}
navigationOptions(屏幕导航选项)
createBottomTabNavigator支持的屏幕导航选项的参数有:
- title: 可以用作headerTitle和tabBarLabel的备选的通用标题。
- tabBarVisible: 显示或隐藏TabBar,默认显示;
- tabBarIcon: 设置TabBar的图标;
- tabBarLabel: 设置TabBar的标签;
- tabBarOnPress: Tab被点击的回调函数,它的参数是一保函一下变量的对象:
- navigation: navigation prop ;
- defaultHandler: tab按下的默认处理程序;
- tabBarButtonComponent:React组件,它包装图标和标签并实现onPress。 默认情况下是TouchableWithoutFeedback的一个封装,使其其表现与其它可点击组件相同,tabBarButtonComponent: TouchableOpacity 将使用 TouchableOpacity 来替代;
- tabBarAccessibilityLabel:选项卡按钮的辅助功能标签。 当用户点击标签时,屏幕阅读器会读取这些信息。 如果您没有选项卡的标签,建议设置此项;
- tabBarTestID:用于在测试中找到该选项卡按钮的 ID;
【案例1】使用createBottomTabNavigator做界面导航、配置navigationOptions
第一步:创建一个createBottomTabNavigator类型的导航器
export const AppTabNavigator = createBottomTabNavigator({
    Page1: {
        screen: Page1,
        navigationOptions: {
            tabBarLabel: 'Page1',
            tabBarIcon: ({tintColor, focused}) => (
                <Ionicons
                    name={focused ? 'ios-home' : 'ios-home-outline'}
                    size={26}
                    style={{color: tintColor}}
                />
            ),
        }
    },
    Page2: {
        screen: Page2,
        navigationOptions: {
            tabBarLabel: 'Page2',
            tabBarIcon: ({tintColor, focused}) => (
                <Ionicons
                    name={focused ? 'ios-people' : 'ios-people-outline'}
                    size={26}
                    style={{color: tintColor}}
                />
            ),
        }
    },
    Page3: {
        screen: Page3,
        navigationOptions: {
            tabBarLabel: 'Page3',
            tabBarIcon: ({tintColor, focused}) => (
                <Ionicons
                    name={focused ? 'ios-chatboxes' : 'ios-chatboxes-outline'}
                    size={26}
                    style={{color: tintColor}}
                />
            ),
        }
    },
}, {
    tabBarComponent: TabBarComponent,
    tabBarOptions: {
        activeTintColor: Platform.OS === 'ios' ? '#e91e63' : '#fff',
    }
});
第二步:配置navigationOptions:
TabNavigator的navigationOptions有两个关键的属性,tabBarLabel标签与tabBarIcon图标:
Page2: {
    screen: Page2,
    navigationOptions: {
        tabBarLabel: 'Page2',
        tabBarIcon: ({tintColor, focused}) => (
            <Ionicons
                name={focused ? 'ios-people' : 'ios-people-outline'}
                size={26}
                style={{color: tintColor}}
            />
        ),
    }
},
在上述代码中使用了react-native-vector-icons的矢量图标作为Tab的显示图标,tabBarIcon接收一个React 组件,大家可以根据需要进行定制:
- tintColor: 当前状态下Tab的颜色;
- focused: Tab是否被选中;
第三步:界面跳转
 const {navigation} = this.props;
 ...
 <Button
    title="跳转到页面2"
    onPress={() => {
        navigation.navigate("Page3",{ name: 'Devio' })
    }}
/>
 <Button
    title="Go Back"
    onPress={() => {
        navigation.goBack();
    }}
/>
代码解析:
页面跳转可分为两步:
-
- 获取navigation:
const {navigation} = this.props; -
- 通过
navigate(routeName, params, action)进行页面跳转:
 navigation.navigate('Page2');
 navigation.navigate('Page3',{ name: 'Devio' });
这里在跳转到
Page3的时候传递了参数{ name: 'Devio' }; - 通过
第四步:更新页面Params与返回
export default class Page1 extends React.Component {
    //也可在这里定义每个页面的导航属性,这里的定义会覆盖掉别处的定义
    // static navigationOptions = {
    //     title: 'Page1',
    // };

    render() {
        const {navigation} = this.props;
        return <View style={{flex: 1, backgroundColor: "gray",}}>
            <Text style={styles.text}>欢迎来到Page1</Text>
            <Button
                title="Go Back"
                onPress={() => {
                    navigation.goBack();
                }}
            />
            <Button
                title="改变主题色"
                onPress={() => {
                    navigation.setParams({theme:{
                        tintColor:'orange',
                        updateTime:new Date().getTime()
                    }})
                }}
            />
            <Button
                title="跳转到页面2"
                onPress={() => {
                    navigation.navigate("Page2")
                }}
            />
        </View>
    }
}
代码解析:
在上述代码中通过:
<Button
    title="改变主题色"
    onPress={() => {
        navigation.setParams({theme:{
            tintColor:'orange',
            updateTime:new Date().getTime()
        }})
    }}
/>
更新当前主题,你会看到当点击“改变主题色“按钮时,TabBar的颜色也会跟着改变。
当用户单击Go Back按钮时,通过:
navigation.goBack();
实现了返回到默认的Tab。
【高级案例】react-navigation的高级应用
在使用react-navigation时往往有些需求通过简单的配置是无法完成的,比如:
- 动态配置createBottomTabNavigator:官方只提供了TabNavigator中的页面的静态配置方式,如果TabNavigator中的页面不固定,需要动态生成那么需要怎么做呢?
- 动态配置createBottomTabNavigator的样式:通过官方的文档是无法实现动态改变TabNavigator的样式的,比如:修改显示的文字,修改字体颜色,修改图标等等;
- 多层嵌套后路由个性化定制:createBottomTabNavigator被包裹后在TabNavigator中的页面是无法借助navigation跳转到外层StackNavigator中的页面的,这种应用场景很多,尤其是你需要定制TabNavigator的时候;
- 初始化传参:如何在设置页面的时候传递参数呢?
类似上述的应用场景有很多,大家可以通过与本教程配套的最新版React Native+Redux打造高质量上线App视频教程进行进一步学习react-navigation的更多高级应用。
- 大家在学习使用React Navigation3x过程中遇到任何问题都可以在React Navigation3x的视频教程中寻找答案哈。
- 另外,也可以通过最新版React Native+Redux打造高质量上线App视频教程学习React Navigation3x开发的更多实战经验和技巧,以及优化思路。
