

喜欢的朋友,点个赞呗鼓励鼓励呗~
本文章针对 Android 7.0 源码进行分析
SharedPreferences是 Android 中比较常用的存储方法,它可以用来存储一些比较小的键值对集合,并最终会在手机的/data/data/package_name/shared_prefs/目录下生成一个 xml 文件存储数据。它的使用非常简单,是一个 Android 开发者的基本技能,在这里不加以阐述了。
SharedPreferences带给我们非常简单易用的数据存储读写功能的同时,不知大家有没有好奇过它底层是怎样实现的呢?
通过ContextImpl.getSharedPreferences方法能够获取SharedPreferences对象, 通过getXxx/putXxx方法能够进行读写操作,通过commit方法同步写磁盘,通过apply方法异步写磁盘。其中涉及到如下几个问题:
- 获取
SharedPreferences对象过程中,系统做了什么? getXxx方法做了什么?putXxx方法做了什么?commit/apply方法如何实现同步/异步写磁盘?
下面,我们来一一解答这些疑惑。
疑问1:获取SharedPreferences对象,系统做了什么?
获取SharedPreferences对象
我们直接看ContextImpl.getSharedPreferences的源码:
@Override
public SharedPreferences getSharedPreferences(String name, int mode) {
    // At least one application in the world actually passes in a null
    // name.  This happened to work because when we generated the file name
    // we would stringify it to "null.xml".  Nice.
    if (mPackageInfo.getApplicationInfo().targetSdkVersion <
            Build.VERSION_CODES.KITKAT) {
        if (name == null) {
            name = "null";
        }
    }

    File file;
    synchronized (ContextImpl.class) {
        if (mSharedPrefsPaths == null) {
            mSharedPrefsPaths = new ArrayMap<>();
        }
        file = mSharedPrefsPaths.get(name);
        if (file == null) {
            // 创建一个对应路径 /data/data/packageName/name 的 File 对象
            file = getSharedPreferencesPath(name);
            mSharedPrefsPaths.put(name, file);
        }
    }

    // 这里调用了 getSharedPreferences(File file, int mode) 方法
    return getSharedPreferences(file, mode);
}
@Override
public SharedPreferences getSharedPreferences(File file, int mode) {
SharedPreferencesImpl sp;
// 这里使用了 synchronized 关键字,确保了 SharedPreferences 对象的构造是线程安全的
synchronized (ContextImpl.class) {
// 获取SharedPreferences 对象的缓存,并复制给 cache
final ArrayMap<File, SharedPreferencesImpl> cache = getSharedPreferencesCacheLocked();
// 以参数 file 作为 key,获取缓存对象
sp = cache.get(file);
if (sp == null) { // 如果缓存中不存在 SharedPreferences 对象
checkMode(mode);
if (getApplicationInfo().targetSdkVersion >= android.os.Build.VERSION_CODES.O) {
if (isCredentialProtectedStorage()
&& !getSystemService(UserManager.class)
.isUserUnlockingOrUnlocked(UserHandle.myUserId())) {
throw new IllegalStateException("SharedPreferences in credential encrypted "
+ "storage are not available until after user is unlocked");
}
}
// 构造一个 SharedPreferencesImpl 对象
sp = new SharedPreferencesImpl(file, mode);
// 放入缓存 cache 中,方便下次直接从缓存中获取
cache.put(file, sp);
// 返回新构造的 SharedPreferencesImpl 对象
return sp;
}
}
// 这里涉及到多进程的逻辑
if ((mode & Context.MODE_MULTI_PROCESS) != 0 ||
getApplicationInfo().targetSdkVersion < android.os.Build.VERSION_CODES.HONEYCOMB) {
// If somebody else (some other process) changed the prefs
// file behind our back, we reload it. This has been the
// historical (if undocumented) behavior.
// 如果由其他进程修改了这个 SharedPreferences 文件,我们将会重新加载它
sp.startReloadIfChangedUnexpectedly();
}
// 程序走到这里,说明命中了缓存,SharedPreferences 已经创建,直接返回
return sp;
}这段源码的流程还是清晰易懂的,注释已经说得很明白,这里我们总结一下这个方法的要点:
- 缓存未命中, 才构造
SharedPreferences对象,也就是说,多次调用getSharedPreferences方法并不会对性能造成多大影响,因为又缓存机制 SharedPreferences对象的创建过程是线程安全的,因为使用了synchronize关键字- 如果命中了缓存,并且参数
mode使用了Context.MODE_MULTI_PROCESS,那么将会调用sp.startReloadIfChangedUnexpectedly()方法,在startReloadIfChangedUnexpectedly方法中,会判断是否由其他进程修改过这个文件,如果有,会重新从磁盘中读取文件加载数据
接着,我们重点关注注释中的sp = new SharedPreferencesImpl(file, mode);//构造一个SharedPreferencesImpl对象这句代码。
构造SharedPreferencesImpl
// SharedPreferencesImpl.java
// 构造方法
SharedPreferencesImpl(File file, int mode) {
    mFile = file;
    // 创建灾备文件,命名为prefsFile.getPath() + ".bak"
    mBackupFile = makeBackupFile(file);
    mMode = mode;
    // mLoaded代表是否已经加载完数据
    mLoaded = false;
    // 解析 xml 文件得到的键值对就存放在mMap中
    mMap = null;
    // 顾名思义,这个方法用于加载 mFile 这个磁盘上的 xml 文件
    startLoadFromDisk();
}

// 创建灾备文件,用于当用户写入失败的时候恢复数据
private static File makeBackupFile(File prefsFile) {
    return new File(prefsFile.getPath() + ".bak");
}我们对SharedPreferencesImpl这个类的构造方法做一个总结:
- 将传进来的参数
file以及mode分别保存在mFile以及mMode中 - 创建一个
.bak备份文件,当用户写入失败的时候会根据这个备份文件进行恢复工作 - 将存放键值对的
mMap初始化为null - 调用
startLoadFromDisk()方法加载数据
上面四个要点中,最重要的就是最后一步,调用startLoadFromDisk()方法加载数据:
// SharedPreferencesImpl.java
private void startLoadFromDisk() {
    synchronized (this) {
        mLoaded = false;
    }

    //注意:这里我们可以看出,SharedPreferences 是通过开启一个线程来异步加载数据的
    new Thread("SharedPreferencesImpl-load") {
        public void run() {
            // 这个方法才是真正负责从磁盘上读取 xml 文件数据
            loadFromDisk();
        }
    }.start();
}

private void loadFromDisk() {
    synchronized (SharedPreferencesImpl.this) {
        // 如果正在加载数据,直接返回
        if (mLoaded) {
            return;
        }

        // 如果备份文件存在,删除原文件,把备份文件重命名为原文件的名字
        // 我们称这种行为叫做回滚
        if (mBackupFile.exists()) {
            mFile.delete();
            mBackupFile.renameTo(mFile);
        }
    }

    // Debugging
    if (mFile.exists() && !mFile.canRead()) {
        Log.w(TAG, "Attempt to read preferences file " + mFile + " without permission");
    }

    Map map = null;
    StructStat stat = null;
    try {
        // 获取文件信息,包括文件修改时间,文件大小等
        stat = Os.stat(mFile.getPath());
        if (mFile.canRead()) {
            BufferedInputStream str = null;
            try {
                // 读取数据并且将数据解析为jia
                str = new BufferedInputStream(
                        new FileInputStream(mFile), *);
                map = XmlUtils.readMapXml(str);
            } catch (XmlPullParserException | IOException e) {
                Log.w(TAG, "getSharedPreferences", e);
            } finally {
                IoUtils.closeQuietly(str);
            }
        }
    } catch (ErrnoException e) {
        /* ignore */
    }

    synchronized (SharedPreferencesImpl.this) {
        // 加载数据成功,设置 mLoaded 为 true
        mLoaded = true;
        if (map != null) {
            // 将解析得到的键值对数据赋值给 mMap
            mMap = map;
            // 将文件的修改时间戳保存到 mStatTimestamp 中
            mStatTimestamp = stat.st_mtime;
            // 将文件的大小保存到 mStatSize 中
            mStatSize = stat.st_size;
        } else {
            mMap = new HashMap<>();
        }

        // 通知唤醒所有等待的线程
        notifyAll();
    }
}上面的源码中,我们对startLoadFromDisk()方法进行了分析,有分析我们可以得到以下几点总结:
- 如果有备份文件,直接使用备份文件进行回滚
- 第一次调用
getSharedPreferences方法的时候,会从磁盘中加载数据,而数据的加载时通过开启一个子线程调用loadFromDisk方法进行异步读取的 - 将解析得到的键值对数据保存在
mMap中 - 将文件的修改时间戳以及大小分别保存在
mStatTimestamp以及mStatSize中(保存这两个值有什么用呢?我们在分析getSharedPreferences方法时说过,如果有其他进程修改了文件,并且mode为MODE_MULTI_PROCESS,将会判断重新加载文件。如何判断文件是否被其他进程修改过,没错,根据文件修改时间以及文件大小即可知道) - 调用
notifyAll()方法通知唤醒其他等待线程,数据已经加载完毕
好了,至此,我们就解决了第一个疑问:调用ContextImpl.getSharedPreferences方法获取一个SharedPreferences对象的过程,系统做了什么工作?
下面给出一个时序流程图:

疑问2:getXxx做了什么?
我们以getString来分析这个问题:
@Nullable
public String getString(String key, @Nullable String defValue) {

    // synchronize 关键字用于保证 getString 方法是线程安全的
    synchronized (this) {

        // 方法 awaitLoadedLocked() 用于确保加载完数据并保存到 mMap 中才进行数据读取
        awaitLoadedLocked();

        // 根据 key 从 mMap中获取 value
        String v = (String)mMap.get(key);

        // 如果 value 不为 null,返回 value,如果为 null,返回默认值
        return v != null ? v : defValue;
    }
}

private void awaitLoadedLocked() {
    if (!mLoaded) {
        // Raise an explicit StrictMode onReadFromDisk for this
        // thread, since the real read will be in a different
        // thread and otherwise ignored by StrictMode.
        BlockGuard.getThreadPolicy().onReadFromDisk();
    }

    // 前面我们说过,mLoaded 代表数据是否已经加载完毕
    while (!mLoaded) {
        try {
            // 等待数据加载完成之后才返回继续执行代码
            wait();
        } catch (InterruptedException unused) {
        }
    }
}getString方法代码很简单,其他的例如getInt,getFloat方法也是一样的原理,我们直接对这个疑问进行总结:
getXxx方法是线程安全的,因为使用了synchronize关键字getXxx方法是直接操作内存的,直接从内存中的mMap中根据传入的key读取valuegetXxx方法有可能会卡在awaitLoadedLocked方法,从而导致线程阻塞等待(什么时候会出现这种阻塞现象呢?前面我们分析过,第一次调用getSharedPreferences方法时,会创建一个线程去异步加载数据,那么假如在调用完getSharedPreferences方法之后立即调用getXxx方法,此时的mLoaded很有可能为false,这就会导致awaiteLoadedLocked方法阻塞等待,直到loadFromDisk方法加载完数据并且调用notifyAll来唤醒所有等待线程)
疑问3:putXxx方法做了什么?
说到写操作方法,首先想到的是通过sharedPreferences.edit()方法返回的SharedPreferences.Editor,所有我们对SharedPreferences的写操作都是基于这个Editor类的。在 Android 系统中,Editor是一个接口类,它的具体实现类是EditorImpl:
public final class EditorImpl implements Editor {

    // putXxx/remove/clear等写操作方法都不是直接操作 mMap 的,而是将所有
    // 的写操作先记录在 mModified 中,等到 commit/apply 方法被调用,才会将
    // 所有写操作同步到 内存中的 mMap 以及磁盘中
    private final Map<String, Object> mModified = Maps.newHashMap();

    //
    private boolean mClear = false;

    public Editor putString(String key, @Nullable String value) {
        synchronized (this) {
            mModified.put(key, value);
            return this;
        }
    }

    public Editor putStringSet(String key, @Nullable Set<String> values) {
        synchronized (this) {
            mModified.put(key, (values == null) ? null : new HashSet<String>(values));
            return this;
        }
    }

    public Editor putInt(String key, int value) {
        synchronized (this) {
            mModified.put(key, value);
            return this;
        }
    }

    public Editor putLong(String key, long value) {
        synchronized (this) {
            mModified.put(key, value);
            return this;
        }
    }

    public Editor putFloat(String key, float value) {
        synchronized (this) {
            mModified.put(key, value);
            return this;
        }
    }

    public Editor putBoolean(String key, boolean value) {
        synchronized (this) {
            mModified.put(key, value);
            return this;
        }
    }

    public Editor remove(String key) {
        synchronized (this) {
            mModified.put(key, this);
            return this;
        }
    }

    ......
    其他方法
    ......
}从EditorImpl类的源码我们可以得出以下总结:
SharedPreferences的写操作是线程安全的,因为使用了synchronize关键字- 对键值对数据的增删记录保存在
mModified中,而并不是直接对SharedPreferences.mMap进行操作(mModified会在commit/apply方法中起到同步内存SharedPreferences.mMap以及磁盘数据的作用)
疑问4:commit()/apply()方法如何实现同步/异步写磁盘?
commit()方法分析
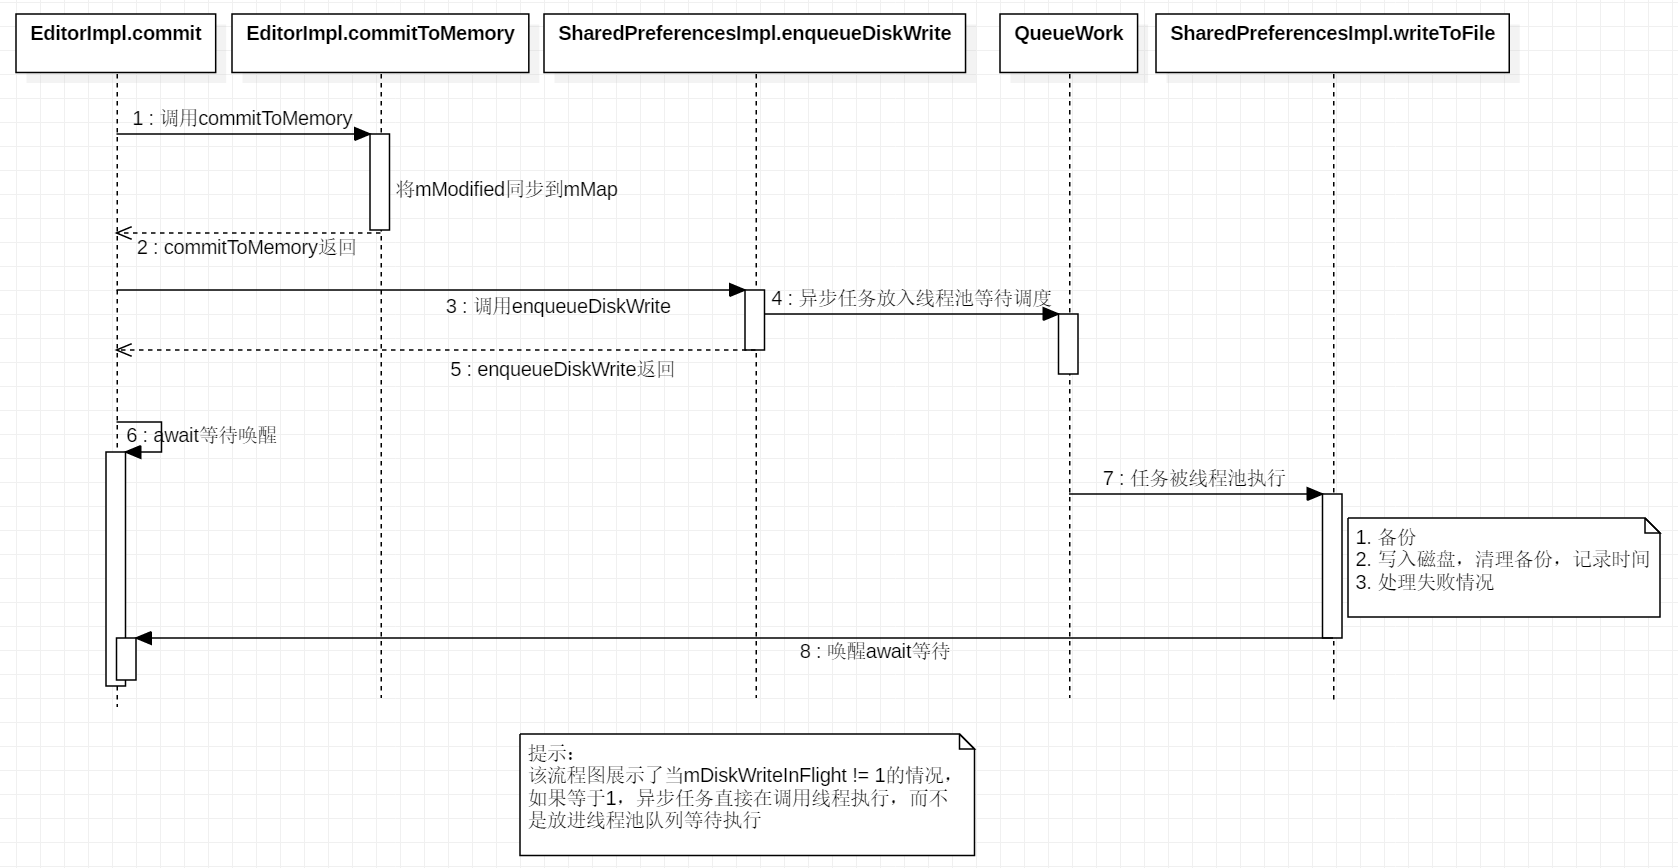
先分析commit()方法,直接上源码:
public boolean commit() {
    // 前面我们分析 putXxx 的时候说过,写操作的记录是存放在 mModified 中的
    // 在这里,commitToMemory() 方法就负责将 mModified 保存的写记录同步到内存中的 mMap 中
    // 并且返回一个 MemoryCommitResult 对象
    MemoryCommitResult mcr = commitToMemory();

    // enqueueDiskWrite 方法负责将数据落地到磁盘上
    SharedPreferencesImpl.this.enqueueDiskWrite( mcr, null /* sync write on this thread okay */);

    try {
        // 同步等待数据落地磁盘工作完成才返回
        mcr.writtenToDiskLatch.await();
    } catch (InterruptedException e) {
        return false;
    }

    // 通知观察者
    notifyListeners(mcr);
    return mcr.writeToDiskResult;
}commit()方法的主体结构很清晰简单:
- 首先将写操作记录同步到内存的
SharedPreferences.mMap中(将mModified同步到mMap) - 然后调用
enqueueDiskWrite方法将数据写入到磁盘上 - 同步等待写磁盘操作完成(这就是为什么
commit()方法会同步阻塞等待的原因) - 通知监听者(可以通过
registerOnSharedPreferenceChangeListener方法注册监听) - 最后返回执行结果:
trueorfalse
看完了commit(),我们接着来看一下它调用的commitToMemory()方法:
private MemoryCommitResult commitToMemory() {
    MemoryCommitResult mcr = new MemoryCommitResult();
    synchronized (SharedPreferencesImpl.this) {
        // We optimistically don't make a deep copy until
        // a memory commit comes in when we're already
        // writing to disk.
        if (mDiskWritesInFlight > 0) {
            // We can't modify our mMap as a currently
            // in-flight write owns it.  Clone it before
            // modifying it.
            // noinspection unchecked
            mMap = new HashMap<String, Object>(mMap);
        }

        // 将 mMap 赋值给 mcr.mapToWriteToDisk,mcr.mapToWriteToDisk 指向的就是最终写入磁盘的数据
        mcr.mapToWriteToDisk = mMap;

        // mDiskWritesInFlight 代表的是“此时需要将数据写入磁盘,但还未处理或未处理完成的次数”
        // 将 mDiskWritesInFlight 自增1(这里是唯一会增加 mDiskWritesInFlight 的地方)
        mDiskWritesInFlight++;

        boolean hasListeners = mListeners.size() > 0;
        if (hasListeners) {
            mcr.keysModified = new ArrayList<String>();
            mcr.listeners =
                    new HashSet<OnSharedPreferenceChangeListener>(mListeners.keySet());
        }

        synchronized (this) {

            // 只有调用clear()方法,mClear才为 true
            if (mClear) {
                if (!mMap.isEmpty()) {
                    mcr.changesMade = true;

                    // 当 mClear 为 true,清空 mMap
                    mMap.clear();
                }
                mClear = false;
            }

            // 遍历 mModified
            for (Map.Entry<String, Object> e : mModified.entrySet()) {
                String k = e.getKey(); // 获取 key
                Object v = e.getValue(); // 获取 value

                // 当 value 的值是 "this" 或者 null,将对应 key 的键值对数据从 mMap 中移除
                if (v == this || v == null) {
                    if (!mMap.containsKey(k)) {
                        continue;
                    }
                    mMap.remove(k);
                } else { // 否则,更新或者添加键值对数据
                    if (mMap.containsKey(k)) {
                        Object existingValue = mMap.get(k);
                        if (existingValue != null && existingValue.equals(v)) {
                            continue;
                        }
                    }
                    mMap.put(k, v);
                }

                mcr.changesMade = true;
                if (hasListeners) {
                    mcr.keysModified.add(k);
                }
            }

            // 将 mModified 同步到 mMap 之后,清空 mModified 历史记录
            mModified.clear();
        }
    }
    return mcr;
}总的来说,commitToMemory()方法主要做了这几件事:
mDiskWritesInFlight自增1(mDiskWritesInFlight代表“此时需要将数据写入磁盘,但还未处理或未处理完成的次数”,提示,整个SharedPreferences的源码中,唯独在commitToMemory()方法中“有且仅有”一处代码会对mDiskWritesInFlight进行增加,其他地方都是减)- 将
mcr.mapToWriteToDisk指向mMap,mcr.mapToWriteToDisk就是最终需要写入磁盘的数据 - 判断
mClear的值,如果是true,清空mMap(调用clear()方法,会设置mClear为true) - 同步
mModified数据到mMap中,然后清空mModified - 最后返回一个
MemoryCommitResult对象,这个对象的mapToWriteToDisk参数指向了最终需要写入磁盘的mMap
需要注意的是,在commitToMemory()方法中,当mClear为true,会清空mMap,但不会清空mModified,所以依然会遍历mModified,将其中保存的写记录同步到mMap中,所以下面这种写法是错误的:
sharedPreferences.edit()
    .putString("key1", "value1")    // key1 不会被 clear 掉,commit 之后依旧会被写入磁盘中
    .clear()
.commit();分析完commitToMemory()方法,我们再回到commit()方法中,对它调用的enqueueDiskWrite方法进行分析:
private void enqueueDiskWrite(final MemoryCommitResult mcr, final Runnable postWriteRunnable) {
    // 创建一个 Runnable 对象,该对象负责写磁盘操作
    final Runnable writeToDiskRunnable = new Runnable() {
        public void run() {
            synchronized (mWritingToDiskLock) {
                // 顾名思义了,这就是最终通过文件操作将数据写入磁盘的方法了
                writeToFile(mcr);
            }
            synchronized (SharedPreferencesImpl.this) {
                // 写入磁盘后,将 mDiskWritesInFlight 自减1,代表写磁盘的需求减少一个
                mDiskWritesInFlight--;
            }
            if (postWriteRunnable != null) {
                // 执行 postWriteRunnable(提示,在 apply 中,postWriteRunnable 才不为 null)
                postWriteRunnable.run();
            }
        }
    };

    // 如果传进的参数 postWriteRunnable 为 null,那么 isFromSyncCommit 为 true
    // 温馨提示:从上面的 commit() 方法源码中,可以看出调用 commit() 方法传入的 postWriteRunnable 为 null
    final boolean isFromSyncCommit = (postWriteRunnable == null);

    // Typical #commit() path with fewer allocations, doing a write on the current thread.
    if (isFromSyncCommit) {
        boolean wasEmpty = false;
        synchronized (SharedPreferencesImpl.this) {
            // 如果此时只有一个 commit 请求(注意,是 commit 请求,而不是 apply )未处理,那么 wasEmpty 为 true
            wasEmpty = mDiskWritesInFlight == 1;
        }

        if (wasEmpty) {
            // 当只有一个 commit 请求未处理,那么无需开启线程进行处理,直接在本线程执行 writeToDiskRunnable 即可
            writeToDiskRunnable.run();
            return;
        }
    }

    // 将 writeToDiskRunnable 方法线程池中执行
    // 程序执行到这里,有两种可能:
    // 1. 调用的是 commit() 方法,并且当前只有一个 commit 请求未处理
    // 2. 调用的是 apply() 方法
    QueuedWork.singleThreadExecutor().execute(writeToDiskRunnable);
}上面的注释已经说得很明白了,在这里就不总结了,接着来分析下writeToFile这个方法:
private void writeToFile(MemoryCommitResult mcr) {
    // Rename the current file so it may be used as a backup during the next read
    if (mFile.exists()) {
        if (!mcr.changesMade) {
            // If the file already exists, but no changes were
            // made to the underlying map, it's wasteful to
            // re-write the file.  Return as if we wrote it
            // out.
            mcr.setDiskWriteResult(true);
            return;
        }
        if (!mBackupFile.exists()) {
            if (!mFile.renameTo(mBackupFile)) {
                Log.e(TAG, "Couldn't rename file " + mFile
                        + " to backup file " + mBackupFile);
                mcr.setDiskWriteResult(false);
                return;
            }
        } else {
            mFile.delete();
        }
    }

    // Attempt to write the file, delete the backup and return true as atomically as
    // possible.  If any exception occurs, delete the new file; next time we will restore
    // from the backup.
    try {
        FileOutputStream str = createFileOutputStream(mFile);
        if (str == null) {
            mcr.setDiskWriteResult(false);
            return;
        }
        XmlUtils.writeMapXml(mcr.mapToWriteToDisk, str);
        FileUtils.sync(str);
        str.close();
        ContextImpl.setFilePermissionsFromMode(mFile.getPath(), mMode, 0);
        try {
            final StructStat stat = Libcore.os.stat(mFile.getPath());
            synchronized (this) {
                mStatTimestamp = stat.st_mtime;
                mStatSize = stat.st_size;
            }
        } catch (ErrnoException e) {
            // Do nothing
        }
        // Writing was successful, delete the backup file if there is one.
        mBackupFile.delete();
        mcr.setDiskWriteResult(true);
        return;
    } catch (XmlPullParserException e) {
        Log.w(TAG, "writeToFile: Got exception:", e);
    } catch (IOException e) {
        Log.w(TAG, "writeToFile: Got exception:", e);
    }
    // Clean up an unsuccessfully written file
    if (mFile.exists()) {
        if (!mFile.delete()) {
            Log.e(TAG, "Couldn't clean up partially-written file " + mFile);
        }
    }
    mcr.setDiskWriteResult(false);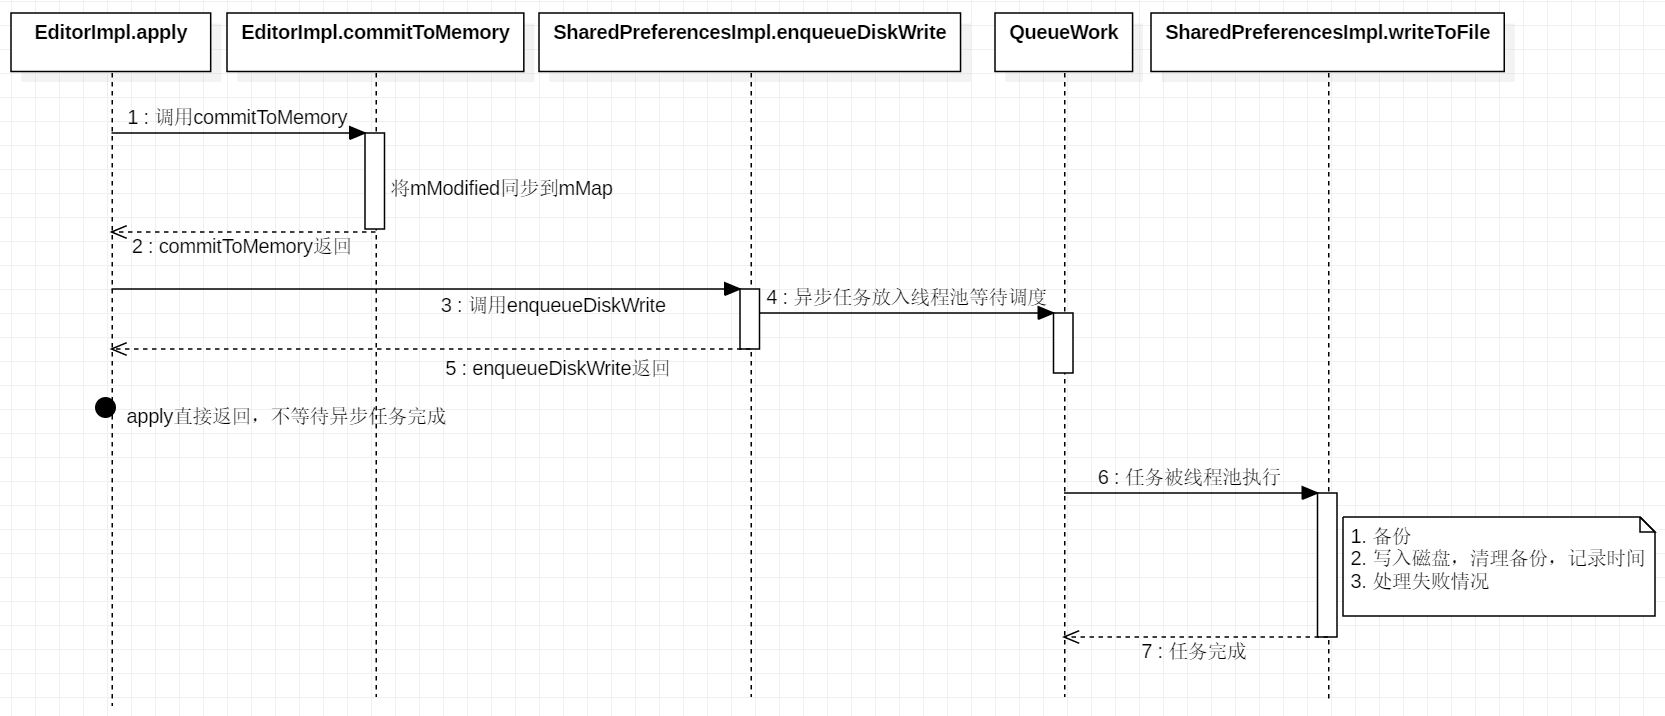
}writeToFile这个方法大致分为三个过程:- 先把已存在的老的 SP 文件重命名(加“.bak”后缀),然后删除老的 SP 文件,这相当于做了备份(灾备)
- 向
mFile中一次性写入所有键值对数据,即mcr.mapToWriteToDisk(这就是commitToMemory所说的保存了所有键值对数据的字段) 一次性写入到磁盘。 如果写入成功则删除备份(灾备)文件,同时记录了这次同步的时间 - 如果往磁盘写入数据失败,则删除这个半成品的 SP 文件
通过上面的分析,我们对commit()方法的整个调用链以及它干了什么都有了认知,下面给出一个图方便记忆理解:
apply()方法分析
分析完commit()方法,再去分析apply()方法就轻松多了:
public void apply() {

    // 将 mModified 保存的写记录同步到内存中的 mMap 中,并且返回一个 MemoryCommitResult 对象
    final MemoryCommitResult mcr = commitToMemory();


    final Runnable awaitCommit = new Runnable() {
        public void run() {
            try {
                mcr.writtenToDiskLatch.await();
            } catch (InterruptedException ignored) {
            }
        }
    };

    QueuedWork.add(awaitCommit);

    Runnable postWriteRunnable = new Runnable() {
        public void run() {
            awaitCommit.run();
            QueuedWork.remove(awaitCommit);
        }
    };

    // 将数据落地到磁盘上,注意,传入的 postWriteRunnable 参数不为 null,所以在
    // enqueueDiskWrite 方法中会开启子线程异步将数据写入到磁盘中
    SharedPreferencesImpl.this.enqueueDiskWrite(mcr, postWriteRunnable);

    // Okay to notify the listeners before it's hit disk
    // because the listeners should always get the same
    // SharedPreferences instance back, which has the
    // changes reflected in memory.
    notifyListeners(mcr);
} 总结一下apply()方法:
commitToMemory()方法将mModified中记录的写操作同步回写到内存SharedPreferences.mMap中。此时, 任何的getXxx方法都可以获取到最新数据了- 通过
enqueueDiskWrite方法调用writeToFile将方法将所有数据异步写入到磁盘中
下面也给出一个apply()时序流程图帮助记忆理解:
总结
SharedPreferences是线程安全的,它的内部实现使用了大量synchronized关键字SharedPreferences不是进程安全的- 第一次调用
getSharedPreferences会加载磁盘 xml 文件(这个加载过程是异步的,通过new Thread来执行,所以并不会在构造SharedPreferences的时候阻塞线程,但是会阻塞getXxx/putXxx/remove/clear等调用),但后续调用getSharedPreferences会从内存缓存中获取。 如果第一次调用getSharedPreferences时还没从磁盘加载完毕就马上调用getXxx/putXxx, 那么getXxx/putXxx操作会阻塞,直到从磁盘加载数据完成后才返回 - 所有的
getXxx都是从内存中取的数据,数据来源于SharedPreferences.mMap apply同步回写(commitToMemory())内存SharedPreferences.mMap,然后把异步回写磁盘的任务放到一个单线程的线程池队列中等待调度。apply不需要等待写入磁盘完成,而是马上返回commit同步回写(commitToMemory())内存SharedPreferences.mMap,然后如果mDiskWritesInFlight(此时需要将数据写入磁盘,但还未处理或未处理完成的次数)的值等于1,那么直接在调用commit的线程执行回写磁盘的操作,否则把异步回写磁盘的任务放到一个单线程的线程池队列中等待调度。commit会阻塞调用线程,知道写入磁盘完成才返回MODE_MULTI_PROCESS是在每次getSharedPreferences时检查磁盘上配置文件上次修改时间和文件大小,一旦所有修改则会重新从磁盘加载文件,所以并不能保证多进程数据的实时同步- 从 Android N 开始,,不支持
MODE_WORLD_READABLE & MODE_WORLD_WRITEABLE。一旦指定, 直接抛异常
使用注意事项
不要使用
SharedPreferences作为多进程通信手段。由于没有使用跨进程的锁,就算使用MODE_MULTI_PROCESS,SharedPreferences在跨进程频繁读写有可能导致数据全部丢失。根据线上统计,SP 大约会有万分之一的损坏率每个 SP 文件不能过大。
SharedPreference的文件存储性能与文件大小相关,我们不要将毫无关联的配置项保存在同一个文件中,同时考虑将频繁修改的条目单独隔离出来还是每个 SP 文件不能过大。在第一个
getSharedPreferences时,会先加载 SP 文件进内存,过大的 SP 文件会导致阻塞,甚至会导致 ANR- 依旧是每个 SP 文件不能过大。每次
apply或者commit,都会把全部的数据一次性写入磁盘, 所以 SP 文件不应该过大, 影响整体性能
喜欢的朋友,点个赞呗鼓励鼓励呗~
