

原文:Reactive Programming - Streams - BLoC - Practical Use Cases 是作者 Didier Boelens 为 Reactive Programming - Streams - BLoC 写的后续
阅读本文前建议先阅读前篇,前篇中文翻译有两个版本:
[译]Flutter响应式编程:Streams和BLoC by JarvanMo
较忠于原作的版本
Flutter中如何利用StreamBuilder和BLoC来控制Widget状态 by 吉原拉面
省略了一些初级概念,补充了一些个人解读
前言
在了解 BLoC, Reactive Programming 和 Streams 概念后,我又花了些时间继续研究,现在非常高兴能够与大家分享一些我经常使用并且很有用的模式(至少我是这么认为的)。这些模式为我节约了大量的开发时间,并且让代码更加易读和调试。
在这篇文章中我要分享的有:
-
BlocProvider 性能优化
结合 StatefulWidget 和 InheritedWidget 两者优势构建 BlocProvider
-
BLoC 的范围和初始化
根据 BLoC 的使用范围初始化 BLoC
-
事件与状态管理
基于事件(Event) 的状态 (State) 变更响应
-
表单验证
根据表单项验证来控制表单行为 (范例中包含了表单中常用的密码和重复密码比对)
-
Part Of 模式
允许组件根据所处环境(是否在某个列表/集合/组件中)调整自身的行为
文中涉及的完整代码可在 GitHub 查看。
1. BlocProvider 性能优化
我想先给大家介绍下我结合 InheritedWidget 实现 BlocProvider 的新方案,这种方式相比原来基于 StatefulWidget 实现的方式有性能优势。
1.1. 旧的 BlocProvider 实现方案
之前我是基于一个常规的 StatefulWidget 来实现 BlocProvider 的,代码如下:
abstract class BlocBase {
  void dispose();
}

// Generic BLoC provider
class BlocProvider<T extends BlocBase> extends StatefulWidget {
  BlocProvider({
    Key key,
    @required this.child,
    @required this.bloc,
  }): super(key: key);

  final T bloc;
  final Widget child;

  @override
  _BlocProviderState<T> createState() => _BlocProviderState<T>();

  static T of<T extends BlocBase>(BuildContext context){
    final type = _typeOf<BlocProvider<T>>();
    BlocProvider<T> provider = context.ancestorWidgetOfExactType(type);
    return provider.bloc;
  }

  static Type _typeOf<T>() => T;
}

class _BlocProviderState<T> extends State<BlocProvider<BlocBase>>{
  @override
  void dispose(){
    widget.bloc.dispose();
    super.dispose();
  }

  @override
  Widget build(BuildContext context){
    return widget.child;
  }
}
这种方案的优点是:StatefulWidget 的 dispose() 方法可以确保在 BLoC 初始化时分配的内存资源在不需要时可以释放掉。
译者注
这个优点是单独基于 InheritedWidget 很难实现的,因为 InheritedWidget 没有提供 dispose 方法,而 Dart 语言又没有自带的析构函数
虽然这种方案运行起来没啥问题,但从性能角度却不是最优解。
这是因为 context.ancestorWidgetOfExactType() 是一个时间复杂度为 O(n) 的方法,为了获取符合指定类型的 ancestor ,它会沿着视图树从当前 context 开始逐步往上递归查找其 parent 是否符合指定类型。如果当前 context 和目标 ancestor 相距不远的话这种方式还可以接受,否则应该尽量避免使用。
下面是 Flutter 中定义这个方法的源码:
@override
Widget ancestorWidgetOfExactType(Type targetType) {
    assert(_debugCheckStateIsActiveForAncestorLookup());
    Element ancestor = _parent;
    while (ancestor != null && ancestor.widget.runtimeType != targetType)
        ancestor = ancestor._parent;
    return ancestor?.widget;
}
1.2. 新的 BlocProvider 实现方案
新方案虽然总体也是基于 StatefulWidget 实现的,但是组合了一个 InheritedWidget
译者注
即在原来 StatefulWidget 的 child 外面再包了一个 InheritedWidget
下面是实现的代码:
Type _typeOf<T>() => T;

abstract class BlocBase {
  void dispose();
}

class BlocProvider<T extends BlocBase> extends StatefulWidget {
  BlocProvider({
    Key key,
    @required this.child,
    @required this.bloc,
  }): super(key: key);

  final Widget child;
  final T bloc;

  @override
  _BlocProviderState<T> createState() => _BlocProviderState<T>();

  static T of<T extends BlocBase>(BuildContext context){
    final type = _typeOf<_BlocProviderInherited<T>>();
    _BlocProviderInherited<T> provider =
            context.ancestorInheritedElementForWidgetOfExactType(type)?.widget;
    return provider?.bloc;
  }
}

class _BlocProviderState<T extends BlocBase> extends State<BlocProvider<T>>{
  @override
  void dispose(){
    widget.bloc?.dispose();
    super.dispose();
  }

  @override
  Widget build(BuildContext context){
    return new _BlocProviderInherited<T>(
      bloc: widget.bloc,
      child: widget.child,
    );
  }
}

class _BlocProviderInherited<T> extends InheritedWidget {
  _BlocProviderInherited({
    Key key,
    @required Widget child,
    @required this.bloc,
  }) : super(key: key, child: child);

  final T bloc;

  @override
  bool updateShouldNotify(_BlocProviderInherited oldWidget) => false;
}
新方案毫无疑问是具有性能优势的,因为用了 InheritedWidget,在查找符合指定类型的 ancestor 时,我们就可以调用 InheritedWidget 的实例方法 context.ancestorInheritedElementForWidgetOfExactType(),而这个方法的时间复杂度是 O(1),意味着几乎可以立即查找到满足条件的 ancestor。
Flutter 中该方法的定义源码体现了这一点:
@override
InheritedElement ancestorInheritedElementForWidgetOfExactType(Type targetType) {
    assert(_debugCheckStateIsActiveForAncestorLookup());
    final InheritedElement ancestor = _inheritedWidgets == null
                                    ? null
                                    : _inheritedWidgets[targetType];
    return ancestor;
}
当然这也是源于 Fluter Framework 缓存了所有 InheritedWidgets 才得以实现。
为什么要用 ancestorInheritedElementForWidgetOfExactType 而不用 inheritFromWidgetOfExactType ?
因为 inheritFromWidgetOfExactType 不仅查找获取符合指定类型的Widget,还将context 注册到该Widget,以便Widget发生变动后,context可以获取到新值;
这并不是我们想要的,我们想要的仅仅就是符合指定类型的Widget(也就是 BlocProvider)而已。
1.3. 如何使用新的 BlocProvider 方案?
1.3.1. 注入 BLoC
Widget build(BuildContext context){
    return BlocProvider<MyBloc>{
        bloc: myBloc,
        child: ...
    }
}
1.3.2. 获取 BLoC
Widget build(BuildContext context){
    MyBloc myBloc = BlocProvider.of<MyBloc>(context);
    ...
}
2. BLoC 的范围和初始化
要回答「要在哪初始化 BLoC?」这个问题,需要先搞清楚 BLoC 的可用范围 (scope)。
2.1. 应用中任何地方可用
在实际应用中,常常需要处理如用户鉴权、用户档案、用户设置项、购物篮等等需要在 App 中任何组件都可访问的数据或状态,这里总结了适用这种情况的两种 BLoC 方案:
2.1.1. 全局单例 (Global Singleton)
这种方案使用了一个不在Widget视图树中的 Global 对象,实例化后可用供所有 Widget 使用。
import 'package:rxdart/rxdart.dart';

class GlobalBloc {
  ///
  /// Streams related to this BLoC
  ///
  BehaviorSubject<String> _controller = BehaviorSubject<String>();
  Function(String) get push => _controller.sink.add;
  Stream<String> get stream => _controller;

  ///
  /// Singleton factory
  ///
  static final GlobalBloc _bloc = new GlobalBloc._internal();
  factory GlobalBloc(){
    return _bloc;
  }
  GlobalBloc._internal();

  ///
  /// Resource disposal
  ///
  void dispose(){
    _controller?.close();
}

GlobalBloc globalBloc = GlobalBloc();
要使用全局单例 BLoC,只需要 import 后调用定义好的方法即可:
import 'global_bloc.dart';

class MyWidget extends StatelessWidget {
    @override
    Widget build(BuildContext context){
        globalBloc.push('building MyWidget'); //调用 push 方法添加数据
        return Container();
    }
}
如果你想要一个唯一的、可从应用中任何组件访问的 BLoC 的话,这个方案还是不错的,因为:
- 简单易用
- 不依赖任何 BuildContext
- 当然也不需要通过 context 查找 BlocProvider 的方式来获取 BLoC
- 释放资源也很简单,只需将 application Widget 基于 StatefulWidget 实现,然后重写其 dispose() 方法,在 dispose() 中调用 globalBloc.dispose() 即可
我也不知道具体是为啥,很多较真的人反对全局单例方案,所以…我们再来看另一种实现方案吧…
2.1.2. 注入到视图树顶层
在 Flutter 中,包含所有页面的ancestor本身必须是 MaterialApp 的父级。 这是因为页面(或者说Route)其实是作为所有页面共用的 Stack 中的一项,被包含在 OverlayEntry 中的。
换句话说,每个页面都有自己独立于任何其它页面的 Buildcontext。这也解释了为啥不用任何技巧是没办法实现两个页面(或路由)之间数据共享的。
因此,必须将 BlocProvider 作为 MaterialApp 的父级才能实现在应用中任何位置都可使用 BLoC,如下所示:
void main() => runApp(Application());

class Application extends StatelessWidget {
  @override
  Widget build(BuildContext context) {
    return BlocProvider<AuthenticationBloc>(
      bloc: AuthenticationBloc(),
      child: MaterialApp(
        title: 'BLoC Samples',
        theme: ThemeData(
          primarySwatch: Colors.blue,
        ),
        home: InitializationPage(),
      ),
    );
  }
}
2.2. 在子视图树(多个页面或组件)中可用
大多数时候,我们只需要在应用的部分页面/组件树中使用 BLoC。举个例子,在一个 App 中有类似论坛的功能模块,在这个功能模块中我们需要用到 BLoC 来实现:
- 与后端服务器交互,获取、添加、更新帖子
- 在特定的页面列出需要显示的数据
- …
显然我们不需要将论坛的 BLoC 实现成全局可用,只需在涉及论坛的视图树中可用就行了。
那么可采用通过 BlocProvider将 BLoC 作为模块子树的根(父级)注入的方式,如下所示:
class MyTree extends StatelessWidget {
  @override
  Widget build(BuildContext context){
    return BlocProvider<MyBloc>(
      bloc: MyBloc(),
      child: Column(
        children: <Widget>[
          MyChildWidget(),
        ],
      ),
    );
  }
}

class MyChildWidget extends StatelessWidget {
  @override
  Widget build(BuildContext context){
    MyBloc = BlocProvider.of<MyBloc>(context);
    return Container();
  }
}
这样,该模块下所有 Widget 都可以通过调用 BlocProvider.of 来获取 BLoC.
注意
上面给出的并不是最佳方案,因为每次 MyTree 重构(rebuild)时都会重新初始化 BLoC ,带来的结果是:
- 丢失 BLoC 中已经存在的数据内容
- 重新初始化BLoC 要占用 CPU 时间
在这个例子中更好的方式是使用 StatefulWidget ,利用其持久化 State 的特性解决上述问题,代码如下:
class MyTree extends StatefulWidget {
 @override
  _MyTreeState createState() => _MyTreeState();
}
class _MyTreeState extends State<MyTree>{
  MyBloc bloc;

  @override
  void initState(){
    super.initState();
    bloc = MyBloc();
  }

  @override
  void dispose(){
    bloc?.dispose();
    super.dispose();
  }

  @override
  Widget build(BuildContext context){
    return BlocProvider<MyBloc>(
      bloc: bloc,
      child: Column(
        children: <Widget>[
          MyChildWidget(),
        ],
      ),
    );
  }
}
这样实现的话,即使 MyTree 组件重构,也不会重新初始化 BLoC,而是直接使用之前的BLoC实例。
2.3. 单一组件中可用
如果只在某一个组件 (Widget) 中使用 BLoC,只需要在该组件内构建 BLoC 实例即可。
3. 事件与状态管理(Event - State)
有时侯需要我们编码实现一些棘手的业务流程,这些流程可能会由串行或并行、耗时长短不一、同步或异步的子流程构成的,很可能每个子流程的处理结果也是千变万化的,而且还可能需要根据其处理进度或状态进行视图更新。
而本文中「事件与状态管理」解决方案的目的就是让处理这种复杂的业务流程变得更简单。
方案是基于以下流程和规则的:
- 发出某个事件
- 该事件触发一些动作 (action) ,这些动作会导致一个或多个状态产生/变更
- 这些状态又触发其它事件,或者产生/变更为其它状态
- 然后这些事件又根据状态的变更情况,触发其它动作
- 等等…
为了更好的展示这些概念,我还举了两个具体的例子:
-
应用初始化 (Application initialization)
很多时候我们都需要运行一系列动作来初始化 App, 这些动作可能是与服务器的交互相关联的 (例如:获取并加载一些数据)。而且在初始化过程中,可能还需要显示进度条及载入动画让用户能耐心等待。
-
用户身份验证 (Authentication)
在 App 启动后需要用户登录或注册,用户成功登录后,将跳转(重定向)到 App 的主页面; 而用户注销则将跳转(重定向)到验证页面。
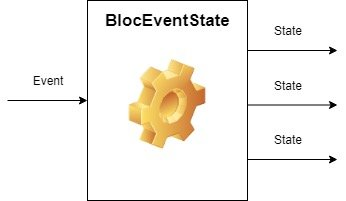
为了应对所有的可能,我们将管理一系列的事件,而这些事件可能是在 App 中任何地方触发的,这使得事件和状态的管理异常复杂,所幸我们可以借助结合了 BlocEventStateBuider 的 BlocEventState 类大大降低事件和状态管理的难度。
3.1. BlocEventState 抽象类
BlocEventState 背后的逻辑是将 BLoC 定义成这样一套机制:
- 接收事件 (event) 作为输入
- 当新的事件触发(输入)时,调用一个对应的事件处理器 eventHandler
- 事件处理器 (eventHandler) 负责根据事件 (event) 采用适当的处理 (actions) 后,抛出一个或多个状态 (State) 作为响应
如下图所示:
定义 BlocEventState 的代码和说明如下:
import 'package:blocs/bloc_helpers/bloc_provider.dart';
import 'package:meta/meta.dart';
import 'package:rxdart/rxdart.dart';

abstract class BlocEvent extends Object {}
abstract class BlocState extends Object {}

abstract class BlocEventStateBase<BlocEvent, BlocState> implements BlocBase {
  PublishSubject<BlocEvent> _eventController = PublishSubject<BlocEvent>();
  BehaviorSubject<BlocState> _stateController = BehaviorSubject<BlocState>();

  ///
  /// To be invoked to emit an event
  ///
  Function(BlocEvent) get emitEvent => _eventController.sink.add;

  ///
  /// Current/New state
  ///
  Stream<BlocState> get state => _stateController.stream;

  ///
  /// External processing of the event
  ///
  Stream<BlocState> eventHandler(BlocEvent event, BlocState currentState);

  ///
  /// initialState
  ///
  final BlocState initialState;

  //
  // Constructor
  //
  BlocEventStateBase({
    @required this.initialState,
  }){
    //
    // For each received event, we invoke the [eventHandler] and
    // emit any resulting newState
    //
    _eventController.listen((BlocEvent event){
      BlocState currentState = _stateController.value ?? initialState;
      eventHandler(event, currentState).forEach((BlocState newState){
        _stateController.sink.add(newState);
      });
    });
  }

  @override
  void dispose() {
    _eventController.close();
    _stateController.close();
  }
}
如代码所示,我们定义的其实是一个抽象类,是需要扩展实现的,实现的重点就是定义 eventHandler 这个方法的具体行为。
当然我们还可以看到:
- Sink (代码中的 emitEvent) 作为事件 Event 的输入入口
- Stream (代码中的 state) 监听已发出的状态 State(s) 作为状态的输出出口
在这个类初始化时 (参考代码中 Constructor 部分):
- 需要提供初始状态 initialState
- 创建了一个 StreamSubscription 用来监听输入的事件 (Events) 并:
- 将事件分配给事件处理器 eventHandler
- 抛出结果 state(s)
3.2. BlocEventState 的扩展实现
下方的模板代码就是基于扩展 BlocEventStateBase 抽象类实现了一个具体的 BlocEventState 类:
bloc_event_state_template.dart
class TemplateEventStateBloc extends BlocEventStateBase<BlocEvent, BlocState> {
  TemplateEventStateBloc()
      : super(
          initialState: BlocState.notInitialized(),
        );

  @override
  Stream<BlocState> eventHandler( BlocEvent event, BlocState currentState) async* {
     yield BlocState.notInitialized();
  }
}
模板代码会报错,请不要担心,这是正常的…因为我们还没有定义 BlocState.notInitialized()…后面会给出的。
这个模板只是在初始化时简单地给出了一个初始状态 initialState,并覆写了 eventHandler 方法。
还需要注意的是,我们使用了 异步生成器 (asynchronous generator) 语法:async* 和 yield
使用 async* 修饰符可将某个方法标记为一个 异步生成器(asynchronous generator) 方法,比如上面的代码中每次调用 eventHandler 方法内 yield 语句时,它都会把 yield 后面的表达式结果添加到输出 Stream 中。
如果我们需要通过一系列动作触发一系列 States (后面会在范例中看到),这一点特别有用。
有关 异步生成器 的其他详细信息,可参考 这篇文章。
3.3. BlocEvent 和 BlocState
你可能注意到了,我们还定义了 BlocEvent 和 BlocState 两个抽象类,这两个抽象类都是要根据实际情况,也就是在实际业务场景中根据你想要触发的事件和抛出的状态来具体 扩展实现 的。
3.4. BlocEventStateBuilder 组件
这个模式的最后一部分就是 BlocEventStateBuilder 组件了,这个组件可以根据 BlocEventState 抛出的 State(s) 作出视图层面的响应。
代码如下:
typedef Widget AsyncBlocEventStateBuilder<BlocState>(BuildContext context, BlocState state);

class BlocEventStateBuilder<BlocEvent,BlocState> extends StatelessWidget {
  const BlocEventStateBuilder({
    Key key,
    @required this.builder,
    @required this.bloc,
  }): assert(builder != null),
      assert(bloc != null),
      super(key: key);

  final BlocEventStateBase<BlocEvent,BlocState> bloc;
  final AsyncBlocEventStateBuilder<BlocState> builder;

  @override
  Widget build(BuildContext context){
    return StreamBuilder<BlocState>(
      stream: bloc.state,
      initialData: bloc.initialState,
      builder: (BuildContext context, AsyncSnapshot<BlocState> snapshot){
        return builder(context, snapshot.data);
      },
    );
  }
}
其实这个组件除了一个 StreamBuilder 外没啥特别的,这个 StreamBuilder 的作用就是每当有新的 BlocState 抛出后,将其作为新的参数值调用 builder 方法。
好了,这些就是这个模式的全部构成,接下来我们看看可以用它们来做些啥…
3.5. 事件与状态管理例1: 应用初始化 (Application Initialization)
第一个例子演示了 App 在启动时执行某些任务的情况。
一个常见的场景就是游戏的启动画面,也称 Splash 界面(不管是不是动画的),在显示真正的游戏主界面前,游戏应用会从服务器获取一些文件、检查是否需要更新、尝试与系统的「游戏中心」通讯等等;而且在完成初始化前,为了不让用户觉得应用啥都没做,可能还会显示进度条、定时切换显示一些图片等。
我给出的实现是非常简单的,只显示了完成百分比的,你可以根据自己的需要非常容易地进行扩展。
首先要做的就是定义事件和状态…
3.5.1. 定义事件: ApplicationInitializationEvent
作为例子,这里我只考虑了 2 个事件:
- start:触发初始化处理过程
- stop:用于强制停止初始化过程
它们的定义如下:
class ApplicationInitializationEvent extends BlocEvent {

  final ApplicationInitializationEventType type;

  ApplicationInitializationEvent({
    this.type: ApplicationInitializationEventType.start,
  }) : assert(type != null);
}

enum ApplicationInitializationEventType {
  start,
  stop,
}
3.5.2. 定义状态: ApplicationInitializationState
ApplicationInitializationState 类将提供与初始化过程相关的信息。
同样作为例子,这里我只考虑了:
- 2 个 flag:
- isInitialized 用来标识初始化是否完成
- isInitializing 用来知晓我们是否处于初始化过程中
- 进度完成率 prograss
代码如下:
class ApplicationInitializationState extends BlocState {
  ApplicationInitializationState({
    @required this.isInitialized,
    this.isInitializing: false,
    this.progress: 0,
  });

  final bool isInitialized;
  final bool isInitializing;
  final int progress;

  factory ApplicationInitializationState.notInitialized() {
    return ApplicationInitializationState(
      isInitialized: false,
    );
  }

  factory ApplicationInitializationState.progressing(int progress) {
    return ApplicationInitializationState(
      isInitialized: progress == 100,
      isInitializing: true,
      progress: progress,
    );
  }

  factory ApplicationInitializationState.initialized() {
    return ApplicationInitializationState(
      isInitialized: true,
      progress: 100,
    );
  }
}
3.5.3. 实现 BLoC: ApplicationInitializationBloc
BLoC 将基于事件类型来处理具体的初始化过程。
代码如下:
class ApplicationInitializationBloc
    extends BlocEventStateBase<ApplicationInitializationEvent, ApplicationInitializationState> {
  ApplicationInitializationBloc()
      : super(
          initialState: ApplicationInitializationState.notInitialized(),
        );

  @override
  Stream<ApplicationInitializationState> eventHandler(
      ApplicationInitializationEvent event, ApplicationInitializationState currentState) async* {

    if (!currentState.isInitialized){
      yield ApplicationInitializationState.notInitialized();
    }

    if (event.type == ApplicationInitializationEventType.start) {
      for (int progress = 0; progress < 101; progress += 10){
        await Future.delayed(const Duration(milliseconds: 300));
        yield ApplicationInitializationState.progressing(progress);
      }
    }

    if (event.type == ApplicationInitializationEventType.stop){
      yield ApplicationInitializationState.initialized();
    }
  }
}
说明:
- 当接收到 ApplicationInitializationEventType.start 事件时,进度完成率 prograss 将从
0到100开始计数(每次步进10),而且未到100时每次都将通过 yield 抛出一个新状态 (state) 告知初始化正在进行 (isInitializing =true) 及完成进度 prograss 具体的值 - 当接收到 ApplicationInitializationEventType.stop 事件时,会认为初始化已经完成。
- 如你所见,我在循环过程中加了些延迟 (delay) ,目的是演示 Future的适用场景(如从服务器获取数据)
3.5.4. 组合使用
现在,剩下的事情就是把代表进度完成率的计数器显示到假的 Splash 界面上:
class InitializationPage extends StatefulWidget {
  @override
  _InitializationPageState createState() => _InitializationPageState();
}

class _InitializationPageState extends State<InitializationPage> {
  ApplicationInitializationBloc bloc;

  @override
  void initState(){
    super.initState();
    bloc = ApplicationInitializationBloc();
    bloc.emitEvent(ApplicationInitializationEvent());
  }

  @override
  void dispose(){
    bloc?.dispose();
    super.dispose();
  }

  @override
  Widget build(BuildContext pageContext) {
    return SafeArea(
      child: Scaffold(
        body: Container(
          child: Center(
            child: BlocEventStateBuilder<ApplicationInitializationEvent, ApplicationInitializationState>(
              bloc: bloc,
              builder: (BuildContext context, ApplicationInitializationState state){
                if (state.isInitialized){
                  //
                  // Once the initialization is complete, let's move to another page
                  //
                  WidgetsBinding.instance.addPostFrameCallback((_){
                    Navigator.of(context).pushReplacementNamed('/home');
                  });
                }
                return Text('Initialization in progress... ${state.progress}%');
              },
            ),
          ),
        ),
      ),
    );
  }
}
说明:
- 在 App 中,ApplicationInitializationBloc 并不是任何组件都需要用到,所以只在一个 StatefulWidget 中初始化(实例化)了该 BLoC
- 直接发出 ApplicationInitializationEventType.start 事件来触发 eventHandler
- 每次 ApplicationInitializationState 被抛出,都会更新文字内容
- 初始化过程完成后,跳转(重定向)到了 Home 界面
小技巧
由于无法直接跳转到 Home 界面,在 builder 方法中,使用了WidgetsBinding.instance.addPostFrameCallback() 方法来请求 Flutter 在完成渲染后执行跳转。参考 addPostFrameCallback()
3.6. 事件与状态管理例2: 用户身份验证(登录与注销)
在这个例子中,我考虑了如下场景:
- 如果用户没有登录,则自动显示 登录/注册(Authentication/Registration) 界面
- 用户提交登录信息后,显示一个代表正在处理的循环进度指示器(转圈圈)
- 一旦用户登录成功,将跳转到 Home 界面
- 在 App 任何地方,用户都可能注销
- 如果用户注销,将自动跳转到 登录(Authentication) 界面
当然以其它编程方式也可以实现这些功能,但以 BLoC 的方式来实现可能更简单。
下图解释了将要实现的方案流程:
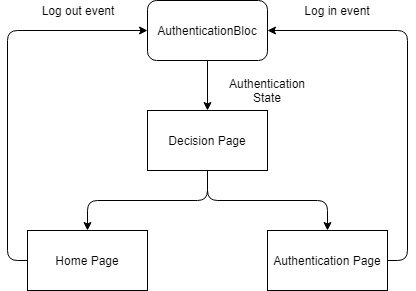
中间跳转页面 DecisionPage 将负责 自动 将用户重定向到 Authentication 界面或 Home 界面,具体到哪个界面取决于用户的登录状态。当然 DecisionPage 不会显示给用户,也不应该将其视为一个真正的页面。
同样首先要做的是定义一些事件和状态…
3.6.1. 定义事件: AuthenticationEvent
作为例子,我只考虑了2个事件:
- login:用户成功登录时会发出该事件
- logout:用户注销时会发出该事件
它们的定义如下:
abstract class AuthenticationEvent extends BlocEvent {
  final String name;

  AuthenticationEvent({
    this.name: '',
  });
}

class AuthenticationEventLogin extends AuthenticationEvent {
  AuthenticationEventLogin({
    String name,
  }) : super(
          name: name,
        );
}

class AuthenticationEventLogout extends AuthenticationEvent {}
3.6.2. 定义状态: AuthenticationState
AuthenticationState 类将提供与验证过程相关的信息。
同样作为例子,我只考虑了:
- 3 个 flag:
- isAuthenticated 用来标识验证是否完成
- isAuthenticating 用来知晓是否处于验证过程中
- hasFailed 用来表示身份是否验证失败
- 经过身份验证后的用户名:name
代码如下:
class AuthenticationState extends BlocState {
  AuthenticationState({
    @required this.isAuthenticated,
    this.isAuthenticating: false,
    this.hasFailed: false,
    this.name: '',
  });

  final bool isAuthenticated;
  final bool isAuthenticating;
  final bool hasFailed;

  final String name;

  factory AuthenticationState.notAuthenticated() {
    return AuthenticationState(
      isAuthenticated: false,
    );
  }

  factory AuthenticationState.authenticated(String name) {
    return AuthenticationState(
      isAuthenticated: true,
      name: name,
    );
  }

  factory AuthenticationState.authenticating() {
    return AuthenticationState(
      isAuthenticated: false,
      isAuthenticating: true,
    );
  }

  factory AuthenticationState.failure() {
    return AuthenticationState(
      isAuthenticated: false,
      hasFailed: true,
    );
  }
}
3.6.3. 实现 BLoC: AuthenticationBloc
BLoC 将基于事件类型来处理具体的身份验证过程。
代码如下:
class AuthenticationBloc
    extends BlocEventStateBase<AuthenticationEvent, AuthenticationState> {
  AuthenticationBloc()
      : super(
          initialState: AuthenticationState.notAuthenticated(),
        );

  @override
  Stream<AuthenticationState> eventHandler(
      AuthenticationEvent event, AuthenticationState currentState) async* {

    if (event is AuthenticationEventLogin) {
      // Inform that we are proceeding with the authentication
      yield AuthenticationState.authenticating();

      // Simulate a call to the authentication server
      await Future.delayed(const Duration(seconds: 2));

      // Inform that we have successfuly authenticated, or not
      if (event.name == "failure"){
        yield AuthenticationState.failure();
      } else {
        yield AuthenticationState.authenticated(event.name);
      }
    }

    if (event is AuthenticationEventLogout){
      yield AuthenticationState.notAuthenticated();
    }
  }
}
说明:
- 当接收到 AuthenticationEventLogin事件时,会通过 yield 抛出一个新状态 (state) 告知身份验证正在进行 (isAuthenticating =
true) - 当身份验证一旦完成,会抛出另一个新的状态 (state) 告知已经完成了
- 当接收到 AuthenticationEventLogout 事件时,会抛出一个新状态 (state) 告知用户已经不在是已验证状态
3.6.4. 登录页面: AuthenticationPage
如你所见,为了便于说明,这个页面并没有做的很复杂。
代码及说明如下:
class AuthenticationPage extends StatelessWidget {
  ///
  /// Prevents the use of the "back" button
  ///
  Future<bool> _onWillPopScope() async {
    return false;
  }

  @override
  Widget build(BuildContext context) {
    AuthenticationBloc bloc = BlocProvider.of<AuthenticationBloc>(context);
    return WillPopScope(
      onWillPop: _onWillPopScope,
      child: SafeArea(
        child: Scaffold(
          appBar: AppBar(
            title: Text('Authentication Page'),
            leading: Container(),
          ),
          body: Container(
            child:
                BlocEventStateBuilder<AuthenticationEvent, AuthenticationState>(
              bloc: bloc,
              builder: (BuildContext context, AuthenticationState state) {
                if (state.isAuthenticating) {
                  return PendingAction();
                }

                if (state.isAuthenticated){
                  return Container();
                }

                List<Widget> children = <Widget>[];

                // Button to fake the authentication (success)
                children.add(
                  ListTile(
                      title: RaisedButton(
                        child: Text('Log in (success)'),
                        onPressed: () {
                            bloc.emitEvent(AuthenticationEventLogin(name: 'Didier'));
                        },
                      ),
                    ),
                );

                // Button to fake the authentication (failure)
                children.add(
                  ListTile(
                      title: RaisedButton(
                        child: Text('Log in (failure)'),
                        onPressed: () {
                            bloc.emitEvent(AuthenticationEventLogin(name: 'failure'));
                        },
                      ),
                    ),
                );

                // Display a text if the authentication failed
                if (state.hasFailed){
                  children.add(
                    Text('Authentication failure!'),
                  );
                }

                return Column(
                  children: children,
                );
              },
            ),
          ),
        ),
      ),
    );
  }
}
说明:
- 第 11 行:在页面中获取 AuthenticationBloc
- 第 24 ~ 70 行:监听被抛出的 AuthenticationState:
- 如果正在验证过程中,会显示循环进度指示器(转圈圈),告知用户正在处理中,并阻止用户访问到其它页面(第25 ~ 27 行)
- 如果验证成功,显示一个空的 Container,即不显示任何内容 (第 29 ~ 31 行)
- 如果用户还没有登录,显示2个按钮,可模拟登录成功和失败的情况
- 当点击其中一个按钮时,会发出 AuthenticationEventLogin 事件以及一些参数(通常会被用于验证处理)
- 如果身份验证失败,显示一条错误消息(第 60 ~ 64 行)
好了,没啥别的事了,很简单对不?
小技巧
你肯定注意到了,我把页面包在了 WillPopScope 里面,这是因为身份验证是必须的步骤,除非成功登录(验证通过),我不希望用户使用 Android 设备提供的 Back 键来跳过验证访问到其它页面。
3.6.5. 中间跳转页面: DecisionPage
如前所述,我希望 App 根据用户登录状态自动跳转到 AuthenticationPage 或 HomePage
代码及说明如下:
class DecisionPage extends StatefulWidget {
  @override
  DecisionPageState createState() {
    return new DecisionPageState();
  }
}

class DecisionPageState extends State<DecisionPage> {
  AuthenticationState oldAuthenticationState;

  @override
  Widget build(BuildContext context) {
    AuthenticationBloc bloc = BlocProvider.of<AuthenticationBloc>(context);
    return BlocEventStateBuilder<AuthenticationEvent, AuthenticationState>(
      bloc: bloc,
      builder: (BuildContext context, AuthenticationState state) {
        if (state != oldAuthenticationState){
          oldAuthenticationState = state;

          if (state.isAuthenticated){
            _redirectToPage(context, HomePage());
          } else if (state.isAuthenticating || state.hasFailed){
  //do nothing
          } else {
            _redirectToPage(context, AuthenticationPage());
          }
        }
        // This page does not need to display anything since it will
        // always remind behind any active page (and thus 'hidden').
        return Container();
      }
    );
  }

  void _redirectToPage(BuildContext context, Widget page){
    WidgetsBinding.instance.addPostFrameCallback((_){
      MaterialPageRoute newRoute = MaterialPageRoute(
          builder: (BuildContext context) => page
        );

      Navigator.of(context).pushAndRemoveUntil(newRoute, ModalRoute.withName('/decision'));
    });
  }
}
提示
为了详细解释下面的问题,我们先回溯下 Flutter 处理 Pages(也就是 路由Route)的方式,即使用 Navigator 对象来管理 Routes,而 Navigator 对象创建了一个 Overlay 对象;这个 Overlay 其实是包含多个 OverlayEntry 的 Stack 对象,而每个 OverlayEntry 都包含了一个 Page;
当我们通过 Navigator.of(context) 操作路由堆栈进行压入、弹出或替换时,也会更新 Overlay 对象(也就是Stack 对象),换句话说,这些操作会导致 Stack 对象的重构;而 Stack 重构时,OverlayEntry (包括其内容 Page)也会跟着重构;
结果就是:
当我们通过 Navigator.of(context) 进行路由操作后,所有其它页面都会重构!
-
那么,为啥我要把它实现为 StatefulWidget ?
为了能够响应 AuthenticationState 任何变更,这个 page 需要在 App 整个生命周期内保留;
而根据上面的提示,每次调用 Navigator.of(context) 后,这个页面都会被重构,因此也会重构 BlocEventStateBuilder ,毫无疑问 BlocEventStateBuilder 里面的 builder 方法也会被调用;
因为这个 builder 方法是负责将用户重定向到与 AuthenticationState 对应的页面,重定向又要通过 Navigator.of(context) 来实现…明显死循环了
所以为了防止这种情况发生,我们需要将「最后一个」 AuthenticationState 存起来,只有当新的 AuthenticationState 与已存的不一样时,我们才进行重定向处理;
而实现存储就是利用 StatefulWidget 的特性,将「最后一个」 AuthenticationState 放到了 State 的 oldAuthenticationState 属性中。
-
到底是怎么运作的?
如上所诉,每当 AuthenticationState 被抛出时,BlocEventStateBuilder 会调用 builder 方法,根据 isAuthenticated 标识,我们就知道具体将用户重定向到哪个页面。
小技巧
由于在 builder 中无法直接跳转到其它界面,我们使用了WidgetsBinding.instance.addPostFrameCallback() 方法来请求 Flutter 在完成渲染后执行跳转。
此外,除了 DecisionPage 需要在整个应用生命周期保留之外,我们需要移除路由堆栈中重定向前所有其它已存在的页面,所以我们使用了 Navigator.of(context).pushAndRemoveUntil(…) 来实现这一目的。参考 pushAndRemoveUntil()
3.6.6. 用户注销
为了让用户能够注销,可以创建一个 LogOutButton,放到 App 中任何地方。
这个按钮只需要点击后发出 AuthenticationEventLogout() 事件,这个事件会触发如下的自动处理动作:
- 事件由 AuthenticationBloc 进行处理
- 处理后抛出一个 AuthentiationState(isAuthenticated =
false) - 抛出的状态将由DecisionPage 通过 BlocEventStateBuilder 进行处理
- 最后将用户重定向到 AuthenticationPage
按钮代码如下:
class LogOutButton extends StatelessWidget {
  @override
  Widget build(BuildContext context) {
    AuthenticationBloc bloc = BlocProvider.of<AuthenticationBloc>(context);
    return IconButton(
      icon: Icon(Icons.exit_to_app),
      onPressed: () {
        bloc.emitEvent(AuthenticationEventLogout());
      },
    );
  }
}
3.6.7. 注入 AuthenticationBloc
由于需要 AuthenticationBloc 在应用中任何页面都可用,所以我们将其注入为 MaterialApp 的父级,如下所示:
void main() => runApp(Application());

class Application extends StatelessWidget {
  @override
  Widget build(BuildContext context) {
    return BlocProvider<AuthenticationBloc>(
      bloc: AuthenticationBloc(),
      child: MaterialApp(
        title: 'BLoC Samples',
        theme: ThemeData(
          primarySwatch: Colors.blue,
        ),
        home: DecisionPage(),
      ),
    );
  }
}
4. 表单验证
BLoC 另一个有意思的应用场景就是表单的验证,比如:
- 验证某个 TextField 表单项是否满足一些业务规则
- 业务规则验证错误时显示提示信息
- 根据业务规则自动处理表单组件是否可用
下面的例子中,我用了一个名叫 RegistrationForm 的表单,这个表单包含3个 TextField (分别为电子邮箱email、密码password和重复密码 confirmPassword)以及一个按钮 RaisedButton 用来发起注册处理
想要实现的业务规则有:
- email 需要是有效的电子邮箱地址,如果不是的话显示错误提示信息
- password 也必须需有效,即包括至少1个大写字母、1个小写字母、1个数字和1个特殊字符在内,且不少于8位字符,如果不是的话也需要显示错误提示信息
- 重复密码 retype password 除了需要和 password 一样的验证规则外,还需要和 password 完全一样,如果不是的话,显示错误提示信息
- register 按钮只有在以上所有规则都验证通过后才能使用
4.1. RegistrationFormBloc
如前所述,这个 BLoC 负责业务规则验证的处理,实现的代码如下:
class RegistrationFormBloc extends Object with EmailValidator, PasswordValidator implements BlocBase {

  final BehaviorSubject<String> _emailController = BehaviorSubject<String>();
  final BehaviorSubject<String> _passwordController = BehaviorSubject<String>();
  final BehaviorSubject<String> _passwordConfirmController = BehaviorSubject<String>();

  //
  //  Inputs
  //
  Function(String) get onEmailChanged => _emailController.sink.add;
  Function(String) get onPasswordChanged => _passwordController.sink.add;
  Function(String) get onRetypePasswordChanged => _passwordConfirmController.sink.add;

  //
  // Validators
  //
  Stream<String> get email => _emailController.stream.transform(validateEmail);
  Stream<String> get password => _passwordController.stream.transform(validatePassword);
  Stream<String> get confirmPassword => _passwordConfirmController.stream.transform(validatePassword)
    .doOnData((String c){
      // If the password is accepted (after validation of the rules)
      // we need to ensure both password and retyped password match
      if (0 != _passwordController.value.compareTo(c)){
        // If they do not match, add an error
        _passwordConfirmController.addError("No Match");
      }
    });

  //
  // Registration button
  Stream<bool> get registerValid => Observable.combineLatest3(
                                      email,
                                      password,
                                      confirmPassword,
                                      (e, p, c) => true
                                    );

  @override
  void dispose() {
    _emailController?.close();
    _passwordController?.close();
    _passwordConfirmController?.close();
  }
}
说明:
- 这个类中我们最先初始化了 3 个 BehaviorSubject,用来处理表单中 3 个 TextField 的 Stream
- 这个类提供了 3 个 Function(String) ,用来接收来自 TextField 的输入
- 这个类提供了 3 个 Stream<String> ,在 TextField 验证失败时,显示各自的错误信息
- 同时还提供了 1 个 Stream<bool>,作用是根据全部表单项的验证结果,控制 RaisedButton 是否可用 (enable/disabe)
好了,我们来深入了解更多的细节…
你可能注意到了,这个 BLoC 类的代码有点特殊,是这样的:
class RegistrationFormBloc extends Object
                           with EmailValidator, PasswordValidator
                           implements BlocBase {
  ...
}
使用了 with 关键字表明这个类用到了 MIXINS (一种在另一个类中重用类代码的方法),而且为了使用 with,这个类还需要基于 Object 类进行扩展。这些 mixins 包含了 email 和 password 各自的验证方式。
关于 Mixins 更多信息建议阅读 Romain Rastel 的这篇文章。
4.1.1. 表单验证用到的 Mixins
我这里只对 EmailValidator 进行说明,因为 PasswordValidator 也是类似的。
首先,代码如下:
const String _kEmailRule = r"^[a-zA-Z0-9_.+-]+@[a-zA-Z0-9-]+\.[a-zA-Z0-9-.]+$";


class EmailValidator {
  final StreamTransformer<String,String> validateEmail =
      StreamTransformer<String,String>.fromHandlers(handleData: (email, sink){
        final RegExp emailExp = new RegExp(_kEmailRule);


        if (!emailExp.hasMatch(email) || email.isEmpty){
          sink.addError('Entre a valid email');
        } else {
          sink.add(email);
        }
      });
}
这个类提供了一个 final 方法 (validateEmail),这个方法其实返回的是一个 StreamTransformer 实例
提示
StreamTransformer 的调用方式为:stream.transform(StreamTransformer)
StreamTransformer 从 Stream 获取输入,然后引用 Stream 的 transform 方法进行输入的处理,并将处理后的数据重新注入到初始的 Stream 中。
在上面的代码中,处理流程包括根据一个 正则表达式 检查输入的内容,如果匹配则将输入的内容重新注入到 stream 中;如果不匹配,则将错误信息注入给 stream
4.1.2. 为什么要用 stream.transform()?
如前所述,如果验证成功,StreamTransformer 会把输入的内容重新注入回 Stream,具体是怎么运作的呢?
我们先看看 Observable.combineLatest3() 这个方法,它在每个 Stream 全都抛出至少一个值之前,并不会给出任何值
如下图所示:
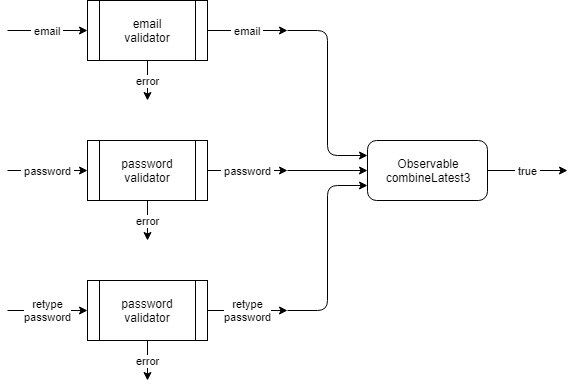
- 如果用户输入的 email 是有效的,email 的 stream 会抛出用户输入的内容,同时再作为 Observable.combineLatest3() 的一个输入
- 如果用户输入的 email 是无效的,email 的 stream 中会被添加一条错误信息(而且 stream 不会抛出数据)
- password 和 retype password 也是类似的机制
- 当它们3个都验证通过时(也就是 3 个 stream 都抛出了数据),Observable.combineLatest3() 会借助 (e, p, c) => true 方法抛出一个
true值(见代码第 35 行)
4.1.3. 密码与重复密码验证
我在网上看到有很多关于密码与重复密码的验证问题,解决方案肯定是有很多的,这里我针对其中两种说明下。
4.1.3.1. 无错误提示的基础方案
第一种解决方案的代码如下:
Stream<bool> get registerValid => Observable.combineLatest3(
                                      email,
                                      password,
                                      confirmPassword,
                                      (e, p, c) => (0 == p.compareTo(c))
                                    );
这个解决方案只是在验证了两个密码之后,将它们进行比较,如果它们一样,则会抛出一个 true 值。
等下我们会看到,Register 按钮是否可用是依赖于 registerValid stream 的,如果两个密码不一样,registerValid stream 就不会抛出任何值,所以 Register 按钮依然是不可用状态。
但是,用户不会接收到任何错误提示信息,所以也不明白发生了什么。
4.1.3.2. 具有错误提示的方案
另一种方案是把 confirmPassword stream的处理方法进行了扩展,代码如下:
Stream<String> get confirmPassword => _passwordConfirmController.stream.transform(validatePassword)
    .doOnData((String c){
      // If the password is accepted (after validation of the rules)
      // we need to ensure both password and retyped password match
      if (0 != _passwordController.value.compareTo(c)){
        // If they do not match, add an error
        _passwordConfirmController.addError("No Match");
      }
    });
一旦 retype password 业务规则验证通过, 用户输入的内容会被 Stream 抛出,并调用 doOnData() 方法,在该方法中通过 _passwordController.value.compareTo() 获取是否与 password stream 中的数据一样,如果不一样,我们就可用添加错误提示了。
4.2. RegistrationForm 组件
在解释说明前我们先来看看 Form 组件的实现代码:
class RegistrationForm extends StatefulWidget {
  @override
  _RegistrationFormState createState() => _RegistrationFormState();
}


class _RegistrationFormState extends State<RegistrationForm> {
  RegistrationFormBloc _registrationFormBloc;


  @override
  void initState() {
    super.initState();
    _registrationFormBloc = RegistrationFormBloc();
  }


  @override
  void dispose() {
    _registrationFormBloc?.dispose();
    super.dispose();
  }


  @override
  Widget build(BuildContext context) {
    return Form(
      child: Column(
        children: <Widget>[
          StreamBuilder<String>(
              stream: _registrationFormBloc.email,
              builder: (BuildContext context, AsyncSnapshot<String> snapshot) {
                return TextField(
                  decoration: InputDecoration(
                    labelText: 'email',
                    errorText: snapshot.error,
                  ),
                  onChanged: _registrationFormBloc.onEmailChanged,
                  keyboardType: TextInputType.emailAddress,
                );
              }),
          StreamBuilder<String>(
              stream: _registrationFormBloc.password,
              builder: (BuildContext context, AsyncSnapshot<String> snapshot) {
                return TextField(
                  decoration: InputDecoration(
                    labelText: 'password',
                    errorText: snapshot.error,
                  ),
                  obscureText: false,
                  onChanged: _registrationFormBloc.onPasswordChanged,
                );
              }),
          StreamBuilder<String>(
              stream: _registrationFormBloc.confirmPassword,
              builder: (BuildContext context, AsyncSnapshot<String> snapshot) {
                return TextField(
                  decoration: InputDecoration(
                    labelText: 'retype password',
                    errorText: snapshot.error,
                  ),
                  obscureText: false,
                  onChanged: _registrationFormBloc.onRetypePasswordChanged,
                );
              }),
          StreamBuilder<bool>(
              stream: _registrationFormBloc.registerValid,
              builder: (BuildContext context, AsyncSnapshot<bool> snapshot) {
                return RaisedButton(
                  child: Text('Register'),
                  onPressed: (snapshot.hasData && snapshot.data == true)
                      ? () {
                          // launch the registration process
                        }
                      : null,
                );
              }),
        ],
      ),
    );
  }
}
说明:
- 因为 RegisterFormBloc 只是用于表单的验证处理,所以仅在表单组件中初始化(实例化)是合适的
- 每个 TextField 都包含在一个StreamBuilder<String> 中,以便能够响应验证过程的任何结果(见代码中的errorText:snapshot.error)
- 每次 TextField 中输入的内容发生改变时,我们都将已输入的内容通过 onChanged:_registrationFormBloc.onEmailChanged (输入email情况下) 发送给 BLoC 进行验证,
- RegisterButton 同样也包含在一个 StreamBuilder<bool> 中
- 如果 _registrationFormBloc.registerValid 抛出了值,onPressed 将在用户点击时对抛出的值进行后续处理
- 如果没有值抛出,onPressed 方法被指定为 null,按钮会被置为不可用状态
好了!可用看到在表单组件中,是看不到任何和业务规则相关的代码的,这意味着我们可以随意修改业务规则,而不需要对表单组件本身进行任何修改,简直 excellent!
5. Part Of 模式
有时候,需要组件根据所处环境(是否是属于某个列表/集合/组件等)来驱动自身的行为,作为本文的最后一个范例,我们将考虑如下场景:
- App 提供与显示多个商品 (item)
- 用户可以将选择的商品放入购物篮
- 每件商品仅能放入购物篮一次
- 购物篮中的商品可以被移除
- 被移除的商品可以重新被用户放入购物篮
在例子中,每个商品都会显示一个按钮,这个按钮根据商品是否是在购物篮中决定其行为:
- 如果是在购物篮中,则允许用户点击后将商品从购物篮中移除
- 如果没在购物篮中,则用户点击后对应商品将添加到购物篮中
为了更好地说明 Part of 模式,我采用了以下的代码架构:
- 实现一个 Shopping Page,用来显示所有可能的商品列表
- Shopping Page 中的每个商品都会有个按钮,这个按钮可将商品添加到购物篮中或从购物篮中移除,取决于商品是否已经在购物篮中
- 如果 Shopping Page 中的一件商品被添加到购物篮中,那么按钮将自动更新,允许用户再次点击后将商品从购物篮中移除(反过来也一样);这个过程不需要重构 Shopping Page
- 构建另一个页面 Shopping Basket,用来显示全部已经添加到购物篮的商品
- 可从 Shopping Basket 页面中移除任何已添加到购物篮的商品
注意
「Part Of 模式」 这个名字是我自己取的,并不是官方名称。
5.1. ShoppingBloc
你可能已经想到了,我们需要考虑让 BLoC 来处理所有商品的列表,以及 Shopping Basket 页面中的(已添加到购物篮中的)商品列表
这个 BLoC 代码如下:
class ShoppingBloc implements BlocBase {
  // List of all items, part of the shopping basket
  Set<ShoppingItem> _shoppingBasket = Set<ShoppingItem>();


  // Stream to list of all possible items
  BehaviorSubject<List<ShoppingItem>> _itemsController = BehaviorSubject<List<ShoppingItem>>();
  Stream<List<ShoppingItem>> get items => _itemsController;


  // Stream to list the items part of the shopping basket
  BehaviorSubject<List<ShoppingItem>> _shoppingBasketController = BehaviorSubject<List<ShoppingItem>>(seedValue: <ShoppingItem>[]);
  Stream<List<ShoppingItem>> get shoppingBasket => _shoppingBasketController;


  @override
  void dispose() {
    _itemsController?.close();
    _shoppingBasketController?.close();
  }


  // Constructor
  ShoppingBloc() {
    _loadShoppingItems();
  }


  void addToShoppingBasket(ShoppingItem item){
    _shoppingBasket.add(item);
    _postActionOnBasket();
  }


  void removeFromShoppingBasket(ShoppingItem item){
    _shoppingBasket.remove(item);
    _postActionOnBasket();
  }


  void _postActionOnBasket(){
    // Feed the shopping basket stream with the new content
    _shoppingBasketController.sink.add(_shoppingBasket.toList());

    // any additional processing such as
    // computation of the total price of the basket
    // number of items, part of the basket...
  }


  //
  // Generates a series of Shopping Items
  // Normally this should come from a call to the server
  // but for this sample, we simply simulate
  //
  void _loadShoppingItems() {
    _itemsController.sink.add(List<ShoppingItem>.generate(50, (int index) {
      return ShoppingItem(
        id: index,
        title: "Item $index",
        price: ((Random().nextDouble() * 40.0 + 10.0) * 100.0).roundToDouble() /
            100.0,
        color: Color((Random().nextDouble() * 0xFFFFFF).toInt() << 0)
            .withOpacity(1.0),
      );
    }));
  }
}
可能唯一需要解释说明的就是 _postActionOnBasket() 方法:每次我们将商品添加到购物篮或移除时,都需要「刷新」 _shoppingBasketController 控制的 stream 内容,监听该 stream 的组件就会收到变更通知,以便组件自身进行刷新或重建 (refresh/rebuild)
5.2. ShoppingPage
这个页面很简单,就是显示所有商品而已:
class ShoppingPage extends StatelessWidget {
  @override
  Widget build(BuildContext context) {
    ShoppingBloc bloc = BlocProvider.of<ShoppingBloc>(context);


    return SafeArea(
        child: Scaffold(
      appBar: AppBar(
        title: Text('Shopping Page'),
        actions: <Widget>[
          ShoppingBasket(),
        ],
      ),
      body: Container(
        child: StreamBuilder<List<ShoppingItem>>(
          stream: bloc.items,
          builder: (BuildContext context,
              AsyncSnapshot<List<ShoppingItem>> snapshot) {
            if (!snapshot.hasData) {
              return Container();
            }
            return GridView.builder(
              gridDelegate: SliverGridDelegateWithFixedCrossAxisCount(
                crossAxisCount: 3,
                childAspectRatio: 1.0,
              ),
              itemCount: snapshot.data.length,
              itemBuilder: (BuildContext context, int index) {
                return ShoppingItemWidget(
                  shoppingItem: snapshot.data[index],
                );
              },
            );
          },
        ),
      ),
    ));
  }
}
说明:
- AppBar 会显示一个按钮,用来:
- 显示购物篮中商品的数量
- 当点击时,跳转到 ShoppingBasket 页面
- 商品列表使用了 GridView 布局,这个 GridView 是包含在一个 *StreamBuilder<List<ShoppingItem>>*中的
- 每个商品对应一个 ShoppingItemWidget
5.3. ShoppingBasketPage
This page is very similar to the ShoppingPage except that the StreamBuilder is now listening to variations of the _shoppingBasket stream, exposed by the ShoppingBloc.
这个页面和 ShoppingPage 非常相似,只是其 StreamBuilder 监听对象是 ShoppingBloc 提供的 _shoppingBasket stream 的变更结果
5.4. ShoppingItemWidget 和 ShoppingItemBloc
Part Of 模式依赖于ShoppingItemWidget 和 ShoppingItemBloc两个元素的组合应用:
- ShoppingItemWidget 负责显示:
- 商品信息
- 添加到购物车或移除的按钮
- ShoppingItemBloc 负责告诉 ShoppingItemWidget 它「是否在购物篮中」状态
我们来看看它们是怎么一起运作的…
5.4.1. ShoppingItemBloc
ShoppingItemBloc 由每个 ShoppingItemWidget 来实例化,并向其提供了自身的商品 ID (identity);
BLoC 将监听 ShoppingBasket stream 的变更结果,并检查具有特定 ID 的商品是否已在购物篮中;
如果已在购物篮中,BLoC 将抛出一个布尔值(=true),对应 ID 的 ShoppingItemWidget 将捕获这个布尔值,从而得知自己已经在购物篮中了。
以下就是 BLoC 的代码:
class ShoppingItemBloc implements BlocBase {
  // Stream to notify if the ShoppingItemWidget is part of the shopping basket
  BehaviorSubject<bool> _isInShoppingBasketController = BehaviorSubject<bool>();
  Stream<bool> get isInShoppingBasket => _isInShoppingBasketController;


  // Stream that receives the list of all items, part of the shopping basket
  PublishSubject<List<ShoppingItem>> _shoppingBasketController = PublishSubject<List<ShoppingItem>>();
  Function(List<ShoppingItem>) get shoppingBasket => _shoppingBasketController.sink.add;


  // Constructor with the 'identity' of the shoppingItem
  ShoppingItemBloc(ShoppingItem shoppingItem){
    // Each time a variation of the content of the shopping basket
    _shoppingBasketController.stream
                          // we check if this shoppingItem is part of the shopping basket
                         .map((list) => list.any((ShoppingItem item) => item.id == shoppingItem.id))
                          // if it is part
                         .listen((isInShoppingBasket)
                              // we notify the ShoppingItemWidget
                            => _isInShoppingBasketController.add(isInShoppingBasket));
  }


  @override
  void dispose() {
    _isInShoppingBasketController?.close();
    _shoppingBasketController?.close();
  }
}
5.4.2. ShoppingItemWidget
这个组件负责:
- 创建一个 ShoppingItemBloc 实例,并将组件自身的 ID 传递给这个 BLoC 实例
- 监听任何 ShoppingBasket 内容的变化,并将变化情况传递给 BLoC
- 监听 ShoppingItemBloc 获知自身「是否已在购物篮中」状态
- 根据自身是否在购物篮中,显示相应的按钮(添加/移除)
- 用户点击按钮后给出响应:
- 当用户点击「添加」按钮时,将自身放入到购物篮中
- 当用户点击「移除」按钮时,将自身从购物篮中移除
来看看具体的实现代码和说明:
class ShoppingItemWidget extends StatefulWidget {
  ShoppingItemWidget({
    Key key,
    @required this.shoppingItem,
  }) : super(key: key);


  final ShoppingItem shoppingItem;


  @override
  _ShoppingItemWidgetState createState() => _ShoppingItemWidgetState();
}


class _ShoppingItemWidgetState extends State<ShoppingItemWidget> {
  StreamSubscription _subscription;
  ShoppingItemBloc _bloc;
  ShoppingBloc _shoppingBloc;


  @override
  void didChangeDependencies() {
    super.didChangeDependencies();


    // As the context should not be used in the "initState()" method,
    // prefer using the "didChangeDependencies()" when you need
    // to refer to the context at initialization time
    _initBloc();
  }


  @override
  void didUpdateWidget(ShoppingItemWidget oldWidget) {
    super.didUpdateWidget(oldWidget);


    // as Flutter might decide to reorganize the Widgets tree
    // it is preferable to recreate the links
    _disposeBloc();
    _initBloc();
  }


  @override
  void dispose() {
    _disposeBloc();
    super.dispose();
  }


  // This routine is reponsible for creating the links
  void _initBloc() {
    // Create an instance of the ShoppingItemBloc
    _bloc = ShoppingItemBloc(widget.shoppingItem);


    // Retrieve the BLoC that handles the Shopping Basket content
    _shoppingBloc = BlocProvider.of<ShoppingBloc>(context);


    // Simple pipe that transfers the content of the shopping
    // basket to the ShoppingItemBloc
    _subscription = _shoppingBloc.shoppingBasket.listen(_bloc.shoppingBasket);
  }


  void _disposeBloc() {
    _subscription?.cancel();
    _bloc?.dispose();
  }


  Widget _buildButton() {
    return StreamBuilder<bool>(
      stream: _bloc.isInShoppingBasket,
      initialData: false,
      builder: (BuildContext context, AsyncSnapshot<bool> snapshot) {
        return snapshot.data
            ? _buildRemoveFromShoppingBasket()
            : _buildAddToShoppingBasket();
      },
    );
  }


  Widget _buildAddToShoppingBasket(){
    return RaisedButton(
      child: Text('Add...'),
      onPressed: (){
        _shoppingBloc.addToShoppingBasket(widget.shoppingItem);
      },
    );
  }


  Widget _buildRemoveFromShoppingBasket(){
    return RaisedButton(
      child: Text('Remove...'),
      onPressed: (){
        _shoppingBloc.removeFromShoppingBasket(widget.shoppingItem);
      },
    );
  }


  @override
  Widget build(BuildContext context) {
    return Card(
      child: GridTile(
        header: Center(
          child: Text(widget.shoppingItem.title),
        ),
        footer: Center(
          child: Text('${widget.shoppingItem.price} €'),
        ),
        child: Container(
          color: widget.shoppingItem.color,
          child: Center(
            child: _buildButton(),
          ),
        ),
      ),
    );
  }
}
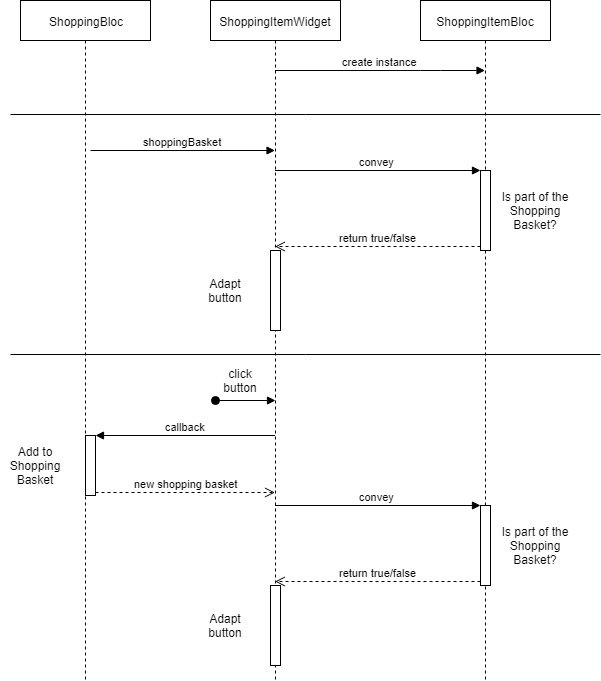
5.5. 这是到底是怎么运作的?
具体每部份的运作方式可参考下图
后记
又一篇长文,我倒是希望能够少写点,但是我觉得很多东西要解释清楚。
正如我在前言中说的,就我个人来说这些「模式」我已经中在开发中经常使用了,它们帮我节省了大量的时间和精力,而且产出的代码更加易读和调试;此外还有助于业务和视图的解耦分离。
肯定有大量其它方式也可以做到,甚至是更好的方式,但是本文中的模式对我来说确实很实用,这就是为啥我想与你分享的原因。
请继续关注新的文章,同时祝您编程愉快。
--全文完--
