

一、前言
在 《SparseArray详解及源码简析》 中,我们熟悉了 SparseArray 的基本用法、特点以及实现原理。而在 Android SDK 的这个工具包中还有一个同样重要的数据结构 ArrayMap,其目的也是在当数据量较小,比如几百个的时候,可以用来替代 HashMap,以提高内存的使用效率。
如果对 HashMap 的实现感兴趣的话,可以看看《HashMap详解以及源码分析》,而这篇文章就来了解一下 ArrayMap 的使用及其实现原理。
二、 源码简析
1. demo 及其简析
分析代码之前同样先看一段 demo,后面同样通过 demo 进行实现原理的分析。
        ArrayMap<String,String> arrayMap = new ArrayMap<>();
        arrayMap.put(null,"张大哥");
        arrayMap.put("abcd","A大哥");
        arrayMap.put("aabb","巴大哥");
        arrayMap.put("aacc","牛大哥");
        arrayMap.put("aadd","牛大哥");
        arrayMap.put("abcd","B大哥");

        Set<ArrayMap.Entry<String,String>> sets = arrayMap.entrySet();
        for (ArrayMap.Entry<String,String> set : sets) {
            Log.d(TAG, "arrayMapSample: key = " + set.getKey() + ";value = " + set.getValue());
        }
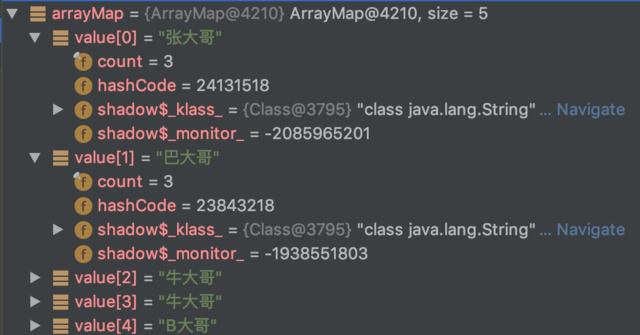
代码中,实际插入了 6 个 Key-Value,然而输出只有 5 个,其中 Key 为 “abcd” 的重复了而发生了覆盖。另外,还有一点注意的是 null 为 key 是允许插入的。以下是其输出的结果。
arrayMapSample: key = null;value = 张大哥 arrayMapSample: key = aabb;value = 巴大哥 arrayMapSample: key = aacc;value = 牛大哥 arrayMapSample: key = aadd;value = 牛大哥 arrayMapSample: key = abcd;value = B大哥
通过 Android Studio 的 Debug 功能,也可以简单观察一下其在内存中的存储。
2.源码分析
先来简单看一下 ArrayMap 的类图结构。

与 HashMap 不同的是,它是直接实现自接口 map。同样,存储 key-value 的方式也不同。ArrayMap 是通过数组直接存储了所有的 key-value。其中,mHashes 在 index 处存储了 key 的 hash code,而 mArray 则在 hash code 的 index<<1 处存储 key,在 index<<1 + 1 处存储 value。简单点说就是偶数处存储 key,相邻奇数处存储 value。
- ArrayMap 的初始化
     /**
     * Create a new empty ArrayMap.  The default capacity of an array map is 0, and
     * will grow once items are added to it.
     */
    public ArrayMap() {
        this(0, false);
    }

    /**
     * Create a new ArrayMap with a given initial capacity.
     */
    public ArrayMap(int capacity) {
        this(capacity, false);
    }

    /** {@hide} */
    public ArrayMap(int capacity, boolean identityHashCode) {
        mIdentityHashCode = identityHashCode;

        // If this is immutable, use the sentinal EMPTY_IMMUTABLE_INTS
        // instance instead of the usual EmptyArray.INT. The reference
        // is checked later to see if the array is allowed to grow.
        if (capacity < 0) {
            mHashes = EMPTY_IMMUTABLE_INTS;
            mArray = EmptyArray.OBJECT;
        } else if (capacity == 0) {
            mHashes = EmptyArray.INT;
            mArray = EmptyArray.OBJECT;
        } else {
            allocArrays(capacity);
        }
        mSize = 0;
    }
ArrayMap 的构造方法有 3 个重载的版本都列在上面了,一般我们都用默认的构造方法,那也就是说默认容量大小就是 0,需要等待到插入元素时才会进行扩容的动作。构造方法中的另一个参数 identityHashCode 控制 hashCode 是由 System 类产生还是由 Object.hashCode() 返回。这两者之间的实现其实没太大区别,因为 System 类最终也是通过 Object.hashCode() 来实现的。其主要就是对 null 进行了特殊处理,比如一律为 0。而在 ArrayMap 的 put() 方法中,如果 key 为 null 也将其 hashCode 视为 0 了。所以这里 identityHashCode 为 true 或者 false 都是一样的。
- 插入元素 put()
public V put(K key, V value) {
        final int osize = mSize;
        // 1.计算 hash code 并获取 index
        final int hash;
        int index;
        if (key == null) {
            // 为空直接取 0
            hash = 0;
            index = indexOfNull();
        } else {
            // 否则取 Object.hashCode()
            hash = mIdentityHashCode ? System.identityHashCode(key) : key.hashCode();
            index = indexOf(key, hash);
        }
        // 2.如果 index 大于等于 0 ,说明之前存在相同的 hash code 且 key 也相同,则直接覆盖
        if (index >= 0) {
            index = (index<<1) + 1;
            final V old = (V)mArray[index];
            mArray[index] = value;
            return old;
        }
        // 3.如果没有找到则上面的 indexOf() 或者  indexOfNull() 就会返回一个负数,而这个负数就是由将要插入的位置 index 取反得到的,所以这里再次取反就变成了将进行插入的位置
        index = ~index;
        // 4.判断是否需要扩容
        if (osize >= mHashes.length) {
            final int n = osize >= (BASE_SIZE*2) ? (osize+(osize>>1))
                    : (osize >= BASE_SIZE ? (BASE_SIZE*2) : BASE_SIZE);

            if (DEBUG) Log.d(TAG, "put: grow from " + mHashes.length + " to " + n);

            final int[] ohashes = mHashes;
            final Object[] oarray = mArray;
            // 5.申请新的空间
            allocArrays(n);

            if (CONCURRENT_MODIFICATION_EXCEPTIONS && osize != mSize) {
                throw new ConcurrentModificationException();
            }

            if (mHashes.length > 0) {
                if (DEBUG) Log.d(TAG, "put: copy 0-" + osize + " to 0");
                // 将数据复制到新的数组中
                System.arraycopy(ohashes, 0, mHashes, 0, ohashes.length);
                System.arraycopy(oarray, 0, mArray, 0, oarray.length);
            }
            // 6.释放旧的数组
            freeArrays(ohashes, oarray, osize);
        }

        if (index < osize) {
            // 7.如果 index 在当前 size 之内,则需要将 index 开始的数据移到 index + 1 处,以腾出 index 的位置
            if (DEBUG) Log.d(TAG, "put: move " + index + "-" + (osize-index)
                    + " to " + (index+1));
            System.arraycopy(mHashes, index, mHashes, index + 1, osize - index);
            System.arraycopy(mArray, index << 1, mArray, (index + 1) << 1, (mSize - index) << 1);
        }

        if (CONCURRENT_MODIFICATION_EXCEPTIONS) {
            if (osize != mSize || index >= mHashes.length) {
                throw new ConcurrentModificationException();
            }
        }
        // 8.然后根据计算得到的 index 分别插入 hash,key,以及 code
        mHashes[index] = hash;
        mArray[index<<1] = key;
        mArray[(index<<1)+1] = value;
        mSize++;
        return null;
    }
put 方法调用了其他几个内部的方法,其中关于扩容以及如何释放空间,申请新的空间这些,从算法层来讲其实不重要,只要知道一点就是,扩容会发生数据的复制,这个是会影响效率的就可以了。而与算法相关性较大的 indexOfNull() 方法以及 indexOf() 方法的实现。由于这两个方法的实现基本一样,因此这里只分析 indexOf() 的实现。
int indexOf(Object key, int hash) {
        final int N = mSize;

        // Important fast case: if nothing is in here, nothing to look for.
        if (N == 0) {
            return ~0;
        }

        int index = binarySearchHashes(mHashes, N, hash);

        // If the hash code wasn't found, then we have no entry for this key.
        if (index < 0) {
            return index;
        }

        // If the key at the returned index matches, that's what we want.
        if (key.equals(mArray[index<<1])) {
            return index;
        }

        // Search for a matching key after the index.
        int end;
        for (end = index + 1; end < N && mHashes[end] == hash; end++) {
            if (key.equals(mArray[end << 1])) return end;
        }

        // Search for a matching key before the index.
        for (int i = index - 1; i >= 0 && mHashes[i] == hash; i--) {
            if (key.equals(mArray[i << 1])) return i;
        }

        // Key not found -- return negative value indicating where a
        // new entry for this key should go.  We use the end of the
        // hash chain to reduce the number of array entries that will
        // need to be copied when inserting.
        return ~end;
    }
其实它原来的注释已经很详细了,详细的步骤是:
(1) 如果当前为空表,则直接返回 ~0,注意不是 0 ,而是最大的负数。
(2) 在 mHashs 数组中进行二分查找,找到 hash 的 index。
(3) 如果 index < 0,说明没有找到。
(4) 如果 index >= 0,且在 mArray 中对应的 index<<1 处的 key 与要找的 key 又相同,则认为是同一个 key,说明找到了。
(5) 如果 key 不相同,说明只是 hash code 相同,那么分别向后和向前进行搜索,如果找到了就返回。如果没找到,那么对 end 取反就是当前需要插入的 index 位置。
再回过头来看 put() 方法, put() 方法的具体实现都在源码中加以了详细的说明,感兴趣的可以详细阅读一下。而从 put 方法得出以下几个结论:
(1) mHashs 数组以升序的方式保存了所有的 hash code。
(2) 通过 hash code 在 mHashs 数组里的 index 值来确定 key 以及 value 在 mArrays 数组中的存储位置。一般来说分别就是 index << 1 以及 index << 1 + 1。再简单点说就是 index * 2 以及 index * 2 + 1。
(3) hashCode 必然可能存在冲突,这里是怎么解决的呢?这个是由上面的第 3 步和第 7 步所决定。第 3 步是得出应该插入的 index 的位置,而第 7 步则是如果 index < osize ,则说明原来 mArrays 中必然已经存在相同 hashCode 的值了,那么就把数据全部往后移一位,从而在 mHashs 中插入多个相同的 hash code 并且一定是连接在一起的,而在 mArrays 中插入新的 key 和 value,最终得以解决 hash 冲突。
上面的结论可能还是让人觉得有点晕,那么再来看看下面的图吧,就一定能明白了。
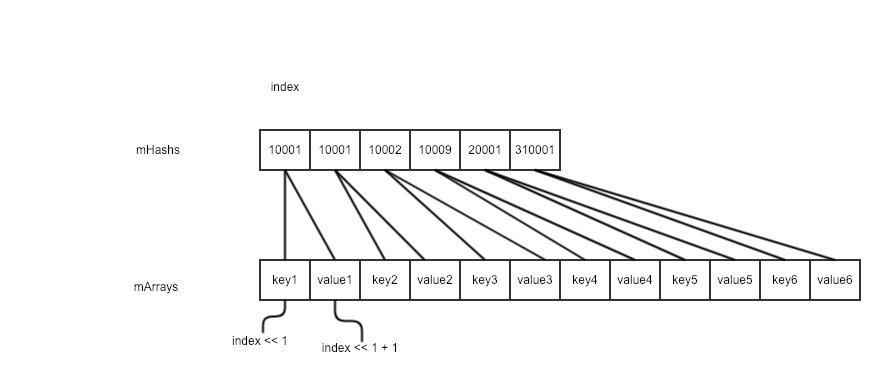
上面图说, index == 0 时 和 index == 1时的 hash code 是一样的,说明 key1 与 key2 的 hash code 是一样的,也就是存在 hash 冲突了。那么,如上,这里的解决办法就是 hash code 存储了 2 份,而 key-value 分别存储一份。
- get() 方法
    public V get(Object key) {
        final int index = indexOfKey(key);
        return index >= 0 ? (V)mArray[(index<<1)+1] : null;
    }
主要就是通过 indexOfKey() 计算出 index,而 indexOfKey() 的实现就是调用 indexOfNull () 和 indexOf(),其具体的实现已经上面分析过了。这里如果返了 index >= 0,则说明一定是找到了,那么根据前面的规则,在 mArray 中,index<<1 + 1 就是所要获取的 value 了。
- remove() 方法
    public V remove(Object key) {
        final int index = indexOfKey(key);
        if (index >= 0) {
            return removeAt(index);
        }
        return null;
    }
首先通过 indexOfKey() 计算出 index 以判断其是否存在,如果存在则进一步调用 removeAt() 来删除相应的 hash code 以及 key-value。
public V removeAt(int index) {
        final Object old = mArray[(index << 1) + 1];
        final int osize = mSize;
        final int nsize;
        // 如果 size 小于等于1 ,移除后数组长度将为 0。为了压缩内存,这里直接将mHashs 以及 mArray 置为了空数组
        if (osize <= 1) {
            // Now empty.
            if (DEBUG) Log.d(TAG, "remove: shrink from " + mHashes.length + " to 0");
            final int[] ohashes = mHashes;
            final Object[] oarray = mArray;
            mHashes = EmptyArray.INT;
            mArray = EmptyArray.OBJECT;
            freeArrays(ohashes, oarray, osize);
            nsize = 0;
        } else {
            // size > 1 的情况,则先将 size - 1
            nsize = osize - 1;
            if (mHashes.length > (BASE_SIZE*2) && mSize < mHashes.length/3) {
                // 如果上面的条件符合,那么就要进行数据的压缩。
                // Shrunk enough to reduce size of arrays.  We don't allow it to
                // shrink smaller than (BASE_SIZE*2) to avoid flapping between
                // that and BASE_SIZE.
                final int n = osize > (BASE_SIZE*2) ? (osize + (osize>>1)) : (BASE_SIZE*2);

                if (DEBUG) Log.d(TAG, "remove: shrink from " + mHashes.length + " to " + n);

                final int[] ohashes = mHashes;
                final Object[] oarray = mArray;
                allocArrays(n);

                if (CONCURRENT_MODIFICATION_EXCEPTIONS && osize != mSize) {
                    throw new ConcurrentModificationException();
                }

                if (index > 0) {
                    if (DEBUG) Log.d(TAG, "remove: copy from 0-" + index + " to 0");
                    System.arraycopy(ohashes, 0, mHashes, 0, index);
                    System.arraycopy(oarray, 0, mArray, 0, index << 1);
                }
                if (index < nsize) {
                    if (DEBUG) Log.d(TAG, "remove: copy from " + (index+1) + "-" + nsize
                            + " to " + index);
                    System.arraycopy(ohashes, index + 1, mHashes, index, nsize - index);
                    System.arraycopy(oarray, (index + 1) << 1, mArray, index << 1,
                            (nsize - index) << 1);
                }
            } else {
                if (index < nsize) {
                    // 如果 index 在 size 内,则将数据往前移一位
                    if (DEBUG) Log.d(TAG, "remove: move " + (index+1) + "-" + nsize
                            + " to " + index);
                    System.arraycopy(mHashes, index + 1, mHashes, index, nsize - index);
                    System.arraycopy(mArray, (index + 1) << 1, mArray, index << 1,
                            (nsize - index) << 1);
                }
                // 然后将最后一位数据置 null
                mArray[nsize << 1] = null;
                mArray[(nsize << 1) + 1] = null;
            }
        }
        if (CONCURRENT_MODIFICATION_EXCEPTIONS && osize != mSize) {
            throw new ConcurrentModificationException();
        }
        mSize = nsize;
        return (V)old;
    }
一般情况下删除一个数据,只需要将 index 后面的数据都往 index 方向移一位,然后删除末位数即可。而如果当前的数组中的条件达到 mHashs 的长度大于 BASE_SIZE2 且实际大小又小于其长度的 1/3,那么就要进行数据的压缩。而压缩后的空间至少也是 BASE_SIZE2 的大小。
三、总结
ArrayMap 中比较重要的是 put() 方法以及 remvoeAt() 方法的实现,这两个方法基本实现了 ArrayMap 的所有重要的特性。这里再重复一下以作为全文的总结。
-
mHashs 数组以升序的方式保存了所有的 hash code,在查找数据时则通过二分查找 hash code 所对应的 index。这也是它的 get() 比 HashMap 慢的根据原因所在。
-
通过 hash code 在 mHashs 数组里的 index 值来确定 key 以及 value 在 mArrays 数组中的存储位置。一般来说分别就是 index << 1 以及 index << 1 + 1。再简单点说就是 index * 2 以及 index * 2 + 1。
-
hashCode 必然可能存在冲突,这里是怎么解决的呢?简单点说就是,在 mHashs 中相邻地存多份 hash code,而在 mArray 中分别以它们的 index 来计算 key-value 的存储位置。
-
当进行 remove 操作时,在一定条件下,可能会发生数据的压缩,从而节省内存的使用。
最后,感谢你能读到并读完此文章。受限于作者水平有限,如果存在错误或者疑问都欢迎留言讨论。如果我的分享能够帮助到你,也请记得帮忙点个赞吧,鼓励我继续写下去,谢谢。
