


个人所有文章整理在此篇,将陆续更新收录:知无涯,行者之路莫言终(我的编程之路)
零、前言
1.本文的知识点
[1].Intent的简介及[隐式调用]和[显示调用]
[2].对象的序列化与反序列化:[Parcelable(简)]和`Serializable]
[3].[Bundle类]的及其在intent的数据传递
[4].Android源码中[intent-filter]的解析流程
2.Intent总览
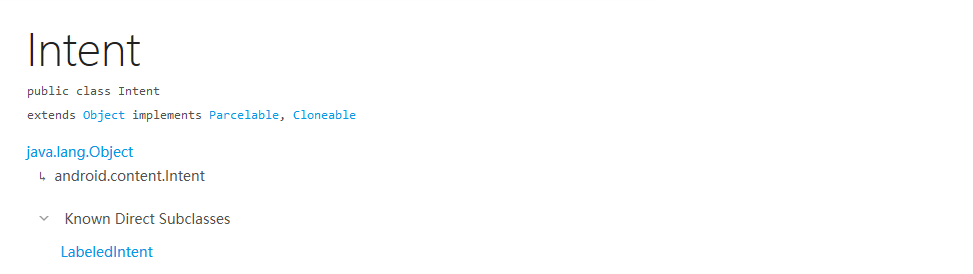
类名:Intent             父类:Object
实现的接口:[Parcelable, Cloneable]
包名:android.content'   依赖类个数:52
内部类/接口个数:3
源码行数:10086         源码行数(除注释):3407
属性个数:24            方法个数:164
一、Intent类简单认识
自从接触安卓的第一天就接触到了这个类:
Intent
上面可见Intent挺普通的,就是比较大,看起来10086行,感觉挺大的
除注释和空行,裸码3407,注释比率之高,家庭背景继承Object,接口平平,可谓白手起家
他是Android四大组件的忠实伙伴,跳转Activity,发送BroadcastReceiver,开启Service
组件之间通过Intent互相联系,并且传递数据,可谓名副其实的"外交官"
1.Intent构造函数
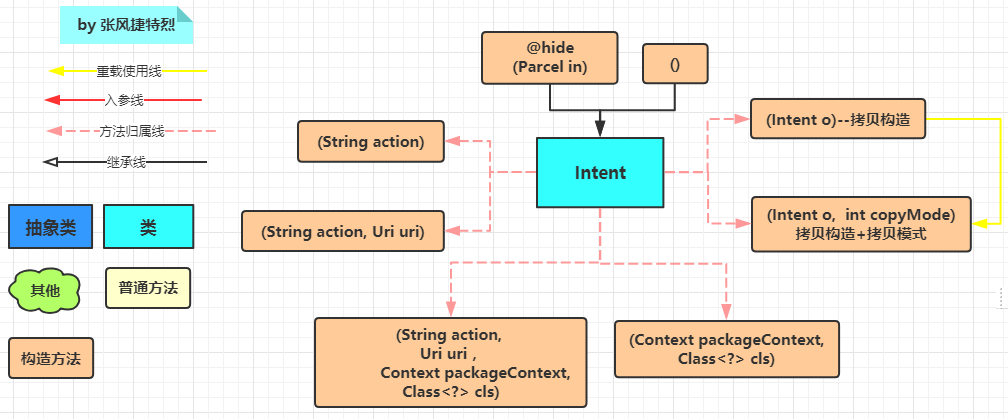
源码上来看一共有8个构造函数,上面两个是空参和隐藏的,不用管
左边两个通过拷贝来生成Intent对象,两参的拷贝是似有的
右边两个通过设置匹配信息方法来生成Intent对象(隐式)
下面两个加入了ComponentName来生成Intent对象 (显式)
2.Intent中的常用成员变量
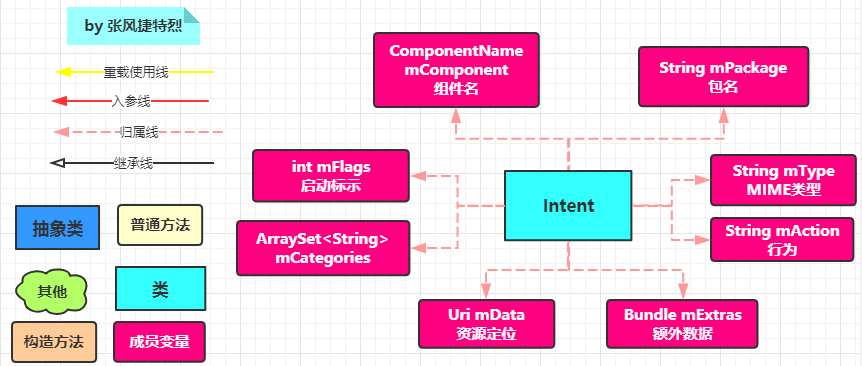
component(组件):目的组件(应用包名+组件全类名)
action(动作):意图的行为action
category(类别):行为action的类别
data(数据):表示与动作要操纵的数据
type(数据类型):对于data范例的描写
extras(扩展信息):扩展信息
Flags(标志位):期望这个意图的运行模式
二、Intent的隐式使用
即不指定组件名,通过
action,category,data,type等信息打开组件
系统中内置了很多应用,我们可以通过这些信息来匹配打开需要的应用
1.仅匹配Action
1.1:新建一个Activity:ActivityJustAction
非常简单,清单中为该Activity设置
intent-filter
自定义action:www.toly1994.com.ActivityJustAction
这个名字随便起,只要使用时对应就行了(一般是唯一的),当然也可以不唯一
没有category会崩掉,这里给个默认的category,也就是action的类别
class ActivityJustAction : AppCompatActivity() {

    override fun onCreate(savedInstanceState: Bundle?) {
        super.onCreate(savedInstanceState)
        setContentView(LinearLayout(this))
        title = "ActivityJustAction"
    }
}

---->[AndroidManifest.xml配置]------------
<activity android:name=".activity.ActivityJustAction">
    <intent-filter>
        <action android:name="www.toly1994.com.ActivityJustAction"></action>
        <category android:name="android.intent.category.DEFAULT"></category>
    </intent-filter>
</activity>
1.2:intent打开指定Action:
就像一个人在喊,我要找
旺财,然后旺财就来了
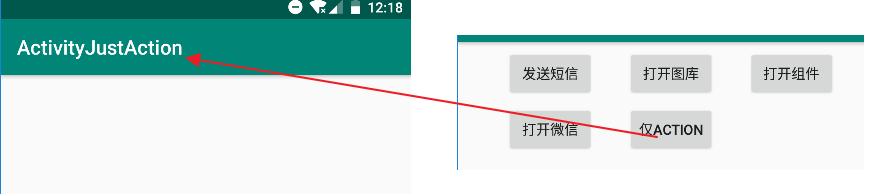
---->[IntentActivity]--------------
id_btn_just_action.setOnClickListener { v ->
    val intent = Intent("www.toly1994.com.ActivityJustAction")
    startActivity(intent)
}
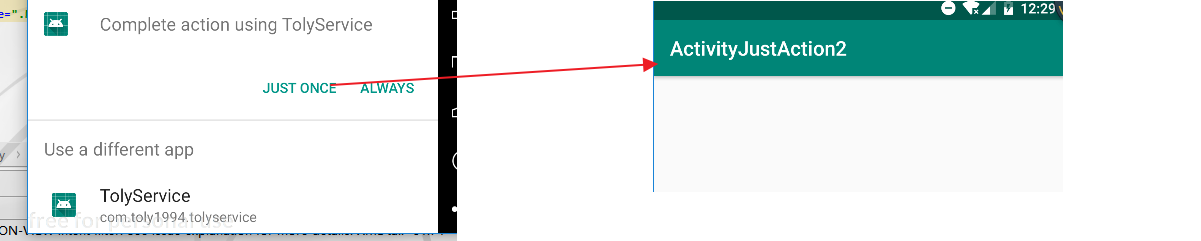
1.3:两个都叫旺财怎么办?
新建一个ActivityJustAction2,intent-filter设置的一样
既然两个都叫旺财,就把两个都带来,让你选一个呗(你应该经常遇到)
class ActivityJustAction2 : AppCompatActivity() {
    override fun onCreate(savedInstanceState: Bundle?) {
        super.onCreate(savedInstanceState)
        setContentView(LinearLayout(this))
        title = "ActivityJustAction2"
    }
}

<activity android:name=".activity.ActivityJustAction2">
    <intent-filter>
        <action android:name="www.toly1994.com.ActivityJustAction2"></action>
        <category android:name="android.intent.category.DEFAULT"></category>
    </intent-filter>
</activity>
2.匹配action+category
名字加类别,一个
intent-filter可以加多个类别,就像一件事物可以划分在多个领域
如人、程序员、中国公民可以指同一人,添加category之后,相当于你喊了句:
我要找一个叫旺财的程序员,这样就能更精确匹配,缩小撞名的可能,方便管理
---->[AndroidManifest.xml配置]------------
<activity android:name=".activity.ActivityJustAction">
    <intent-filter>
        <action android:name="www.toly1994.com.ActivityJustAction"></action>
        <category android:name="android.intent.category.DEFAULT"></category>
        <category android:name="www.toly1994.com.people"></category>
        <category android:name="www.toly1994.com.coder"></category>
    </intent-filter>
</activity>

<activity android:name=".activity.ActivityJustAction2">
    <intent-filter>
        <action android:name="www.toly1994.com.ActivityJustAction"></action>
        <category android:name="android.intent.category.DEFAULT"></category>
        <category android:name="www.toly1994.com.dog"></category>
        <category android:name="www.toly1994.com.erha"></category>
    </intent-filter>
</activity>

---->[IntentActivity]--------------
id_btn_just_action.setOnClickListener { v ->
    val intent = Intent("www.toly1994.com.ActivityJustAction")
    //intent.addCategory("www.toly1994.com.coder")//开1
    //intent.addCategory("www.toly1994.com.people")//开1
    //intent.addCategory("www.toly1994.com.dog")//开2
    intent.addCategory("www.toly1994.com.erha")//开2
    startActivity(intent)
}
3.行为+添加资源定位标识符:action + data
说起Uri(Uniform Resource Identifier),统一资源标识符
形式为:<scheme>://<authority><path>?<query>
3.1:打开网页
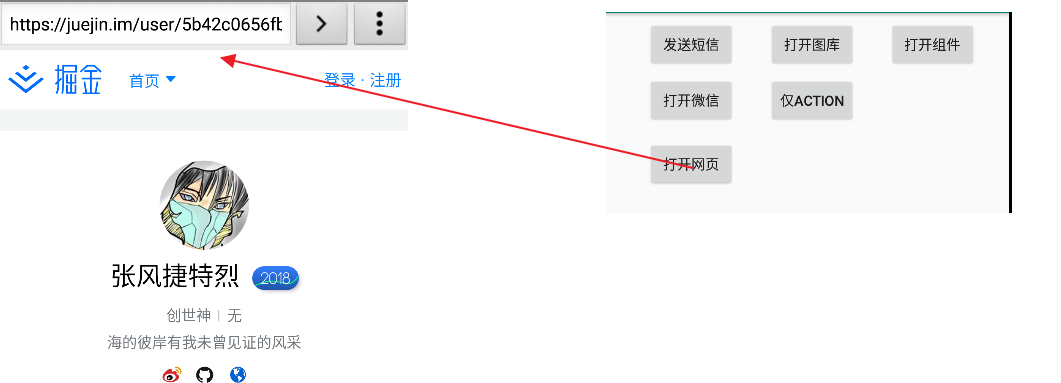
id_btn_open_web.setOnClickListener { v ->
    val intent = Intent(Intent.ACTION_VIEW)
    intent.data = Uri.parse("https://juejin.cn/user/149189281194766")
    startActivity(intent)
}
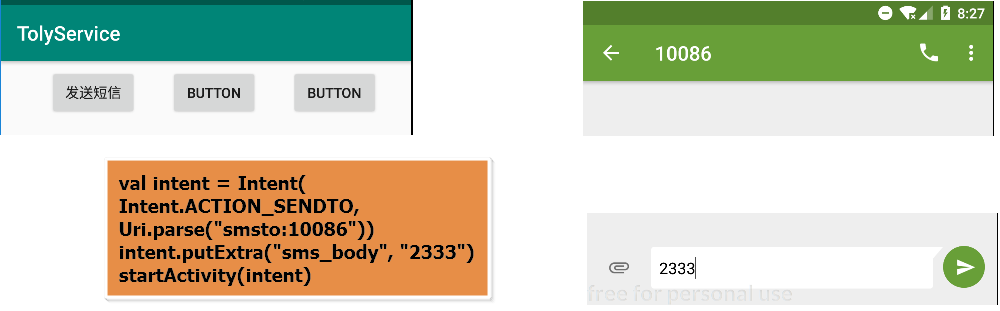
3.2:打开短信
/**
 * 发送短信
 * @param number 号码
 * @param body 内容
 */
private fun sendMsg(number: String, body: String) {
    val intent = Intent(Intent.ACTION_SENDTO, Uri.parse("smsto:$number"))
    intent.putExtra("sms_body", body)
    startActivity(intent)
}
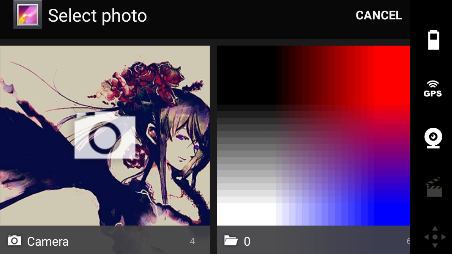
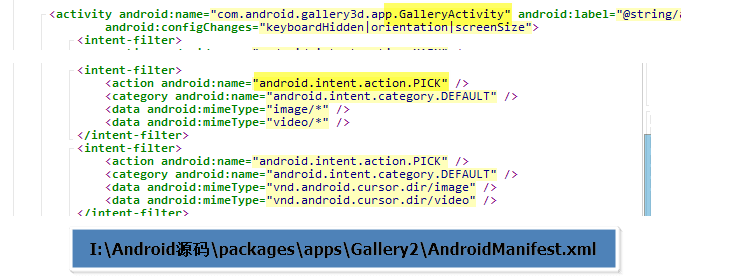
4.Intent开启图库Activity(action+type)
根据action打一个应用,附加
MIME类型
/**
 * 打开图库
 */
private fun openGallery() {
    val intent = Intent(Intent.ACTION_PICK)
    intent.type = "image/*";
    startActivity(intent)
}
看一下图库的源码是如何配置
5.Intent打开文件action+type+data

5.1:适配
Android API 24 及以上对file的Uri做了限制,需要适配一下
/**
 * 作者:张风捷特烈<br/>
 * 时间:2018/10/30 0030:18:38<br/>
 * 邮箱:1981462002@qq.com<br/>
 * 说明:适配类
 */
public class Compat {
    public static void fileUri(Context context, Intent intent, File file, String type) {
        //判断是否是AndroidN以及更高的版本
        if (Build.VERSION.SDK_INT >= Build.VERSION_CODES.N) {
            intent.setFlags(Intent.FLAG_GRANT_READ_URI_PERMISSION);
            Uri contentUri = FileProvider.getUriForFile(context, BuildConfig.APPLICATION_ID + ".fileProvider", file);
            intent.setDataAndType(contentUri, type);
        } else {
            intent.setDataAndType(Uri.fromFile(file), type);
            intent.setFlags(Intent.FLAG_ACTIVITY_NEW_TASK);
        }
    }
}

---->[AndroidManifest.xml配置provider]------
<!--android:authorities="本应用包名.fileProvider"-->
<provider android:name="android.support.v4.content.FileProvider"
          android:authorities="com.toly1994.tolyservice.fileProvider"
          android:grantUriPermissions="true"
          android:exported="false">
    <meta-data
            android:name="android.support.FILE_PROVIDER_PATHS"
            android:resource="@xml/file_paths" />
</provider>

---->[xml/file_paths.xml]-----------
<?xml version="1.0" encoding="utf-8"?>
<paths>
    <!--Android/data/本应用包名/-->
    <external-path path="Android/data/com.toly1994.tolyservice/" name="files_root" />
    <external-path path="." name="external_storage_root" />
</paths>
5.2:使用
需要加文件读权限
<uses-permission android:name="android.permission.READ_EXTERNAL_STORAGE"/>
id_btn_music.setOnClickListener { v ->//音频
val intent = Intent(Intent.ACTION_VIEW)
val file = File("/sdcard/toly/勇气-梁静茹-1772728608-1.mp3")
Compat.fileUri(this, intent, file, "audio/mp3")
startActivity(intent)
}
id_btn_video.setOnClickListener { v ->//视频
val intent = Intent(Intent.ACTION_VIEW)
val file = File("/sdcard/toly/cy3d.mp4")
Compat.fileUri(this, intent, file, "video/mp4")
startActivity(intent)
}
id_btn_txt.setOnClickListener { v ->//文本
val intent = Intent(Intent.ACTION_VIEW)
val file = File("/sdcard/toly/应龙.txt")
Compat.fileUri(this, intent, file, "text/*")
startActivity(intent)
}
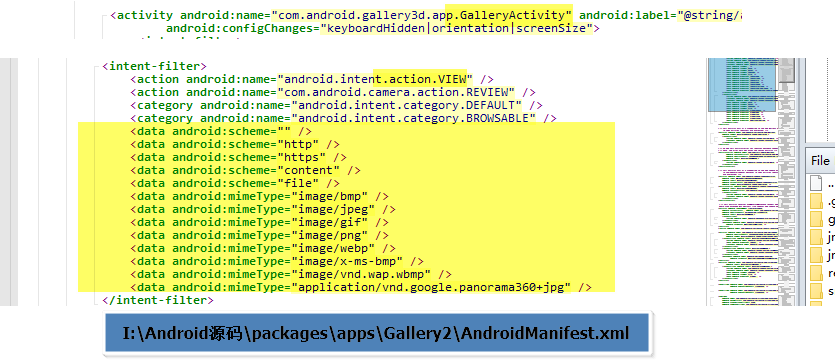
id_btn_pic.setOnClickListener { v ->//图片
val intent = Intent(Intent.ACTION_VIEW)
val file = File("/sdcard/toly/touch.jpg.png")
Compat.fileUri(this, intent, file, "image/*")
startActivity(intent)
}
图库源码中对于打开一张图片的配置:
隐式的intent抓住action、category、data、type四个要点就行了
三、Intent显式调用
即已经明确需要开启的组件
1.打开组件本组件上下文+目标组件字节码
这个是我们最常用的,打开
Activity,Service,BroadcastReceiver
private fun openComponent() {
    val intent = Intent(this, MainActivity::class.java)
    startActivity(intent)
}

2.ComponentName的简介
一直用Intent打开Activity,貌似没有分析过,现在进源码里看看吧
---->[Intent#Intent(Context, Class<?>)]-------
public Intent(Context packageContext, Class<?> cls) {
    mComponent = new ComponentName(packageContext, cls);
}

可见该方法核心是ComponentName,顾名思义"组件名称"
源码首行注释说:特定应用程序组件的标识符
---->[ComponentName#ComponentName(Context, lang.Class<?>)]--------
public ComponentName(@NonNull Context pkg, @NonNull Class<?> cls) {
    mPackage = pkg.getPackageName();
    mClass = cls.getName();
}

-------------------------------------------------------------------
ComponentName是一个比较简单的类,核心是两个成员变量mPackage和mClass
这个两参构造中,mPackage是传入的context的包名,mClass是目标组件的类名

看一下两个String的ComponentName构造,更能表达出它们的作用
也能够实现打开组件的功能,所以知道项目的包名,和组件的全类名,就能开启组件
val intent = Intent()
val compName = ComponentName(
    "com.toly1994.tolyservice",//项目的包名
    "com.toly1994.tolyservice.activity.MainActivity")//要打开的组件全类名
intent.component = compName
startActivity(intent)
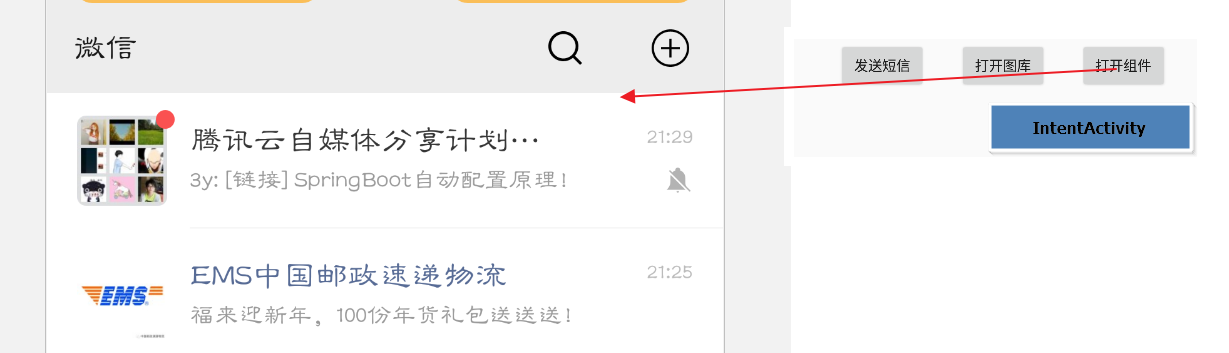
3.打开微信:组件包名+目标组件全类名+flag
private fun openComponent() {
    val intent = Intent()
    intent.flags=Intent.FLAG_ACTIVITY_NEW_TASK
    val compName = ComponentName(
        "com.tencent.mm",//本组件的包名
        "com.tencent.mm.ui.LauncherUI")//要打开的组件全类名
    intent.component = compName
    startActivity(intent)
}
4.拷贝构造源码
---->[Intent拷贝构造]---------
public Intent(Intent o) {
    this(o, COPY_MODE_ALL);
}
//|--使用两参的[COPY_MODE_ALL]模式

---->[Intent两参拷贝]---------
private Intent(Intent o, @CopyMode int copyMode) {
    this.mAction = o.mAction;
    this.mData = o.mData;
    this.mType = o.mType;
    this.mPackage = o.mPackage;
    this.mComponent = o.mComponent;
    if (o.mCategories != null) {
        this.mCategories = new ArraySet<>(o.mCategories);
    }
 //|--至此把category,action,data, type,component,package 的字段拷贝了
 //|--COPY_MODE_ALL顾名思义,把所有的内容都拷贝
    if (copyMode != COPY_MODE_FILTER) {
        this.mFlags = o.mFlags;
        this.mContentUserHint = o.mContentUserHint;
        this.mLaunchToken = o.mLaunchToken;
        if (o.mSourceBounds != null) {
            this.mSourceBounds = new Rect(o.mSourceBounds);
        }
        if (o.mSelector != null) {
            this.mSelector = new Intent(o.mSelector);
        }
        if (copyMode != COPY_MODE_HISTORY) {
            if (o.mExtras != null) {
                this.mExtras = new Bundle(o.mExtras);
            }
            if (o.mClipData != null) {
                this.mClipData = new ClipData(o.mClipData);
            }
        } else {
            if (o.mExtras != null && !o.mExtras.maybeIsEmpty()) {
                this.mExtras = Bundle.STRIPPED;
            }
            // Also set "stripped" clip data when we ever log mClipData in the (broadcast)
            // history.
        }
    }
}

---->[还有个clone方法]------------------
@Override
public Object clone() {
    return new Intent(this);
}
|----根据调用的intent对象,直接返回了一个新的实例,本质上合拷贝构造并无区别
四、系列化与反序列化
序列化有什么用?
1.永久的保存对象数据(保存在文件当中,或者是磁盘中),需要时反序列化生成对象
2.将对象数据转换成字节流进行网络传输
3.使用Intent时传递序列化对象
1.对象的序列化Serializable

//类的可序列化,只要实现Serializable即可,非常简单
class Person(var name: String?, var age: Int) : Serializable {
    override fun toString(): String {
        return "Person{" +
                "name='" + name + '\''.toString() +
                ", age=" + age +
                '}'.toString()
    }
}
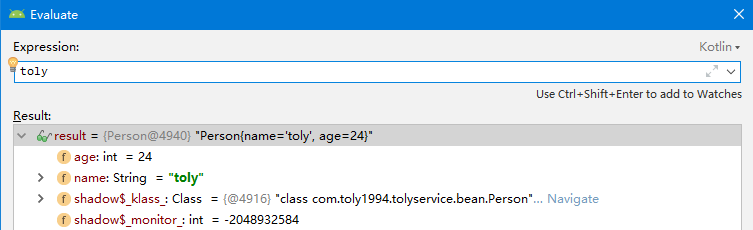
2.1:Serializable序列化保存到磁盘
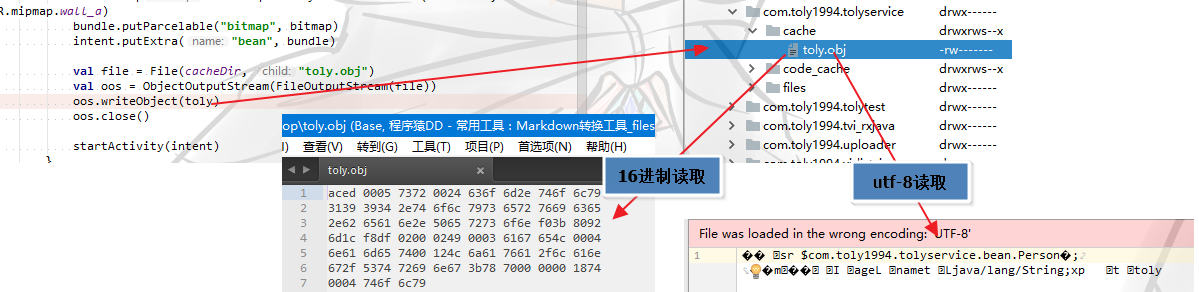
val toly = Person("toly", 24)
val file = File(cacheDir, "toly.obj")
val oos = ObjectOutputStream(FileOutputStream(file))
oos.writeObject(toly)
oos.close()
2.2:反序列化从磁盘实例化对象
val ois = ObjectInputStream(FileInputStream(file))
val toly = ois.readObject() as Person
ois.close()
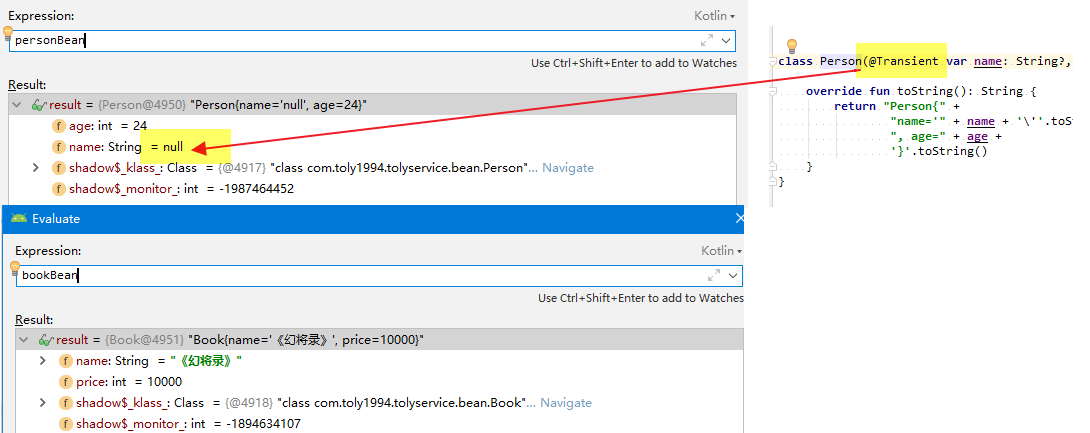
2.3:限制字段的序列化方式
当某些字段不需要序列化时,可使用
@Transient(kotlin)或transient(Java)关键字
比如我不想让name字段序列化。(因为字段越多,消耗的资源越多)
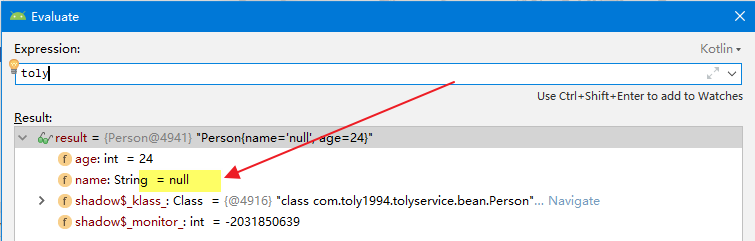
class Person(@Transient var name: String?, var age: Int) : Serializable {

    override fun toString(): String {
        return "Person{" +
                "name='" + name + '\''.toString() +
                ", age=" + age +
                '}'.toString()
    }
}
2.4:关于serialVersionUID

看一下Android源码,实现Serializable的类都有一个`serialVersionUID`的常量
Java的序列化机制是通过判断类的serialVersionUID来验证版本一致性的。
在进行反序列化时,JVM会把传来的字节流和当前类中的serialVersionUID进行对比,
是一致的则进行反序列化,否则抛序列化版本不一致的异常(InvalidCastException)
3.Parcelable实现对象的序列化(Java版)
当一个实现Parcelable接口时必须实现
describeContents和writeToParcel方法
感觉怪麻烦的,还好AndroidStudio有快捷生成方式

/**
 * 作者:张风捷特烈<br/>
 * 时间:2019/1/21/021:22:30<br/>
 * 邮箱:1981462002@qq.com<br/>
 * 说明:Parcelable序列化
 */
public class Book implements Parcelable {

    private String name;
    private int price;

    public Book(String name, int price) {
        this.name = name;
        this.price = price;
    }

    @Override
    public int describeContents() {
        return 0;
    }

    @Override
    public void writeToParcel(Parcel dest, int flags) {
        dest.writeString(this.name);
        dest.writeInt(this.price);
    }

    protected Book(Parcel in) {
        this.name = in.readString();
        this.price = in.readInt();
    }

    public static final Parcelable.Creator<Book> CREATOR = new Parcelable.Creator<Book>() {
        @Override
        public Book createFromParcel(Parcel source) {
            return new Book(source);
        }

        @Override
        public Book[] newArray(int size) {
            return new Book[size];
        }
    };

    @Override
    public String toString() {
        return "Book{" +
                "name='" + name + '\'' +
                ", price=" + price +
                '}';
    }
}
3.Parcelable与Serializable的比较
Parcelable      所属包android.os
Serializable    所属包java.io
|---所属包说明了Parcelable只能在Android中使用

P以Ibinder作为信息载体的,在内存上的开销比较小,P在性能方面要强于S
S在序列化操作的时候会产生大量的临时变量,(反射机制)从而导致GC的频繁调用
|---Parcelable的性能要强于Serializable

在读写数据的时候,Parcelable是在内存中直接进行读写
而Serializable是通过使用IO流的形式将数据读写入在硬盘上

Parcelable无法将数据进行持久化(磁盘存储),Serializable可以
(在不同的Android版本当中,Parcelable可能会不)
五、Intent的数据传递
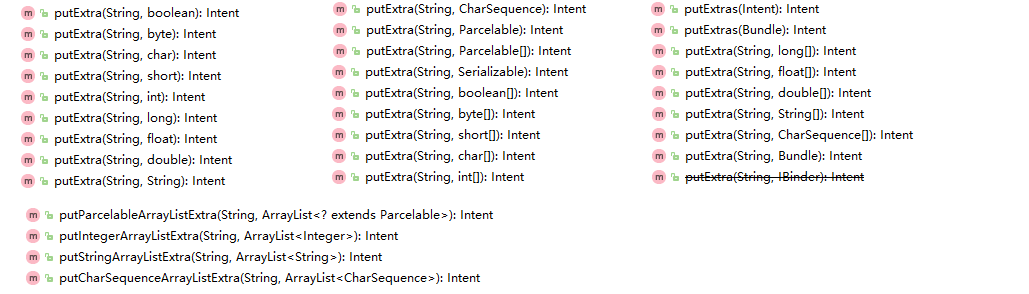
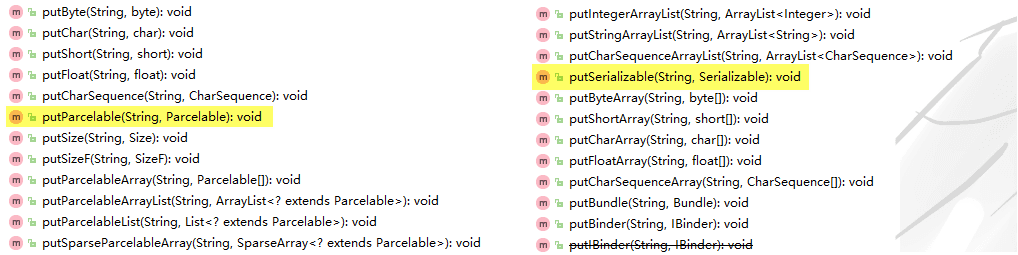
Intent 除来一大堆对属性的set之外,还有一大堆的putExtra来盛放数据
Intent不仅传递"命令"还能携带数据传达,put数据的方法躲到令人发指
可以说应有尽有,有put,当然对应有get,下面仅列举出put数据的方法
1.常见数据类型的传输
由于常见类型很多,这里选三个代表,其他的用法类似,怎么放怎么取
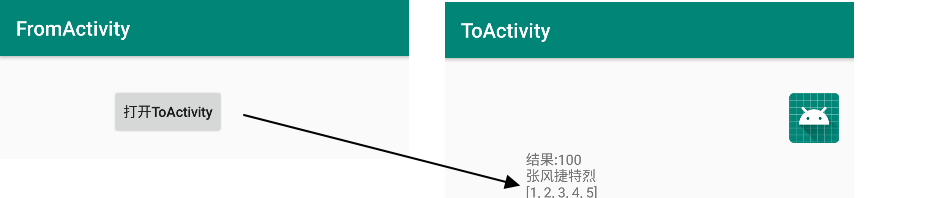
---->[FromActivity  点击时]--------
val intent = Intent(this, ToActivity::class.java)
//String类型数据
intent.putExtra("stringData", "张风捷特烈")
//int类型数据
intent.putExtra("intData", 100)
//容器类型数据
val arr = arrayListOf(1, 2, 3, 4, 5)
intent.putExtra("arrData", arr)
startActivity(intent)

---->[ToActivity#onCreate]--------
var result = ""
val stringData = intent.getStringExtra("stringData")
val intData = intent.getIntExtra("intData", 10)
val arrData = intent.getIntegerArrayListExtra("arrData")
result+=intData.toString()+"\n"
if (stringData != null) {
    result+=stringData+"\n"
}
if (arrData != null) {
    result+=arrData.toString()+"\n"
}
id_tv_result.append(result)
2.Intent传递Bundle对象
简单来看就是键值对,并没有什么非常神奇的。也有一堆的put,get
其中最重要的是有put序列化对象(Parcelable/Serializable)的方法
A mapping from String keys to various {@link Parcelable} values.
字符串型的键到不同值得映射(link 到 Parcelable)
---->[FromActivity  点击时]--------
val intent = Intent(this, ToActivity::class.java)
val bundle = Bundle()
//存放Serializable序列化对象
val toly = Person("toly", 24)
bundle.putSerializable("person", toly)
//存放Parcelable序列化对象
val book = Book("《幻将录》", 10000)
bundle.putParcelable("book", book)
intent.putExtra("bean", bundle)
startActivity(intent)

---->[ToActivity#onCreate]--------
val bundle = intent.getBundleExtra("bean")
if (bundle != null) {
    val personBean = bundle.get("person") as Person
    val bookBean = bundle.get("book") as Book
}
六:Android源码intent-filter的解析流程
1.解析流程
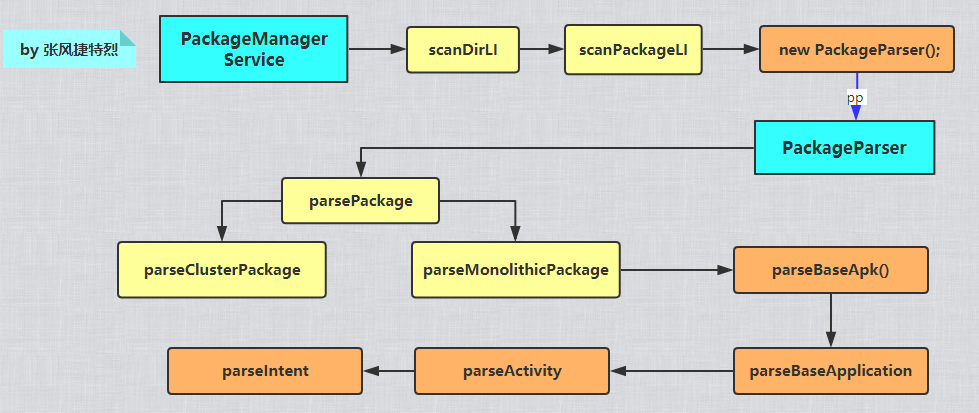
PackageManagerService在启动后会扫描系统和第三方的app信息,
在scanPackageLI方法中实例化PackageParser对象pp,使用pp对包进行解析
PackageParser的parseBaseApk在调用之后解析AndroidManifest.xml,返回一个Package对象
将手机中所有的app的AndroidManifest.xml解析完毕,构建出一个手机中所有app的信息树
从这颗棵树上
---->[PackageParser#parseMonolithicPackage]------------
  @Deprecated
    public Package parseMonolithicPackage(File apkFile, int flags) throws PackageParserException {
        //略...
        final AssetManager assets = new AssetManager();
        try {
            final Package pkg = parseBaseApk(apkFile, assets, flags);
            pkg.codePath = apkFile.getAbsolutePath();
            return pkg;
        } finally {
            IoUtils.closeQuietly(assets);
        }
    }

private static final String ANDROID_MANIFEST_FILENAME = "AndroidManifest.xml";

---->[PackageParser#parseBaseApk 3参]------------
private Package parseBaseApk(File apkFile, AssetManager assets, int flags)
        throws PackageParserException {
    final String apkPath = apkFile.getAbsolutePath();
    //略...
    Resources res = null;
    XmlResourceParser parser = null;//构建Xml的解析器
    try {
        res = new Resources(assets, mMetrics, null);
        assets.setConfiguration(0, 0, null, 0, 0, 0, 0, 0, 0, 0, 0, 0, 0, 0, 0, 0,
                Build.VERSION.RESOURCES_SDK_INT);
        parser = assets.openXmlResourceParser(cookie, ANDROID_MANIFEST_FILENAME);//打开`AndroidManifest.xml`文件

        final String[] outError = new String[1];
        final Package pkg = parseBaseApk(res, parser, flags, outError);
        if (pkg == null) {
            throw new PackageParserException(mParseError,
                    apkPath + " (at " + parser.getPositionDescription() + "): " + outError[0]);
        }

        pkg.volumeUuid = volumeUuid;
        pkg.applicationInfo.volumeUuid = volumeUuid;
        pkg.baseCodePath = apkPath;
        pkg.mSignatures = null;
        return pkg;
    //略...
}

---->[PackageParser#parseBaseApk 4参]------------
|--------核心的解析xml逻辑全在这个方法里,非常长,----------
----------这里从application的解析开始看------------------
private Package parseBaseApk(Resources res, XmlResourceParser parser, int flags,
        String[] outError) throws XmlPullParserException, IOException {
    //略...
        String tagName = parser.getName();
        if (tagName.equals("application")) {//下面开始解析application
        //略...
        //这里调用了parseBaseApplication方法,activity的解析就在其中
            if (!parseBaseApplication(pkg, res, parser, attrs, flags, outError)) {
                return null;
            }

---->[PackageParser#parseBaseApplication]------------
private boolean parseBaseApplication(Package owner, Resources res,
        XmlPullParser parser, AttributeSet attrs, int flags, String[] outError)
  //略...
    while ((type = parser.next()) != XmlPullParser.END_DOCUMENT
            && (type != XmlPullParser.END_TAG || parser.getDepth() > innerDepth)) {
        if (type == XmlPullParser.END_TAG || type == XmlPullParser.TEXT) {
            continue;
        }

        String tagName = parser.getName();
        if (tagName.equals("activity")) {//这里开始解析activity
            Activity a = parseActivity(owner, res, parser, attrs, flags, outError, false,
                    owner.baseHardwareAccelerated);
            if (a == null) {
                mParseError = PackageManager.INSTALL_PARSE_FAILED_MANIFEST_MALFORMED;
                return false;
            }
            owner.activities.add(a);
        } else if (tagName.equals("receiver")) {//这里开始解析receiver
            Activity a = parseActivity(owner, res, parser, attrs, flags, outError, true, false);
            if (a == null) {
                mParseError = PackageManager.INSTALL_PARSE_FAILED_MANIFEST_MALFORMED;
                return false;
            }
            owner.receivers.add(a);

        } else if (tagName.equals("service")) {//这里开始解析service
            Service s = parseService(owner, res, parser, attrs, flags, outError);
            if (s == null) {
                mParseError = PackageManager.INSTALL_PARSE_FAILED_MANIFEST_MALFORMED;
                return false;
            }

            owner.services.add(s);

        } else if (tagName.equals("provider")) {//这里开始解析provider
            Provider p = parseProvider(owner, res, parser, attrs, flags, outError);
            if (p == null) {
                mParseError = PackageManager.INSTALL_PARSE_FAILED_MANIFEST_MALFORMED;
                return false;
            }
            owner.providers.add(p);
            //略...还有很多解析的东西
    return true;
}

---->[PackageParser#parseActivity]------------
private Activity parseActivity(Package owner, Resources res,
        XmlPullParser parser, AttributeSet attrs, int flags, String[] outError,
        boolean receiver, boolean hardwareAccelerated)
        throws XmlPullParserException, IOException {
    TypedArray sa = res.obtainAttributes(attrs, R.styleable.AndroidManifestActivity);
  //略...
  //下面开始解析:intent-filter
        if (parser.getName().equals("intent-filter")) {
        //创建ActivityIntentInfo
            ActivityIntentInfo intent = new ActivityIntentInfo(a);
            //调用parseIntent方法
            if (!parseIntent(res, parser, attrs, true, true, intent, outError)) {
                return null;
            }
            if (intent.countActions() == 0) {
            } else {
                a.intents.add(intent);
            //略...
    return a;
}

---->[PackageParser#parseIntent]------------

private boolean parseIntent(Resources res, XmlPullParser parser, AttributeSet attrs,
        boolean allowGlobs, boolean allowAutoVerify, IntentInfo outInfo, String[] outError)
        throws XmlPullParserException, IOException {

    TypedArray sa = res.obtainAttributes(attrs,
            com.android.internal.R.styleable.AndroidManifestIntentFilter);
            //略...
    int outerDepth = parser.getDepth();
    int type;
    while ((type = parser.next()) != XmlPullParser.END_DOCUMENT
            && (type != XmlPullParser.END_TAG || parser.getDepth() > outerDepth)) {
        if (type == XmlPullParser.END_TAG || type == XmlPullParser.TEXT) {
            continue;
        }
        String nodeName = parser.getName();
        if (nodeName.equals("action")) {//解析action
            String value = attrs.getAttributeValue(
                    ANDROID_RESOURCES, "name");
            if (value == null || value == "") {
                outError[0] = "No value supplied for <android:name>";
                return false;
            }
            XmlUtils.skipCurrentTag(parser);

            outInfo.addAction(value);
        } else if (nodeName.equals("category")) {//解析category
            String value = attrs.getAttributeValue(
                    ANDROID_RESOURCES, "name");
            if (value == null || value == "") {
                outError[0] = "No value supplied for <android:name>";
                return false;
            }
            XmlUtils.skipCurrentTag(parser);
            outInfo.addCategory(value);
        } else if (nodeName.equals("data")) {//解析data
            sa = res.obtainAttributes(attrs,
                    com.android.internal.R.styleable.AndroidManifestData);
            String str = sa.getNonConfigurationString( com.android.internal.R.styleable.AndroidManifestData_mimeType, 0);
            if (str != null) {
                try {
                    outInfo.addDataType(str);
                } catch (IntentFilter.MalformedMimeTypeException e) {
                    outError[0] = e.toString();
                    sa.recycle();
                    return false;
                }
            }
    return true;
}
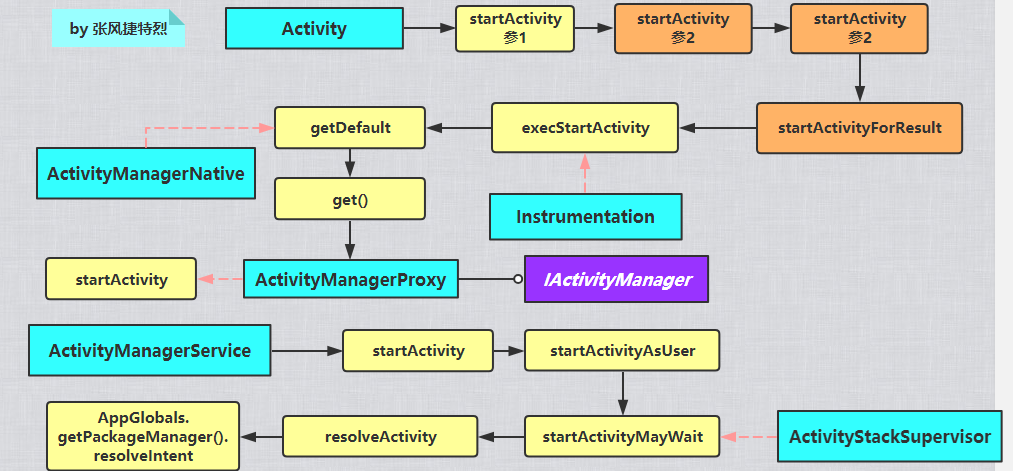
2.startActivity(intent)做了什么?
startActivity一连串的调用之后,最终核心是下面的方法
前一篇已经涉及过Instrumentation类,它真可谓Activity的忠实仆人
------>[Activity#startActivityForResult]----------------------
public void startActivityForResult(@RequiresPermission Intent intent, int requestCode,
@Nullable Bundle options) {
if (mParent == null) {
options = transferSpringboardActivityOptions(options);
Instrumentation.ActivityResult ar =
mInstrumentation.execStartActivity(
this, mMainThread.getApplicationThread(), mToken, this,
intent, requestCode, options);
//略...
}
}
------>[Instrumentation#execStartActivity]----------------------
public ActivityResult execStartActivity(
Context who, IBinder contextThread, IBinder token, String target,
Intent intent, int requestCode, Bundle options) {
IApplicationThread whoThread = (IApplicationThread) contextThread;
if (mActivityMonitors != null) {
synchronized (mSync) {
final int N = mActivityMonitors.size();
for (int i=0; i<N; i++) {
final ActivityMonitor am = mActivityMonitors.get(i);
if (am.match(who, null, intent)) {
am.mHits++;
if (am.isBlocking()) {
return requestCode >= 0 ? am.getResult() : null;
}
break;
}
}
}
}
try {
intent.migrateExtraStreamToClipData();
intent.prepareToLeaveProcess(who);
int result = ActivityManagerNative.getDefault()
.startActivity(whoThread, who.getBasePackageName(), intent,
intent.resolveTypeIfNeeded(who.getContentResolver()),
token, target, requestCode, 0, null, options);
checkStartActivityResult(result, intent);
} catch (RemoteException e) {
throw new RuntimeException("Failure from system", e);
}
return null;
}
------>[ActivityManagerNative#getDefault]----------------------
static public IActivityManager getDefault() {
return gDefault.get();
}
------>[ActivityManagerNative#Singleton]----------------------
private static final Singleton<IActivityManager> gDefault = new Singleton<IActivityManager>() {
protected IActivityManager create() {
IBinder b = ServiceManager.getService("activity");
if (false) {
Log.v("ActivityManager", "default service binder = " + b);
}
IActivityManager am = asInterface(b);//IActivityManager的创建
if (false) {
Log.v("ActivityManager", "default service = " + am);
}
return am;
}
};
------>[ActivityManagerNative#asInterface]----------------------
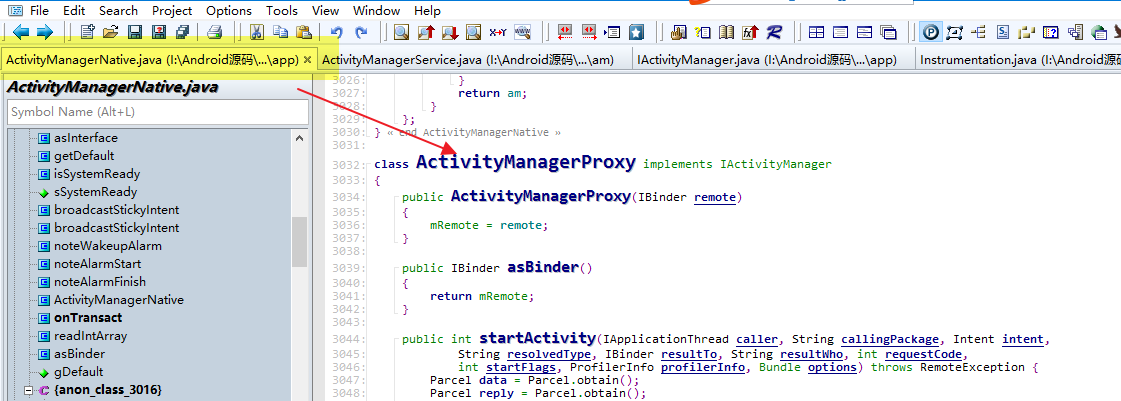
|--------这里可以看出get的IActivityManager对象是一个ActivityManagerProxy对象
static public IActivityManager asInterface(IBinder obj) {
if (obj == null) {
return null;
}
IActivityManager in =
(IActivityManager)obj.queryLocalInterface(descriptor);
if (in != null) {
return in;
}
return new ActivityManagerProxy(obj);
}
>现在焦点在ActivityManagerProxy的身上
3.ActivityManagerProxy是何许人也?
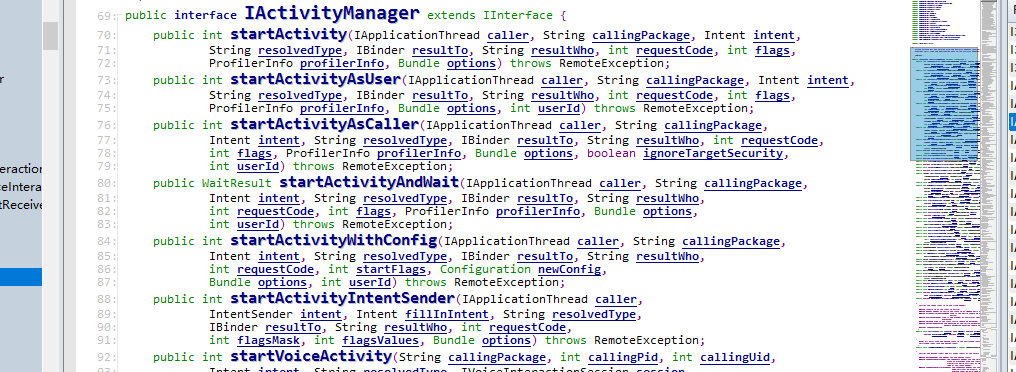
先看IActivityManager,他是一个接口定义了很多关于Activity管理的方法
ActivityManagerProxy作为它的实现类,当然也就实现了这些方法
---->[ActivityStackSupervisor#startActivity]--------
 @Override
    public final int startActivity(IApplicationThread caller, String callingPackage,
            Intent intent, String resolvedType, IBinder resultTo, String resultWho, int requestCode,
            int startFlags, ProfilerInfo profilerInfo, Bundle options) {
        return startActivityAsUser(caller, callingPackage, intent, resolvedType, resultTo,

---->[ActivityStackSupervisor#startActivityAsUser]--------
 @Override
    public final int startActivityAsUser(IApplicationThread caller, String callingPackage,
            Intent intent, String resolvedType, IBinder resultTo, String resultWho, int requestCode,
            int startFlags, ProfilerInfo profilerInfo, Bundle options, int userId) {
        enforceNotIsolatedCaller("startActivity");
        userId = handleIncomingUser(Binder.getCallingPid(), Binder.getCallingUid(), userId,
                false, ALLOW_FULL_ONLY, "startActivity", null);
        // TODO: Switch to user app stacks here.
        return mStackSupervisor.startActivityMayWait(caller, -1, callingPackage, intent,
                resolvedType, null, null, resultTo, resultWho, requestCode, startFlags,
                profilerInfo, null, null, options, false, userId, null, null);

---->[ActivityStackSupervisor#resolveActivity]--------
 ActivityInfo resolveActivity(Intent intent, String resolvedType, int startFlags,
            ProfilerInfo profilerInfo, int userId) {
        // Collect information about the target of the Intent.
        ActivityInfo aInfo;
        try {
            ResolveInfo rInfo =
            //这里通过AppGlobals获取了getPackageManager,也就是包管理器
                AppGlobals.getPackageManager().resolveIntent(
                        intent, resolvedType,
                        PackageManager.MATCH_DEFAULT_ONLY
                                    | ActivityManagerService.STOCK_PM_FLAGS, userId);
            aInfo = rInfo != null ? rInfo.activityInfo : null;

---->[ActivityStackSupervisor#resolveActivity]--------
public static IPackageManager getPackageManager() {
//通过ActivityThread获取PackageManager
    return ActivityThread.getPackageManager();
}

---->[ActivityThread#getPackageManager]--------
public static IPackageManager getPackageManager() {
    if (sPackageManager != null) {
        //Slog.v("PackageManager", "returning cur default = " + sPackageManager);
        return sPackageManager;
    }
    //通过ServiceManager获取包管理器的IBinder
    IBinder b = ServiceManager.getService("package");
    //Slog.v("PackageManager", "default service binder = " + b);
    //生成的IPackageManager对象
    sPackageManager = IPackageManager.Stub.asInterface(b);
    //Slog.v("PackageManager", "default service = " + sPackageManager);
    return sPackageManager;
}

//接下来的焦点集中到了PackageManager和IPackageManager身上
IPackageManager.aidl的描述中有这个方法
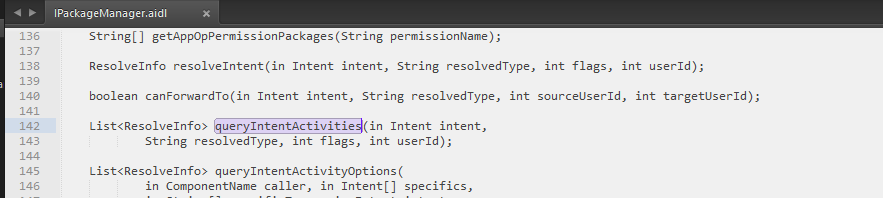
PackageManagerService作为IPackageManager.Stub的实现类
肯定也实现了queryIntentActivities方法,就是他查看intent是否匹配
其中aidl的相关知识,会写一篇进行详述

---->[PackageManagerService#queryIntentActivities]------------
@Override
public List<ResolveInfo> queryIntentActivities(Intent intent,
        String resolvedType, int flags, int userId) {
    //略...
    synchronized (mPackages) {//有包名
        final String pkgName = intent.getPackage();
        if (pkgName == null) {
    //略...
            //ActivityIntentResolver#queryIntent进行查询
            List<ResolveInfo> result = mActivities.queryIntent(
                    intent, resolvedType, flags, userId);
     //略...
            }
            return result;
        }
        final PackageParser.Package pkg = mPackages.get(pkgName);
        if (pkg != null) {
            return filterIfNotPrimaryUser(
                    mActivities.queryIntentForPackage(
                            intent, resolvedType, flags, pkg.activities, userId),
                    userId);
        }
        return new ArrayList<ResolveInfo>();
    }
}

---->[PackageManagerService$ActivityIntentResolver#queryIntent]------------
final class ActivityIntentResolver
        extends IntentResolver<PackageParser.ActivityIntentInfo, ResolveInfo> {
    public List<ResolveInfo> queryIntent(Intent intent, String resolvedType,
            boolean defaultOnly, int userId) {
        if (!sUserManager.exists(userId)) return null;
        mFlags = defaultOnly ? PackageManager.MATCH_DEFAULT_ONLY : 0;
        //这里调用了父类的queryIntent方法
        return super.queryIntent(intent, resolvedType, defaultOnly, userId);
    }

---->[IntentResolver#queryIntent]------------
public List<R> queryIntent(Intent intent, String resolvedType, boolean defaultOnly,int userId) {
    String scheme = intent.getScheme();

    ArrayList<R> finalList = new ArrayList<R>();

    final boolean debug = localLOGV ||
            ((intent.getFlags() & Intent.FLAG_DEBUG_LOG_RESOLUTION) != 0);

    if (debug) Slog.v(
        TAG, "Resolving type=" + resolvedType + " scheme=" + scheme
        + " defaultOnly=" + defaultOnly + " userId=" + userId + " of " + intent);

    F[] firstTypeCut = null;
    F[] secondTypeCut = null;
    F[] thirdTypeCut = null;
    F[] schemeCut = null;

    // If the intent includes a MIME type, then we want to collect all of
    // the filters that match that MIME type.
    if (resolvedType != null) {
        int slashpos = resolvedType.indexOf('/');
        if (slashpos > 0) {
            final String baseType = resolvedType.substring(0, slashpos);
            if (!baseType.equals("*")) {
                if (resolvedType.length() != slashpos+2
                        || resolvedType.charAt(slashpos+1) != '*') {
                    // Not a wild card, so we can just look for all filters that
                    // completely match or wildcards whose base type matches.
                    firstTypeCut = mTypeToFilter.get(resolvedType);
                    if (debug) Slog.v(TAG, "First type cut: " + Arrays.toString(firstTyp
                    secondTypeCut = mWildTypeToFilter.get(baseType);
                    if (debug) Slog.v(TAG, "Second type cut: "
                            + Arrays.toString(secondTypeCut));
                } else {
                    // We can match anything with our base type.
                    firstTypeCut = mBaseTypeToFilter.get(baseType);
                    if (debug) Slog.v(TAG, "First type cut: " + Arrays.toString(firstTyp
                    secondTypeCut = mWildTypeToFilter.get(baseType);
                    if (debug) Slog.v(TAG, "Second type cut: "
                            + Arrays.toString(secondTypeCut));
                }
                // Any */* types always apply, but we only need to do this
                // if the intent type was not already */*.
                thirdTypeCut = mWildTypeToFilter.get("*");
                if (debug) Slog.v(TAG, "Third type cut: " + Arrays.toString(thirdTypeCut
            } else if (intent.getAction() != null) {
                // The intent specified any type ({@literal *}/*).  This
                // can be a whole heck of a lot of things, so as a first
                // cut let's use the action instead.
                firstTypeCut = mTypedActionToFilter.get(intent.getAction());
                if (debug) Slog.v(TAG, "Typed Action list: " + Arrays.toString(firstType
            }
        }
    }

    // If the intent includes a data URI, then we want to collect all of
    // the filters that match its scheme (we will further refine matches
    // on the authority and path by directly matching each resulting filter).
    if (scheme != null) {
        schemeCut = mSchemeToFilter.get(scheme);
        if (debug) Slog.v(TAG, "Scheme list: " + Arrays.toString(schemeCut));
    }

    // If the intent does not specify any data -- either a MIME type or
    // a URI -- then we will only be looking for matches against empty
    // data.
    if (resolvedType == null && scheme == null && intent.getAction() != null) {
        firstTypeCut = mActionToFilter.get(intent.getAction());
        if (debug) Slog.v(TAG, "Action list: " + Arrays.toString(firstTypeCut));
    }

    FastImmutableArraySet<String> categories = getFastIntentCategories(intent);
    if (firstTypeCut != null) {
        buildResolveList(intent, categories, debug, defaultOnly,
                resolvedType, scheme, firstTypeCut, finalList, userId);
    }
    if (secondTypeCut != null) {
        buildResolveList(intent, categories, debug, defaultOnly,
                resolvedType, scheme, secondTypeCut, finalList, userId);
    }
    if (thirdTypeCut != null) {
        buildResolveList(intent, categories, debug, defaultOnly,
                resolvedType, scheme, thirdTypeCut, finalList, userId);
    }
    if (schemeCut != null) {
        buildResolveList(intent, categories, debug, defaultOnly,
                resolvedType, scheme, schemeCut, finalList, userId);
    }
    sortResults(finalList);

    if (debug) {
        Slog.v(TAG, "Final result list:");
        for (int i=0; i<finalList.size(); i++) {
            Slog.v(TAG, "  " + finalList.get(i));
        }
    }
    return finalList;
}