

本系列主要是探讨View的绘制过程及部分相关的实现机制的源码分析
setContentView分析
相关关系
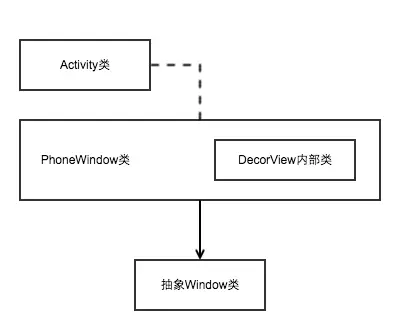
Activity中有Window成员 实例化为PhoneWindow PhoneWindow是抽象Window类的实现类
Window提供了绘制窗口的通用API PhoneWindow中包含了DecorView对象 是所有窗口(Activity界面)的根View
具体的构如下
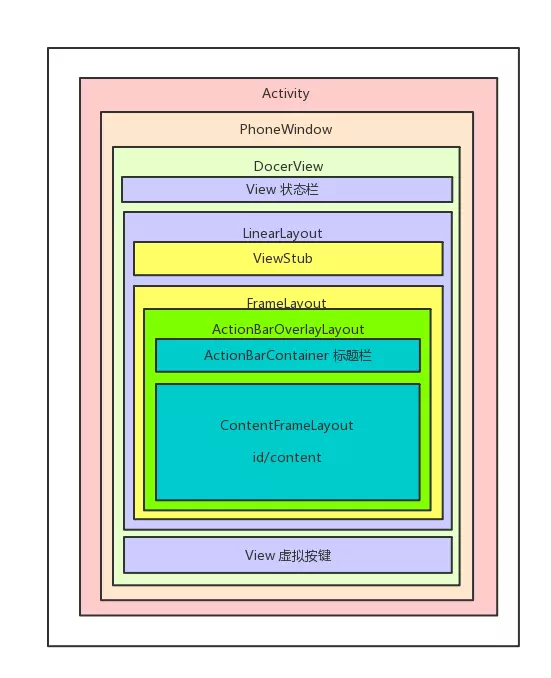
具体的可以通过hierarchyviewer工具分析一下
PhoneWindow的setContentView分析
Window类的setContentView方法 而Window的setContentView方法是抽象的 所以查看PhoneWindow的setContentView()
- setContentView方法
  // This is the view in which the window contents are placed. It is either
  // mDecor itself, or a child of mDecor where the contents go.
  private ViewGroup mContentParent;

  @Override
  public void setContentView(int layoutResID) {
      // Note: FEATURE_CONTENT_TRANSITIONS may be set in the process of installing the window
      // decor, when theme attributes and the like are crystalized. Do not check the feature
      // before this happens.
      if (mContentParent == null) {
          //第一次调用
          //下面会详细分析
          installDecor();
      } else if (!hasFeature(FEATURE_CONTENT_TRANSITIONS)) {
          //移除该mContentParent下的所有View
          //又因为这个的存在  我们可以多次使用setContentView()
          mContentParent.removeAllViews();
      }
      //判断是否使用了Activity的过度动画
      if (hasFeature(FEATURE_CONTENT_TRANSITIONS)) {
        //设置动画场景
          final Scene newScene = Scene.getSceneForLayout(mContentParent, layoutResID,
                  getContext());
          transitionTo(newScene);
      } else {
          //将资源文件通过LayoutInflater对象装换为View树
          //在PhoneWindow的构造函数中 mLayoutInflater = LayoutInflater.from(context);
          mLayoutInflater.inflate(layoutResID, mContentParent);
      }

      //View中
      /**
       * Ask that a new dispatch of {@link #onApplyWindowInsets(WindowInsets)} be performed.
       */
      // public void requestApplyInsets() {
      //     requestFitSystemWindows();
      // }
      mContentParent.requestApplyInsets();
      final Callback cb = getCallback();
      if (cb != null && !isDestroyed()) {
          cb.onContentChanged();
      }
  }

  @Override
  public void setContentView(View view) {
      setContentView(view, new ViewGroup.LayoutParams(MATCH_PARENT, MATCH_PARENT));
  }

  @Override
  public void setContentView(View view, ViewGroup.LayoutParams params) {
      if (mContentParent == null) {
          installDecor();
      } else if (!hasFeature(FEATURE_CONTENT_TRANSITIONS)) {
          mContentParent.removeAllViews();
      }

      if (hasFeature(FEATURE_CONTENT_TRANSITIONS)) {
          view.setLayoutParams(params);
          final Scene newScene = new Scene(mContentParent, view);
          transitionTo(newScene);
      } else {
        //已经为View 直接使用View的addView方法追加到当前mContentParent中
          mContentParent.addView(view, params);
      }
      mContentParent.requestApplyInsets();
      final Callback cb = getCallback();
      //调用CallBack接口的onContentChange来通知Activity组件视图发生了变化
      if (cb != null && !isDestroyed()) {
          cb.onContentChanged();
      }
  }
- installDecor方法
  //截取部分主要分析代码
  private void installDecor() {
      if (mDecor == null) {
          //如果mDecor为空则创建一个DecorView实例
          // protected DecorView generateDecor() {
          //   return new DecorView(getContext(), -1);
          // }
          mDecor = generateDecor();
          mDecor.setDescendantFocusability(ViewGroup.FOCUS_AFTER_DESCENDANTS);
          mDecor.setIsRootNamespace(true);
          if (!mInvalidatePanelMenuPosted && mInvalidatePanelMenuFeatures != 0) {
              mDecor.postOnAnimation(mInvalidatePanelMenuRunnable);
          }
      }
      if (mContentParent == null) {
          //根据窗口的风格修饰 选择对应的修饰布局文件 将id为content的FrameLayout赋值于mContentParent
          mContentParent = generateLayout(mDecor);
          ...
        }
  }
  protected ViewGroup generateLayout(DecorView decor) {
       // Apply data from current theme.
       //根据当前style修饰相应样式

       TypedArray a = getWindowStyle();

       ...
       //一堆if判断

       // 增加窗口修饰

       int layoutResource;
       int features = getLocalFeatures();

       ...
       //根据features选择不同的窗帘修饰布局文件得到
       //把选中的窗口修饰布局文件添加到DecorView中, 指定contentParent的值
       View in = mLayoutInflater.inflate(layoutResource, null);
       decor.addView(in, new ViewGroup.LayoutParams(MATCH_PARENT, MATCH_PARENT));
       mContentRoot = (ViewGroup) in;

       ViewGroup contentParent = (ViewGroup)findViewById(ID_ANDROID_CONTENT);
       if (contentParent == null) {
           throw new RuntimeException("Window couldn't find content container view");
       }

       ...
       return contentParent;
   }
该方法的主要功能为 根据窗口的style为该窗口选择不同的窗口根布局文件 将mDecor作为根视图将窗口布局添加,获取id为content的FrameLayout返回给mContentParent对象 实质为阐释mDecor和mContentParent对象
- (扩展)关于设置Activity属性需要在setContentView方法之前调用的问题
在设置Activity属性的时候 比如requestWindowFeature(Window.FEATURE_NO_TITLE) 需要在setContentView方法之前调用
  public boolean requestFeature(int featureId) {
      if (mContentParent != null) {
          throw new AndroidRuntimeException("requestFeature() must be called before adding content");
      }
      ...
  }
- onContentChanged方法
在PhoneWindow中没有重写getCallback相关方法 而在Window类下
  /**
   * Return the current Callback interface for this window.
   */
  public final Callback getCallback() {
      return mCallback;
  }
mCallback相关的赋值方法
  /**
   * Set the Callback interface for this window, used to intercept key
   * events and other dynamic operations in the window.
   *
   * @param callback The desired Callback interface.
   */
  public void setCallback(Callback callback) {
      mCallback = callback;
  }
setCallback方法在Activity中被使用
  final void attach(Context context, ActivityThread aThread,
            Instrumentation instr, IBinder token, int ident,
            Application application, Intent intent, ActivityInfo info,
            CharSequence title, Activity parent, String id,
            NonConfigurationInstances lastNonConfigurationInstances,
            Configuration config, String referrer, IVoiceInteractor voiceInteractor) {
        ...
        mWindow.setCallback(this);
        ...
  }
说明Activity实现了Window的CallBack接口 然后在Activity中找到onContentChanged方法
  public void onContentChanged() {
  }
对空方法. 说明在Activity的布局改动时 (setContentView或者addContentView 方法执行完毕后会调用改方法) 所以各种View的findViewById方法什么的可以放在这里
- setContentView源码总结
- 创建一个DecorView的对象mDector 该mDector将作为整个应用窗口的根视图
- 根据根据Feature等style theme创建不同的窗口修饰布局文件 并且通过findViewById获取Activity布局文件该存放的地方
- 将Activity的布局文件添加至id为content的FrameLayout内
- 执行到当前页面还没有显示出来
- Activity页面显示
我们都知道Activity的实际开始于ActivityThread的main方法 当该方法调运完之后会调用该类的performLaunchActivity方法来创建要启动的Activity组件 这个过程中还会为该Activity组件创建窗口对象和视图对象 当组件创建完成后用过调用该类的handleResumeActivity方法将其激活
  final void handleResumeActivity(IBinder token,
             boolean clearHide, boolean isForward, boolean reallyResume) {
               ...
             if (!r.activity.mFinished && willBeVisible
                     && r.activity.mDecor != null && !r.hideForNow) {
                 ...
                 if (r.activity.mVisibleFromClient) {
                     r.activity.makeVisible();
                     //这里这里 通过调用Activity的makeVisible方法来显示我们通过setContentView创建的mDecor
                 }
                 ...
             }
         } else {
           ...
         }
     }
  //Activity的makeVisible方法
  void makeVisible() {
       if (!mWindowAdded) {
           ViewManager wm = getWindowManager();
           wm.addView(mDecor, getWindow().getAttributes());
           mWindowAdded = true;
       }
       mDecor.setVisibility(View.VISIBLE);
   }
至此通过setContentView方法设置的页面才最后显示出来
