

前言
前面两篇文章主要讲了SpringShiroFilter的初始化以及doFilter方法。总结一下:初始化的主要操作是根据配置构建所有url对应的过滤链,doFilter()方法将url对应的过滤链添加到javaEE原生的的过滤器中。
本篇文章的内容
本篇文章主要解析具体的Filter是如何处理鉴权的(即如何判断某个用户是否有权限访问该url)。本篇文章一PermissionsAuthorizationFilter为例(shiro默认的拦截器有9个,包括roles,anno,perms等等)
正文
首先给出PermissionsAuthorizationFilter的类结构,该类只有一个isAccessAllowed方法

public class PermissionsAuthorizationFilter extends AuthorizationFilter {
  //TODO - complete JavaDoc

    public boolean isAccessAllowed(ServletRequest request, ServletResponse response, Object mappedValue) throws IOException {

        Subject subject = getSubject(request, response);
        String[] perms = (String[]) mappedValue;

        boolean isPermitted = true;
        if (perms != null && perms.length > 0) {
            if (perms.length == 1) {
                if (!subject.isPermitted(perms[0])) {
                    isPermitted = false;
                }
            } else {
                if (!subject.isPermittedAll(perms)) {
                    isPermitted = false;
                }
            }
        }

        return isPermitted;
    }
}
第一步,既然是过滤器,我们当然还是一步一步往上寻找doFilter()方法,最终还是在OncePerRequestFilter()方法中找到
public final void doFilter(ServletRequest request, ServletResponse response, FilterChain filterChain)
            throws ServletException, IOException {
        String alreadyFilteredAttributeName = getAlreadyFilteredAttributeName();
        if ( request.getAttribute(alreadyFilteredAttributeName) != null ) {
            log.trace("Filter '{}' already executed.  Proceeding without invoking this filter.", getName());
            filterChain.doFilter(request, response);
        } else //noinspection deprecation
            if (/* added in 1.2: */ !isEnabled(request, response) ||
                /* retain backwards compatibility: */ shouldNotFilter(request) ) {
            log.debug("Filter '{}' is not enabled for the current request.  Proceeding without invoking this filter.",
                    getName());
            filterChain.doFilter(request, response);
        } else {
            // Do invoke this filter...
            log.trace("Filter '{}' not yet executed.  Executing now.", getName());
            request.setAttribute(alreadyFilteredAttributeName, Boolean.TRUE);

            try {
                doFilterInternal(request, response, filterChain);
            } finally {
                // Once the request has finished, we're done and we don't
                // need to mark as 'already filtered' any more.
                request.removeAttribute(alreadyFilteredAttributeName);
            }
        }
    }


  public void doFilterInternal(ServletRequest request, ServletResponse response, FilterChain chain)
            throws ServletException, IOException {

        Exception exception = null;

        try {

            boolean continueChain = preHandle(request, response);
            if (log.isTraceEnabled()) {
                log.trace("Invoked preHandle method.  Continuing chain?: [" + continueChain + "]");
            }

            if (continueChain) {
                executeChain(request, response, chain);
            }

            postHandle(request, response);
            if (log.isTraceEnabled()) {
                log.trace("Successfully invoked postHandle method");
            }

        } catch (Exception e) {
            exception = e;
        } finally {
            cleanup(request, response, exception);
        }
    }
这里鉴权的核心在于doFilterInternal方法中的boolean continueChain = preHandle(request, response),如果鉴权通过则返回true,并且调用executeChain()调用下一个过滤器。(这里我找了好一番时间才发现鉴权逻辑躲在preHandle里面,抓狂,正常理解不怎么都应该在executeChain里面嘛。暗暗吐槽)
下面让我们来一层一层的剥开preHandle的外衣。
protected boolean preHandle(ServletRequest request, ServletResponse response) throws Exception {

        if (this.appliedPaths == null || this.appliedPaths.isEmpty()) {
            if (log.isTraceEnabled()) {
                log.trace("appliedPaths property is null or empty.  This Filter will passthrough immediately.");
            }
            return true;
        }

        for (String path : this.appliedPaths.keySet()) {
            // If the path does match, then pass on to the subclass implementation for specific checks
            //(first match 'wins'):
            if (pathsMatch(path, request)) {
                log.trace("Current requestURI matches pattern '{}'.  Determining filter chain execution...", path);
                Object config = this.appliedPaths.get(path);
                return isFilterChainContinued(request, response, path, config);
            }
        }

        //no path matched, allow the request to go through:
        return true;
    }
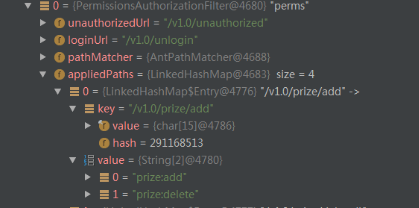
第一步检查appliedPaths是否为空,这里可能有小伙伴忘记appliedPaths里面存的是什么了,还是得祭出第一篇文章的dubug图。
for (String path : this.appliedPaths.keySet()) {
            // If the path does match, then pass on to the subclass implementation for specific checks
            //(first match 'wins'):
            if (pathsMatch(path, request)) {
                log.trace("Current requestURI matches pattern '{}'.  Determining filter chain execution...", path);
                Object config = this.appliedPaths.get(path);
                return isFilterChainContinued(request, response, path, config);
            }
        }
这里得到了权限配置的config,这里的config对象通过debug图可看到是一个String数组,这都是在第一篇文章Filter初始化时完成的,其实里面就是我们配置的权限,例如perms[user:add,user:delete]。第三步调用isFilterChainContinued()进行鉴权
private boolean isFilterChainContinued(ServletRequest request, ServletResponse response,
                                           String path, Object pathConfig) throws Exception {

        if (isEnabled(request, response, path, pathConfig)) {
            return onPreHandle(request, response, pathConfig);
        }
        return true;
    }
点开onPreHandle,注意这里是个逻辑表达式,如果前面isAccessAllowed()返回true,后面的OnAccessDenied()方法将不会执行。(短路原则)
 public boolean onPreHandle(ServletRequest request, ServletResponse response, Object mappedValue) throws Exception {
        return isAccessAllowed(request, response, mappedValue) || onAccessDenied(request, response, mappedValue);
    }
最终调用到我们PermissionsAuthorizationFilter的isAccessAllowed方法。getSubject得到用户,将鉴权的逻辑委派给Subject。(Subject在SpringShiroFilter中创建了,所以这里可以直接获取到,如何创建以及维护的在后面的文章讲解)
 public boolean isAccessAllowed(ServletRequest request, ServletResponse response, Object mappedValue) throws IOException {

        Subject subject = getSubject(request, response);
        String[] perms = (String[]) mappedValue;

        boolean isPermitted = true;
        if (perms != null && perms.length > 0) {
            if (perms.length == 1) {
                if (!subject.isPermitted(perms[0])) {
                    isPermitted = false;
                }
            } else {
                if (!subject.isPermittedAll(perms)) {
                    isPermitted = false;
                }
            }
        }

        return isPermitted;
    }
这里首先判断有没有principals(凭证,登录时放进去的,权限是通过凭证获取的,也是识别用户的唯一标识,一般为用户名)。如果有凭证则将鉴权委托给securityManager。(shiro官网也提及到securityManager是shiro的核心,到后面会发现所有的登录,鉴权,session管理都是由它掌控的)
public boolean isPermittedAll(String... permissions) {
        return hasPrincipals() && securityManager.isPermittedAll(getPrincipals(), permissions);
    }
这里稍微看一下securityManager的类图结构,方便以后章节的讲解。authenticator处理登录,authorizer处理鉴权,sessionManager处理sesison管理

本篇文章涉及到的是authorizer,回头看到我们的spring-shiro.xml配置文件,我配置的是一个多认证器,并为他设置了认证策略(一个成功为成功)。

  public boolean isPermittedAll(PrincipalCollection principals, String... permissions) {
        assertRealmsConfigured();
        if (permissions != null && permissions.length > 0) {
            for (String perm : permissions) {
                if (!isPermitted(principals, perm)) {
                    return false;
                }
            }
        }
        return true;
    }
 public boolean isPermitted(PrincipalCollection principals, Permission permission) {
        assertRealmsConfigured();
        for (Realm realm : getRealms()) {
            if (!(realm instanceof Authorizer)) continue;
            if (((Authorizer) realm).isPermitted(principals, permission)) {
                return true;
            }
        }
        return false;
    }
public boolean isPermitted(PrincipalCollection principals, String permission) {
        Permission p = getPermissionResolver().resolvePermission(permission);
        return isPermitted(principals, p);
    }
这里将权限字符串构建成了一个permission对象,这个permission对象可以执行通配符式的权限比对。然后开始获取AuthorizationInfo(授权信息)
 public boolean isPermitted(PrincipalCollection principals, Permission permission) {
        AuthorizationInfo info = getAuthorizationInfo(principals);
        return isPermitted(permission, info);
    }
注意这个getAuthorizationInfo先从缓存中获取(所以shiro是支持授权缓存的),如果缓存为空才调用doGetAuthorizationInfo获取授权。
protected AuthorizationInfo getAuthorizationInfo(PrincipalCollection principals) {

        if (principals == null) {
            return null;
        }

        AuthorizationInfo info = null;

        if (log.isTraceEnabled()) {
            log.trace("Retrieving AuthorizationInfo for principals [" + principals + "]");
        }

        Cache<Object, AuthorizationInfo> cache = getAvailableAuthorizationCache();
        if (cache != null) {
            if (log.isTraceEnabled()) {
                log.trace("Attempting to retrieve the AuthorizationInfo from cache.");
            }
            Object key = getAuthorizationCacheKey(principals);
            info = cache.get(key);
            if (log.isTraceEnabled()) {
                if (info == null) {
                    log.trace("No AuthorizationInfo found in cache for principals [" + principals + "]");
                } else {
                    log.trace("AuthorizationInfo found in cache for principals [" + principals + "]");
                }
            }
        }


        if (info == null) {
            // Call template method if the info was not found in a cache
            info = doGetAuthorizationInfo(principals);
            // If the info is not null and the cache has been created, then cache the authorization info.
            if (info != null && cache != null) {
                if (log.isTraceEnabled()) {
                    log.trace("Caching authorization info for principals: [" + principals + "].");
                }
                Object key = getAuthorizationCacheKey(principals);
                cache.put(key, info);
            }
        }

        return info;
    }
doGetAuthorizationInfo最终会调用到我们的配置的Realms类的,实现我们自己的授权逻辑
 /**
     * 授权,会在需要验证权限的时候被shiro调用,如果开启了缓存则只会第一次验证的时候被调用.
     *
     * @param principals
     * @return AuthorizationInfo
     * @author liuruojing
     * @since ${PROJECT_NAME} 0.1.0
     */
    @Override
    protected final AuthorizationInfo doGetAuthorizationInfo(final PrincipalCollection principals) {

        String username = (String) principals.getPrimaryPrincipal();
        User  user = userMapper.selectByUsername(username);
        Set<String> roles = new HashSet<>();  //角色集合
        Set<String> permissions = new HashSet<>(); //权限集合
        //根据userId查出所拥有的roleId
        List<Long> roleIds = userRoleMapper.selectByUserId(user.getUserId());
        Iterator<Long> iterator = roleIds.iterator();
        while (iterator.hasNext()) {
            Long roleId = iterator.next();
            Role role = roleMapper.selectByPrimaryKey(roleId);
            //将角色放入角色集合
            roles.add(role.getRoleName());
            //根据角色查出权限Id
            List<Long> permissionIds = rolePermissionMapper.selectByRoleId(roleId);
            Iterator<Long> pIterator = permissionIds.iterator();
            while (pIterator.hasNext()) {
                Long permissionId = (Long) pIterator.next();
                Permission permission = permissionMapper.selectByPrimaryKey(permissionId);
                //将所有权限放入权限集合
                permissions.add(permission.getPermissionName());
            }
        }
        SimpleAuthorizationInfo info = new SimpleAuthorizationInfo();
        info.setRoles(roles); //放入角色
        info.setStringPermissions(permissions); //放入权限
        return info;
    }
}
现在我们知道了访问url需要的权限,同时也查询出了此用户具有的权限,我们只需要进行比对两者便可以知道用户是否有权限访问此url了。将获取的AuthorizationInfo解析成Permission对象集合,逐个调用Permission对象的implies方法进行比对。如果比对成功则返回true执行下一个所需权限的比对。
//changed visibility from private to protected for SHIRO-332
    protected boolean isPermitted(Permission permission, AuthorizationInfo info) {
        Collection<Permission> perms = getPermissions(info);
        if (perms != null && !perms.isEmpty()) {
            for (Permission perm : perms) {
                if (perm.implies(permission)) {
                    return true;
                }
            }
        }
        return false;
    }
最后所有权限比对完后会回到上面的onpreHandle(),如果isAccessAllowed鉴权通过则返回true,否则调用onAccessDenied方法设置重定向到unloginUrl或者unAuthorizedUrl,这两个url是我们在xml中配置的
 public boolean onPreHandle(ServletRequest request, ServletResponse response, Object mappedValue) throws Exception {
        return isAccessAllowed(request, response, mappedValue) || onAccessDenied(request, response, mappedValue);
    }
protected boolean onAccessDenied(ServletRequest request, ServletResponse response) throws IOException {

        Subject subject = getSubject(request, response);
        // If the subject isn't identified, redirect to login URL
        if (subject.getPrincipal() == null) {
            saveRequestAndRedirectToLogin(request, response);
        } else {
            // If subject is known but not authorized, redirect to the unauthorized URL if there is one
            // If no unauthorized URL is specified, just return an unauthorized HTTP status code
            String unauthorizedUrl = getUnauthorizedUrl();
            //SHIRO-142 - ensure that redirect _or_ error code occurs - both cannot happen due to response commit:
            if (StringUtils.hasText(unauthorizedUrl)) {
                WebUtils.issueRedirect(request, response, unauthorizedUrl);
            } else {
                WebUtils.toHttp(response).sendError(HttpServletResponse.SC_UNAUTHORIZED);
            }
        }
        return false;
    }
