前言
今天主要带大家一起分析下flutter是如何启动、初始化和加载dart代码的。这里有几点需要提前告知:
-
由于篇幅的问题,关于flutter界面创建、绘制过程将略过;
-
由于相关的c++代码比较多,而且较为复杂,建议先下载flutter engine的完整开发环境代码,阅读本文更方便;
-
本文只分析启动过程,参考的项目是基于android studio创建的一个默认flutter项目,以下简称demo。
正文
java层启动过程
熟悉android的朋友都知道,一个APP启动会先执行Application再执行Activity(AndroidManifest.xml中配置的启动Activity),结合这个,我们先看看Application里做了什么,在分析过程中我们将挑取一些关键的native方法作为c++层入口方法作进一步的分析。
// io.flutter.app.FlutterApplication
public class FlutterApplication extends Application {
    @Override
    @CallSuper
    public void onCreate() {
        super.onCreate();
        FlutterMain.startInitialization(this);
    }

    //这块代码和FlutterActivityDelegate的生命周期方法结合使用
    private Activity mCurrentActivity = null;
    public Activity getCurrentActivity() {
        return mCurrentActivity;
    }
    public void setCurrentActivity(Activity mCurrentActivity) {
        this.mCurrentActivity = mCurrentActivity;
    }
}

// io.flutter.view.FlutterMain中的方法
public static void startInitialization(Context applicationContext, FlutterMain.Settings settings) {
    if (Looper.myLooper() != Looper.getMainLooper()) {
        throw new IllegalStateException("startInitialization must be called on the main thread");
    } else if (sSettings == null) {
        sSettings = settings;
        long initStartTimestampMillis = SystemClock.uptimeMillis();
        initConfig(applicationContext);
        initAot(applicationContext);
        initResources(applicationContext);
        System.loadLibrary("flutter");
       ...
    }
}
startInitialization只能执行在主线程中,否则会抛出异常。通过sSettings这个变量可以看出,启动的过程中,这个方法将只执行一遍。initConfig初始化一些变量的配置信息(在AndroidManifest.xml中可以通过meta-data方式配置这些变量值), System.loadLibrary("flutter")则完成装载flutter库文件,期间会在c++层完成JNI方法的动态注册。initResources方法我们往下看。
private static void initResources(Context applicationContext) {
	Context context = applicationContext;
	new ResourceCleaner(context).start();
	...
	sResourceExtractor = new ResourceExtractor(context);
	...
	sResourceExtractor.start();
}
ResourceCleaner将清理带有指定标识的缓存文件,ResourceExtractor将完成asset 目录下flutter相关资源的拷贝,这些资源会在后续flutter engine和DartVM等初始化时使用。
然后我们再来看看启动activity都做了些什么
onCreate
//MainActivity.java

public class MainActivity extends FlutterActivity {
  @Override
  protected void onCreate(Bundle savedInstanceState) {
    super.onCreate(savedInstanceState);
    GeneratedPluginRegistrant.registerWith(this);
  }
}

//FlutterActivity.java

protected void onCreate(Bundle savedInstanceState) {
    super.onCreate(savedInstanceState);
    this.eventDelegate.onCreate(savedInstanceState);
}
先看FlutterActivity中执行onCreate,可以看到这里面并没有当前ContentView的设置,那么其内容界面是在哪里设置的呢,我们可以看到第二句this.eventDelegate.onCreate(savedInstanceState);,最终我们发现Activity中显示的view是在代理类中进行初始化的,下面看下代理类FlutterActivityDelegate的执行,
//FlutterActivityDelegate.java

public void onCreate(Bundle savedInstanceState) {
    ...
    String[] args = getArgsFromIntent(this.activity.getIntent());
    FlutterMain.ensureInitializationComplete(this.activity.getApplicationContext(), args);
    this.flutterView = this.viewFactory.createFlutterView(this.activity);
    if (this.flutterView == null) {
        FlutterNativeView nativeView = this.viewFactory.createFlutterNativeView();
        this.flutterView = new FlutterView(this.activity, (AttributeSet)null, nativeView);
        this.flutterView.setLayoutParams(matchParent);
        this.activity.setContentView(this.flutterView);
        this.launchView = this.createLaunchView();
        if (this.launchView != null) {
            this.addLaunchView();
        }
    }
   ...
   this.runBundle(appBundlePath);
   ...
}
在这里我们需要注意FlutterMain.ensureInitializationComplete的执行,
//FlutterMain.java

public static void ensureInitializationComplete(Context applicationContext, String[] args) {
    ...
    sResourceExtractor.waitForCompletion();
    ...
    nativeInit(applicationContext, (String[])shellArgs.toArray(new String[0]), appBundlePath, appStoragePath, engineCachesPath);
    sInitialized = true;
    ...
}

//c++关键方法1
private static native void nativeInit(Context var0, String[] var1, String var2, String var3, String var4);
它将等待解压任务结束,资源处理完毕,然后拼接参数,完成参数初始化后将执行nativeInit方法对c++层初始化。
然后会创建FlutterView对象,这里面还包含了很多关键对象的创建,这个下文将会分析到。
//FlutterView.java的构造方法
public FlutterView(Context context, AttributeSet attrs, FlutterNativeView nativeView) {
    super(context, attrs);
    ...
    if (nativeView == null) {
        this.mNativeView = new FlutterNativeView(activity.getApplicationContext());
    } else {
        this.mNativeView = nativeView;
    }
    this.mNativeView.getFlutterJNI();
    this.mIsSoftwareRenderingEnabled = FlutterJNI.nativeGetIsSoftwareRenderingEnabled();
    ...
    this.mNativeView.attachViewAndActivity(this, activity);
    this.mSurfaceCallback = new Callback() {
        public void surfaceCreated(SurfaceHolder holder) {
            FlutterView.this.assertAttached();
            FlutterView.this.mNativeView.getFlutterJNI().onSurfaceCreated(holder.getSurface());
        }

        public void surfaceChanged(SurfaceHolder holder, int format, int width, int height) {
            FlutterView.this.assertAttached();
            FlutterView.this.mNativeView.getFlutterJNI().onSurfaceChanged(width, height);
        }

        public void surfaceDestroyed(SurfaceHolder holder) {
            FlutterView.this.assertAttached();
            FlutterView.this.mNativeView.getFlutterJNI().onSurfaceDestroyed();
        }
    };
    this.getHolder().addCallback(this.mSurfaceCallback);
    this.mAccessibilityManager = (AccessibilityManager)this.getContext().getSystemService("accessibility");
    ...
    this.mFlutterLocalizationChannel = new MethodChannel(this, "flutter/localization", JSONMethodCodec.INSTANCE);
    ...
}
这个方法中先执行FlutterNativeView对象创建,然后是FlutterJNI对象创建,再通过c++层完成两者的绑定关系。另外activity和flutterView的绑定关系也在这里完成,并会在PlatformViewsController中完成注册方法回调关系。这个方法还包含了界面绘制监听,flutter绘制的关键调用,建立了通讯体系(各类Channel)。在c++层会用到的资源处理对象也是从这里创建的。
//FlutterNativeView.java构造方法

public FlutterNativeView(Context context, boolean isBackgroundView) {
    this.mPluginRegistry = new FlutterPluginRegistry(this, context);
    this.mFlutterJNI = new FlutterJNI();
    this.mFlutterJNI.setRenderSurface(new FlutterNativeView.RenderSurfaceImpl());
    this.mFlutterJNI.setPlatformMessageHandler(new FlutterNativeView.PlatformMessageHandlerImpl());
    this.mFlutterJNI.addEngineLifecycleListener(new FlutterNativeView.EngineLifecycleListenerImpl());
    this.attach(this, isBackgroundView);
    ....
}
//c++关键方法2
private native long nativeAttach(FlutterJNI var1, boolean var2);
FlutterPluginRegistry是actitiy和flutterView绑定关系操作类,而FlutterJNI创建时,将绑定绘制、跨平台通讯、生命周期的监听方法。这里还会涉及到nativeAttach这个c++方法,等一会将会分析到。
继续看runBundle的执行
//FlutterView.java

private FlutterNativeView mNativeView;
public void runFromBundle(FlutterRunArguments args) {
  assertAttached();
  preRun();
  mNativeView.runFromBundle(args);
  ...
}

//FlutterNativeView.java

public void runFromBundle(FlutterRunArguments args) {
   ...
   runFromBundleInternal(new String[] {args.bundlePath, args.defaultPath},
            args.entrypoint, args.libraryPath);
   ...
}

/**
* 这里通过demo,我们需要留意下传入的数据,方便接下来的分析
* bundlePaths:(flutter_assets目录地址)
* entrypoint:"main"
* libraryPath:null
*
*/
private void runFromBundleInternal(String[] bundlePaths, String entrypoint,
    String libraryPath) {
    ....
    mFlutterJNI.runBundleAndSnapshotFromLibrary(
        bundlePaths,
        entrypoint,
        libraryPath,
        mContext.getResources().getAssets()
    );
    ....
}
此时,runFromBundle会先判断资源的绑定,把一些参数通过runBundleAndSnapshotFromLibrary方法中mFlutterJNI对象调用JNI方法来传递指定flutter入口供DartVM执行dart层代码逻辑。
//FlutterJNI.java

@UiThread
public void runBundleAndSnapshotFromLibrary(@NonNull String[] prioritizedBundlePaths, @Nullable String entrypointFunctionName, @Nullable String pathToEntrypointFunction, @NonNull AssetManager assetManager) {
    this.ensureAttachedToNative();
    this.nativeRunBundleAndSnapshotFromLibrary(this.nativePlatformViewId, prioritizedBundlePaths, entrypointFunctionName, pathToEntrypointFunction, assetManager);
}

//最终样例数据:pathToEntrypointFunction = null,entrypointFunctionName="main"
//prioritizedBundlePaths同上面,nativePlatformViewId = 3719055232
private native void nativeRunBundleAndSnapshotFromLibrary(
    long nativePlatformViewId,
    @NonNull String[] prioritizedBundlePaths,
    @Nullable String entrypointFunctionName,
    @Nullable String pathToEntrypointFunction,
    @NonNull AssetManager manager
);
nativeRunBundleAndSnapshotFromLibrary 则是native启动方法的入口,另外这个 nativePlatformViewId 是在FlutterNativeView 创建的时候调用了FlutterJNI的attachToNative方法,其来源是native层shell_holder对象指针,这个对象指针在native启动过程中非常关键。
再看MainActivity中onCreate执行,GeneratedPluginRegistrant.registerWith(this)将执行到如下代码中
//FlutterActivityDelegate.java

private FlutterView flutterView;
@Override
public Registrar registrarFor(String pluginKey) {
    return flutterView.getPluginRegistry().registrarFor(pluginKey);
}

//FlutterPluginRegistry.java

@Override
public Registrar registrarFor(String pluginKey) {
    if (mPluginMap.containsKey(pluginKey)) {
        throw new IllegalStateException("Plugin key " + pluginKey + " is already in use");
    }
    mPluginMap.put(pluginKey, null);
    return new FlutterRegistrar(pluginKey);
}
registrarFor保存了插件的实例,避免重复注册。
onStart:
以下方法通过生命周期对应的Platform Channel发送生命周期状态给Flutter层来告知当前的APP状态。
this.mFlutterLifecycleChannel.send("AppLifecycleState.inactive");
onResume:
public void onResume() {
    Application app = (Application)this.activity.getApplicationContext();
    FlutterMain.onResume(app);
    if (app instanceof FlutterApplication) {
        FlutterApplication flutterApp = (FlutterApplication)app;
        flutterApp.setCurrentActivity(this.activity);
    }
}

public static void onResume(Context context) {
    //热更新有关,这里也不分析
    if (sResourceUpdater != null && sResourceUpdater.getDownloadMode() == DownloadMode.ON_RESUME) {
        sResourceUpdater.startUpdateDownloadOnce();
    }
}
到这里基本完成了java层分析,主要方法调用链可以参考如下
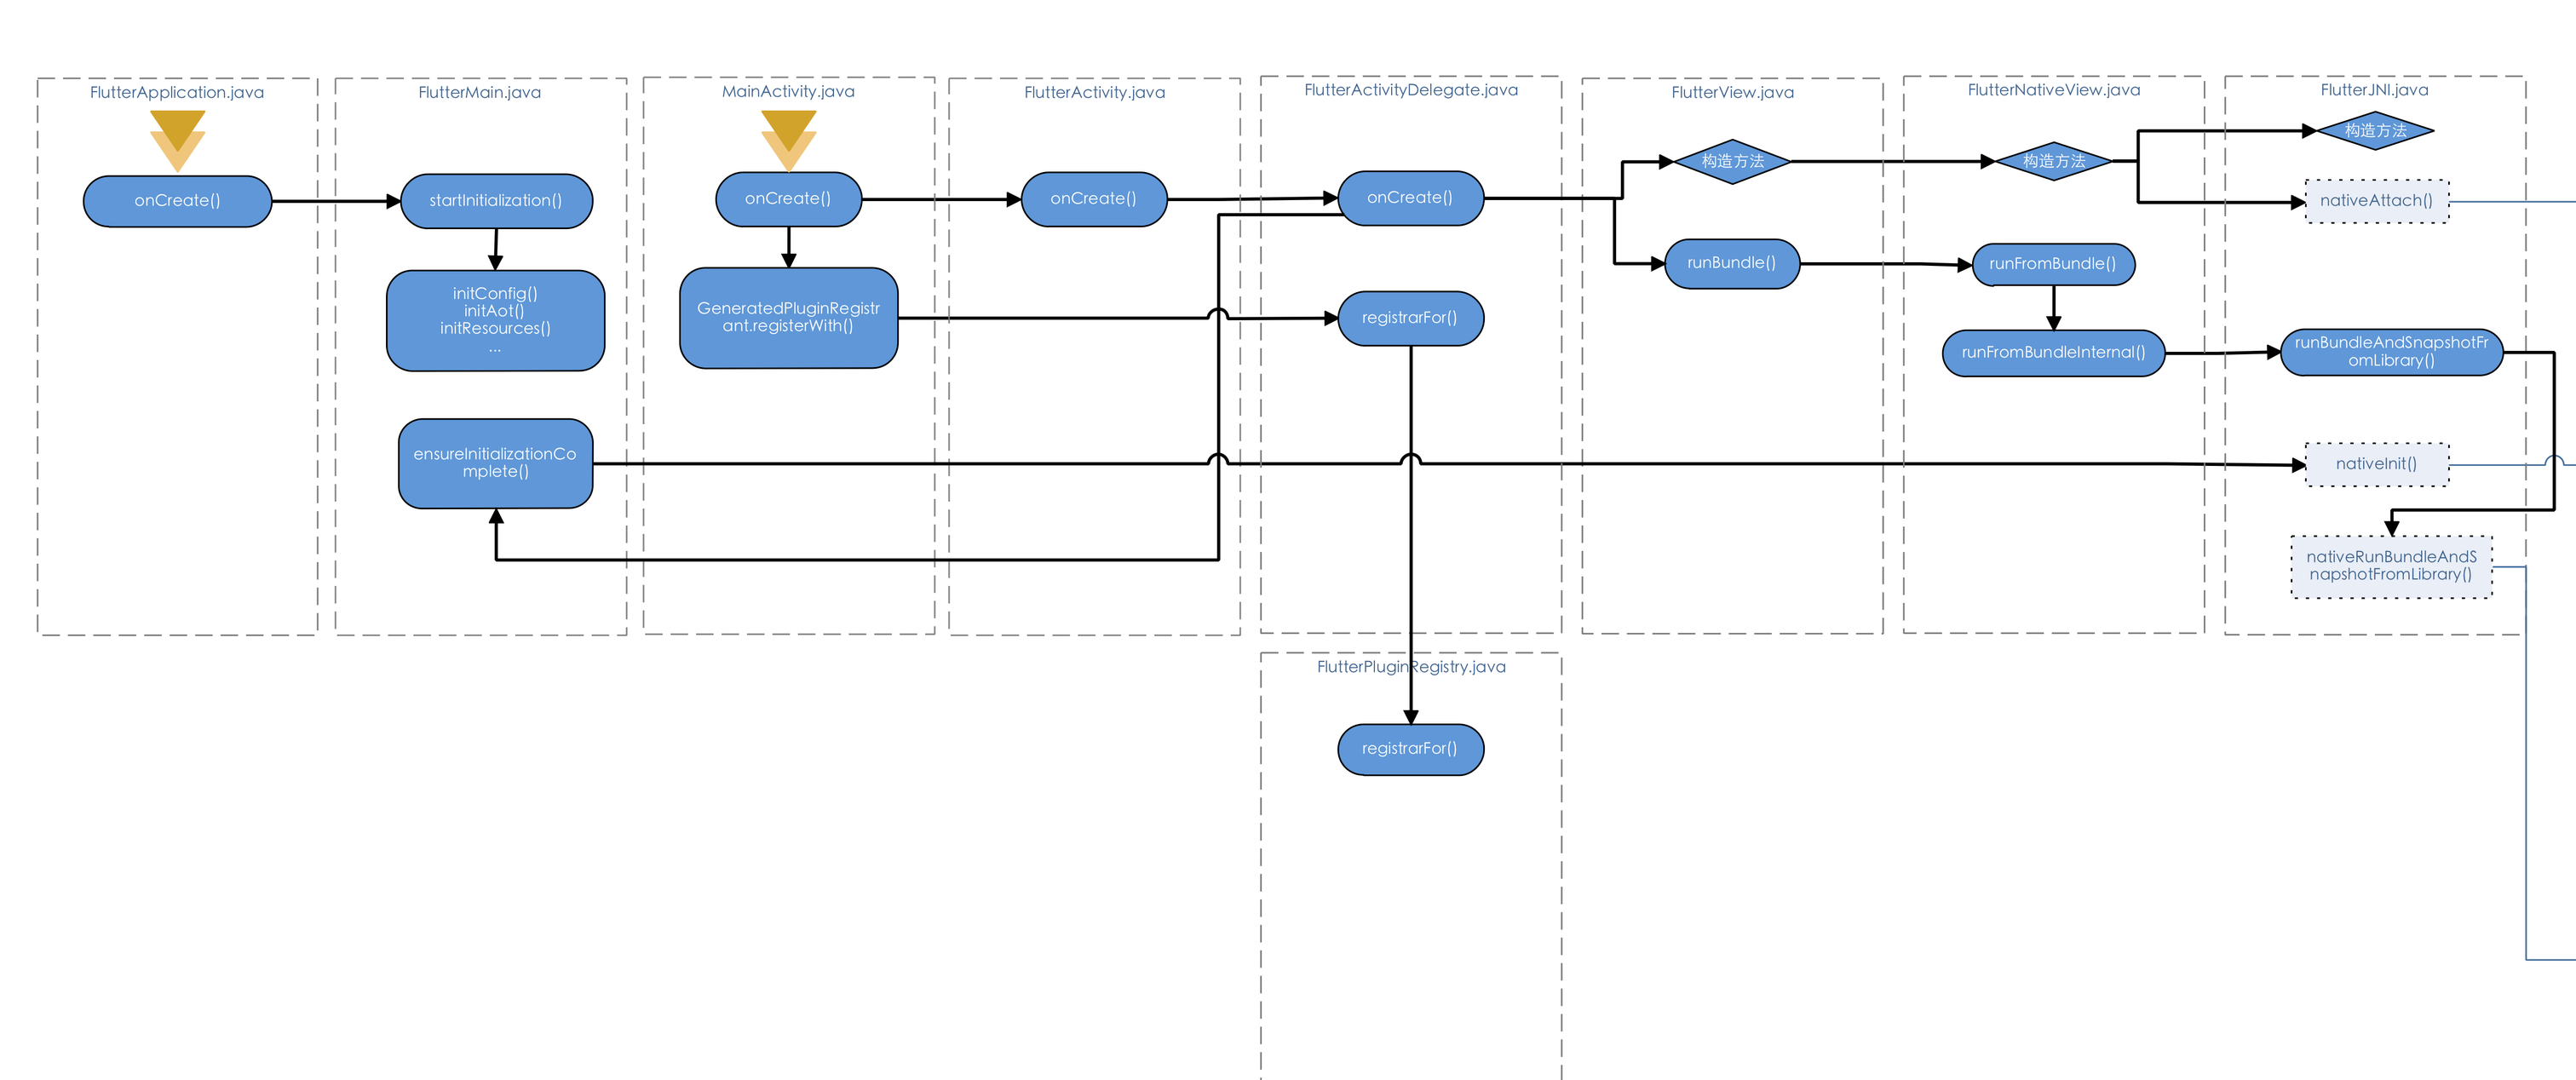
接下来将需要分析的关键JNI方法罗列如下:
- nativeInit
- nativeAttach
- nativeRunBundleAndSnapshotFromLibrary
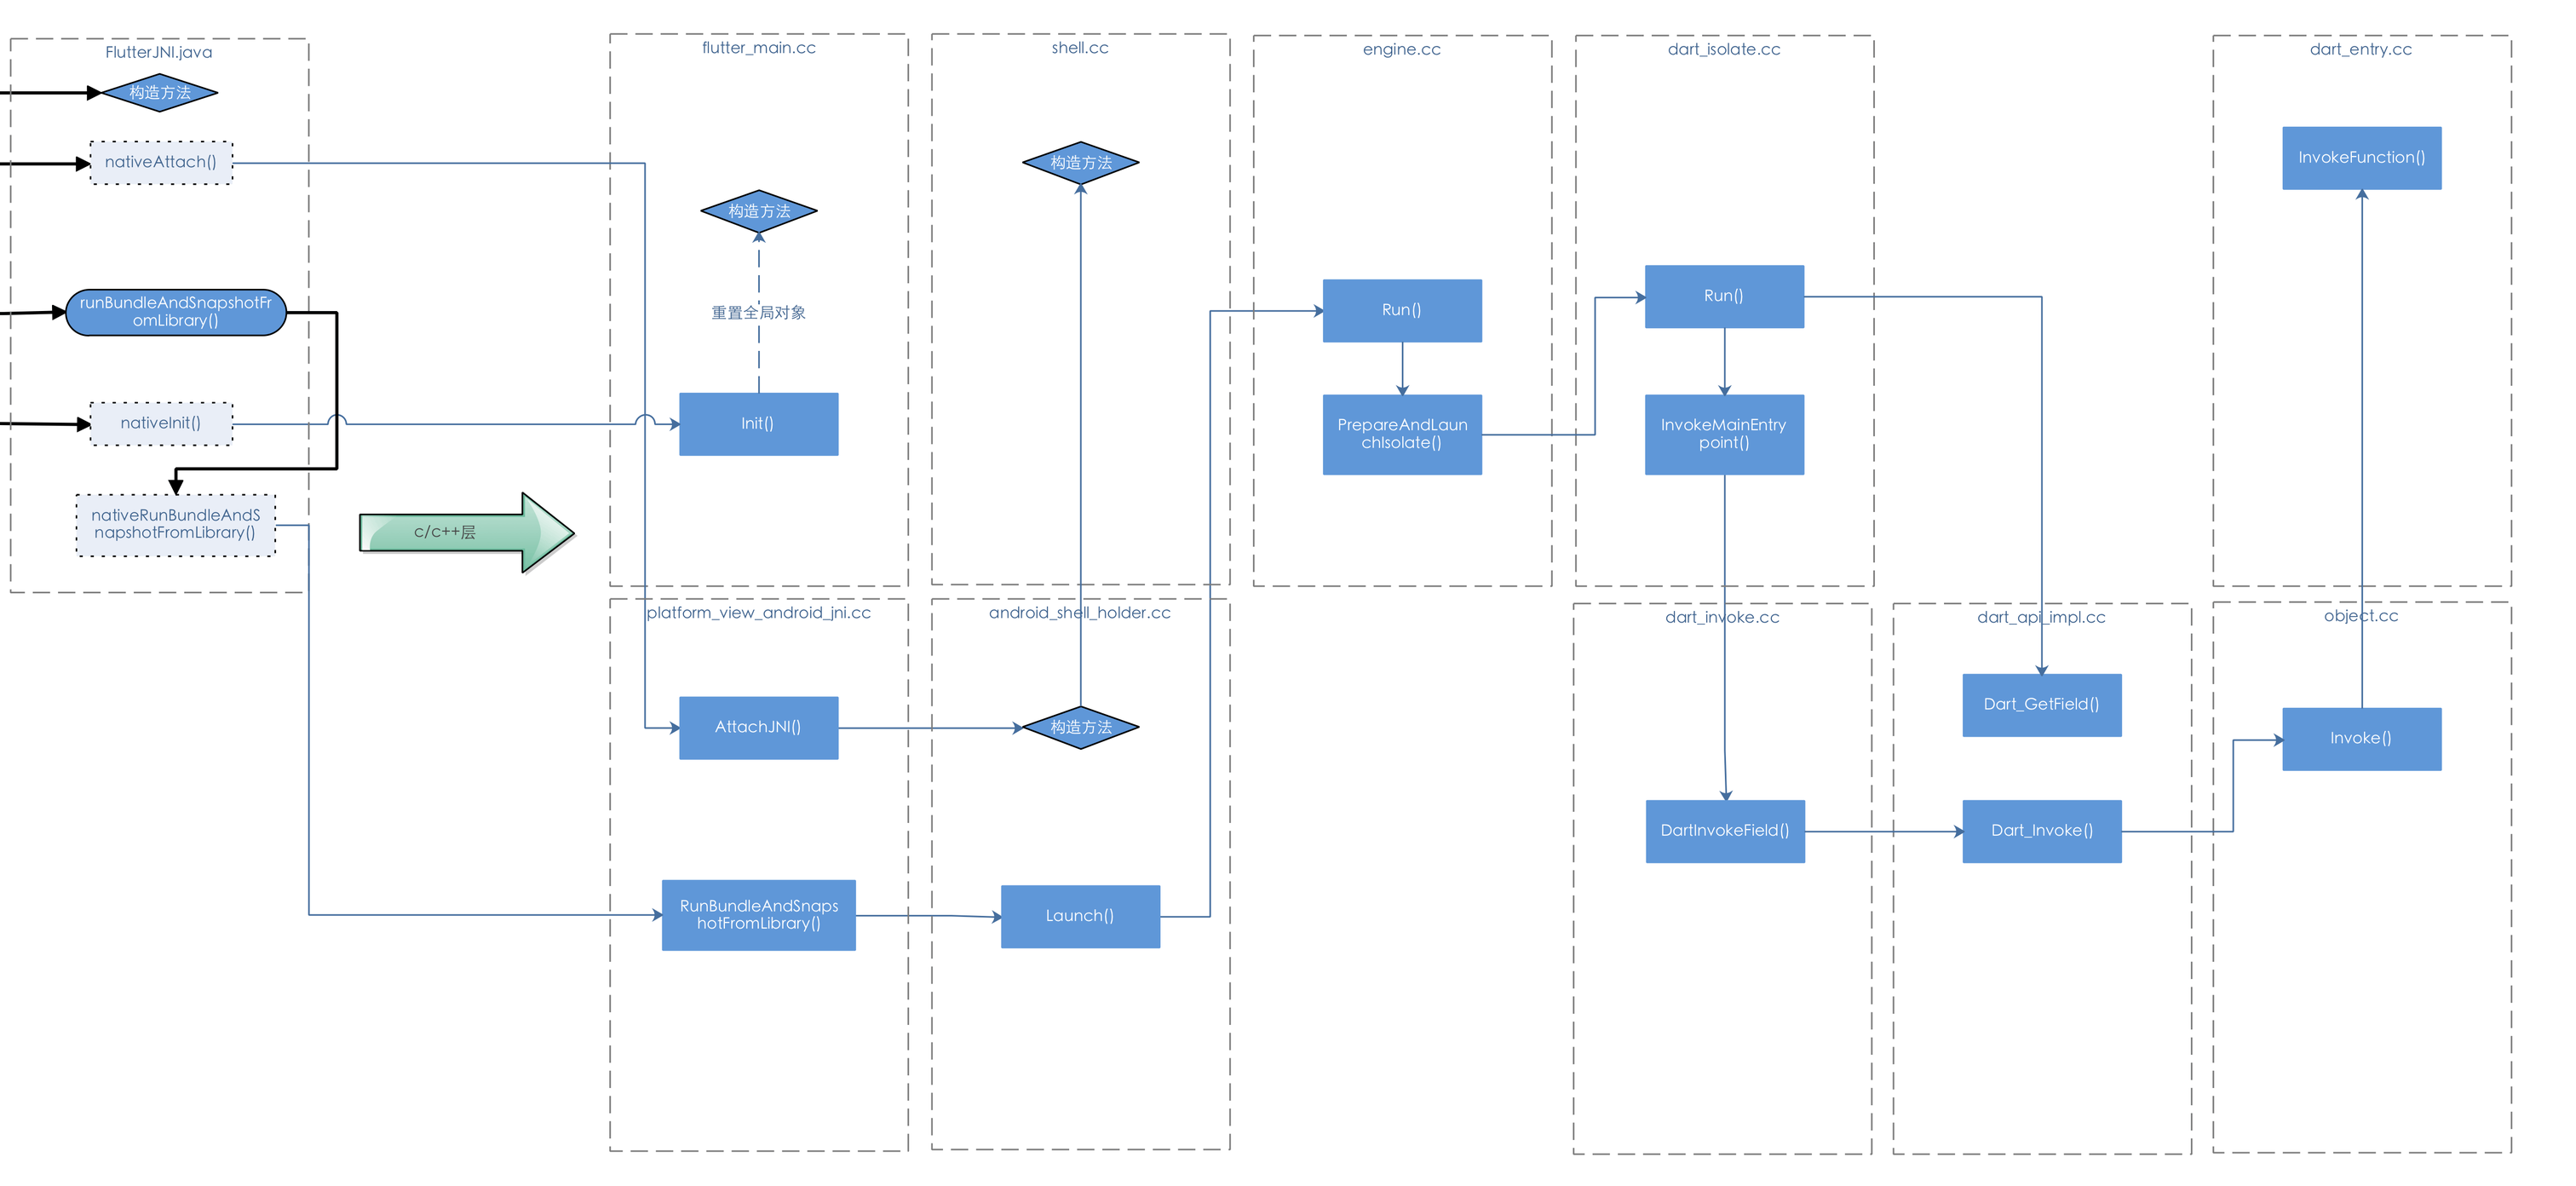
c/c++层启动过程
nativeInit分析
我们直接找到对应的方法,位于shell/platform/android/flutter_main.cc
void FlutterMain::Init(JNIEnv* env,
                       jclass clazz,
                       jobject context,
                       jobjectArray jargs,
                       jstring bundlePath,
                       jstring appStoragePath,
                       jstring engineCachesPath) {
  std::vector<std::string> args;
  args.push_back("flutter");
  for (auto& arg : fml::jni::StringArrayToVector(env, jargs)) {
    args.push_back(std::move(arg));
  }
  auto command_line = fml::CommandLineFromIterators(args.begin(), args.end());

  auto settings = SettingsFromCommandLine(command_line);

  settings.assets_path = fml::jni::JavaStringToString(env, bundlePath);
  ...
  settings.task_observer_add = [](intptr_t key, fml::closure callback) {
    fml::MessageLoop::GetCurrent().AddTaskObserver(key, std::move(callback));
  };

  settings.task_observer_remove = [](intptr_t key) {
    fml::MessageLoop::GetCurrent().RemoveTaskObserver(key);
  };
  ...
  g_flutter_main.reset(new FlutterMain(std::move(settings)));
}
这里做了几件事情:
- 解析java传过来的参数
- 创建Setting,保存配置
- 创建FlutterMain,重置其全局对象
nativeAttach分析
static jlong AttachJNI(JNIEnv* env,
                       jclass clazz,
                       jobject flutterJNI,
                       jboolean is_background_view) {
  fml::jni::JavaObjectWeakGlobalRef java_object(env, flutterJNI);
  auto shell_holder = std::make_unique<AndroidShellHolder>(
      FlutterMain::Get().GetSettings(), java_object, is_background_view);
  if (shell_holder->IsValid()) {
    return reinterpret_cast<jlong>(shell_holder.release());
  } else {
    return 0;
  }
}

//shell/platform/android/android_shell_holder.cc
AndroidShellHolder::AndroidShellHolder(
    blink::Settings settings,
    fml::jni::JavaObjectWeakGlobalRef java_object,
    bool is_background_view)
    : settings_(std::move(settings)), java_object_(java_object) {
  ...
  auto jni_exit_task([key = thread_destruct_key_]() {
    FML_CHECK(pthread_setspecific(key, reinterpret_cast<void*>(1)) == 0);
  });
  thread_host_.ui_thread->GetTaskRunner()->PostTask(jni_exit_task);
  if (!is_background_view) {
    thread_host_.gpu_thread->GetTaskRunner()->PostTask(jni_exit_task);
  }
  ...
  fml::MessageLoop::EnsureInitializedForCurrentThread();
  fml::RefPtr<fml::TaskRunner> gpu_runner;
  fml::RefPtr<fml::TaskRunner> ui_runner;
  fml::RefPtr<fml::TaskRunner> io_runner;
  fml::RefPtr<fml::TaskRunner> platform_runner =
      fml::MessageLoop::GetCurrent().GetTaskRunner();
  if (is_background_view) {
    auto single_task_runner = thread_host_.ui_thread->GetTaskRunner();
    gpu_runner = single_task_runner;
    ui_runner = single_task_runner;
    io_runner = single_task_runner;
  } else {
    gpu_runner = thread_host_.gpu_thread->GetTaskRunner();
    ui_runner = thread_host_.ui_thread->GetTaskRunner();
    io_runner = thread_host_.io_thread->GetTaskRunner();
  }
  blink::TaskRunners task_runners(thread_label,     // label
                                  platform_runner,  // platform
                                  gpu_runner,       // gpu
                                  ui_runner,        // ui
                                  io_runner         // io
  );
  shell_ =
      Shell::Create(task_runners,             // task runners
                    settings_,                // settings
                    on_create_platform_view,  // platform view create callback
                    on_create_rasterizer      // rasterizer create callback
      );
     ...
}

std::unique_ptr<Shell> Shell::Create(
    blink::TaskRunners task_runners,
    blink::Settings settings,
    Shell::CreateCallback<PlatformView> on_create_platform_view,
    Shell::CreateCallback<Rasterizer> on_create_rasterizer) {
   PerformInitializationTasks(settings);
  auto vm = blink::DartVM::ForProcess(settings);
  FML_CHECK(vm) << "Must be able to initialize the VM.";
  return Shell::Create(std::move(task_runners),             //
                       std::move(settings),                 //
                       vm->GetIsolateSnapshot(),            //
                       blink::DartSnapshot::Empty(),        //
                       std::move(on_create_platform_view),  //
                       std::move(on_create_rasterizer)      //
  );
}
nativeAttach的方法中,调用了AndroidShellHolder对象的创建,包含了JNI生命周期同UI和GPU线程绑定, 视图回调和c++层绘制绑定,启动一些必要的线程。而shell对象的创建中,PerformInitializationTasks包含了一些关键库的初始化,如skia(图形绘制库)、ICU(国际化库)等初始化,shell对象的创建也标志着dart vm的创建。
关键点:AndroidShellHolder对象创建完成后,会将其对象指针值返回给java层保存,用于后续安卓原生层对Flutter层各操作方法的调用。
nativeRunBundleAndSnapshotFromLibrary 分析
在shell/platform/android/io/platform_view_android_jni.cc中,我们很容易找到对应的方法,是采用动态注册的方式:
  {
          .name = "nativeRunBundleAndSnapshotFromLibrary",
          .signature = "(J[Ljava/lang/String;Ljava/lang/String;"
                       "Ljava/lang/String;Landroid/content/res/AssetManager;)V",
          .fnPtr =
              reinterpret_cast<void*>(&shell::RunBundleAndSnapshotFromLibrary),
 }
static void RunBundleAndSnapshotFromLibrary(JNIEnv* env,
                                            jobject jcaller,
                                            jlong shell_holder,
                                            jobjectArray jbundlepaths,
                                            jstring jEntrypoint,
                                            jstring jLibraryUrl,
                                            jobject jAssetManager) {
  auto asset_manager = std::make_shared<blink::AssetManager>();
  for (const auto& bundlepath :
       fml::jni::StringArrayToVector(env, jbundlepaths)) {
    ...
    const auto file_ext_index = bundlepath.rfind(".");
    if (bundlepath.substr(file_ext_index) == ".zip") {
        //资源解压
      asset_manager->PushBack(std::make_unique<blink::ZipAssetStore>(
          bundlepath, "assets/flutter_assets"));

    } else {
      //操作资源地址并存储到容器中
      asset_manager->PushBack(
          std::make_unique<blink::DirectoryAssetBundle>(fml::OpenDirectory(
              bundlepath.c_str(), false, fml::FilePermission::kRead)));
      ...
    }
  }

  auto isolate_configuration = CreateIsolateConfiguration(*asset_manager);
  ...
  RunConfiguration config(std::move(isolate_configuration),
                          std::move(asset_manager));

  {
    auto entrypoint = fml::jni::JavaStringToString(env, jEntrypoint);
    auto libraryUrl = fml::jni::JavaStringToString(env, jLibraryUrl);

    if ((entrypoint.size() > 0) && (libraryUrl.size() > 0)) {
        //设置dart的入口函数,entrypoint为“main”,引用库地址
      config.SetEntrypointAndLibrary(std::move(entrypoint),
                                     std::move(libraryUrl));
    } else if (entrypoint.size() > 0) {
      config.SetEntrypoint(std::move(entrypoint));
    }
  }

  ANDROID_SHELL_HOLDER->Launch(std::move(config));
}
从上面的方法我们可以简单的总结下这个方法做了什么:
- 资源的解压
- 创建AppSnapshotIsolateConfiguration对象
- 执行配置项
- 执行启动方法
android_shell_holder.cc
void AndroidShellHolder::Launch(RunConfiguration config) {
  //is_valid_ = shell_ != nullptr;正常情况下为true
  if (!IsValid()) {
    return;
  }

  shell_->GetTaskRunners().GetUITaskRunner()->PostTask(
      fml::MakeCopyable([engine = shell_->GetEngine(),  //拿到了引擎的弱引用对象
                         config = std::move(config)
  ]() mutable {
        ...
        //next
        if (!engine || engine->Run(std::move(config)) ==
                           shell::Engine::RunStatus::Failure) {
        ...
        }
        ...
      }));
}
Launch方法中拿到engine对象后,调用Run的执行
//engine.cc
Engine::RunStatus Engine::Run(RunConfiguration configuration) {
  ...
  auto isolate_launch_status =
      PrepareAndLaunchIsolate(std::move(configuration));
  ....
}

shell::Engine::RunStatus Engine::PrepareAndLaunchIsolate(
    RunConfiguration configuration) {
  TRACE_EVENT0("flutter", "Engine::PrepareAndLaunchIsolate");
  UpdateAssetManager(configuration.GetAssetManager());
  auto isolate_configuration = configuration.TakeIsolateConfiguration();
  std::shared_ptr<blink::DartIsolate> isolate =
      runtime_controller_->GetRootIsolate().lock();

  if (!isolate) {
    return RunStatus::Failure;
  }
  ...
  if (!isolate_configuration->PrepareIsolate(*isolate)) {
    FML_LOG(ERROR) << "Could not prepare to run the isolate.";
    return RunStatus::Failure;
  }
  if (configuration.GetEntrypointLibrary().empty()) {
    if (!isolate->Run(configuration.GetEntrypoint())) {
      FML_LOG(ERROR) << "Could not run the isolate.";
      return RunStatus::Failure;
    }
  } else {
    if (!isolate->RunFromLibrary(configuration.GetEntrypointLibrary(),
                                 configuration.GetEntrypoint())) {
      FML_LOG(ERROR) << "Could not run the isolate.";
      return RunStatus::Failure;
    }
  }

  return RunStatus::Success;
}
在engine的启动过程中,准备和启动isolate,在这个方法中将完成对isolate创建、及状态返回处理。更新资源管理后,PrepareIsolate方法主要检查Isolate的状态,通过属性phase(枚举)来表示不同的状态,然后我们再结合java层传递的数据,可以知道将执行isolate->Run方法。
//dart_api_impl.cc
FML_WARN_UNUSED_RESULT
bool DartIsolate::Run(const std::string& entrypoint_name) {
 ...
  auto user_entrypoint_function =
      Dart_GetField(Dart_RootLibrary(), tonic::ToDart(entrypoint_name.c_str()));
  if (!InvokeMainEntrypoint(user_entrypoint_function)) {
    return false;
  }
 ...
}
Run方法中也比较简单,继续看下文。
//dart_isolate.cc
FML_WARN_UNUSED_RESULT
static bool InvokeMainEntrypoint(Dart_Handle user_entrypoint_function) {
  ...
  Dart_Handle start_main_isolate_function =
      tonic::DartInvokeField(Dart_LookupLibrary(tonic::ToDart("dart:isolate")),
                             "_getStartMainIsolateFunction", {});
  ...
  if (tonic::LogIfError(tonic::DartInvokeField(
          Dart_LookupLibrary(tonic::ToDart("dart:ui")), "_runMainZoned",
          {start_main_isolate_function, user_entrypoint_function}))) {
    FML_LOG(ERROR) << "Could not invoke the main entrypoint.";
    return false;
  }
  return true;
}
在InvokeMainEntrypoint方法中 会拿到了Dart_Handle对象,并通过DartInvokeField方法执行Dart_Invoke方法。另外Dart_LookupLibrary中创建的对象是一个Library,这个是下个方法执行步骤的判断依据。
dart_api_impl.cc
DART_EXPORT Dart_Handle Dart_Invoke(Dart_Handle target,
                                    Dart_Handle name,
                                    int number_of_arguments,
                                    Dart_Handle* arguments) {
  DARTSCOPE(Thread::Current());
  API_TIMELINE_DURATION(T);
  CHECK_CALLBACK_STATE(T);
  String& function_name =
      String::Handle(Z, Api::UnwrapStringHandle(Z, name).raw());
  if (function_name.IsNull()) {
    RETURN_TYPE_ERROR(Z, name, String);
  }
  if (number_of_arguments < 0) {
    return Api::NewError(
        "%s expects argument 'number_of_arguments' to be non-negative.",
        CURRENT_FUNC);
  }
  ...
  if (obj.IsType()) {
    ...
    const Class& cls = Class::Handle(Z, Type::Cast(obj).type_class());
    ...
    //分析节点1
    return Api::NewHandle(
        T, cls.Invoke(function_name, args, arg_names, respect_reflectable,
                      check_is_entrypoint));
  } else if (obj.IsNull() || obj.IsInstance()) {
     ...
    Instance& instance = Instance::Handle(Z);
    ...
    //分析节点2
    return Api::NewHandle(
        T, instance.Invoke(function_name, args, arg_names, respect_reflectable,
                           check_is_entrypoint));
  } else if (obj.IsLibrary()) {
    ...
    const Library& lib = Library::Cast(obj);
    ...
    //分析节点3
    return Api::NewHandle(
        T, lib.Invoke(function_name, args, arg_names, respect_reflectable,
                      check_is_entrypoint));
  }
  ...
}
在Dart_Invoke方法中,会先进行状态检查 ,然后拿到由java层传递过来的dart 入口函数对应的方法名(也就"main"),注意在这个方法中,不管是错误还是正确都是返回Dart_Handle这个对像。然后再看这个三个分析节点,根据上面的分析,将会执行节点3
//object.cc
RawObject* Library::Invoke(const String& function_name,
                           const Array& args,
                           const Array& arg_names,
                           bool respect_reflectable,
                           bool check_is_entrypoint) const {
    ...
    Function& function = Function::Handle(zone, LookupStaticFunction(function_name));
    ...
    return DartEntry::InvokeFunction(function, args, args_descriptor_array);
    ...
}
Invoke方法将会通过方法名拿到内存中Function对象,然后通过dart执行该方法。
这里留意下DartEntry这个类,看源码的注释大意是提取解析dart函数所需的功能的操作对象。是dart函数调用的重要对象之一,接着看看InvokeFunction做了什么。
third_party/dart/runtime/vm/dart_entry.cc
RawObject* DartEntry::InvokeFunction(const Function& function,
                                     const Array& arguments,
                                     const Array& arguments_descriptor,
                                     uword current_sp) {
...
#if defined(TARGET_ARCH_DBC)
  //具体方法解析调用
  return Simulator::Current()->Call(code, arguments_descriptor, arguments,
                                    thread);
#elif defined(USING_SIMULATOR)
 //模拟器
  return bit_copy<RawObject*, int64_t>(Simulator::Current()->Call(
      reinterpret_cast<intptr_t>(entrypoint), reinterpret_cast<intptr_t>(&code),
      reinterpret_cast<intptr_t>(&arguments_descriptor),
      reinterpret_cast<intptr_t>(&arguments),
      reinterpret_cast<intptr_t>(thread)));
      ...
}
InvokeFunction 中将先会对Function对象内容是否编译过进行判断(未编译将编译重新调用),拿到当前线程去执行。该方法还会区分生产环境,是否是模拟器等情况对方法进行解析,解析方法执行可以参考Simulator::Current()->Call,在Call的方法内我们可以看到整个方法非常庞大,光方法体就有几千行代码,包含了常量值、字节码等的操作,所以这一篇文章就不展开分析。有兴趣的朋友可以结合虚拟机原理,看看这部分是如何执行的。
总结
至此我们大致看到了整个启动过程,在java层主要是对flutter资源相关的参数进行了赋值、初始化,以及回调方法的注册,资源的拷贝,c++关键方法的调用,建立了通讯体系(各类Channel)。而在c++层,我们发现除去关键对象的创建,还有各类异常的处理(包含各种情况的考量),参数的解析,资源的解析,方法对象的构建等一系列的调用,最后通过dart vm的操作对象对方法进行解析与执行。
作者简介
苏哲,铜板街Android开发工程师,2017年12月加入团队,目前主要负责APP端 Android 日常开发。