

Vue页面、组件之间传参方式繁多,此处罗列出常用的几种方式,欢迎审阅补充。
一丶路由传参
这里的路由传参以编程式router.push(...)为例,声明式<router-link :to="...">与之类似。此处模拟情景为从componentsA.vue页面跳转到componentsB.vue页面传参。首先,路由配置信息如下:
router.js
import Vue from 'vue'
import Router from 'vue-router'

import componentsA from './components/componentsA' //在components下创建componentsA.vue
import componentsB from './components/componentsB' //在components下创建componentsB.vue
Vue.use(Router)

export default new Router({
	routes:[
		{
			path:'/componentsA',
			name:'componentsA',
			component:componentsA
		},
		{
			path:'/componentsB',
			name:'componentsB',
			component:componentsB
		}
	]
})
1.1 路由配置传参
首先确定自己要传的参数名,将路由配置修改一下,传name,age,sex三个参数:
		{
			path:'/componentsB/:name/:age/:sex',
			name:'componentsB',
			component:componentsB
}在componentsA.vue页面通过this.$router.push配置与之对应的参数:
componentsA.vue
<template>
	<div>
		<div>我是组件A</div>
		<button @click='routerToB1'>方式一跳转到组件B</button>
	</div>
</template>
<script>
	export default{
		data(){
			return{
				person:{name:'Gene',age:'18',sex:'male'}
			}
		},
		methods: {
			routerToB1() {
				this.$router.push({
					path:`componentsB/${this.person.name}/${this.person.age}/${this.person.sex}`
				})
			}
		},
	}
</script>
<style>
</style>然后在componentsB.vue页面用this.$route.params接收参数:
componentsB.vue
<template>
	<div>
		<div>我是组件B</div>
	</div>
</template>
<script>
	export default{
		created(){
			this.getRouterData()
		},
		methods: {
			getRouterData(){
				const param = this.$route.params
				console.log(param)//{name:'Gene',age:'18',sex:'male'}
			}
		},
	}
</script>
<style>
</style>点击按钮"方式一跳转到组件B",componentsB页面打印出{name:'Gene',age:'18',sex:'male'},成功获取到A页面传过来的参数,并且地址栏显示为localhost:8889/#/componentsB/Gene/18/male(端口号根据自己设置的来),表明这种传参方式url会携带参数。
1.2 params传参
首先将刚才路由配置修改部分还原,在componentsA.vue页面添加按钮"方式二跳转到组件B":
componentsA.vue
<template>
	<div>
		<div>我是组件A</div>
		<button @click='routerToB1'>方式一跳转到组件B</button>
		<button @click='routerToB2'>方式二跳转到组件B</button>
	</div>
</template>在methods中添加方法routerToB2,使用路由属性name来确定匹配的路由,使用属性params来传递参数:
componentsA.vue
			routerToB2(){
				this.$router.push({
					name:'componentsB',
					params:{
						exa:'我是传到组件B的参数'
					}
				})
},componentsB.vue保持不变,params传参方式获取参数也是通过this.$route.params,点击A页面新添加的按钮"方式二跳转到组件B",在B页面打印出{exa: "我是传到组件B的参数"},传参成功,地址栏为localhost:8889/#/componentsB,表明这种方式url不会携带参数。
1.3 query传参
这种方式和params传参方式类似,在componentsA.vue页面继续添加按钮"方式三跳转到组件B":
componentsA.vue
<template>
	<div>
		<div>我是组件A</div>
		<button @click='routerToB1'>方式一跳转到组件B</button>
		<button @click='routerToB2'>方式二跳转到组件B</button>
		<button @click='routerToB3'>方式三跳转到组件B</button>
	</div>
</template>在methods中添加方法routerToB3,使用路由属性name或者path来确定匹配的路由,使用属性query 来传参:
componentsA.vue
			routerToB3(){
				this.$router.push({
					name:'componentsB',// path:'/componentsB'
					query:{
						que:'我是通过query传到组件B的参数'
					}
				})
}在componentsB.vue页面通过this.$route.query来获取参数:
componentsB.vue
			getRouterData(){
				const query = this.$route.query
				console.log(query)//{que: "我是通过query传到组件B的参数"}
}查看地址栏为localhost:8889/#/componentsB?que=我是通过query传到组件B的参数,显然这种方式url会携带参数。
1.4 小结
- 路由配置传参注意书写格式
/:id,获取参数都是通过$route而不是$router params传参和query传参区别类似于post和get方法。params传参地址栏不会显示参数,而query传参会将参数显示在地址栏中params传参刷新页面参数会丢失,另外两种不会params传参对应的路由属性是name,而query传参对应的路由属性既可以是name,也可以是path
二丶使用缓存
缓存方式即通过sessionStorage、localStorage、Cookie方式传参,这种方式和是不是用Vue无关,因此,不谈。
三丶父子组件之间传值
在components目录下创建父组件parent.vue和子组件children.vue,在父组件中引入子组件。为了演示方便,在路由配置中加入/parent路径。
3.1 父组件向子组件传值 props
在parent.vue的子组件标签上注册message1,在children.vue中通过props接收message1,如果传递的值为变量,则使用v-bind:或直接用:,参考如下:
parent.vue
<template>
	<div>
		<div>我是父组件</div>
		<children message1='我是直接参数' v-bind:message2='msg' :message3='obj'></children>
	</div>
</template>

<script>
	import Children from './children'
	export default{
		components:{
			Children
		},
		data(){
			return{
				msg:'我是父组件的参数'
			}
		},
		created(){
			this.obj = {a:'1',b:'2',c:'3'}
		}
	}
</script>

<style>
</style>
children.vue
<template>
<div>
<div>我是子组件</div>
<div>{{message1}}</div>
<div>{{message2}}</div>
<div>{{message3}}</div>
</div>
</template>
<script>
export default{
props:['message1','message2','message3'],
created(){
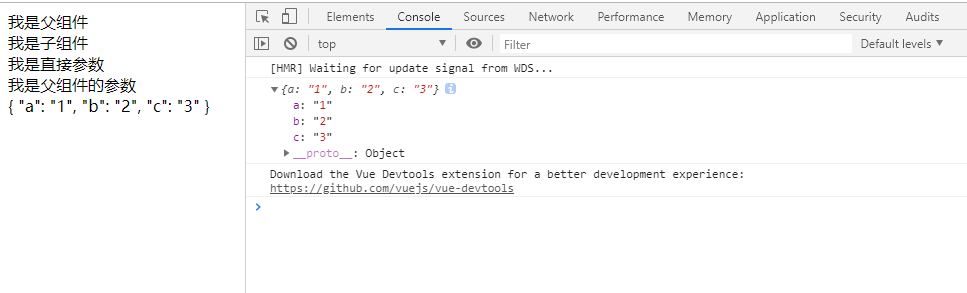
console.log(this.message3)
}
}
</script>
<style>
</style>在浏览器中打开:
3.2 子组件向父组件传值 $emit
子组件通过vm.$emit( event, […args] ),触发当前实例上的事件。附加参数都会传给监听器回调。父组件在子组件标签上监听事件获得参数。
children.vue
<template>
	<div style="margin-top: 100px;">
		<div>我是子组件</div>
		<div>{{message1}}</div>
		<div>{{message2}}</div>
		<div>{{message3}}</div>
		<button @click='ChildToParent'>点我传爱</button>
	</div>
</template>

<script>
	export default{
		props:['message1','message2','message3'],
		data(){
			return{
				loud:'I love xx'
			}
		},
		methods:{
			ChildToParent(){
				this.$emit('emitToParent',this.loud)
			}
		},
		created(){
			console.log(this.message3)
		}
	}
</script>

<style>
</style>
parent.vue
<template>
<div>
<div>我是父组件</div>
<div>大声告诉我你爱谁:{{loveWho}}</div>
<children @emitToParent='parentSayLove' message1='我是直接参数' v-bind:message2='msg' :message3='obj'></children>
</div>
</template>
<script>
import Children from './children'
export default{
components:{
Children
},
data(){
return{
msg:'我是父组件的参数',
loveWho:''
}
},
methods:{
parentSayLove(data){
this.loveWho = data
}
},
created(){
this.obj = {a:'1',b:'2',c:'3'}
}
}
</script>
<style>
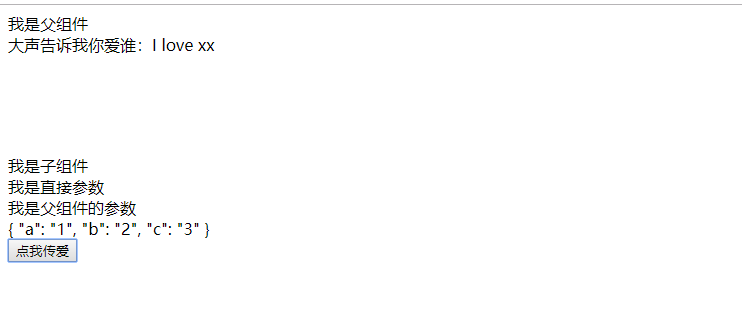
</style>点击按钮浏览器显示:
3.3 小结
props可以是字符串数组,也可以是对象(可以类型验证、设置默认值等) ;- 使用
.native修饰监听事件,开发中使用了element-ui的框架标签时候,使用事件绑定无效。这时候需要使用.native修饰v-on:event,可以在框架标签或组件的根元素 上监听一个原生事件,例如<my-component v-on:click.native="doTheThing"></my-component>。
四丶非父子(兄弟)组件之间传值
非父子组件之间传值,需要定义公共实例文件bus.js,作为中间仓库来传值,不然路由组件之间达不到传值的效果。在components目录下新建first.vue和second.vue以及公共文件bus.js。
bus.js
import Vue from 'vue'
export default new Vue()在first.vue和second.vue中分别引入bus.js。
import Bus from '../bus.js'模拟情景:first.vue向second.vue传值。在first.vue通过在事件中添加Bus.$emit( event, […args] )进行传值,在second.vue中通过Bus.$on(event,callBack)进行监听。
first.vue
<template>
	<div>
		<div>我是first.vue</div>
		<button @click="firstToSecond">点击传值给second.vue</button>
	</div>
</template>

<script>
	import Bus from '../bus.js'
	export default{
		data(){
			return{
				msg:'我是first.vue传到second.vue的参数'
			}
		},
		methods:{
			firstToSecond(){
				Bus.$emit('emitToSecond',this.msg)
			}
		}
	}
</script>

<style>
</style>
second.vue
<template>
	<div>
		<div>我是second.vue</div>
		{{info}}
	</div>
</template>

<script>
	import Bus from '../bus.js'
	export default{
		data(){
			return{
				info:''
			}
		},
		mounted(){
			const that = this;
			Bus.$on('emitToSecond',function(data){
				that.info = data
			})
		}
	}
</script>

<style>
</style>
点击按钮,浏览器中显示:

小结
兄弟组件之间与父子组件之间的数据交互,两者相比较,兄弟组件之间的通信其实和子组件向父组件传值有些类似,他们的通信原理都是相同的,例如子向父传值也是$emit和$on的形式,只是没有Bus,但若我们仔细想想,此时父组件其实就充当了Bus这个事件总线的角色。
五丶使用Vuex
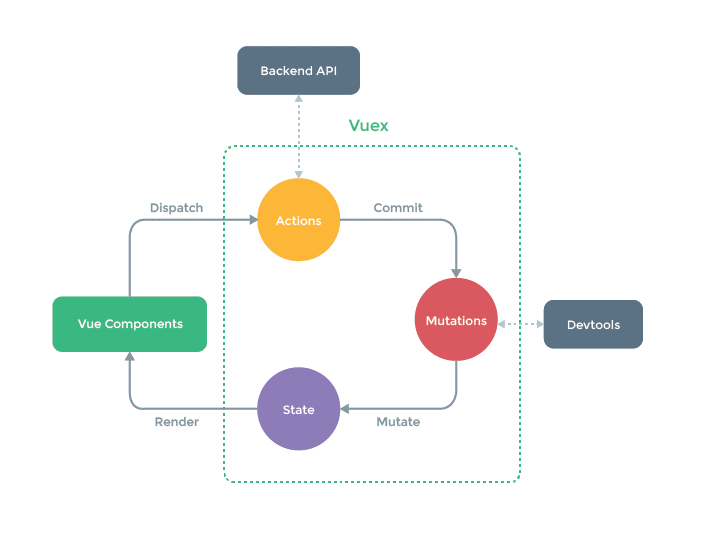
何为Vuex,看一下官网的解释:
Vuex 是一个专为 Vue.js 应用程序开发的状态管理模式。它采用集中式存储管理应用的所有组件的状态,并以相应的规则保证状态以一种可预测的方式发生变化。
什么情况下使用Vuex?
Vuex 可以帮助我们管理共享状态,并附带了更多的概念和框架。这需要对短期和长期效益进行权衡。
如果您不打算开发大型单页应用,使用 Vuex 可能是繁琐冗余的。确实是如此——如果您的应用够简单,您最好不要使用 Vuex。一个简单的 store 模式 就足够您所需了。但是,如果您需要构建一个中大型单页应用,您很可能会考虑如何更好地在组件外部管理状态,Vuex 将会成为自然而然的选择。
在components目录下新建vuexA.vue和vuexB.vue,模拟场景:vuexA.vue向vuexB.vue传值。
首先我们安装vuex,npm install vuex --save,在src目录下创建vuex目录,然后在vuex目录下新建index.js、state.js、getters.js、actions.js、mutations.js:

vuex/index.js
import Vue from 'vue'
import Vuex from 'vuex'
import state from './state.js'
import mutations from './mutations.js'
import getters from './getters.js'
import actions from './actions.js'
Vue.use(Vuex)

export default new Vuex.Store({
	state,
	getters,
	mutations,
	actions
})
在main.js中引入vuex/index.js并注入到Vue中:
main.js
import Vue from 'vue'
import App from './App.vue'
import router from './router'
import store from './vuex'
Vue.config.productionTip = false

new Vue({
	store,
	router,
  render: h => h(App),
}).$mount('#app')
state.js
export default{
	city:'nanjing'
}
vuexA.vue
<template>
        <div>
		<div>我是vuexA中city参数:{{city}}</div>
		<input type="text" :value="city" @change="change">
	</div>
</template>

<script>
	export default{
		methods:{
			change(e){
				this.$store.dispatch('setCityName',e.target.value)
			}
		},
		computed:{
			city(){
				return this.$store.getters.getCity
			}
		}
	}
</script>

<style>
</style>
vuexB.vue
<template>
	<div>
		<div>我是vuexB中的city参数:{{city}}</div>
	</div>
</template>

<script>
	export default{
		data(){
			return{

			}
		},
		computed:{
			city(){
				return this.$store.state.city
			}
		}
	}
</script>

<style>
</style>
actions.js
export default{
	setCityName({commit,state},name){
		commit('setCity',name)
	}
}
mutations.js
export default{
	setCity(state,name){
		state.city = name//设置新的值
	}
}
getter.js
export default{
	getCity(state){
		return state.city//返回目前城市名称
	}
}
在浏览器中打开:
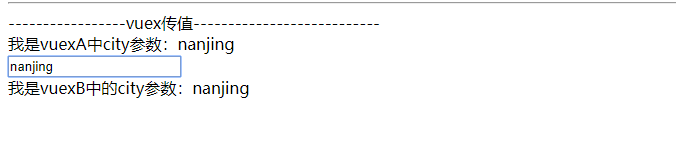
修改input中的值:
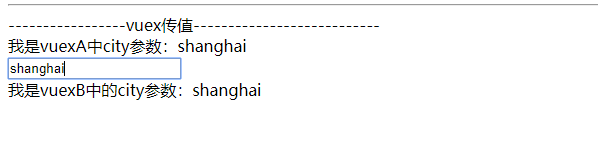
显而易见,当vuexA页面中input值改变时,可同时改变vuexB页面中的值,即将city参数从vuexA页面传到了vuexB页面,从而实现用vuex在组件中传值。
vuex更多详细功能请参考Vuex中文官方文档。
全部实例代码已上传至我的GitHub,欢迎访问Fork。
