

前后端分离那些事
问题:我们打包的dist文件夹和Index.html后,需要后端怎么配合,我们才能在线上域名成功访问?
一、将dist包和后端代码丢在一起。如tomcat。
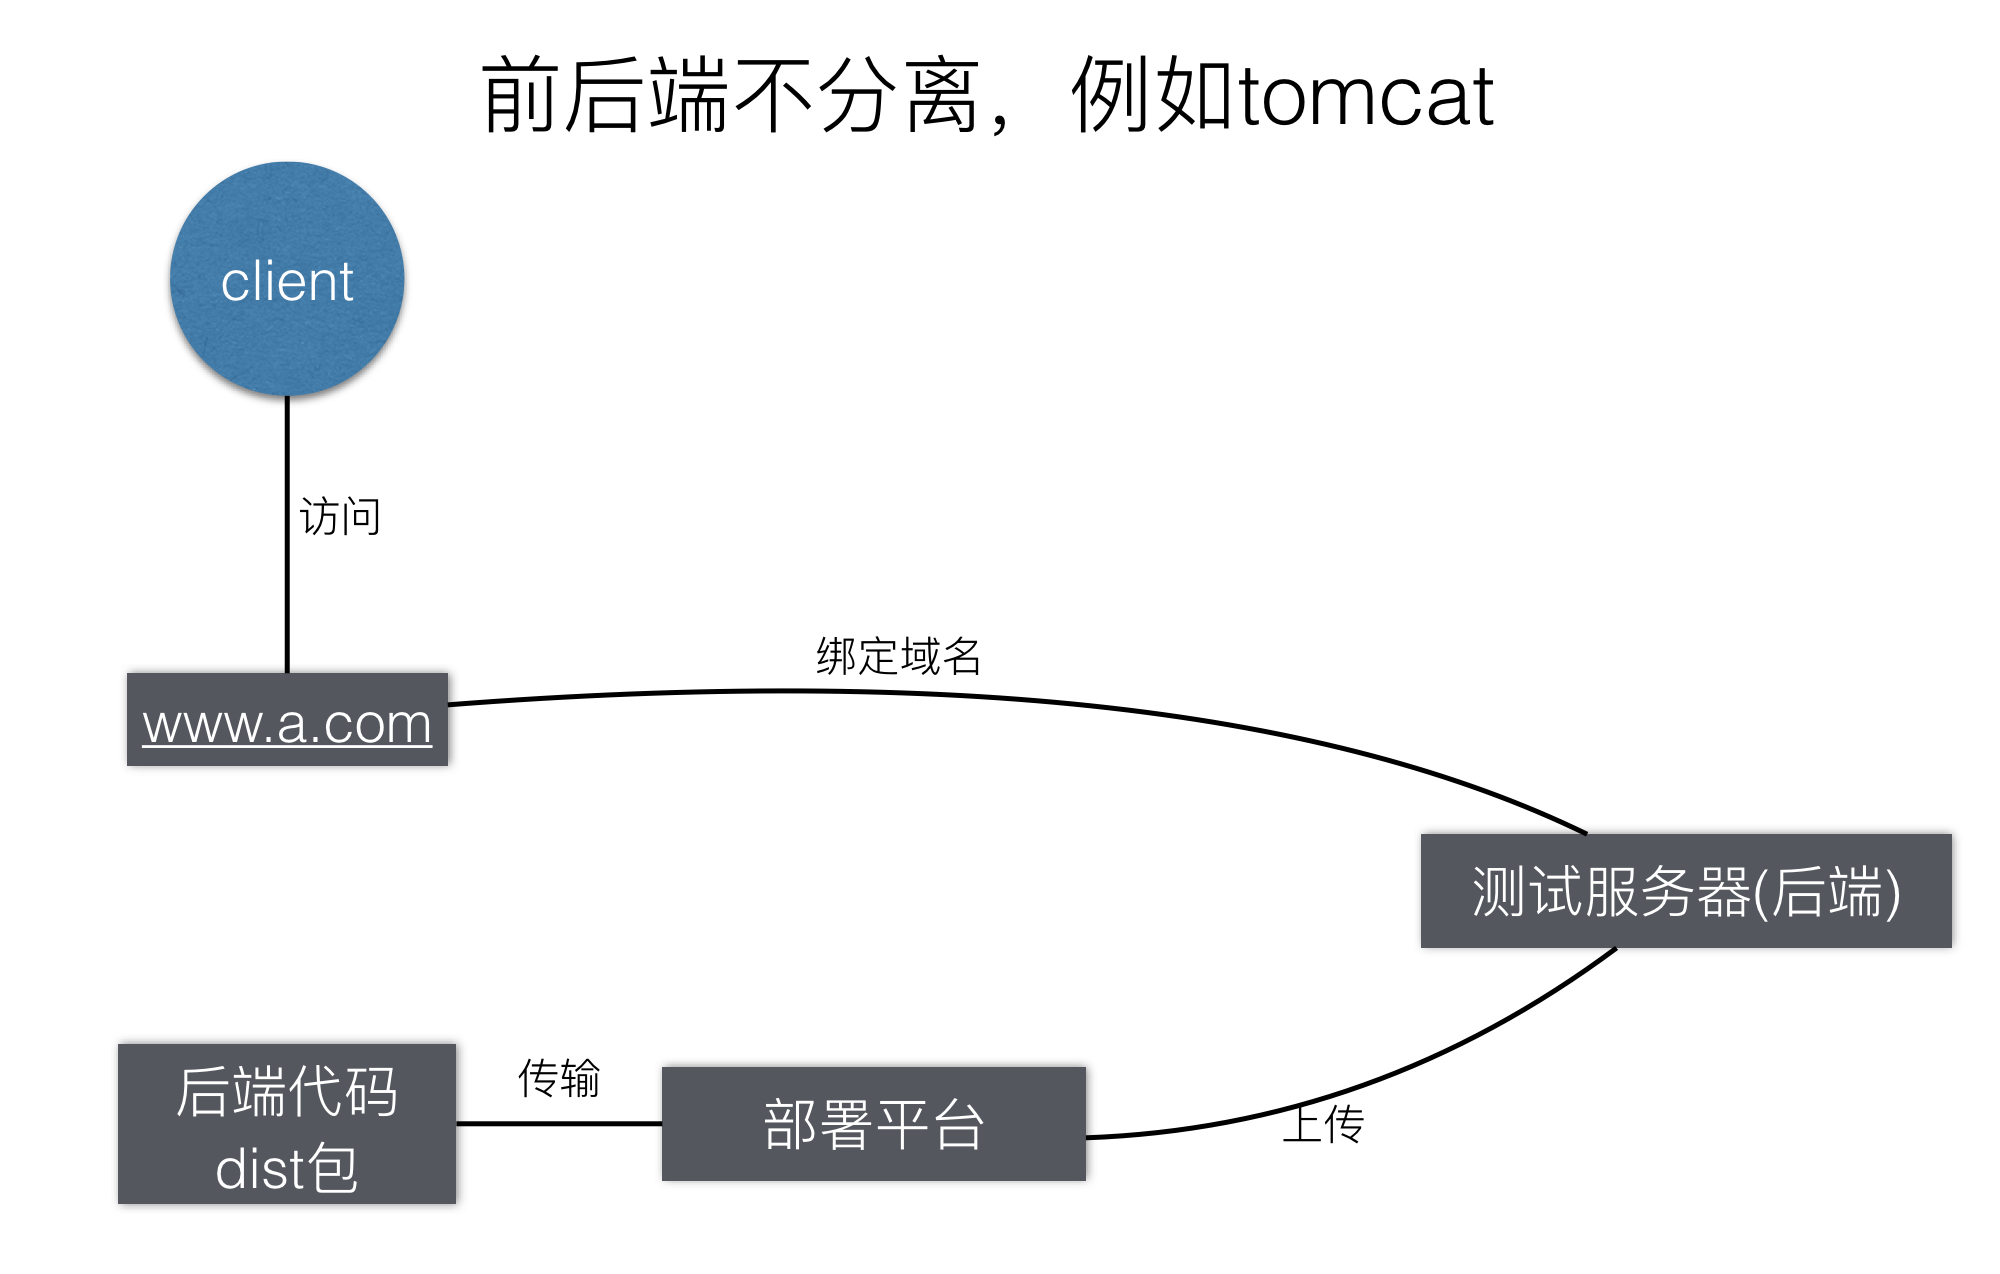
我们将dist包和后端的jar包放在一起,由后端部署到对应的服务器。
开发环境

 proxyTable: {
  '/api/': {
    target: 'http://10.180.221.199:8090/api',
    changeOrigin: true,
  }
}
Network.get('/api/user/login').then((res) => {});
相当于请求 http://10.180.221.199:8090/api
后端
if (indexof(api) !== -1) {
    to class;
} else {
    return index.html
};
测试生产环境
我们的前后端代码部署在一个服务器上面,就是直接请求https://test-project.pingan.com这样的了。
普通的,tomcat将index和dist放在src下面,后端配置路由,进行返回。后端配置路由主要有两种:
1.api(前后端约定好的字符)作为前缀,当判断到前端的请求是api开头,则表示用于接口的请求,后端跳转到对应的class做各种逻辑处理。
2.除了api外,所有的请求,我们在前端router中设置的路由(/、/home、/login等)我们只需要后端返回index.html,index.html会根据需要去引入对应的js css文件等,之后我们在页面路由的点击的页面跳转,自然走的是前端配置的router。
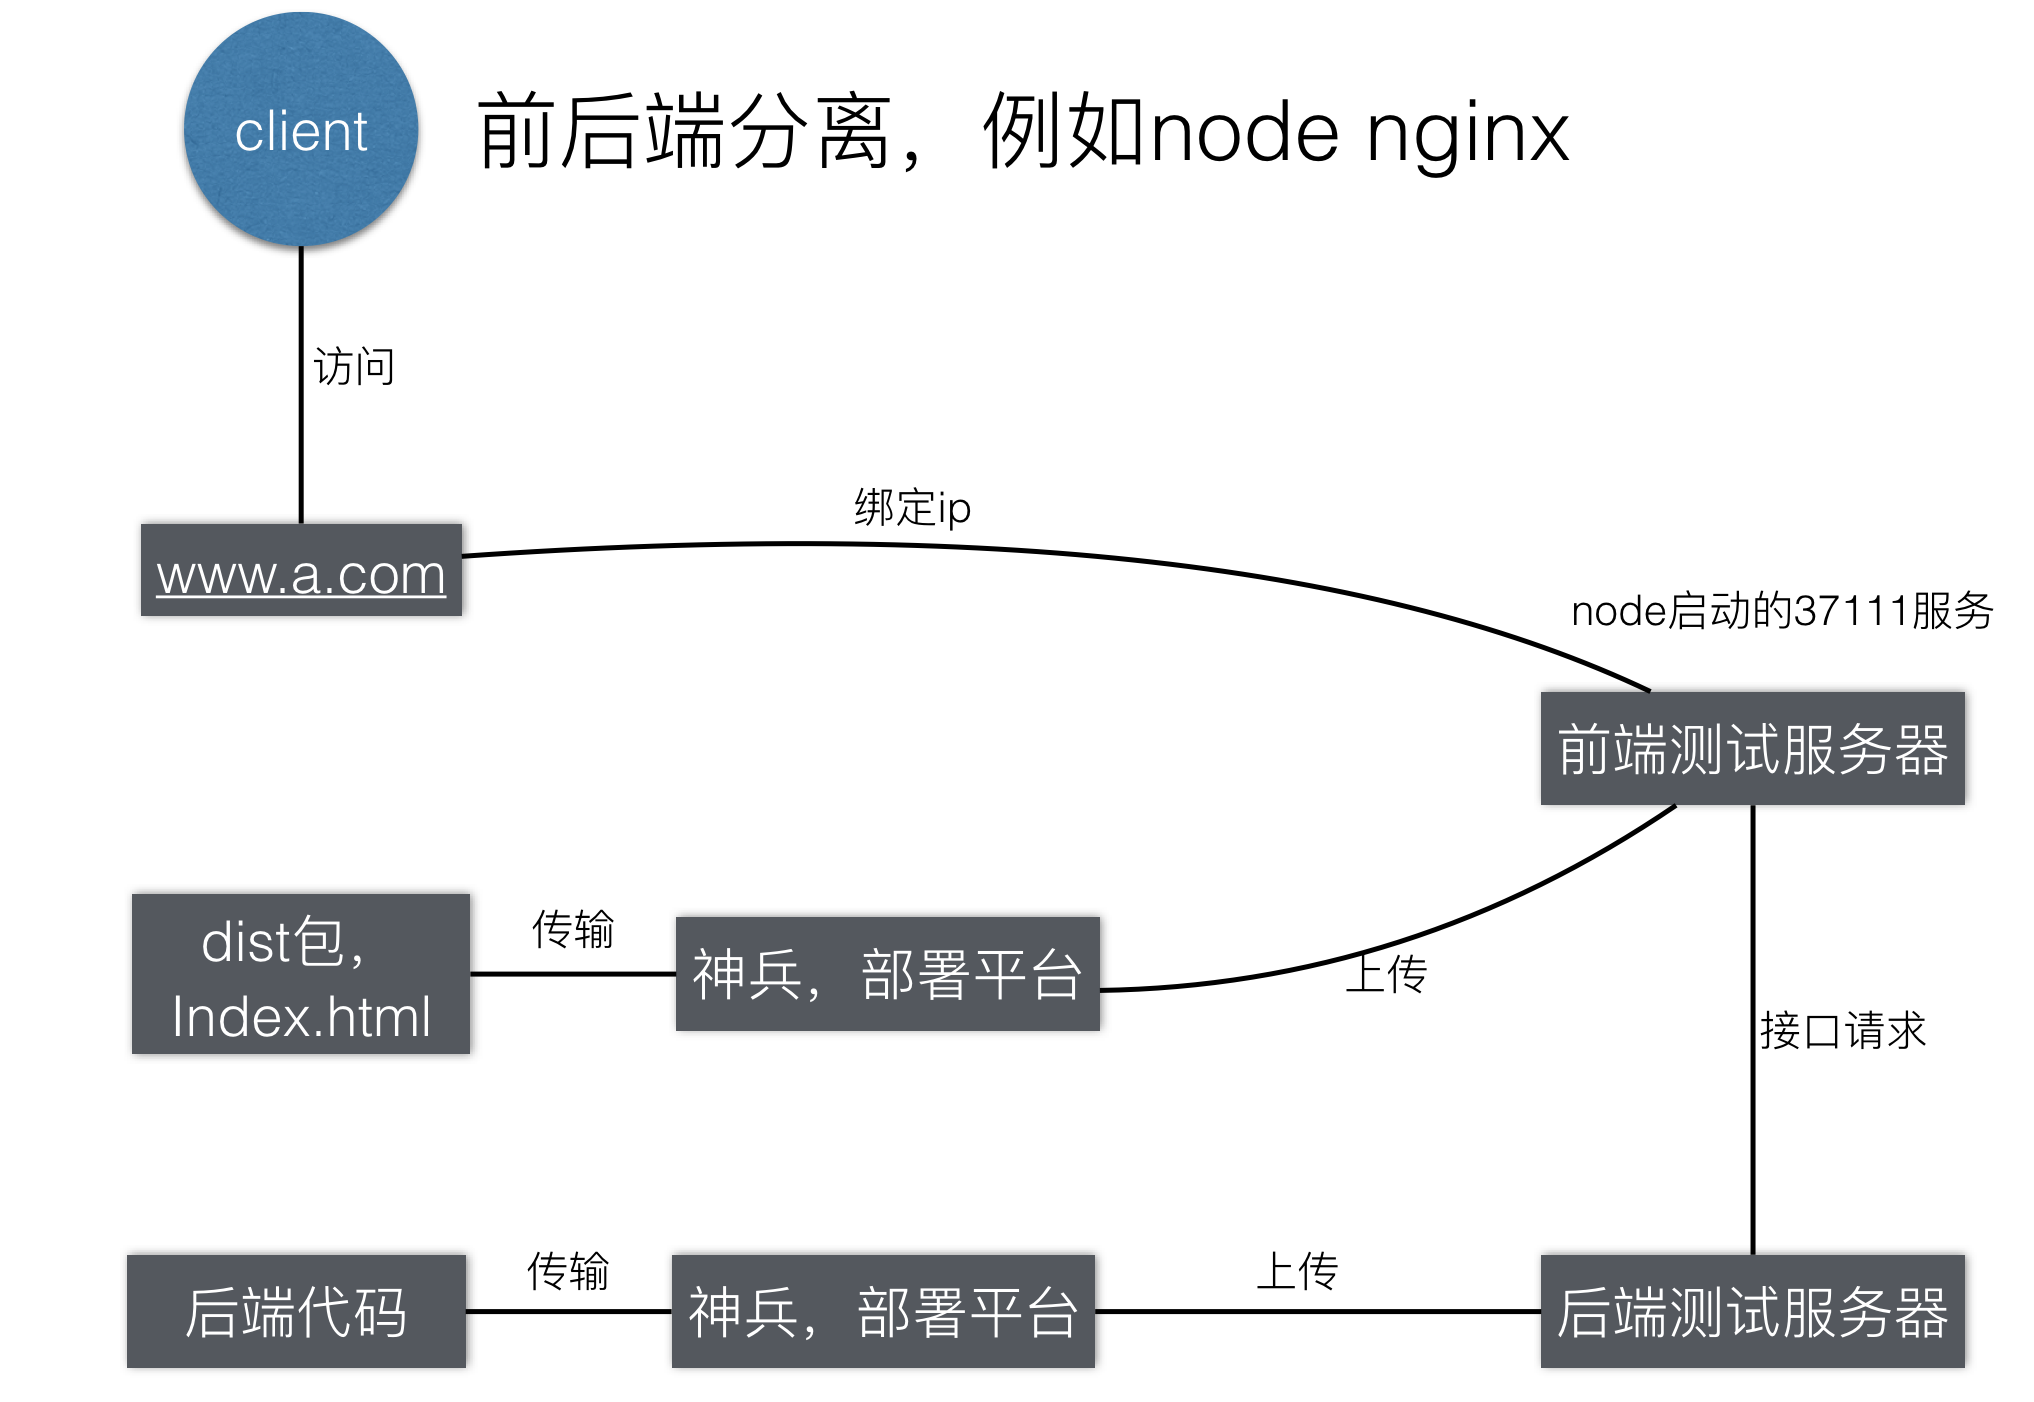
二、前后端完全分离,我们将dist放在node或者nginx启动一个服务器上.
NetWork:
import axios from 'axios';
const env = {
  development: 'http://0.0.0.0:37111', // 本地开发环境
  test: '', // 测试环境
  production: '', // 生产环境
};
const instance = axios.create({
  baseURL: env[process.env.NODE_ENV],
  timeout: 10000,
});
...
Network.get('/api/user/login').then((res) => {});
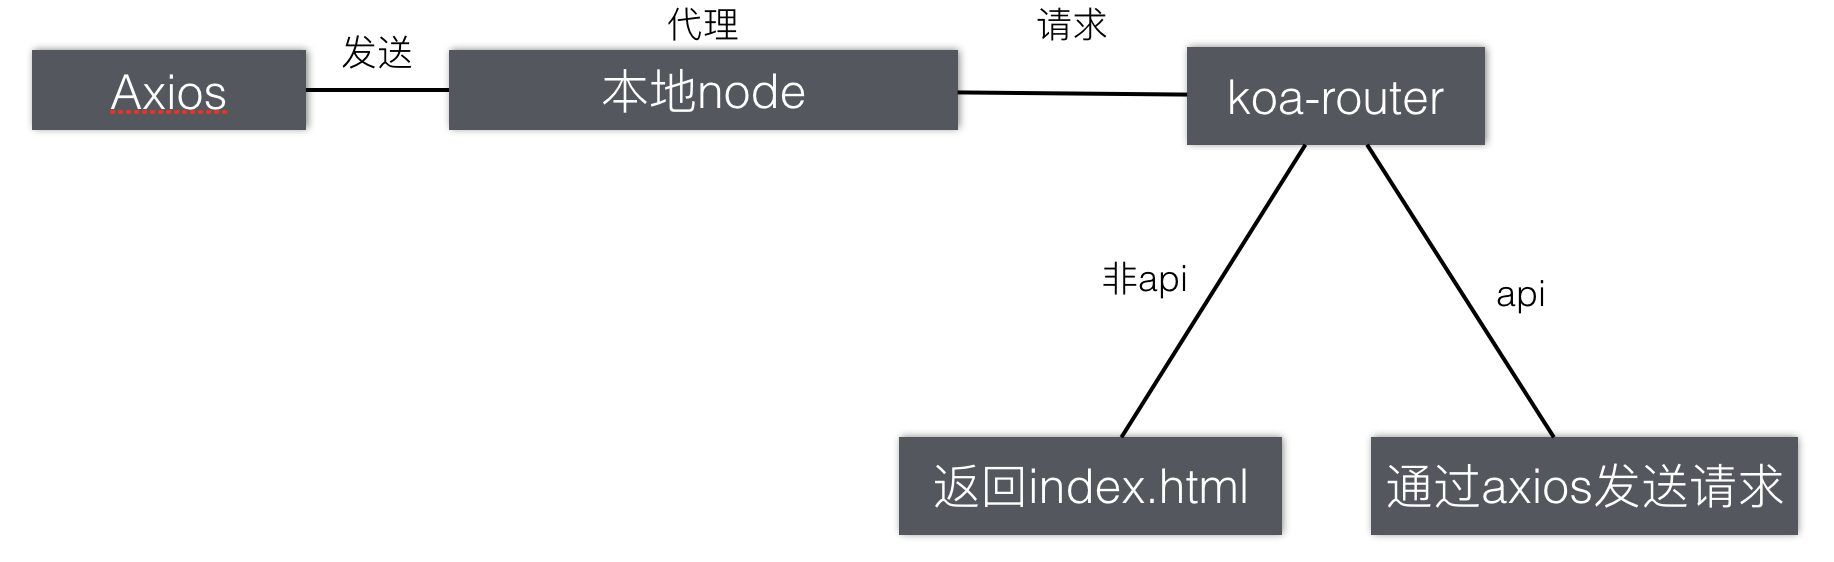
node
...
const renderIndex = (pageName) => {
  return async (ctx) => {
    await ctx.render(`./dist/${pageName}.html`);
  };
};
router
  .get('/', renderIndex('index'))
  .get('/home', renderIndex('index'))
  .get('/login', renderIndex('index')); // 如果不是api就返回index页面

router.use('/api', checkLogin, apiRouter.routes()); //api就进行接口的请求
...
比较
两者的优缺点显而易见,用tomcat如果有新的dist包,每次都需要后端进行项目的重启,加大了合作成本。所以前后端完全分离的方式是更理想的,可以做到互不影响,自然效率更高。
- 前后端完全分离,相互独立,减少合作成本
- 可以在Node上,配置错误日志,修改后端接口返回的数据格式,catch error,请求参数校验等
简言之,其实node和nginx最简单的一个目的就是为了将index.html返回。node可以做的事情,nginx也可以做。
nginx进行配置
申请了一个云服务器,CentOS7,我们用root用户进行登录(当然,也可以下载一个secureFX可视化操作。)
ssh root@12.34.12.43
yum list | grep nginx // 查看yum源
vim /etc/yum.repos.d/nginx.repo // 修改源配置文件
官网上提供了安装nginx的方法
sudo yum install yum-utils
[nginx-stable]
name=nginx stable repo
baseurl=http://nginx.org/packages/centos/$releasever/$basearch/
gpgcheck=1
enabled=0
gpgkey=https://nginx.org/keys/nginx_signing.key
sudo yum install nginx
利用nginx -v测试是否安装成功。切换到nginx文件夹下面
cd /etc/nginx
cd /usr/share/nginx/html
有两个我们必须知道的文件conf.d(文件夹,里面配置各种虚拟主机)和nginx.conf(nginx的基本配置 )
nginx.conf 文件是Nginx总配置文件,在我们搭建服务器时经常调整的文件。
#运行用户,默认即是nginx,可以不进行设置
user  nginx;
#Nginx进程,一般设置为和CPU核数一样
worker_processes  1;
#错误日志存放目录
error_log  /var/log/nginx/error.log warn;
#进程pid存放位置
pid        /var/run/nginx.pid;
events {
    worker_connections  1024; # 单个后台进程的最大并发数
}
http {
    include       /etc/nginx/mime.types;   #文件扩展名与类型映射表
    default_type  application/octet-stream;  #默认文件类型
    #设置日志模式
    log_format  main  '$remote_addr - $remote_user [$time_local] "$request" '
                      '$status $body_bytes_sent "$http_referer" '
                      '"$http_user_agent" "$http_x_forwarded_for"';
    access_log  /var/log/nginx/access.log  main;   #nginx访问日志存放位置
    sendfile        on;   #开启高效传输模式
    #tcp_nopush     on;    #减少网络报文段的数量
    keepalive_timeout  65;  #保持连接的时间,也叫超时时间
    #gzip  on;  #开启gzip压缩
    include /etc/nginx/conf.d/*.conf; #包含的子配置项位置和文件
进入conf.d目录,然后使用vim default.conf进行查看。
server {
    listen       80;   #配置监听端口
    server_name  localhost;  //配置域名
    #charset koi8-r;
    #access_log  /var/log/nginx/host.access.log  main;
    location / {
        root   /usr/share/nginx/html;     #服务默认启动目录
        index  index.html index.htm;    #默认访问文件
    }
    #error_page  404              /404.html;   # 配置404页面
    # redirect server error pages to the static page /50x.html
    #
    error_page   500 502 503 504  /50x.html;   #错误状态码的显示页面,配置后需要重启
    location = /50x.html {
        root   /usr/share/nginx/html;
    }
    # proxy the PHP scripts to Apache listening on 127.0.0.1:80
    #
    #location ~ \.php$ {
    #    proxy_pass   http://127.0.0.1;
    #}
    # pass the PHP scripts to FastCGI server listening on 127.0.0.1:9000
    #
    #location ~ \.php$ {
    #    root           html;
    #    fastcgi_pass   127.0.0.1:9000;
    #    fastcgi_index  index.php;
    #    fastcgi_param  SCRIPT_FILENAME  /scripts$fastcgi_script_name;
    #    include        fastcgi_params;
    #}
    # deny access to .htaccess files, if Apache's document root
    # concurs with nginx's one
    #
    #location ~ /\.ht {
    #    deny  all;
    #}
}
一些实用的命令组合
nginx // 启动nginx
systemctl start nginx.service
ps aux | grep nginx // 查看nginx启动情况
nginx -s stop // 停止nginx
nginx -s quit
killall
systemctl stop nginx.service
nginx -s reload // 重新载入配置文件
netstat -tlnp // 查看端口占用情况
配置errorpage
error_page 404 http://www.baidu.com;
简单配置禁止访问
location / {
    deny   32.21.22.123;
    allow  10.25.32.112;
}
注意有个坑,现在是所有的都不能访问
location / {
    deny   all;
    allow  45.76.202.231;
}
要学会使用正则进行配置,例如以php结尾的就不能访问了。
location ~\.php$ {
    deny all;
}
虚拟主机
虚拟主机是一台物理主机服务器划分的多个磁盘空间,可以理解就是一台独立的服务器。
我们配置一个新的port虚拟主机
server{
        listen 8001;
        server_name localhost;
        root /usr/share/nginx/html/html8001;
        index index.html;
}
这里的server_name可以配置成ip和域名等。
反向代理
理解一下正向代理,vpn就是一个例子,我们想访问国外某网站,需要通过代理服务器去请求。
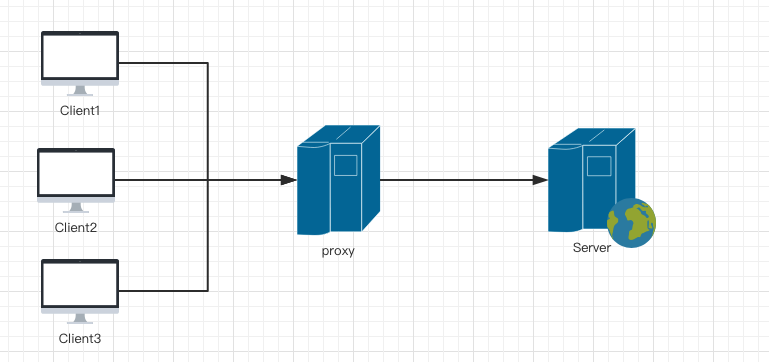
反向代理其实就是真实服务器不能直接被外部网络访问到,需要一台代理服务器,代理服务器和真实服务器是在一个网络中的,
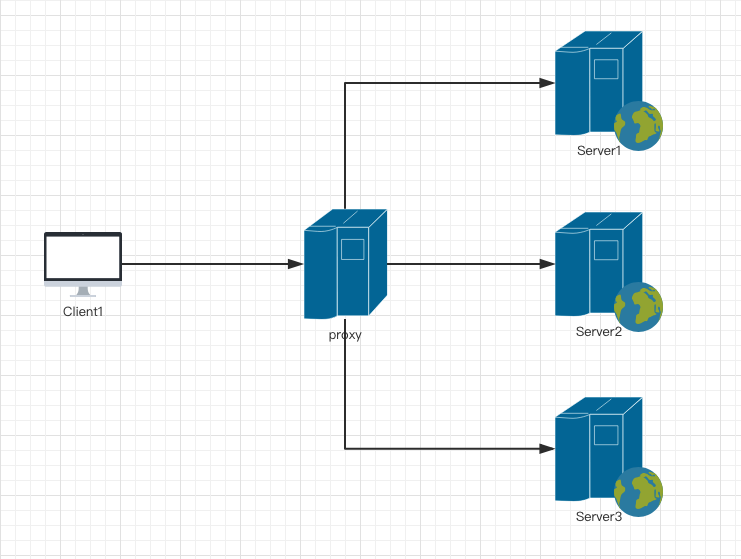
反向代理跟代理正好相反(需要说明的是,现在基本所有的大型网站的页面都是用了反向代理),客户端发送的请求,想要访问server服务器上的内容。发送的内容被发送到代理服务器上,这个代理服务器再把请求发送到自己设置好的内部服务器上,而用户真实想获得的内容就在这些设置好的服务器上
反向代理的用途和好处
安全性:正向代理的客户端能够在隐藏自身信息的同时访问任意网站,这个给网络安全代理了极大的威胁。因此,我们必须把服务器保护起来,使用反向代理客户端用户只能通过外来网来访问代理服务器,并且用户并不知道自己访问的真实服务器是那一台,可以很好的提供安全保护。
功能性:反向代理的主要用途是为多个服务器提供负债均衡、缓存等功能。负载均衡就是一个网站的内容被部署在若干服务器上,可以把这些机子看成一个集群,那Nginx可以将接收到的客户端请求“均匀地”分配到这个集群中所有的服务器上,从而实现服务器压力的平均分配,也叫负载均衡。
我们需要通过访问a.com,反向代理到b.com,等同于访问a.com其实是访问到了b.com
server{
        listen 8001;
        server_name a.com;
        location / {
               proxy_pass http://b.com;
        }
}
pc和移动端的适配 $http_user_agent
server{
     listen 80;
     server_name nginx2.jspang.com;
     location / {
      root /usr/share/nginx/pc;
      if ($http_user_agent ~* '(Android|webOS|iPhone|iPod|BlackBerry)') {
         root /usr/share/nginx/mobile;
      }
      index index.html;
     }
}
负载均衡
负载均衡:就是分摊到多个操作单元上执行。如果某个服务器down了,就会自动从服务器中移除
upstream test {
  server localhost:8080;
  server localhost:8081;
}
server {
  listen       81;
  server_name  localhost;
  client_max_body_size 1024M;

  location / {
    proxy_pass http://test;
    proxy_set_header Host $host:$server_port;
  }
}
权重
适用于服务器性能不同的服务器
upstream test {
    server localhost:8080 weight=9;
    server localhost:8081 weight=1;
}
ip_hash
存在一个问题,比如说我们Login的session,如果访问了一个机器,但是连接另外一个机器是没有的,那就要重新登录了,可以用id_hash保持一直连接一个机器
upstream test {
  ip_hash;
  server localhost:8080;
  server localhost:8081;
}
fair(第三方)
按后端服务器的响应时间来分配请求,响应时间短的优先分配。
upstream backend {
  fair;
  server localhost:8080;
  server localhost:8081;
}
url_hash(第三方)
按访问url的hash结果来分配请求,使每个url定向到同一个后端服务器,后端服务器为缓存时比较有效。 在upstream中加入hash语句,server语句中不能写入weight等其他的参数,hash_method是使用的hash算法
upstream backend {
  hash $request_uri;
  hash_method crc32;
  server localhost:8080;
  server localhost:8081;
}
gzip压缩
gzip有一个原理,浏览器先告诉服务器是否支持gzip,如果支持,服务器就是以gzip进行压缩。一般可以压缩至原来的30%
http {
   .....
    gzip on;
    gzip_types text/plain application/javascript text/css;
   .....
}
