

一、前言
在上一个章节主要描述了如何实现对GIF图片的支持,这样图片的加载功能就大致完成了。但目前框架只是进行了一些简单的封装,还有很多功能尚未完成。我们在第一节中,使用了
NSCache来作为内存缓存和NSFileManager来简单地封装为磁盘缓存,现在我们将对缓存进行重构。
二、内存缓存
iOS系统本身就提供了
NSCache来作为内存缓存,它是线程安全的,且能保证在内存紧张的情况下,会自动回收一部分内存。因此,我们就不必再造轮子来实现一个内存缓存了。为了提高框架的灵活性,我们可以提供一个接口来支持外部的扩展。
@interface JImageManager : NSObject
+ (instancetype)shareManager;
- (void)setMemoryCache:(NSCache *)memoryCache;
@end
三、磁盘缓存
磁盘缓存简单来说就是对文件增删查改等操作,再复杂点就是能够控制文件保存的时间,以及文件的总大小。
1. 针对缓存中可配置的属性,我们独立开来作为一个配置类
@interface JImageCacheConfig : NSObject
@property (nonatomic, assign) BOOL shouldCacheImagesInMemory; //是否使用内存缓存
@property (nonatomic, assign) BOOL shouldCacheImagesInDisk; //是否使用磁盘缓存
@property (nonatomic, assign) NSInteger maxCacheAge; //文件最大缓存时间
@property (nonatomic, assign) NSInteger maxCacheSize; //文件缓存最大限制
@end

static const NSInteger kDefaultMaxCacheAge = 60 * 60 * 24 * 7;
@implementation JImageCacheConfig
- (instancetype)init {
    if (self = [super init]) {
        self.shouldCacheImagesInDisk = YES;
        self.shouldCacheImagesInMemory = YES;
        self.maxCacheAge = kDefaultMaxCacheAge;
        self.maxCacheSize = NSIntegerMax;
    }
    return self;
}
2. 对于文件增删查改操作,我们先定义一个磁盘缓存相关的协议
#import <Foundation/Foundation.h>
NS_ASSUME_NONNULL_BEGIN
@protocol JDiskCacheDelegate <NSObject>
- (void)storeImageData:(nullable NSData *)imageData
                forKey:(nullable NSString *)key;
- (nullable NSData *)queryImageDataForKey:(nullable NSString *)key;
- (BOOL)removeImageDataForKey:(nullable NSString *)key;
- (BOOL)containImageDataForKey:(nullable NSString *)key;
- (void)clearDiskCache;

@optional
- (void)deleteOldFiles; //后台更新文件
@end
NS_ASSUME_NONNULL_END
关于磁盘的增删查改操作这里就不一一复述了,这里主要讲解如何实现maxCacheAge和maxCacheSize属性
3.maxCacheAge和maxCacheSize属性
这两个属性是针对文件的保存时间和总文件大小的限制,为什么需要这种限制呢?首先我们来看
maxCacheSize属性,这个很好理解,我们不可能不断地扩大磁盘缓存,否则会导致APP占用大量手机空间,对用户的体验很不好。而maxCacheAge属性,可以这么想,假如一个缓存的文件很久没有被访问或修改过,那么大概率它之后也不会被访问。因此,我们也没有必要去保留它。
maxCacheAge属性
实现该属性的大致流程:根据设置的存活时间计算出文件可保留的最早时间->遍历文件,进行时间比对->若文件被访问的时间早于最早时间,那么删除对应的文件
NSURL *diskCacheURL = [NSURL fileURLWithPath:self.diskPath isDirectory:YES];
//计算出文件可保留的最早时间
NSDate *expirationDate = [NSDate dateWithTimeIntervalSinceNow:-self.maxCacheAge];
NSArray<NSString *> *resourceKeys = @[NSURLIsDirectoryKey, NSURLContentAccessDateKey];
//获取到所有的文件以及文件属性
NSDirectoryEnumerator *fileEnumerator = [self.fileManager enumeratorAtURL:diskCacheURL includingPropertiesForKeys:resourceKeys options:NSDirectoryEnumerationSkipsHiddenFiles errorHandler:NULL];
NSMutableArray <NSURL *> *deleteURLs = [NSMutableArray array];
for (NSURL *fileURL in fileEnumerator) {
    NSError *error;
    NSDictionary<NSString *, id> *resourceValues = [fileURL resourceValuesForKeys:resourceKeys error:&error];
    if (error || !resourceValues || [resourceValues[NSURLIsDirectoryKey] boolValue]) { //错误或不存在文件属性或为文件夹的情况忽略
        continue;
    }
    NSDate *accessDate = resourceValues[NSURLContentAccessDateKey]; //获取到文件最近被访问的时间
    if ([accessDate earlierDate:expirationDate]) { //若早于可保留的最早时间,则加入删除列表中
        [deleteURLs addObject:fileURL];
    }
}

for (NSURL *URL in deleteURLs) {
    NSLog(@"delete old file: %@", URL.absoluteString);
    [self.fileManager removeItemAtURL:URL error:nil]; //删除过时的文件
}
maxCacheSize属性
实现该属性的流程:遍历文件计算文件总大小->若文件总大小超过限制的大小,则对文件按被访问的时间顺序进行排序->逐一删除文件,直到小于总限制的一半为止。
NSMutableDictionary<NSURL *, NSDictionary<NSString *, id>*> *cacheFiles = [NSMutableDictionary dictionary];
NSInteger currentCacheSize = 0;
for (NSURL *fileURL in fileEnumerator) {
    NSError *error;
    NSDictionary<NSString *, id> *resourceValues = [fileURL resourceValuesForKeys:resourceKeys error:&error];
    if (error || !resourceValues || [resourceValues[NSURLIsDirectoryKey] boolValue]) {
        continue;
    }
    //获取文件的大小,并保存文件相关属性
    NSNumber *fileSize = resourceValues[NSURLTotalFileAllocatedSizeKey];
    currentCacheSize += fileSize.unsignedIntegerValue;
    [cacheFiles setObject:resourceValues forKey:fileURL];
}

if (self.maxCacheSize > 0 && currentCacheSize > self.maxCacheSize) { //超过总限制大小
    NSUInteger desiredCacheSize = self.maxCacheSize / 2;
    NSArray<NSURL *> *sortedFiles = [cacheFiles keysSortedByValueWithOptions:NSSortConcurrent usingComparator:^NSComparisonResult(id  _Nonnull obj1, id  _Nonnull obj2) {
        return [obj1[NSURLContentAccessDateKey] compare:obj2[NSURLContentAccessDateKey]];
    }]; //对文件按照被访问时间的顺序来排序
    for (NSURL *fileURL in sortedFiles) {
        if ([self.fileManager removeItemAtURL:fileURL error:nil]) {
            NSDictionary<NSString *, id> *resourceValues = cacheFiles[fileURL];
            NSNumber *fileSize = resourceValues[NSURLTotalFileAllocatedSizeKey];
            currentCacheSize -= fileSize.unsignedIntegerValue;

            if (currentCacheSize < desiredCacheSize) { //达到总限制大小的一半即可停止删除
                break;
            }
        }
    }
}
为什么是删除文件直到总限制大小的一半才停止删除?由于访问和删除文件是需要消耗一定性能的,若只是达到总限制大小就停止,那么一旦再存入一小部分文件,就很快达到限制,就必须再执行该操作了。
如上,我们可以看到maxCacheAge和maxCacheSize属性的实现中有很多相同的步骤,比如获取文件属性。为了避免重复操作,我们可以将两者合并起来实现。
- (void)deleteOldFiles {
    NSLog(@"start clean up old files");
    NSURL *diskCacheURL = [NSURL fileURLWithPath:self.diskPath isDirectory:YES];
    NSArray<NSString *> *resourceKeys = @[NSURLIsDirectoryKey, NSURLContentAccessDateKey, NSURLTotalFileAllocatedSizeKey];
    NSDirectoryEnumerator *fileEnumerator = [self.fileManager enumeratorAtURL:diskCacheURL includingPropertiesForKeys:resourceKeys options:NSDirectoryEnumerationSkipsHiddenFiles errorHandler:NULL];
    NSDate *expirationDate = [NSDate dateWithTimeIntervalSinceNow:-self.maxCacheAge];
    NSMutableArray <NSURL *> *deleteURLs = [NSMutableArray array];
    NSMutableDictionary<NSURL *, NSDictionary<NSString *, id>*> *cacheFiles = [NSMutableDictionary dictionary];
    NSInteger currentCacheSize = 0;
    for (NSURL *fileURL in fileEnumerator) {
        NSError *error;
        NSDictionary<NSString *, id> *resourceValues = [fileURL resourceValuesForKeys:resourceKeys error:&error];
        if (error || !resourceValues || [resourceValues[NSURLIsDirectoryKey] boolValue]) {
            continue;
        }
        NSDate *accessDate = resourceValues[NSURLContentAccessDateKey];
        if ([accessDate earlierDate:expirationDate]) {
            [deleteURLs addObject:fileURL];
            continue;
        }

        NSNumber *fileSize = resourceValues[NSURLTotalFileAllocatedSizeKey];
        currentCacheSize += fileSize.unsignedIntegerValue;
        [cacheFiles setObject:resourceValues forKey:fileURL];
    }
    //删除过时文件
    for (NSURL *URL in deleteURLs) {
        NSLog(@"delete old file: %@", URL.absoluteString);
        [self.fileManager removeItemAtURL:URL error:nil];
    }
    //删除过时文件之后,若还是超过文件总大小限制,则继续删除
    if (self.maxCacheSize > 0 && currentCacheSize > self.maxCacheSize) {
        NSUInteger desiredCacheSize = self.maxCacheSize / 2;
        NSArray<NSURL *> *sortedFiles = [cacheFiles keysSortedByValueWithOptions:NSSortConcurrent usingComparator:^NSComparisonResult(id  _Nonnull obj1, id  _Nonnull obj2) {
            return [obj1[NSURLContentAccessDateKey] compare:obj2[NSURLContentAccessDateKey]];
        }];
        for (NSURL *fileURL in sortedFiles) {
            if ([self.fileManager removeItemAtURL:fileURL error:nil]) {
                NSDictionary<NSString *, id> *resourceValues = cacheFiles[fileURL];
                NSNumber *fileSize = resourceValues[NSURLTotalFileAllocatedSizeKey];
                currentCacheSize -= fileSize.unsignedIntegerValue;
                if (currentCacheSize < desiredCacheSize) {
                    break;
                }
            }
        }
    }
}
- 何时触发
deleteOldFiles函数,以保证磁盘缓存中的maxCacheAge和maxCacheSize
因为我们并不知道何时磁盘总大小会超过限制或缓存的文件过时,假如使用
NSTimer周期性去检查,会导致不必要的性能消耗,也不好确定轮询的时间。为了避免这些问题,我们可以考虑在应用进入后台时,启动后台任务去完成检查和清理工作。
[[NSNotificationCenter defaultCenter] addObserver:self selector:@selector(onDidEnterBackground:) name:UIApplicationDidEnterBackgroundNotification object:nil];

- (void)onDidEnterBackground:(NSNotification *)notification {
    [self backgroundDeleteOldFiles];
}

- (void)backgroundDeleteOldFiles {
    Class UIApplicationClass = NSClassFromString(@"UIApplication");
    if(!UIApplicationClass || ![UIApplicationClass respondsToSelector:@selector(sharedApplication)]) {
        return;
    }
    UIApplication *application = [UIApplication performSelector:@selector(sharedApplication)];
    __block UIBackgroundTaskIdentifier bgTask = [application beginBackgroundTaskWithExpirationHandler:^{
        [application endBackgroundTask:bgTask];
        bgTask = UIBackgroundTaskInvalid;
    }];
    //交给后台去完成
    void(^deleteBlock)(void) = ^ {
        if ([self.diskCache respondsToSelector:@selector(deleteOldFiles)]) {
            [self.diskCache deleteOldFiles];
        }
        dispatch_async(dispatch_get_main_queue(), ^{
            [application endBackgroundTask:bgTask];
            bgTask = UIBackgroundTaskInvalid;
        });
    };
    dispatch_async(self.ioQueue, deleteBlock);
}
四、缓存架构
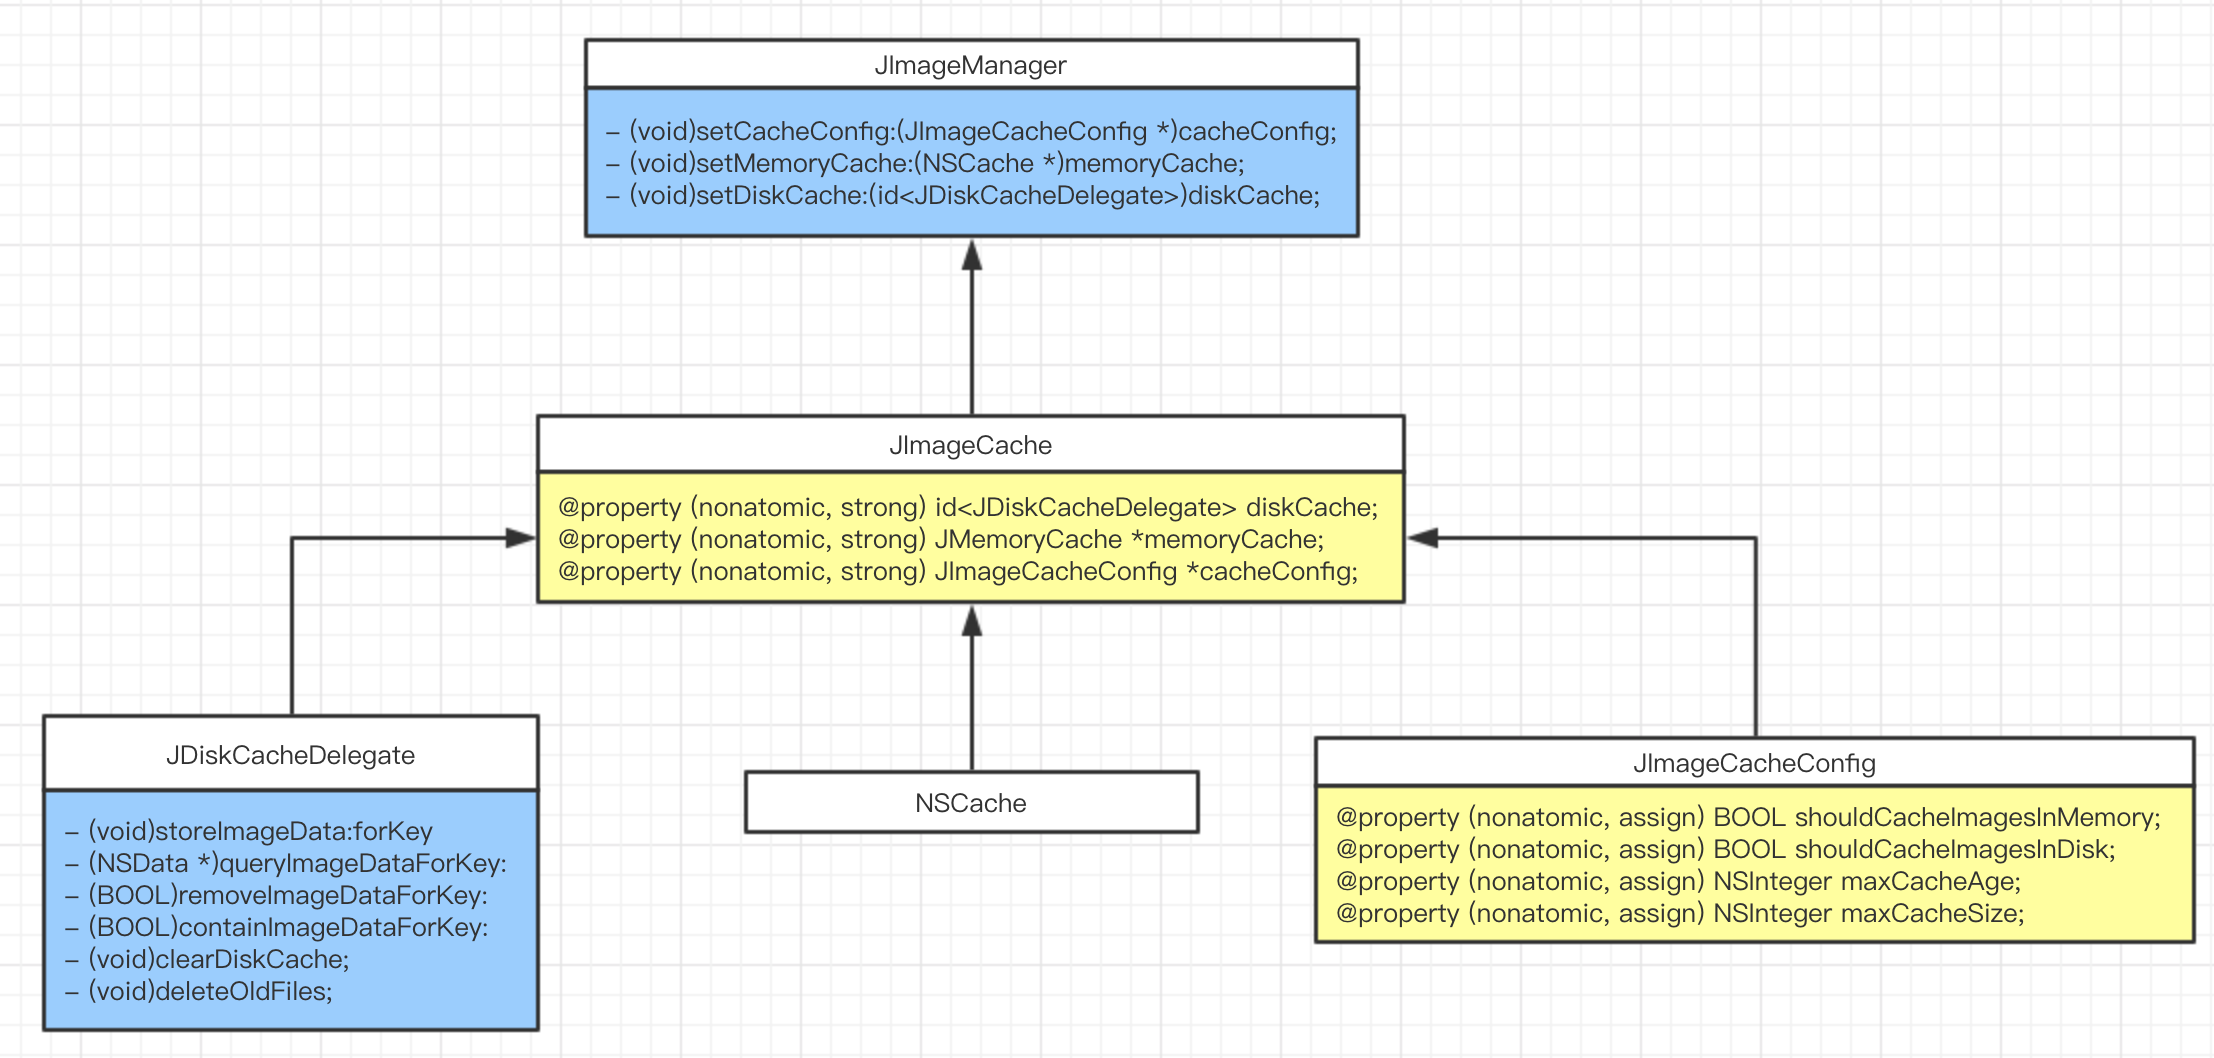
JImageManager作为管理类,暴露相关设置接口,可以用于外部自定义缓存相关内容;JImageCache为缓存管理类,实际上为中介者,统一管理缓存配置、内存缓存和磁盘缓存等,并将相关操作交给NSCache和JDiskCache来完成。
这里以存储图片为例:
- (void)storeImage:(UIImage *)image imageData:(NSData *)imageData forKey:(NSString *)key completion:(void (^)(void))completionBlock {
    if (!key || key.length == 0 || (!image && !imageData)) {
        SAFE_CALL_BLOCK(completionBlock);
        return;
    }
    void(^storeBlock)(void) = ^ {
        if (self.cacheConfig.shouldCacheImagesInMemory) {
            if (image) {
                [self.memoryCache setObject:image forKey:key cost:image.memoryCost];
            } else if (imageData) {
                UIImage *decodedImage = [[JImageCoder shareCoder] decodeImageWithData:imageData];
                [self.memoryCache setObject:decodedImage forKey:key cost:decodedImage.memoryCost];
            }
        }
        if (self.cacheConfig.shouldCacheImagesInDisk) {
            if (imageData) {
                [self.diskCache storeImageData:imageData forKey:key];
            } else if (image) {
                NSData *data = [[JImageCoder shareCoder] encodedDataWithImage:image];
                if (data) {
                    [self.diskCache storeImageData:data forKey:key];
                }
            }
        }
        SAFE_CALL_BLOCK(completionBlock);
    };
    dispatch_async(self.ioQueue, storeBlock);
}
这里定义了一个关于block的宏,为了避免参数传递的block为nil,需要在使用前对block进行判断是否为nil
#define SAFE_CALL_BLOCK(blockFunc, ...)    \
    if (blockFunc) {                        \
        blockFunc(__VA_ARGS__);              \
    }
在第二章节中讲解了NSData转换为image的实现,考虑到一种情况,若参数中的imageData为空,但image中包含数据,那么我们也应该将image存储下来。若要将数据存储到磁盘中,这就需要我们将image转换为NSData了。
五、image转换为NSData
对于PNG或JPEG格式的图片,处理起来比较简单,我们可以分别调用
UIImagePNGRepresentation和UIImageJPEGRepresentation即可转换为NSData。
- 图片角度的处理
由于拍摄角度和拍摄设备的不同,如果不对图片进行角度处理,那么很有可能出现图片倒过来或侧过来的情况。为了避免这一情况,那么我们在对图片存储时需要将图片“摆正”,然后再存储。具体相关可以看这里
- (UIImage *)normalizedImage {
    if (self.imageOrientation == UIImageOrientationUp) { //图片方向是正确的
        return self;
    }
    UIGraphicsBeginImageContextWithOptions(self.size, NO, self.scale);
    [self drawInRect:CGRectMake(0, 0, self.size.width, self.size.height)];
    UIImage *normalizedImage = UIGraphicsGetImageFromCurrentImageContext();
    UIGraphicsEndImageContext();
    return normalizedImage;
}
如上所示,当图片方向不正确是,利用drawInRect方法对图像进行重新绘制,这样可以保证绘制之后的图片方向是正确的。
- (NSData *)encodedDataWithImage:(UIImage *)image {
    if (!image) {
        return nil;
    }
    switch (image.imageFormat) {
        case JImageFormatPNG:
        case JImageFormatJPEG:
            return [self encodedDataWithImage:image imageFormat:image.imageFormat];
        case JImageFormatGIF:{
            return [self encodedGIFDataWithImage:image];
        }
        case JImageFormatUndefined:{
            if (JCGImageRefContainsAlpha(image.CGImage)) {
                return [self encodedDataWithImage:image imageFormat:JImageFormatPNG];
            } else {
                return [self encodedDataWithImage:image imageFormat:JImageFormatJPEG];
            }
        }
    }
}
//对PNG和JPEG格式图片的处理
- (nullable NSData *)encodedDataWithImage:(UIImage *)image imageFormat:(JImageFormat)imageFormat {
    UIImage *fixedImage = [image normalizedImage];
    if (imageFormat == JImageFormatPNG) {
        return UIImagePNGRepresentation(fixedImage);
    } else {
        return UIImageJPEGRepresentation(fixedImage, 1.0);
    }
}
如上所示,对PNG和JPEG图片的处理都比较简单。现在主要来讲解下如何将GIF图片转换为NSData类型存储到磁盘中。我们先回顾下GIF图片中NSData如何转换为image:
NSInteger loopCount = 0;
CFDictionaryRef properties = CGImageSourceCopyProperties(source, NULL);
if (properties) { //获取loopcount
    CFDictionaryRef gif = CFDictionaryGetValue(properties, kCGImagePropertyGIFDictionary);
    if (gif) {
        CFTypeRef loop = CFDictionaryGetValue(gif, kCGImagePropertyGIFLoopCount);
        if (loop) {
            CFNumberGetValue(loop, kCFNumberNSIntegerType, &loopCount);
        }
    }
    CFRelease(properties);
}
NSMutableArray<NSNumber *> *delayTimeArray = [NSMutableArray array]; //存储每张图片对应的展示时间
NSMutableArray<UIImage *> *imageArray = [NSMutableArray array]; //存储图片
NSTimeInterval duration = 0;
for (size_t i = 0; i < count; i ++) {
    CGImageRef imageRef = CGImageSourceCreateImageAtIndex(source, i, NULL);
    if (!imageRef) {
        continue;
    }
    //获取图片
    UIImage *image = [[UIImage alloc] initWithCGImage:imageRef];
    [imageArray addObject:image];
    CGImageRelease(imageRef);
    //获取delayTime
    float delayTime = kJAnimatedImageDefaultDelayTimeInterval;
    CFDictionaryRef properties = CGImageSourceCopyPropertiesAtIndex(source, i, NULL);
    if (properties) {
        CFDictionaryRef gif = CFDictionaryGetValue(properties, kCGImagePropertyGIFDictionary);
        if (gif) {
            CFTypeRef value = CFDictionaryGetValue(gif, kCGImagePropertyGIFUnclampedDelayTime);
            if (!value) {
                value = CFDictionaryGetValue(gif, kCGImagePropertyGIFDelayTime);
            }
            if (value) {
                CFNumberGetValue(value, kCFNumberFloatType, &delayTime);
                if (delayTime < ((float)kJAnimatedImageDelayTimeIntervalMinimum - FLT_EPSILON)) {
                    delayTime = kJAnimatedImageDefaultDelayTimeInterval;
                }
            }
        }
        CFRelease(properties);
    }
    duration += delayTime;
    [delayTimeArray addObject:@(delayTime)];
}
我们可以看到,NSData转换为image主要是获取loopCount、images和delaytimes,那么我们从image转换为NSData,即反过来,将这些属性写入到数据里即可。
- (nullable NSData *)encodedGIFDataWithImage:(UIImage *)image {
    NSMutableData *gifData = [NSMutableData data];
    CGImageDestinationRef imageDestination = CGImageDestinationCreateWithData((__bridge CFMutableDataRef)gifData, kUTTypeGIF, image.images.count, NULL);
    if (!imageDestination) {
        return nil;
    }
    if (image.images.count == 0) {
        CGImageDestinationAddImage(imageDestination, image.CGImage, nil);
    } else {
        NSUInteger loopCount = image.loopCount;
        NSDictionary *gifProperties = @{(__bridge NSString *)kCGImagePropertyGIFDictionary : @{(__bridge NSString *)kCGImagePropertyGIFLoopCount : @(loopCount)}};
        CGImageDestinationSetProperties(imageDestination, (__bridge CFDictionaryRef)gifProperties);//写入loopCount
        size_t count = MIN(image.images.count, image.delayTimes.count);
        for (size_t i = 0; i < count; i ++) {
            NSDictionary *properties = @{(__bridge NSString *)kCGImagePropertyGIFDictionary : @{(__bridge NSString *)kCGImagePropertyGIFDelayTime : image.images[i]}};
            CGImageDestinationAddImage(imageDestination, image.images[i].CGImage, (__bridge CFDictionaryRef)properties); //写入images和delaytimes
        }
    }
    if (CGImageDestinationFinalize(imageDestination) == NO) {
        gifData = nil;
    }
    CFRelease(imageDestination);
    return [gifData copy];
}
六、总结
本章节主要对缓存进行了重构,使其功能更完善,易扩展,另外还补充讲解了对GIF图片的存储。
