

本文主要讲述了iOS的本地和远程通知的基本使用,以及某些不易注意的问题。
Note:文章有不少身旁同学提供了帮助,大量引用或转载本文请声明原文地址,多谢。
一:用户通知简介
用户通知是什么
iOS中存在三种常见的事件通知方式:NSNofiticationCenter、KVO Notification 和 User Notifications,其中 User Notifications,就是本文将要探讨的用户通知。
我们都知道 iOS 系统经常的有一些与 App 相关的通知栏消息,这些消息往往伴随着提示音以及 App 的桌面图标右上角的未读消息提示,这些通知就是 iOS 的用户通知。
用户通知的分类
用户通知分为两类:本地通知和远程通知,其中远程通知又称为推送通知。
两者最主要的区别是:本地通知是由 App 发送到当前设备上,不需要网络支持;而远程通知是由 App 的服务器发送到苹果的 APNs 服务器,并由 APNs 服务器转发到相应设备(由 App 服务器指定接收通知的设备)。
两者最主要的共同点是:本地通知和远程通知对用户的表现形式是相同的,两者均可以采用通知栏消息、App 桌面图标右上角角标和提示音的方式通知用户。
用户通知有什么用处
及时有效的(无论是在前台还是后台)向用户发送消息(聊天信息、新闻、待办事项、天气变化等)是用户通知最大的优势。
此外,有效合理的使用用户通知,可以让我们的 App 有更好的体验,如:
- 当待办事项将要过期时可以及时提醒用户;
- 当用户执行下载大文件任务时进入后台,当下载完成后可以通知用户;
- 当用户环球旅行时,可以根据用户的地理位置推送天气变化等信息;
- 当用户订阅的某杂志或新闻主题有更新时,通知用户;
- ……
本文后续内容将以应用开发者的角度对用户通知进行深入的探讨,本文讨论内容针对iOS7/8/9,有关 iOS10 系统的用户通知会另做讲解。
这里可下载 本文demo 。此外,本文中的远程通知使用了 Simplepush.php ,内部代码很简单,可使用该脚本自定义远程通知的内容,当然可以使用 本文demo 里我修改过的脚本文件,建议花几分钟查看以下 Simplepush.php 的用法。此外,demo 不提供证书,如有远程通知需求,请自行申请证书,否则无法正常使用 Simplepush。
本文主要参考了苹果官方的 Local and Remote Notification Programming Guide 以及本文用到的接口的官方文档。
二:本地通知的使用
开启本地通知功能
-
对于 iOS7,如果用户没有在系统设置里关闭该 App 的通知功能,那么开发者无需做任何操作即可使用本地通知功能。
-
对于 iOS8 及以后的系统,若需要使用本地通知功能,则需要注册通知类型。 通知类型有四种:角标(UIUserNotificationTypeBadge)、提示音(UIUserNotificationTypeSound)、提示信息(UIUserNotificationTypeAlert)和无任何通知(UIUserNotificationTypeNone)。
你可以注册上诉四种通知类型的任意组合,但最终可用的通知形式需要根据用户对此 App 通知的设置确定。比如:App 内部注册了角标、提示音和提示信息,但是用户关闭了声音通知,那么收到本地通知时是不会有提示音的。 对于 iOS8 及以后的系统,注册本地通知的代码示例如下:
- (BOOL)application:(UIApplication *)application didFinishLaunchingWithOptions:(NSDictionary *)launchOptions {
    // 只有 iOS8 and later 才需要
    if ([[UIApplication sharedApplication] 	respondsToSelector:@selector(registerForRemoteNotifications)]) {
        // 这里 types 可以自定义,如果 types 为 0,那么所有的用户通知均会静默的接收,系统不会给用户任何提示(当然,App 可以自己处理并给出提示)
        UIUserNotificationType types = (UIUserNotificationType) (UIUserNotificationTypeBadge | UIUserNotificationTypeSound | UIUserNotificationTypeAlert);
        // 这里 categories 可暂不深入,本文后面会详细讲解。
        UIUserNotificationSettings *mySettings = [UIUserNotificationSettings settingsForTypes:types categories:nil];
        // 当应用安装后第一次调用该方法时,系统会弹窗提示用户是否允许接收通知
        [[UIApplication sharedApplication] registerUserNotificationSettings:mySettings];
    }

    // Your own other codes.
    return YES;
}
当系统弹窗提示用户是否允许接收通知后,用户可能会拒绝;我们可以在 AppDelegate 的 application:didRegisterUserNotificationSettings: 方法中用来查看注册成功的通知类型,我们可以在拿到注册结果后做自定义操作(比如失败时弹个窗提示用户当前无法使用用户通知)。
苹果推荐在之后发送的本地通知时,要避免使用没有注册成功的通知类型(并不是强制要求)。
- (void)application: (UIApplication*)application didRegisterUserNotificationSettings:(UIUserNotificationSettings *)notificationSettings {
    if (notificationSettings.types & UIUserNotificationTypeBadge) {
        NSLog(@"Badge Nofitication type is allowed");
    }
    if (notificationSettings.types & UIUserNotificationTypeAlert) {
        NSLog(@"Alert Notfication type is allowed");
    }
    if (notificationSettings.types & UIUserNotificationTypeSound) {
        NSLog(@"Sound Notfication type is allowed");
    }
}
发送本地通知
发送一个本地通知主要有如下步骤:
-
首先要按照上述 "开启本地通知功能" 步骤注册通知类型;
-
创建一个
UILocalNotification对象; -
设置
UILocalNotification对象的 fireDate 属性,该属性表示什么时间点发送这条本地通知;同时可以设置 timeZone 属性表示时区,设置 timeZone 后,当用户跨越时区时,fireDate 会按照时区被调整(类似于钟表调整);此外,可以使用 repeatInterval 和 repeatCalendar 来设置周期性的通知。 -
设置通知的提示信息:
- 设置 alertTitle 作为通知的概要,设置 alertBody 作为通知的具体信息;注意这里强烈建议使用本地化的字符串,即
NSLocalizedString(@"This is alert body", nil);。 注意 alertTitle 属性只适用于 iOS8.2 及以后的系统 - 设置 applicationIconBadgeNumber 用于展示 App 桌面图标的右上角角标。
- 设置 soundName, 我们一般设置为 UILocalNotificationDefaultSoundName;使用自定义 sound 在后面会进一步讲解。
- 在设置提醒方式的值时,对于 iOS8 及以后的系统,可以检查下当前提醒方式是否已经注册成功(可以用
[[UIApplication sharedApplication] currentUserNotificationSettings]获取注册成功的通知类型)。
- 设置 alertTitle 作为通知的概要,设置 alertBody 作为通知的具体信息;注意这里强烈建议使用本地化的字符串,即
-
可以选择设置 userInfo 属性,该属性一般可以存放业务有关的信息(如 ID 等),这样收到通知后可以方便处理业务相关逻辑;
-
将上面创建的
UILocalnotification放入通知队列中:使用方法scheduleLocalNotification:会按照UILocalnotification中的 fireDate 进行通知的发送,而使用presentLocalNotificationNow:会立即发送该本地通知。
下面给出一段示例代码:
- (void)scheduleLocalNotification {
    NSDate *itemDate = [NSDate date];

    UILocalNotification *localNotif = [[UILocalNotification alloc] init];
    if (localNotif == nil)
        return;
    localNotif.fireDate = [itemDate dateByAddingTimeInterval:10];
    localNotif.timeZone = [NSTimeZone defaultTimeZone];

    localNotif.alertBody = [NSString stringWithFormat:NSLocalizedString(@"%@ after %i seconds scheduled.", nil), @"本地通知", 10];

    localNotif.alertTitle = NSLocalizedString(@"Local Notification Title", nil);

    localNotif.soundName = UILocalNotificationDefaultSoundName;
    localNotif.applicationIconBadgeNumber = 1;

    NSDictionary *infoDict = [NSDictionary dictionaryWithObject:@"ID:10" forKey:@"LocalNotification"];
    localNotif.userInfo = infoDict;

    [[UIApplication sharedApplication] scheduleLocalNotification:localNotif];
}
处理收到的本地通知
这里分三种情况讨论如何处理本地通知:
应用处于前台
应用处于前台时,本地通知到达时,不会有提示音、通知栏横幅提示,但是 App 桌面图标的右上角角标是有数值显示的,所以即使在前台,我们也应该对角标数量做处理
此时,我们可以在 application:didReceiveLocalNotification: 方法中获取到本地通知,示例代码如下:
- (void)application:(UIApplication *)application didReceiveLocalNotification:(UILocalNotification *)notification {
    NSString *itemName = [notification.userInfo objectForKey:@"LocalNotification"];
    [self.windowRootController displayNotification:[NSString stringWithFormat:@"%@ receive from didReceiveLocalNotificaition", itemName]];
    // 这里将角标数量减一,注意系统不会帮助我们处理角标数量
    application.applicationIconBadgeNumber -= 1;
}
应用处于后台
当应用处于后台时,本地通知到达时,会根据本地通知设置的通知类型以及用户设置的通知类型进行提示,例如锁屏界面通知、通知栏通知、声音、角标。
此时如果滑动锁屏界面通知或点击通知栏通知,则会切换应用到前台,我们可以使用与应用处于前台时相同的获取通知的方式。
但是如果我们点击 App 桌面图标,则无法获取到用户通知,此时通知栏消息仍然会存在。此外,角标也不会变化,如果希望修改角标,则需要 App 进入前台后将其修改。
应用没有运行
如果应用没有运行,当本地通知到达时,会根据本地通知设置的通知类型以及用户设置的通知类型进行提示,例如锁屏界面通知、通知栏通知、声音、角标。此时如果滑动锁屏界面通知或点击通知栏通知,则会打开应用,但这时我们获取通知的方式与前面有所不同,通过application:didReceiveLocalNotification: 是无法获取通知的。 这种情况我们需要通过 application:didFinishLaunchingWithOptions: 中的 LaunchOptions 获取通知,示例代码如下:
- (BOOL)application:(UIApplication *)application didFinishLaunchingWithOptions:(NSDictionary *)launchOptions {
    UILocalNotification *localNotif = [launchOptions objectForKey:UIApplicationLaunchOptionsLocalNotificationKey];
    if (localNotif) {
        NSString *itemName = [localNotif.userInfo objectForKey:@"LocalNotification"];
        [self.windowRootController displayNotification:[NSString stringWithFormat:@"%@ receive from didFinishLaunch", itemName]];  // custom method
        [UIApplication sharedApplication].applicationIconBadgeNumber = localNotif.applicationIconBadgeNumber-1;
    }

    // Your own other codes.
    return YES;
}
同样的,但是如果我们点击 App 桌面图标,则无法获取到用户通知,此时通知栏消息仍然会存在。此外,角标也不会变化,如果希望修改角标,则需要 App 进入前台后将其修改。
地理位置相关的本地通知
在 iOS8 及以后系统中,我们可以定义一个与地理位置有关的本地通知,这样当我们跨过设定的地理区域时,系统会发送本地通知。
注册位置相关的本地通知
-
需要创建一个 CLLocationManager 对象,并为其设置一个 delegate;
-
请求用户允许使用定位服务:调用 CLLocationManager 的
requestWhenInUseAuthorization,注意工程的 plist 中需要配置 NSLocationWhenInUseUsageDescription 选项,否则定位服务无法正常启用;示例代码如下:- (void)registerLocationBasedNotification { CLLocationManager *locationManager = [[CLLocationManager alloc] init]; locationManager.delegate = self; // 申请定位权限 [locationManager requestWhenInUseAuthorization]; } -
通过 CLLocationManagerDelegate 回调检查用户是否允许使用定位服务,如果允许了服务,那么可以发送一个位置相关的本地通知。
- (void)locationManager:(CLLocationManager *)manager didChangeAuthorizationStatus:(CLAuthorizationStatus)status { // 因为上面我们是使用了 requestWhenInUseAuthorization,所以这里检查的是 kCLAuthorizationStatusAuthorizedWhenInUse if (status == kCLAuthorizationStatusAuthorizedWhenInUse) { [self scheduleLocalBasedNotification]; } } -
创建一个位置相关的本地通知,并将其交由系统处理。
- (void)scheduleLocalBasedNotification {
	UILocalNotification *locationNotification = [[UILocalNotification alloc] init];
	locationNotification.alertBody = @"到达xxx";
	locationNotification.regionTriggersOnce = NO; // 表示每次跨越指定区域就会发送通知
	locationNotification.region = [[CLCircularRegion alloc] initWithCenter:LOC_COORDINATE radius:LOC_RADIUS identifier:LOC_IDENTIFIER];

	[[UIApplication sharedApplication] scheduleLocalNotification:locNotification];
}
处理位置相关的本地通知
与上面讲过的 “处理收到的本地通知” 比较,这里可以在通知里获取到 region,然后可以做自定义操作,其余所有操作均与 “处理收到的本地通知” 一致。
注意如果用户没有允许使用定位权限,则无法收到位置相关的本地通知。
三:远程通知的使用
APNs 简介
APNs 是苹果提供的远程通知的服务器,当 App 处于后台或者没有运行时,如果 App 的服务器(之后我们称为 Provider)需要发送通知信息给客户端,则需要借助于 APNs 服务器。
使用 APNs 服务时,远程通知的路由路径为: Provider –> 苹果的 APNs 服务器 –> 手机设备 –> App。在这个路径中,Provider 与 APNs 服务器之间有一个 TLS 连接,Provider 通过这个连接将远程通知推送到苹果的 APNs 服务器;手机设备与 APNs 服务器之间也会有一个 TLS 连接,所有发往手机设备的 APNs 远程通知都是使用这一个 TLS连接,然后由设备区分远程通知所属的 App,进而通知给用户某应用有远程通知。
下面简单介绍下这个流程:
设备 与 APNs
设备与 APNs 建立连接的过程如图:
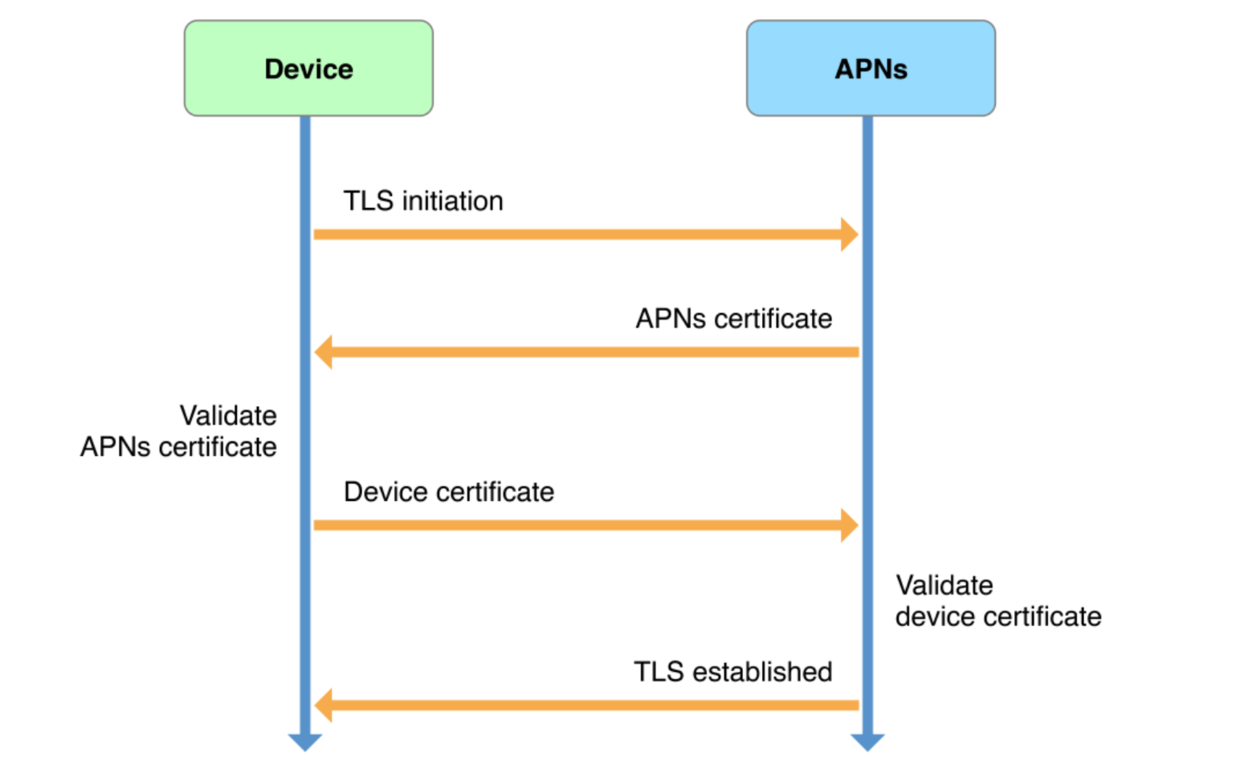
需要明确的要点:
- 此连接由系统建立并维持,无需开发人员管理;
- 上图中的证书是苹果设备本身的证书,与开发者账号中申请的证书无关;
- 每个设备与 APNs 服务器只需维持一条连接。
Provider 与 APNs
Provider 与 APNs 建立连接的过程如图:
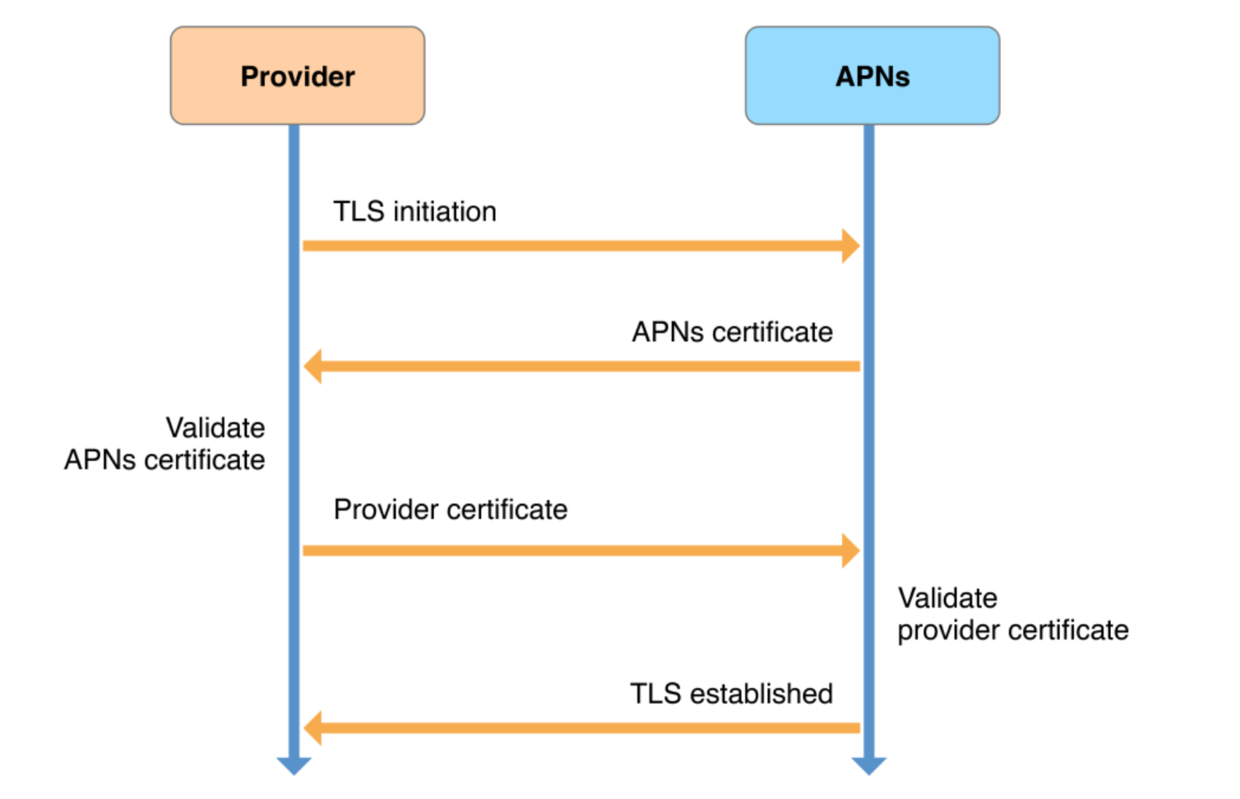
需要明确的要点:
- 此连接由 App 的 bundle ID 唯一确定;
- 上图中 Provider certificate 需要通过开发者账号申请生成,其中包含 App 的 bundle ID。
APNs 工作的流程
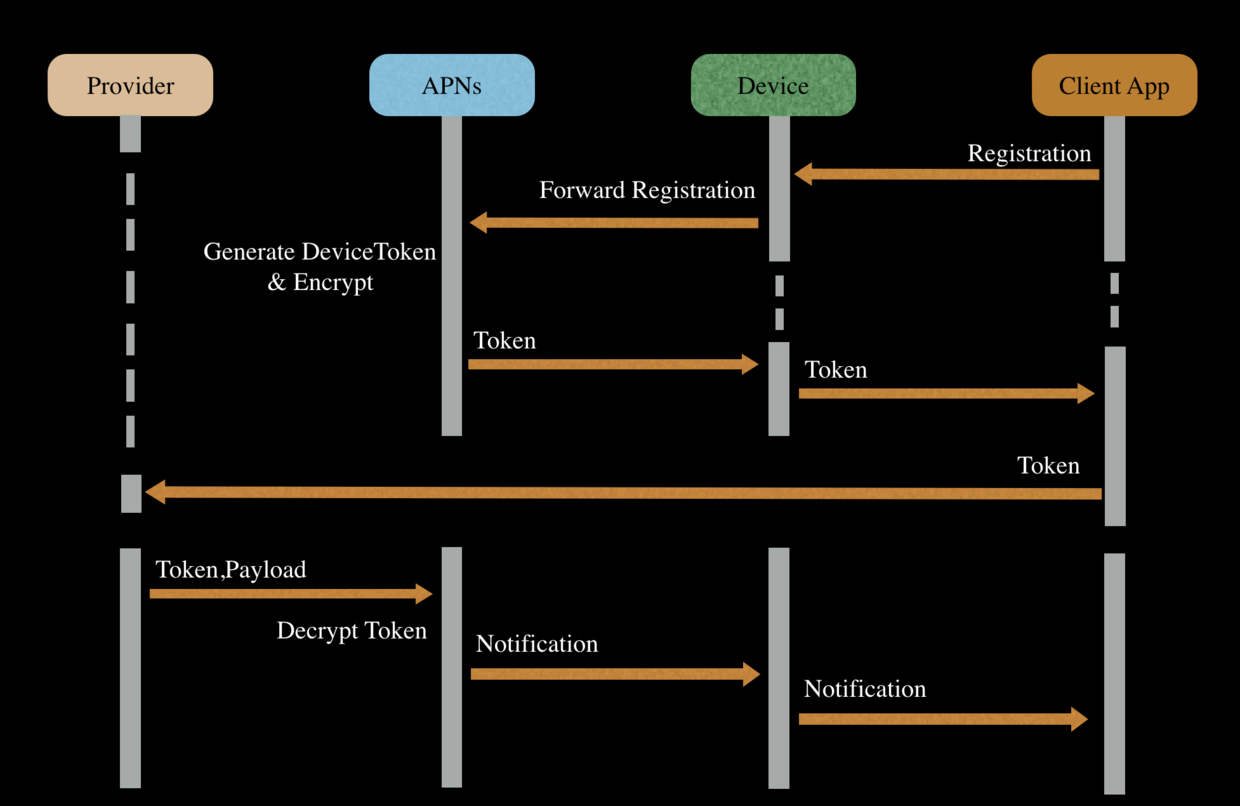
-
首先客户端需要向 APNs 服务器注册当前 App,APNs 会返回一个Token(注意这个过程要求 App 有合法的证书,有关证书这里不做详细描述);注意不同应用在同一设备上获取的 Token 不同,同一应用在不同设备上获取的 Token也不同,所以 Token 是跟设备与 App 唯一绑定的;
-
App 拿到 Token 后需要将其发送给 Provider;
-
Provider 发送推送通知时,指定 Token 和通知内容,并发送给 APNs 服务器;
-
APNs 服务器会将通知发送给 Token 对应的设备上;
-
设备收到通知后,根据 APNs 发过来的通知中带有的 bundleID 信息区分是哪个App的远程通知(这里应该是根据 Token 来获取 bundleID)。
Feedback 机制
Feedback 是 APNs 服务器提供的用于减少服务器压力以及优化网络的服务,基本的工作流程如下图:
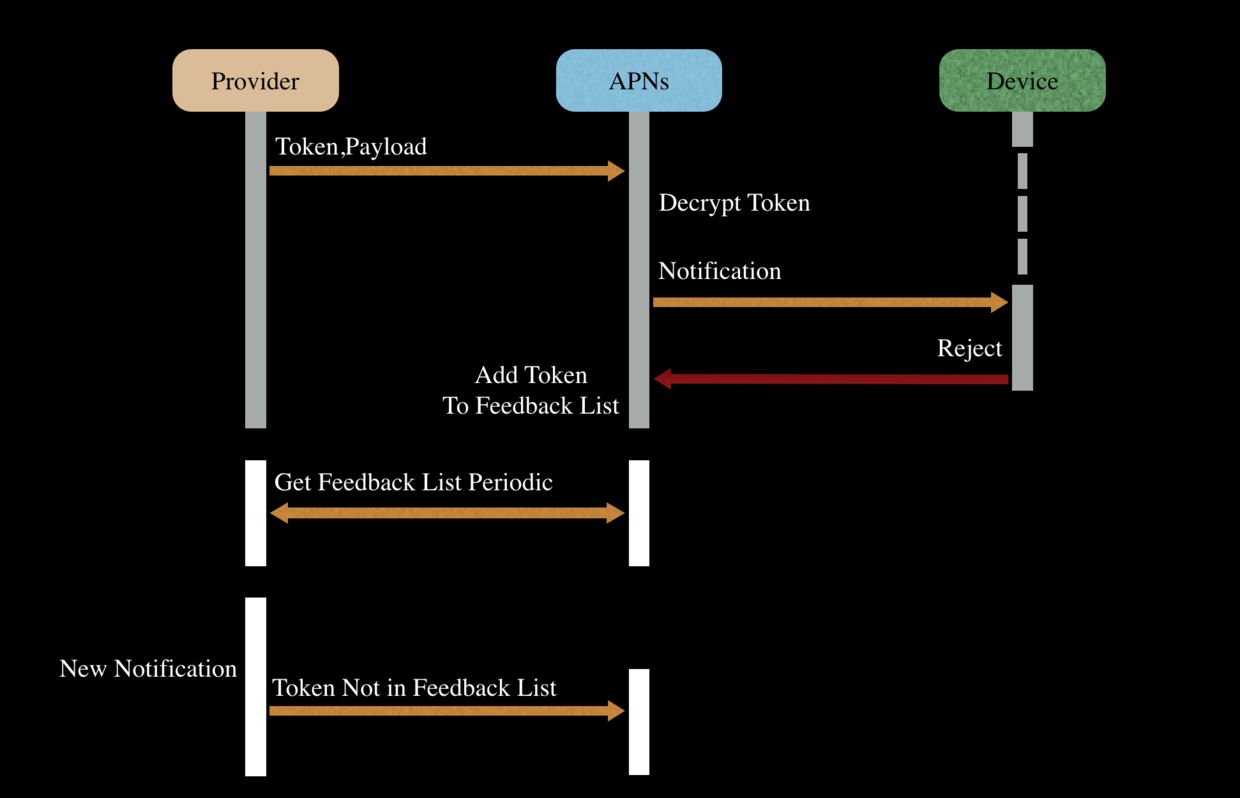
-
Provider 发送一个远程通知给 APNs 服务器,APNs 服务器会检测目的设备是否在线,如果不在线,那么 APNs 服务器会暂存该消息;
-
当目的设备上线后,APNs 会发送暂存的消息给目的设备(按照苹果官方说法暂存消息只会暂存最后一条消息,之前的消息会被丢弃);
-
如果目的设备很久都没有上线,那么 APNs 消息会把该设备加入 feedback 名单。Provider 可以定期去 APNs 拉新 feedback 名单;
-
当 Provider 再次给之前的设备发送远程通知时,需要检查一下 feedback 名单,如果设备在这个名单,则不再发送给 APNs 了;
-
当设备重新上线后,Provider 可以再将此设备移除 feedback 名单,当 Provider 更新 feedback list 后,就可以重新给该设备发送远程通知了。当然,feedback list 的更新可能会有周期,如果需要及时有效的更新 feedback list,那么需要 App 打开后,及时通知 Provider;
-
这种机制的好处就是防止发送多余无用的远程通知消息,一方面可以减缓 APNs 服务器的压力,另一方面也可以减少网络流量;
开启远程通知功能
注册通知类型
- 对于 iOS7,无需此步骤;
- 对于 iOS8 及以后的系统,若需要使用远程通知功能,则需要注册通知类型。步骤与 "本地通知的使用" 中 "开启本地通知功能" 是完全相同的,此处不再重复。
注册远程通知
基本流程为:
- 注册通知类型,上一小节已经做了介绍;
- 使用
registerForRemoteNotifications注册远程通知(对于 iOS7 使用registerForRemoteNotificationTypes:); - 使用
application:didRegisterForRemoteNotificationsWithDeviceToken:接收 APNs 返回的 Token,使用application:didFailToRegisterForRemoteNotificationsWithError:处理注册错误; - 如果上一步骤中注册成功了,那么将得到的 Token 发送给 Provider。
注意:
-
目前看来,对于 iOS9,每次重新安装应用后得到的 Token 是不一样的,而且每次重装系统也会改变,所以 每次应用启动时都需要按上面的步骤注册一次 ;
-
不要将之前的 Token 缓存,当需要将 Token 传送到 Provider 时,一定要使用
registerForRemoteNotifications获取,并使用回调处理注册结果;当应用注册过通知,而且 Token 没有改变时,系统会立即返回结果,不会去 APNs 请求。这里猜测系统帮助将 Token 缓存下来,且与应用的状态进行了关联,如果应用当前状态没有改变,那么会立即将系统存下的 Token 返回。为了证明这点,可以将网络关闭进行测试,如果 App 没有卸载,也是可以获取到 Token 的; -
一定要有开启了 Push 功能的证书,才能正常使用远程推送。
注册远程通知的示例代码如下:
- (void)registerRemoteNotifications {
    // 区分是否是 iOS8 or later
    if ([[UIApplication sharedApplication] respondsToSelector:@selector(registerForRemoteNotifications)]) {
        // 这里 types 可以自定义,如果 types 为 0,那么所有的用户通知均会静默的接收,系统不会给用户任何提示(当然,App 可以自己处理并给出提示)
        UIUserNotificationType types = (UIUserNotificationType) (UIUserNotificationTypeBadge | UIUserNotificationTypeSound | UIUserNotificationTypeAlert);
        // 这里 categories 可暂不深入,本文后面会详细讲解。
        UIUserNotificationSettings *mySettings = [UIUserNotificationSettings settingsForTypes:types categories:nil];
        // 当应用安装后第一次调用该方法时,系统会弹窗提示用户是否允许接收通知
        [[UIApplication sharedApplication] registerUserNotificationSettings:mySettings];
    } else {
        UIRemoteNotificationType types = UIRemoteNotificationTypeAlert | UIRemoteNotificationTypeBadge | UIRemoteNotificationTypeSound;
        [[UIApplication sharedApplication] registerForRemoteNotificationTypes:types];
    }
}

- (void)application:(UIApplication *)application didRegisterUserNotificationSettings:(nonnull UIUserNotificationSettings *)notificationSettings {
    // Register for remote notifications.
    [[UIApplication sharedApplication] registerForRemoteNotifications];
}

// Handle register result.
- (void)application:(UIApplication *)application didRegisterForRemoteNotificationsWithDeviceToken:(NSData *)deviceToken {
    //获得 device token,这一步处理为字符串的操作很重要
    NSString *token = [[[deviceToken description]
                        stringByTrimmingCharactersInSet:[NSCharacterSet characterSetWithCharactersInString:@"<>"]]
                        stringByReplacingOccurrencesOfString:@" "
                        withString:@""];
    NSLog(@"DeviceToken string, %@", token);
    [UIApplication sharedApplication].applicationIconBadgeNumber = 0;
    // 将 token 发送给 Provider
}

- (void)application:(UIApplication *)application didFailToRegisterForRemoteNotificationsWithError:(NSError *)error {
    NSLog(@"Error in registration for apns service. Error: %@", error);
}
发送远程通知
远程通知的内容
Provider 发送给 APNs 服务器的内容格式如下:
{
   // aps key 是必须要有的
   "aps" : {
      "alert" : {
         "title" : "通知的概要,对 8.2 以前的系统本选项无效"
         "body" : "通知的具体内容",
         "loc-key" : "GAME_PLAY_REQUEST_FORMAT",
         "loc-args" : [ "Jenna", "Frank"]
      },
      "badge" : 3, // 角标数值
      "sound" : “chime.aiff" // 可以自定义提示音
   },

   "userName" : "username", // aps key 之外可以有自定义内容,需要符合 json 格式
   "message" : ["hello", "world", "programmer"]
}
上面只是简要介绍了常见的内容,如需要更加深度定制推送通知,建议查看: 苹果官方payload文档
远程通知的本地化处理
有两种方式:
-
在 Provider 端进行本地化 App 可以将当前使用的语言发送给 Provider,Provider 在发送远程通知前,检查当前设备使用的语言,并做好本地化后发送给 APNs 服务器。App 发送当前使用的语言给 Provider 的示例代码:
NSString *preferredLang = [[NSLocale preferredLanguages] objectAtIndex:0];
const char *langStr = [preferredLang UTF8String];
[self sendProviderCurrentLanguage:langStr]; // custom method
一般来说,将当前系统语言信息发送给 Provider 时,也会将 Token 一起发送,这样 Provider 才能够在发送远程通知时根据不同目的设备进行本地化处理。 此外,当应用启动后,用户可能会修改系统语言,这时,App 需要监听
NSCurrentLocaleDidChangeNotification通知,并在处理通知的方法中重新向 Provider 发送当前使用的语言。 -
在客户端本地化 这种模式下,Provider 在发送远程通知时,需要设置 Payload -> alert 中的本地化相关属性,如下:
{
 	// aps key 是必须要有的
	"aps" : {
      	"alert" : {
         	      "title" : "通知的概要,对 8.2 以前的系统本选项无效",
         	      "loc-key" : "Remote Notification",
         	      "loc-args" : [ "hello", "world"]
      	},
      	"badge" : 3, // 角标数值
      	"sound" : “chime.aiff" // 可以自定义提示音
   	}
}
上面 loc-key 以及 loc-args 就是本地化相关的属性,用于本地化 alert 中的 body。 当 App 收到此消息时,会根据系统当前的语言设置去相应的本地化文件中查找与 loc-key 对应的 value,如果 loc-key 对应的 value 是一个格式化的字符串,那么可以用 loc-args 传递参数。
假设本地化文件中: "Remote Notification" = "我们程序员通常钟爱:%@ %@" ,那么提示信息就是: "我们程序员钟爱:hello world";
此外在本地化文件中我们也可以用 %n@ %1$@",那么提示信息是:"我们程序员钟爱:world hello"。
同样的,title-loc-key 和 title-loc-args 是对 alert 中的 title 做本地化的。
处理收到的远程通知
这里分三种情况讨论如何处理远程通知:
应用处于前台
应用处于前台时,本地通知到达时,不会有提示音、通知栏横幅提示。但是 App 桌面图标的右上角角标是有数值显示的,所以即使在前台,我们也应该对角标数量做处理;
此时,我们可以在 application:didReceiveRemoteNotification:fetchCompletionHandler: 方法中获取到远程通知,示例代码如下:
- (void)application:(UIApplication *)application didReceiveRemoteNotification:(nonnull NSDictionary *)userInfo fetchCompletionHandler:(nonnull void (^)(UIBackgroundFetchResult))completionHandler {
    NSData *infoData = [NSJSONSerialization dataWithJSONObject:userInfo options:0 error:nil];
    NSString *info = [[NSString alloc] initWithData:infoData encoding:NSUTF8StringEncoding];
    [self.windowRootController displayNotification:[NSString stringWithFormat:@"From didReceiveRemoteNotification: %@", info]];
    // 这里将角标数量减一,注意系统不会帮助我们处理角标数量
    application.applicationIconBadgeNumber = notification.applicationIconBadgeNumber - 1;
}
应用处于后台
当应用处于后台时,远程通知到达时,会根据注册通知是设置的通知类型以及用户设置的通知类型进行提示,例如锁屏界面通知、通知栏通知、声音、角标。
此时如果滑动锁屏界面通知或点击通知栏通知,则会切换应用到前台,我们可以使用与应用处于前台时相同的获取通知的方式。
但是如果我们点击 App 桌面图标,则无法获取到用户通知,此时通知栏消息仍然会存在。此外,角标也不会变化,如果希望修改角标,则需要 App 进入前台后将其修改。
应用没有运行
这里有两种处理方式:
-
与本地通知的处理方式相同,在
application:didFinishLaunchingWithOptions:的 LaunchOptions 中获取通知,不过内部代码会略有不同,示例如下:- (BOOL)application:(UIApplication *)application didFinishLaunchingWithOptions:(NSDictionary *)launchOptions { NSDictionary *remoteNotif = [launchOptions objectForKey:UIApplicationLaunchOptionsRemoteNotificationKey]; if (remoteNotif) { NSData *infoData = [NSJSONSerialization dataWithJSONObject:remoteNotif options:0 error:nil]; NSString *info = [[NSString alloc] initWithData:infoData encoding:NSUTF8StringEncoding]; [self.windowRootController displayNotification:[NSString stringWithFormat:@"From didFinishLaunch: %@", info]]; [UIApplication sharedApplication].applicationIconBadgeNumber -= 1; } // Your own other codes. return YES; } -
与应用处于前后台时处理方式相同,使用
application:didReceiveRemoteNotification:fetchCompletionHandler:方法,示例代码见 "应用处于前台" 时的处理。对于远程通知,推荐使用此种方式处理。此外,对于远程通知,如果我们点击 App 桌面图标,则无法获取到用户通知,此时通知栏消息仍然会存在。此外,角标也不会变化,如果希望修改角标,则需要 App 进入前台后将其修改。
远程通知-静默推送
静默推送是指应用在前台或后台状态下,收到远程通知时,没有弹窗或横幅提示,即使处于后台也可以处理远程通知。具体使用流程如下:
-
打开应用工程 Target 的 Capacities,将 Background Modes 选项打开,并且勾选 Remote Notifications;
-
在 Provider 发送远程通知时,需要将远程通知 Payload 中的 aps 内的 content-available 设置为 1,如下:
aps { content-available: 1 alert: {...} } -
应用需要实现
application:didReceiveRemoteNotification:fetchCompletionHandler:方法接收静默推送。
有几点需要注意:
- 使用静默推送时,alert 字段不应有任何信息,但可以设置 aps 内的自定义字段;
- sound 和 badge 字段可以设置,但最好不设置,否则会有提示音;
- 静默推送只有当应用处于前台或后台时才能处理,当应用没有启动时是收不到静默推送的;
- 处理静默推送时,不能做耗时操作,因为系统只为这种处理行为分配少量时间,如下载文件之类的操作请使用后台下载服务。
可操作通知
首先需要注意的是,可操作通知只适用于 iOS8 及以后的系统。
可操作通知其实并不是一种新的通知形式,它只是在这本地通知和远程通知的基础上加了一些可操作的行为而已。为了直观说明什么是可操作通知,可以参考下图:
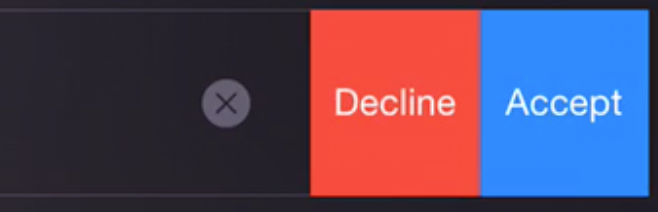
可操作通知为用户提供了在通知提示中方便执行操作的方式,在使用横幅提示通知消息时,最多可以有两个操作,在使用弹窗提示通知消息是,最多可以有四个操作。下面讲解如何使用:
四:定义可操作通知的行为
基本使用方法:
-
创建一个 UIMutableUserNotificationAction 对象,并按需求配置该对象的属性,示例代码:
UIMutableUserNotificationAction *acceptAction = [[UIMutableUserNotificationAction alloc] init]; // 为该操作设置一个 id acceptAction.identifier = @"accept"; // 设置该操作对应的 button 显示的字符串 acceptAction.title = @"Accept"; // 指定是否需要应用处于运行状态 acceptAction.activationMode = UIUserNotificationActivationModeBackground; // 表示该操作是否有害,若设置为 YES,则对应的button会有高亮 acceptAction.destructive = NO; // 当锁屏时收到可操作通知,该属性表示是否必须解锁才能执行该操作 acceptAction.authenticationRequired = YES; -
创建一个 UIMutableUserNotificationCategory 对象,并将自定义的操作通过 setActions: 的方式设置给 category 对象。代码如下:
// 这里为了测试,又新建了两个 action,declineAction 和 maybeAction ,代码可见 demo UIMutableUserNotificationCategory *inviteCategory = [[UIMutableUserNotificationCategory alloc] init]; // 设置一个 ID,用于本地通知或远程通知时指定该通知可执行的操作group inviteCategory.identifier = @"Action"; // 为弹窗模式设置 actions [inviteCategory setActions:@[acceptAction, maybeAction, declineAction] forContext:UIUserNotificationActionContextDefault]; // 为横幅模式设置 actions [inviteCategory setActions:@[acceptAction, declineAction] forContext:UIUserNotificationActionContextMinimal]; -
注册通知类型以及可操作的actions
类似于本地通知和远程通知,调用
registerUserNotificationSettings:注册通知,只是这里的 setting 加入了我们上面定义的 category。NSSet *categories = [NSSet setWithObjects:inviteCategory, nil]; // 这里 types 可以自定义,如果 types 为 0,那么所有的用户通知均会静默的接收,系统不会给用户任何提示(当然,App 可以自己处理并给出提示) UIUserNotificationType types = (UIUserNotificationType) (UIUserNotificationTypeBadge | UIUserNotificationTypeSound | UIUserNotificationTypeAlert); // 这里 categories 可暂不深入,本文后面会详细讲解。 UIUserNotificationSettings *mySettings = [UIUserNotificationSettings settingsForTypes:types categories:categories]; // 当应用安装后第一次调用该方法时,系统会弹窗提示用户是否允许接收通知 [[UIApplication sharedApplication] registerUserNotificationSettings:mySettings];
如果将可执行通知用于远程通知,那么需要按照远程通知的注册方式获取 token,可参考远程通知的注册。
发送可操作通知
之前说过,可操作通知只是在本地通知和远程通知的基础上加了自定义的操作,所以发送可操作通知就是发送本地通知或远程通知。不过,如果希望我们自定义的 action 有效,在发送本地通知或远程通知时需要进行一些改变:
-
本地通知的可操作通知 为 UILocalNotification 对象设置我们自定义的 category。如下:
UILocalNotification *notification = [[UILocalNotification alloc] init]; // Other configurations notification.category = @"Action"; [[UIApplication sharedApplication] scheduleLocalNotification:notification]; -
远程通知的可操作通知 在远程通知的 Payload 中设置我们自定义的 category,如下:
{
    "aps" :  {
        "alert" : "You’re invited!",
        "category" : "Action"
    }
}
处理可操作通知
处理可操作通知与处理本地通知和远程通知相同,唯一的不同点就是当用户执行了某个操作后,应用可以在后台运行application:handleActionWithIdentifier:forRemoteNotification:completionHandler: 处理通知(例如后台更新数据等操作),我们可以在这个回调里快速的执行操作:
- (void)application:(UIApplication *) application
              handleActionWithIdentifier: (NSString *) identifier
          // either forLocalNotification: (NSDictionary *) notification or
                   forRemoteNotification: (NSDictionary *) notification
                       completionHandler: (void (^)()) completionHandler {

    if ([identifier isEqualToString: @"accept"]) {
        [self handleAcceptActionWithNotification:notification];
    }

    // 执行自定义代码完成后必须调用
    completionHandler();
}
对于本地通知我们可以使用 application:handleActionWithIdentifier:forLocalNotification:completionHandler: 。
可操作通知到底有什么好处?
这里举个例子说明: 假如A向B发出了一个出席发布会邀请,并且 App 是以远程通知的方式接收到该信息,那么当不使用可操作通知的时候,我们需要做的事情主要包括:
- 用户需要打开应用;
- App 查看远程通知的内容是一个邀请,那么 App 应该弹窗提示用户是否接受该邀请;
- 用户选择后,App 通过 Http(也可以使用其他通信协议) 将结果返回给服务器;
- 邀请通知处理完毕。
那么,如果我们使用可操作通知,可以很简单的做到这件事情:
-
用户选择接受或拒绝邀请(用户无需打开 App);
-
App 通过可操作通知的回调处理用户操作结果,将结果发送给服务器;
-
邀请通知处理完毕。
可以看到,不论是从用户角度还是开发者角度,可操作通知都极大的方便了处理具有可操作动作的这类通知。
五:总结
到这里已经讲解完成了用户通知的内容,文章包含了苹果给出的用户通知的基本所有用法,如果想要确认文档是否有误可自行参考 Local and Remote Notification Programming Guide ,如果本文中内容有误,欢迎指出与讨论。
