

阅读说明:
- 本文假设读者已掌握如何使用
ConstraintLayout。 - 本文是一篇
MotionLayout基础教程,如您已了解如何使用MotionLayout,本文可能对您帮助不大。 - 本教程共有两篇文章,这是第一篇,另一篇请点击 这里。
- 建议读者跟随本文一起动手操作,如您现在不方便,建议稍后阅读。
- 本文基于
ConstraintLayout 2.0.0-alpha4版本编写,建议读者优先使用这一版本。 - 由于
MotionLayout官方文档不全,有些知识点是根据笔者自己的理解总结的,如有错误,欢迎指正。
添加支持库:
dependencies {
    ...
    implementation 'androidx.constraintlayout:constraintlayout:2.0.0-alpha4'
}
MotionLayout 最低支持到 Android 4.3(API 18),还有就是 MotionLayout 是 ConstraintLayout 2.0 添加的,因此必须确保支持库的版本不低于 2.0。
简介
MotionLayout 类继承自 ConstraintLayout 类,允许你为各种状态之间的布局设置过渡动画。由于 MotionLayout 继承了 ConstraintLayout,因此可以直接在 XML 布局文件中使用 MotionLayout 替换 ConstraintLayout。
MotionLayout 是完全声明式的,你可以完全在 XML 文件中描述一个复杂的过渡动画而 无需任何代码(如果您打算使用代码创建过渡动画,那建议您优先使用属性动画,而不是 MotionLayout)。
开始使用
由于 MotionLayout 类继承自 ConstraintLayout 类,因此可以在布局中使用 MotionLayout 替换掉 ConstraintLayout。
MotionLayout 与 ConstraintLayout 不同的是,MotionLayout 需要链接到一个 MotionScene 文件。使用 MotionLayout 的 app:layoutDescription 属性将 MotionLayout 链接到一个 MotionScene 文件。
例:
<?xml version="1.0" encoding="utf-8"?>
<androidx.constraintlayout.motion.widget.MotionLayout xmlns:android="http://schemas.android.com/apk/res/android"
    xmlns:app="http://schemas.android.com/apk/res-auto"
    xmlns:tools="http://schemas.android.com/tools"
    android:layout_width="match_parent"
    android:layout_height="match_parent"

    app:layoutDescription="@xml/scene_01">

    <ImageView
        android:id="@+id/image"
        android:layout_width="48dp"
        android:layout_height="48dp"
        android:src="@mipmap/ic_launcher"
        app:layout_constraintBottom_toBottomOf="parent"
        app:layout_constraintLeft_toLeftOf="parent"
        app:layout_constraintRight_toRightOf="parent"
        app:layout_constraintTop_toTopOf="parent" />

</androidx.constraintlayout.motion.widget.MotionLayout>
注意!必须为 MotionLayout 布局的所有直接子 View 都设置一个 Id(允许不为非直接子 View 设置 Id)。
创建 MotionScene 文件
MotionScene 文件描述了两个场景间的过渡动画,存放在 res/xml 目录下。
要使用 MotionLayout 创建过渡动画,你需要创建两个 layout 布局文件来描述两个不同场景的属性。当从一个场景切换到另一个场景时,MotionLayout 框架会自动检测这两个场景中具有相同 id 的 View 的属性差别,然后针对这些差别属性应用过渡动画(类似于 TransitionManger)。
MotionLayout 框架支持的标准属性:
android:visibilityandroid:alphaandroid:elevationandroid:rotationandroid:rotationXandroid:rotationYandroid:scaleXandroid:scaleYandroid:translationXandroid:translationYandroid:translationZ
MationLayout 除了支持上面列出的标准属性外,还支持全部的 ConstraintLayout 属性。
下面来看一个完整的例子,这个例子分为以下 3 步。
第 1 步:创建场景 1 的布局文件:
文件名:
activity_main_scene1.xml
<?xml version="1.0" encoding="utf-8"?>
<androidx.constraintlayout.motion.widget.MotionLayout xmlns:android="http://schemas.android.com/apk/res/android"
    xmlns:app="http://schemas.android.com/apk/res-auto"
    android:layout_width="match_parent"
    android:layout_height="match_parent"
    android:id="@+id/motionLayout"
    app:layoutDescription="@xml/activity_main_motion_scene">

    <ImageView
        android:id="@+id/image"
        android:layout_width="48dp"
        android:layout_height="48dp"
        android:src="@mipmap/ic_launcher"
        app:layout_constraintBottom_toBottomOf="parent"
        app:layout_constraintLeft_toLeftOf="parent"
        app:layout_constraintRight_toRightOf="parent"
        app:layout_constraintTop_toTopOf="parent" />

</androidx.constraintlayout.motion.widget.MotionLayout>
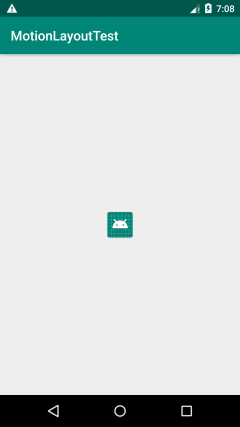
场景 1 的布局预览如下图所示:
第 2 步:创建场景 2 的布局文件:
文件名:
activity_main_scene2.xml
<?xml version="1.0" encoding="utf-8"?>
<androidx.constraintlayout.motion.widget.MotionLayout xmlns:android="http://schemas.android.com/apk/res/android"
    xmlns:app="http://schemas.android.com/apk/res-auto"
    android:id="@+id/motionLayout"
    android:layout_width="match_parent"
    android:layout_height="match_parent"
    app:layoutDescription="@xml/activity_main_motion_scene">

    <ImageView
        android:id="@+id/image"
        android:layout_width="48dp"
        android:layout_height="48dp"
        android:src="@mipmap/ic_launcher"
        app:layout_constraintLeft_toLeftOf="parent"
        app:layout_constraintRight_toRightOf="parent"
        app:layout_constraintTop_toTopOf="parent" />

</androidx.constraintlayout.motion.widget.MotionLayout>
场景 2 的布局预览如下图所示:
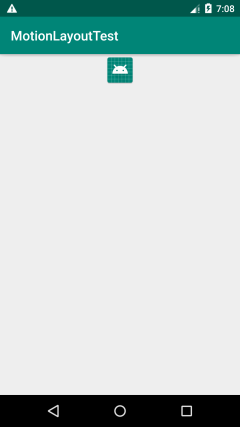
说明:场景 1 与场景 2 中都有一个 id 值为 image 的 ImageView,它们的差别是:场景 1 中的 image 是水平垂直居中放置的,而场景 2 中的 image 是水平居中,垂直对齐到父布局顶部的。因此当从场景 1 切换到场景 2 时,MotionLayout 将针对 image 的位置差别自动应用位移过渡动画。
第 3 步:创建 MotionScene 文件:
文件名:
activity_main_motion_scene.xml,存放在res/xml目录下
<?xml version="1.0" encoding="utf-8"?>
<MotionScene xmlns:android="http://schemas.android.com/apk/res/android"
    xmlns:app="http://schemas.android.com/apk/res-auto">

    <Transition
        app:constraintSetStart="@layout/activity_main_scene1"
        app:constraintSetEnd="@layout/activity_main_scene2"
        app:duration="1000">

        <OnClick
            app:clickAction="toggle"
            app:targetId="@id/image" />

    </Transition>

</MotionScene>
编写完 MotionLayout 文件后就可以直接运行程序了。点击 image 即可进行场景切换。当进行场景切换时,MotionLayout 会自动计算出两个场景之间的差别,然后应用相应的过渡动画。
下面对 MotionLayout 文件进行说明:
如上例所示,MotionScene 文件的根元素是 <MotionScene>。在 <MotionScene> 元素中使用 <Transition> 子元素来描述一个过渡,使用 <Transition> 元素的 app:constraintSetStart 属性指定起始场景的布局文件,使用 app:constraintSetEnd 指定结束场景的布局文件。在 <Transition> 元素中使用 <OnClick> 或者 <OnSwip> 子元素来描述过渡的触发条件。
<Transition> 元素的属性:
app:constraintSetStart:设置为起始场景的布局文件Id。app:constraintSetEnd:设置为结束场景的布局文件Id。app:duration:过渡动画的持续时间。app:motionInterpolator:过渡动画的插值器。共有以下6个可选值:linear:线性easeIn:缓入easeOut:缓出easeInOut:缓入缓出bounce:弹簧anticipate:(功能未知,没有找到文档)
app:staggered:【浮点类型】(功能未知,没有找到文档)
可以在 <Transition> 元素中使用一个 <OnClick> 或者 <OnSwipe> 子元素来描述过渡的触发条件。
<OnClick> 元素的属性:
app:targetId:【id值】设置用来触发过渡的那个View的Id(例如:@id/image或@+id/image)。
提示:
app:targetId的值的前缀既可以是@+id/也可以是@id/,两者都可以。官方示例中使用的是@+id/。不过,使用@id/前缀似乎更加符合语义,因为@+id/前缀在布局中常用来创建一个新的Id,而@id/前缀则常用来引用其他的Id值。为了突出这里引用的是其他的Id而不是新建了一个Id,使用@id/前缀要更加符合语义。
app:clickAction:设置点击时执行的动作。该属性共有以下5个可选的值:toggle:在Start场景和End场景之间循环的切换。transitionToEnd:过渡到End场景。transitionToStart:过渡到Start场景。jumpToEnd:跳到End场景(不执行过渡动画)。jumpToStart:跳到Start场景(不执行过渡动画)。
<OnSwipe> 元素的属性:
app:touchAnchorId:【id值】设置拖动操作要关联到的对象,让触摸操作看起来像是在拖动这个对象的由app:touchAnchorSide属性指定的那个边。app:touchAnchorSide:设置触摸操作将会拖动对象的哪一边,共有以下4个可选值:topleftrightbottom
app:dragDirection:设置拖动的方向(注意,只有设置了app:touchAnchorId属性后该属性才有效)。共有以下4个可选值:dragUp:手指从下往上拖动(↑)。dragDown:手指从上往下拖动(↓)。dragLeft:手指从右往左拖动(←)。dragRight:手指从左往右拖动(→)。
app:maxVelocity:【浮点值】设置动画在拖动时的最大速度(单位:像素每秒px/s)。app:maxAcceleration:【浮点值】设置动画在拖动时的最大加速度(单位:像素每二次方秒px/s^2)。
可以同时设置 <OnClick> 与 <OnSwipe> ,或者都不设置,而是使用代码来触发过渡。
还可以在 <Transition> 元素中设置多个 <OnClick>,每个 <OnClick> 都可以关联到一个不同的控件上。虽然 <Transition> 元素中也可以设置多个 <OnSwipe>,但是后面的 <OnSwipe> 会替换掉前面的 <OnSwipe>,最终使用的是最后一个 <OnSwipe>。
<OnSwipe> 拖动操作
由于 <OnSwipe> 拖动操作涉及的交互较为复杂,这里单独对它的以下 3 个属性进行说明:
app:touchAnchorIdapp:dragDirectionapp:touchAnchorSide
首先是 app:touchAnchorId 属性与 app:dragDirection 属性。app:touchAnchorId 属性用于设置拖动操作要关联到的对象;app:dragDirection 属性用于指定拖动方向。
默认情况下,由上往下 拖动时会运行过渡动画,此时 <OnSwipe/> 元素不需要设置任何属性,只要在 <Transition> 中加一个 <OnSwipe/> 标签即可。
例:
<Transition
    ...>

    <OnSwipe/>

</Transition>
但是,如果你要支持 由下往上(↑)或者 由左往右(→)或者 由右往左(←),那么至少应该设置好 app:touchAnchorId 与 app:dragDirection 属性。
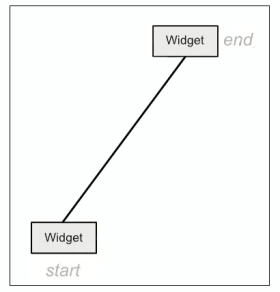
app:dragDirection 属性设置的拖动方向与 app:touchAnchorId 属性关联到的对象在 Start 场景和 End 场景中的位置是息息相关的。例如下图 a 中,End 场景中的 Widget 位于 Start 场景中的 Widget 的上方,那么应该设置 app:dragDirection="dragUp"。再看图 b 中,End 场景中的 Widget 位于 Start 场景中的 Widget 的右边,那么应该设置 app:dragDirection="dragRight":

如果 End 场景中的 Widget 相对于 Start 场景中的 Widget 是倾斜的(如下图所示),将会有两个可选的方向,下图中的可选方向是 dragUp、dragRight,具体使用哪个方向,由你自己决定。
设置一个正确的拖动方向是非常重要的,否则拖动时,过渡动画将表现不佳。
提示:
MotionLayout将使用app:touchAnchorId关联到的对象在app:dragDirection方向上的拖动进度(progress)作为整个过渡动画的进度,当关联对象在app:dragDirection方向上的拖动完成时,也就意味着整个过渡动画完成了。
例:实现拖动效果
删除 <Transition> 元素元素的 <OnClick> 标签,并加入一个 <OnSwipe> 标签,修改后的 MotionScene 文件内容如下所示:
<?xml version="1.0" encoding="utf-8"?>
<MotionScene xmlns:android="http://schemas.android.com/apk/res/android"
    xmlns:app="http://schemas.android.com/apk/res-auto">

    <Transition
        app:constraintSetStart="@layout/activity_main_scene1"
        app:constraintSetEnd="@layout/activity_main_scene2"
        app:duration="1000">

        <!-- 删除 OnClick,加入 OnSwipe -->

        <OnSwipe
            app:touchAnchorId="@id/image"
            app:dragDirection="dragUp"/>

    </Transition>

</MotionScene>

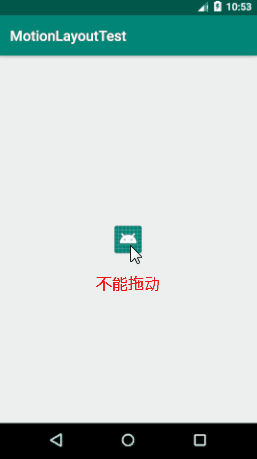
注意:如果将 <OnClick> 和 <OnSwipe> 关联到了同一个控件,或者 <OnSwipe> 关联到的那个控件是可点击的,点击事件将会影响到拖动,你将无法按住控件进行拖动,只能按住控件的外面才能拖动。
例:
在 <Transition> 标签中加入 <OnClick>,修改后的 MotionScene 文件内容如下所示:
<?xml version="1.0" encoding="utf-8"?>
<MotionScene xmlns:android="http://schemas.android.com/apk/res/android"
    xmlns:app="http://schemas.android.com/apk/res-auto">

    <Transition
        app:constraintSetStart="@layout/activity_main_scene1"
        app:constraintSetEnd="@layout/activity_main_scene2"
        app:duration="1000">

        <OnSwipe
            app:touchAnchorId="@id/image"
            app:dragDirection="dragUp"/>

        <!-- 加入 OnClick -->
        <OnClick
            app:targetId="@id/image"
            app:clickAction="toggle"/>

    </Transition>

</MotionScene>
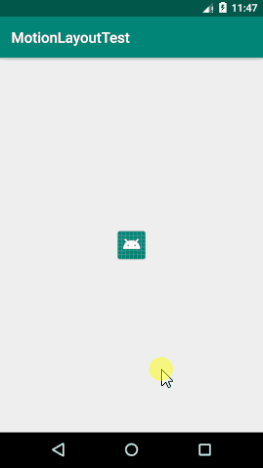
效果如下所示:
app:touchAnchorSide 属性:
app:touchAnchorSide 属性的功能是 “设置触摸操作将会拖动对象的哪一边”,该属性可用于实现可折叠效果,例如可折叠标题栏。
例:在底部实现一个向上拉的折叠效果。
1. 修改 acticity_main_scene1.xml 文件:
<?xml version="1.0" encoding="utf-8"?>
<androidx.constraintlayout.motion.widget.MotionLayout xmlns:android="http://schemas.android.com/apk/res/android"
    xmlns:app="http://schemas.android.com/apk/res-auto"
    android:layout_width="match_parent"
    android:layout_height="match_parent"
    android:id="@+id/motionLayout"
    app:layoutDescription="@xml/activity_main_motion_scene">

    <ImageView
        android:id="@+id/image"
        android:layout_width="48dp"
        android:layout_height="48dp"
        android:src="@mipmap/ic_launcher"
        app:layout_constraintBottom_toBottomOf="parent"
        app:layout_constraintLeft_toLeftOf="parent"
        app:layout_constraintRight_toRightOf="parent"
        app:layout_constraintTop_toTopOf="parent" />

    <!-- 增加以下代码 -->
    <FrameLayout
        android:id="@+id/bottomBar"
        android:layout_width="match_parent"
        android:layout_height="0dp"
        android:background="@color/colorPrimary"
        app:layout_constraintTop_toBottomOf="parent"
        app:layout_constraintBottom_toBottomOf="parent">

        <ImageView
            android:layout_gravity="center"
            android:src="@mipmap/ic_launcher"
            android:layout_width="wrap_content"
            android:layout_height="wrap_content"/>

    </FrameLayout>

</androidx.constraintlayout.motion.widget.MotionLayout>
2. 修改 acticity_main_scene2.xml 文件:
<?xml version="1.0" encoding="utf-8"?>
<androidx.constraintlayout.motion.widget.MotionLayout xmlns:android="http://schemas.android.com/apk/res/android"
    xmlns:app="http://schemas.android.com/apk/res-auto"
    android:id="@+id/motionLayout"
    android:layout_width="match_parent"
    android:layout_height="match_parent"
    app:layoutDescription="@xml/activity_main_motion_scene">

    <ImageView
        android:id="@+id/image"
        android:layout_width="48dp"
        android:layout_height="48dp"
        android:src="@mipmap/ic_launcher"
        app:layout_constraintLeft_toLeftOf="parent"
        app:layout_constraintRight_toRightOf="parent"
        app:layout_constraintTop_toTopOf="parent" />

    <!-- 增加以下代码 -->
    <FrameLayout
        android:id="@+id/bottomBar"
        android:layout_width="match_parent"
        android:layout_height="120dp"
        android:background="@color/colorPrimary"
        app:layout_constraintBottom_toBottomOf="parent">

        <ImageView
            android:layout_gravity="center"
            android:src="@mipmap/ic_launcher"
            android:layout_width="wrap_content"
            android:layout_height="wrap_content"/>

    </FrameLayout>

</androidx.constraintlayout.motion.widget.MotionLayout>
3. 修改 MotionScene 文件(文件名:activity_main_motion_scene.xml)
<?xml version="1.0" encoding="utf-8"?>
<MotionScene xmlns:android="http://schemas.android.com/apk/res/android"
    xmlns:app="http://schemas.android.com/apk/res-auto">

    <Transition
        app:constraintSetStart="@layout/activity_main_scene1"
        app:constraintSetEnd="@layout/activity_main_scene2"
        app:duration="1000">

        <!--  关联到 bottomBar 上-->
        <OnSwipe
            app:touchAnchorId="@id/bottomBar"
            app:touchAnchorSide="top"
            app:dragDirection="dragUp"/>

        <OnClick
            app:targetId="@id/image"
            app:clickAction="toggle"/>

    </Transition>

</MotionScene>
效果如下所示:
提示:其实
<OnSwipe>可以不关联到bottomBar上,在因为在前面的例子中我们已经把<OnSwipe>关联到了image上,且拖动方向也设置正确(drageUp),这样其实已经可以正常拖动了。但是由于bottomBar是可折叠的,把<OnSwipe>拖动关联到它上面更加合适,这样可以设置app:touchAnchorSide="top",告诉MotionLayout控件bottomBar的上边界是可拖动的,这样更符合语义。
使用代码触发过渡动画
除了使用 <OnClick> 元素与 <OnSwipe> 元素来设置触发过渡动画的触发条件外,还可以使用代码来手动触发过渡动画。
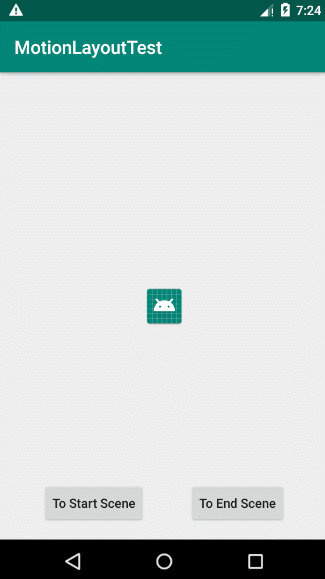
下面对场景 1 的布局文件进行修改,在布局中添加 2 个按钮,预览如下图所示:
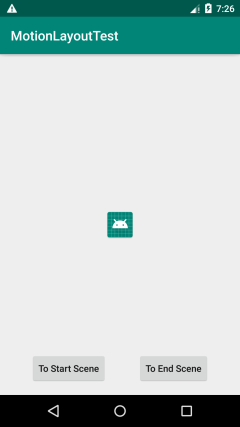
场景 1 修改后的布局文件内容为:
<?xml version="1.0" encoding="utf-8"?>
<androidx.constraintlayout.motion.widget.MotionLayout xmlns:android="http://schemas.android.com/apk/res/android"
    xmlns:app="http://schemas.android.com/apk/res-auto"
    android:id="@+id/motionLayout"
    android:layout_width="match_parent"
    android:layout_height="match_parent"
    app:layoutDescription="@xml/activity_main_motion_scene">

    <ImageView
        android:id="@+id/image"
        android:layout_width="48dp"
        android:layout_height="48dp"
        android:src="@mipmap/ic_launcher"
        app:layout_constraintBottom_toBottomOf="parent"
        app:layout_constraintLeft_toLeftOf="parent"
        app:layout_constraintRight_toRightOf="parent"
        app:layout_constraintTop_toTopOf="parent" />

    <Button
        android:id="@+id/btnToStartScene"
        android:layout_width="wrap_content"
        android:layout_height="wrap_content"
        android:layout_marginBottom="16dp"
        android:text="To Start Scene"
        android:textAllCaps="false"
        app:layout_constraintBottom_toBottomOf="parent"
        app:layout_constraintLeft_toLeftOf="parent"
        app:layout_constraintRight_toLeftOf="@id/btnToEndScene" />

    <Button
        android:id="@+id/btnToEndScene"
        android:layout_width="wrap_content"
        android:layout_height="wrap_content"
        android:layout_marginBottom="16dp"
        android:text="To End Scene"
        android:textAllCaps="false"
        app:layout_constraintBottom_toBottomOf="parent"
        app:layout_constraintLeft_toRightOf="@id/btnToStartScene"
        app:layout_constraintRight_toRightOf="parent" />

</androidx.constraintlayout.motion.widget.MotionLayout>
场景 2 的布局文件不需要修改。
在 MainActivity 中添加如下代码来手动执行过渡动画:
public class MainActivity extends AppCompatActivity {
    private MotionLayout mMotionLayout;
    private Button btnToStartScene;
    private Button btnToEndScene;

    @Override
    protected void onCreate(Bundle savedInstanceState) {
        super.onCreate(savedInstanceState);
        setContentView(R.layout.activity_main_scene1);

        mMotionLayout = findViewById(R.id.motionLayout);
        btnToStartScene = findViewById(R.id.btnToStartScene);
        btnToEndScene = findViewById(R.id.btnToEndScene);

        btnToStartScene.setOnClickListener(new View.OnClickListener() {
            @Override
            public void onClick(View v) {
                // 切换到 Start 场景
                mMotionLayout.transitionToStart();
            }
        });

        btnToEndScene.setOnClickListener(new View.OnClickListener() {
            @Override
            public void onClick(View v) {
                // 切换到 End 场景
                mMotionLayout.transitionToEnd();
            }
        });
    }
}
如上面代码中所示,调用 MotionLayout 的 transitionToStart() 方法可以切换到 Start 场景,调用 MotionLayout 的 transitionToStart() 方法可以切换到 End 场景。
效果如下所示:
调整过渡动画的进度
MotionLayout 还支持手动调整过渡动画的播放进度。使用 MotionLayout 的 setProgress(float pos) 方法(pos 参数的取值范围为 [0.0 ~ 1.0])来调整过渡动画的播放进度。
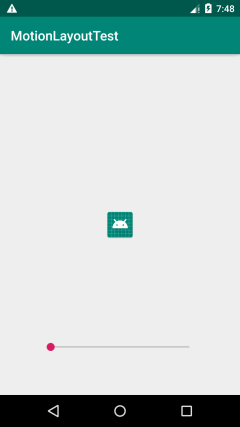
下面对场景 1 的布局文件进行修改,移除两个按钮,加入一个 SeekBar,修改后的布局代码如下所示:
<?xml version="1.0" encoding="utf-8"?>
<androidx.constraintlayout.motion.widget.MotionLayout xmlns:android="http://schemas.android.com/apk/res/android"
    xmlns:app="http://schemas.android.com/apk/res-auto"
    android:id="@+id/motionLayout"
    android:layout_width="match_parent"
    android:layout_height="match_parent"
    app:layoutDescription="@xml/activity_main_motion_scene">

    <ImageView
        android:id="@+id/image"
        android:layout_width="48dp"
        android:layout_height="48dp"
        android:src="@mipmap/ic_launcher"
        app:layout_constraintBottom_toBottomOf="parent"
        app:layout_constraintLeft_toLeftOf="parent"
        app:layout_constraintRight_toRightOf="parent"
        app:layout_constraintTop_toTopOf="parent" />

    <SeekBar
        android:id="@+id/seekBar"
        android:layout_width="240dp"
        android:layout_height="wrap_content"
        android:layout_marginBottom="56dp"
        app:layout_constraintBottom_toBottomOf="parent"
        app:layout_constraintLeft_toLeftOf="parent"
        app:layout_constraintRight_toRightOf="parent" />

</androidx.constraintlayout.motion.widget.MotionLayout>
布局预览如下图所示:
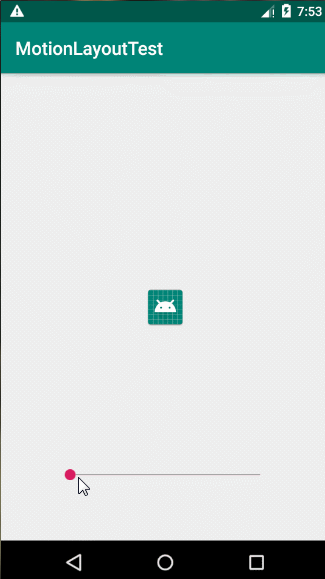
修改 MainActivity 中的代码:
public class MainActivity extends AppCompatActivity {
    private MotionLayout mMotionLayout;
    private SeekBar mSeekBar;

    @Override
    protected void onCreate(Bundle savedInstanceState) {
        super.onCreate(savedInstanceState);
        setContentView(R.layout.activity_main_scene1);

        mMotionLayout = findViewById(R.id.motionLayout);
        mSeekBar = findViewById(R.id.seekBar);

        mSeekBar.setMax(0);
        mSeekBar.setMax(100);
        mSeekBar.setOnSeekBarChangeListener(new SeekBar.OnSeekBarChangeListener() {
            @Override
            public void onProgressChanged(SeekBar seekBar, int progress, boolean fromUser) {
                mMotionLayout.setProgress((float) (progress * 0.01));
            }

            @Override
            public void onStartTrackingTouch(SeekBar seekBar) {

            }

            @Override
            public void onStopTrackingTouch(SeekBar seekBar) {

            }
        });
    }
}
效果如下图所示:
监听 MotionLayout 过渡
可以调用 MotionLayout 的 setTransitionListener() 方法向 MotionLayout 对象注册一个过渡动画监听器,这个监听器可以监听过渡动画的播放进度和结束事件。
public void setTransitionListener(MotionLayout.TransitionListener listener)
TransitionListener 监听器接口:
public interface TransitionListener {
    // 过渡动画正在运行时调用
    void onTransitionChange(MotionLayout motionLayout, int startId, int endId, float progress);
    // 过渡动画结束时调用
    void onTransitionCompleted(MotionLayout motionLayout, int currentId);
}
提示:
TransitionListener接口在alpha版本中有所改动,可多出了2个回调方法:onTransitionStarted和onTransitionTrigger。由于MotionLayout还处于alpha版本,并未正式发布,因此有所改动也是正常。
例:
MotionLayout motionLayout = findViewById(R.id.motionLayout);
motionLayout.setTransitionListener(new MotionLayout.TransitionListener() {
    @Override
    public void onTransitionChange(MotionLayout motionLayout, int i, int i1, float v) {
        Log.d("App", "onTransitionChange: " + v);
    }

    @Override
    public void onTransitionCompleted(MotionLayout motionLayout, int i) {
        Log.d("App", "onTransitionCompleted");
    }
});
结语
本篇文章到此就结束了,你可能会觉得前面的例子不够炫酷,这里给出一个炫酷点的例子(这个例子很简单,建议读者动手尝试实现一下):
后续文章:
参考文章:
