文章首发自个人微信公众号: 小哈学Java
大家好,后续会间断地奉上一些 Spring Boot 2.x 相关的博文,包括 Spring Boot 2.x 教程和 Spring Boot 2.x 新特性教程相关,如 WebFlux 等。还有自定义 Starter 组件的进阶教程,比如:如何手撸一个自定义图床 Starter 启动器(支持上传到服务器内部,阿里 OSS 和七牛云等), 仅仅需要配置相关参数,就可以将图片上传功能集成到现有的项目中。
好吧,这些都是后话。今天主要来讲讲如何在 Spring Boot 2.x 版本中集成发送邮件功能。
可以说,邮件发送在企业级应用中是比较常见的服务了,如运维报警,用户激活,广告推广等场景,均会使用到它。废话少说,开干!
目录
一、添加依赖
二、添加邮件相关配置
三、关于授权码
- 3.1 什么是 QQ 邮箱授权码
- 3.2 如何获取
四、开始编码
- 4.1 定义功能类
- 4.2 项目结构
- 4.3 单元测试,验证效果
五、总结
六、GitHub 源码地址
一、添加依赖
在 pom.xml 文件中添加 spring-boot-starter-mail 依赖:
<dependency>
    <groupId>org.springframework.boot</groupId>
    <artifactId>spring-boot-starter-mail</artifactId>
</dependency>
二、添加邮件相关配置
在 application.properties 配置文件中添加下面内容:
# 发送邮件的服务器,笔者这里使用的 QQ 邮件
spring.mail.host=smtp.qq.com
spring.mail.username=你的邮箱地址
spring.mail.password=授权码,或邮箱密码
spring.mail.properties.mail.smtp.auth=true
spring.mail.properties.mail.smtp.starttls.enable=true
spring.mail.properties.mail.smtp.starttls.required=true
yml 格式的配置文件,添加如下:
spring:
  mail:
    host: smtp.qq.com #发送邮件的服务器,笔者这里使用的 QQ 邮件
    username: 你的邮箱地址
    password: 授权码,或邮箱密码
    properties.mail.smtp.auth: true
    properties.mail.smtp.starttls.enable: true
    default-encoding: utf-8
三、关于授权码
对于上面的配置,您肯定对密码配置那块还抱有疑问,如果您使用的是 163 邮箱,或者 Gmail 邮箱,直接使用密码就可以了,如果您使用的是 QQ 邮箱,则需要先获取授权码。
到底什么事授权码? :
3.1 什么是 QQ 邮箱授权码
下图截自 QQ 邮箱官方文档:

3.2 如何获取
登录 QQ 邮箱:
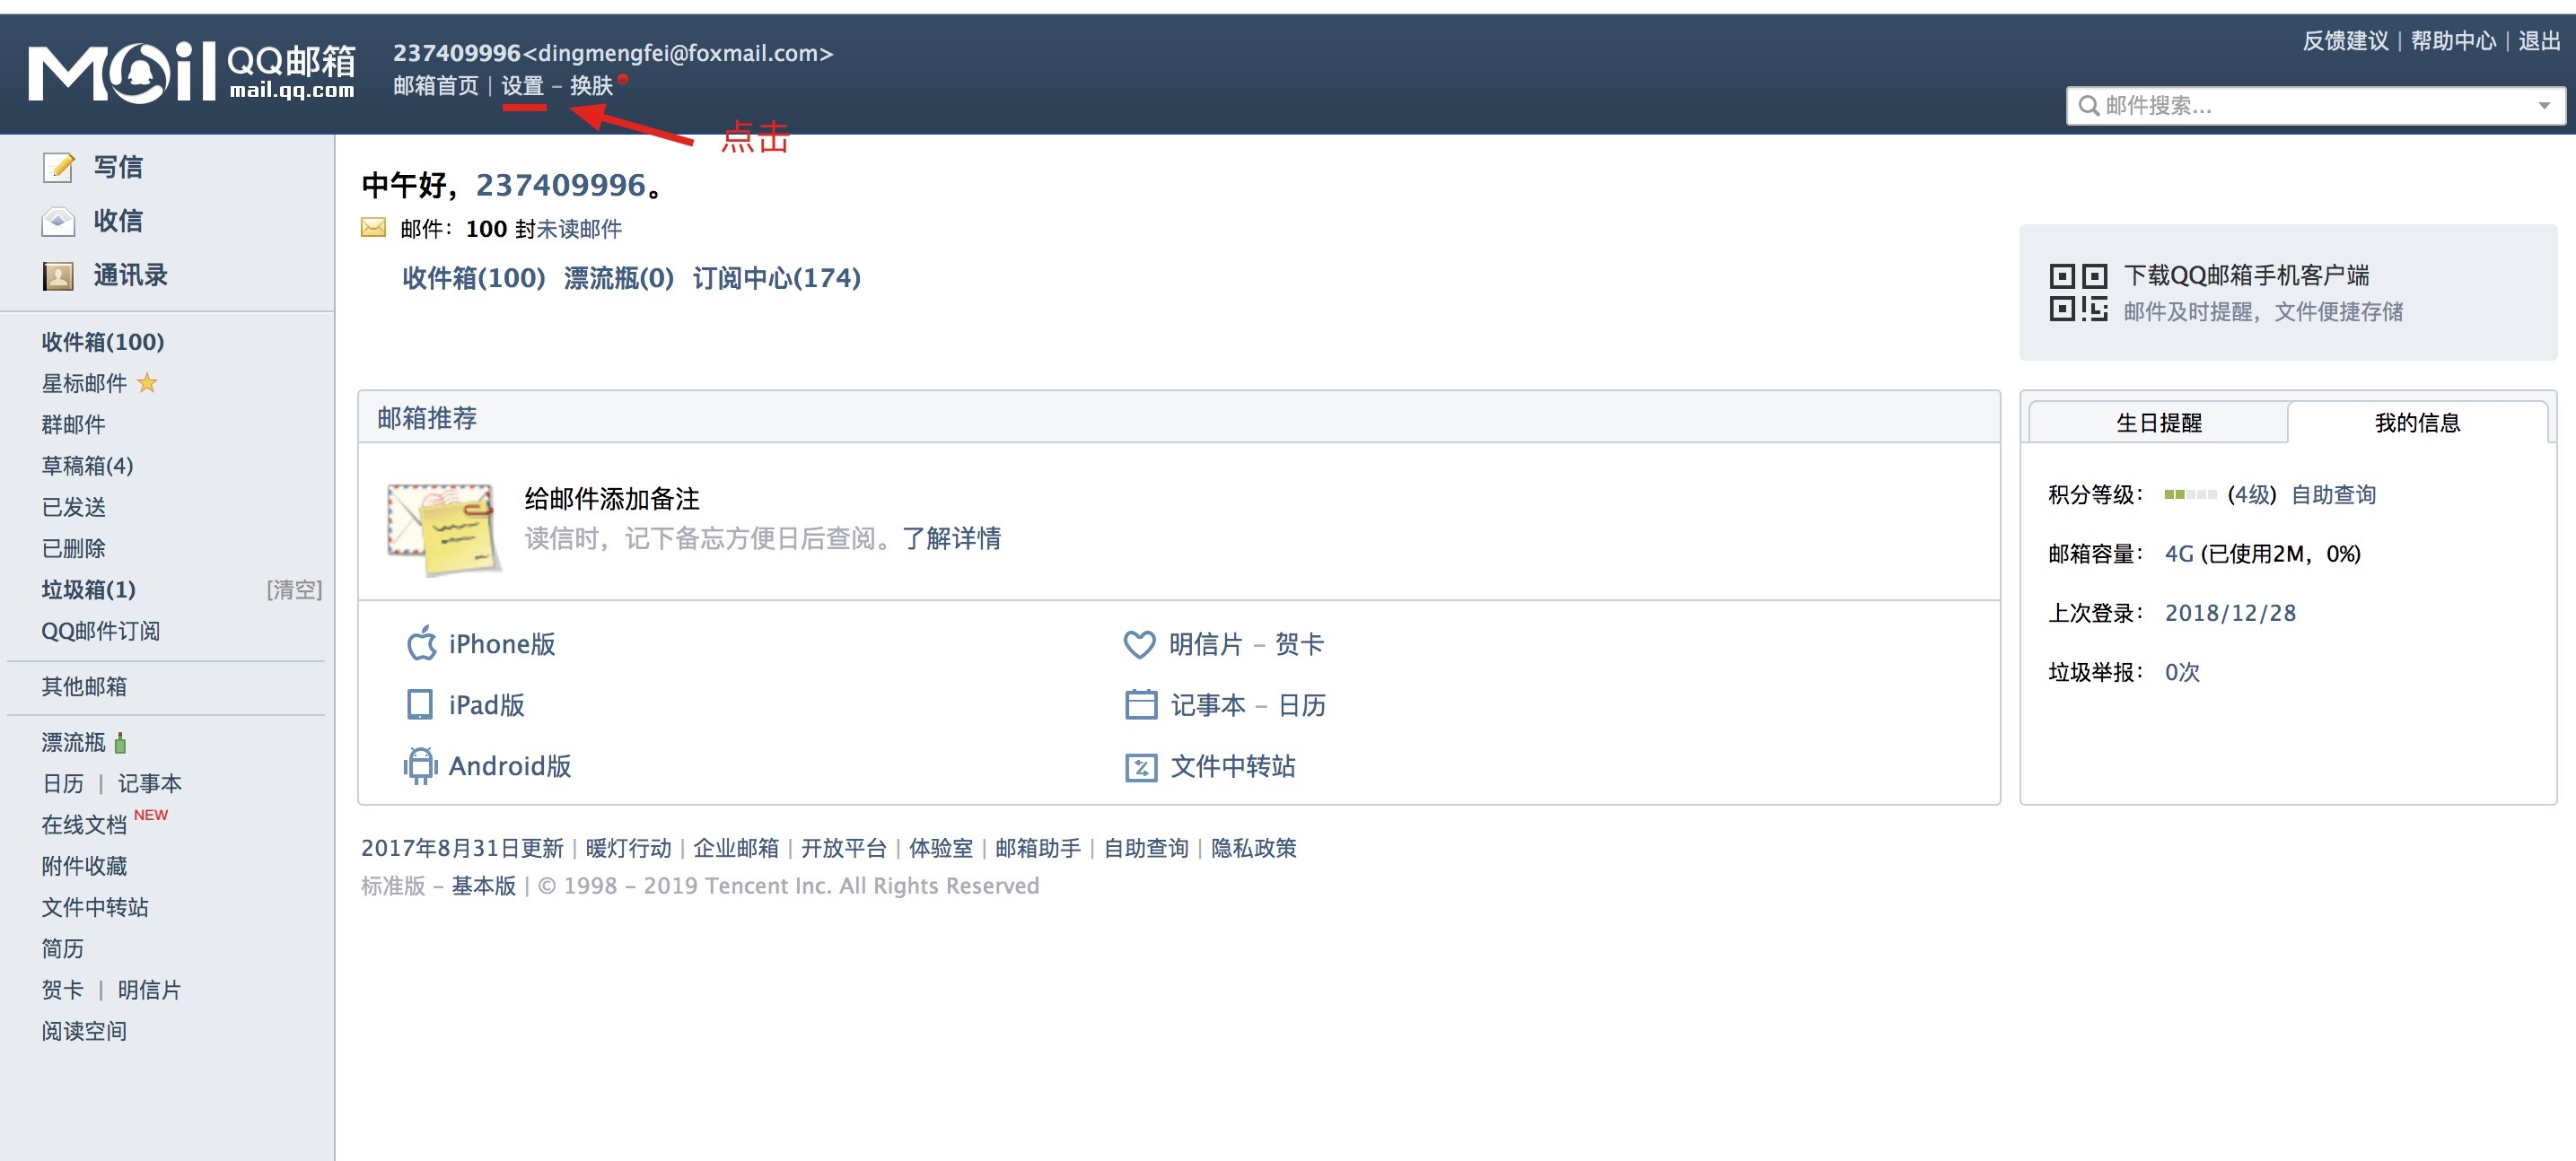
点击设置:
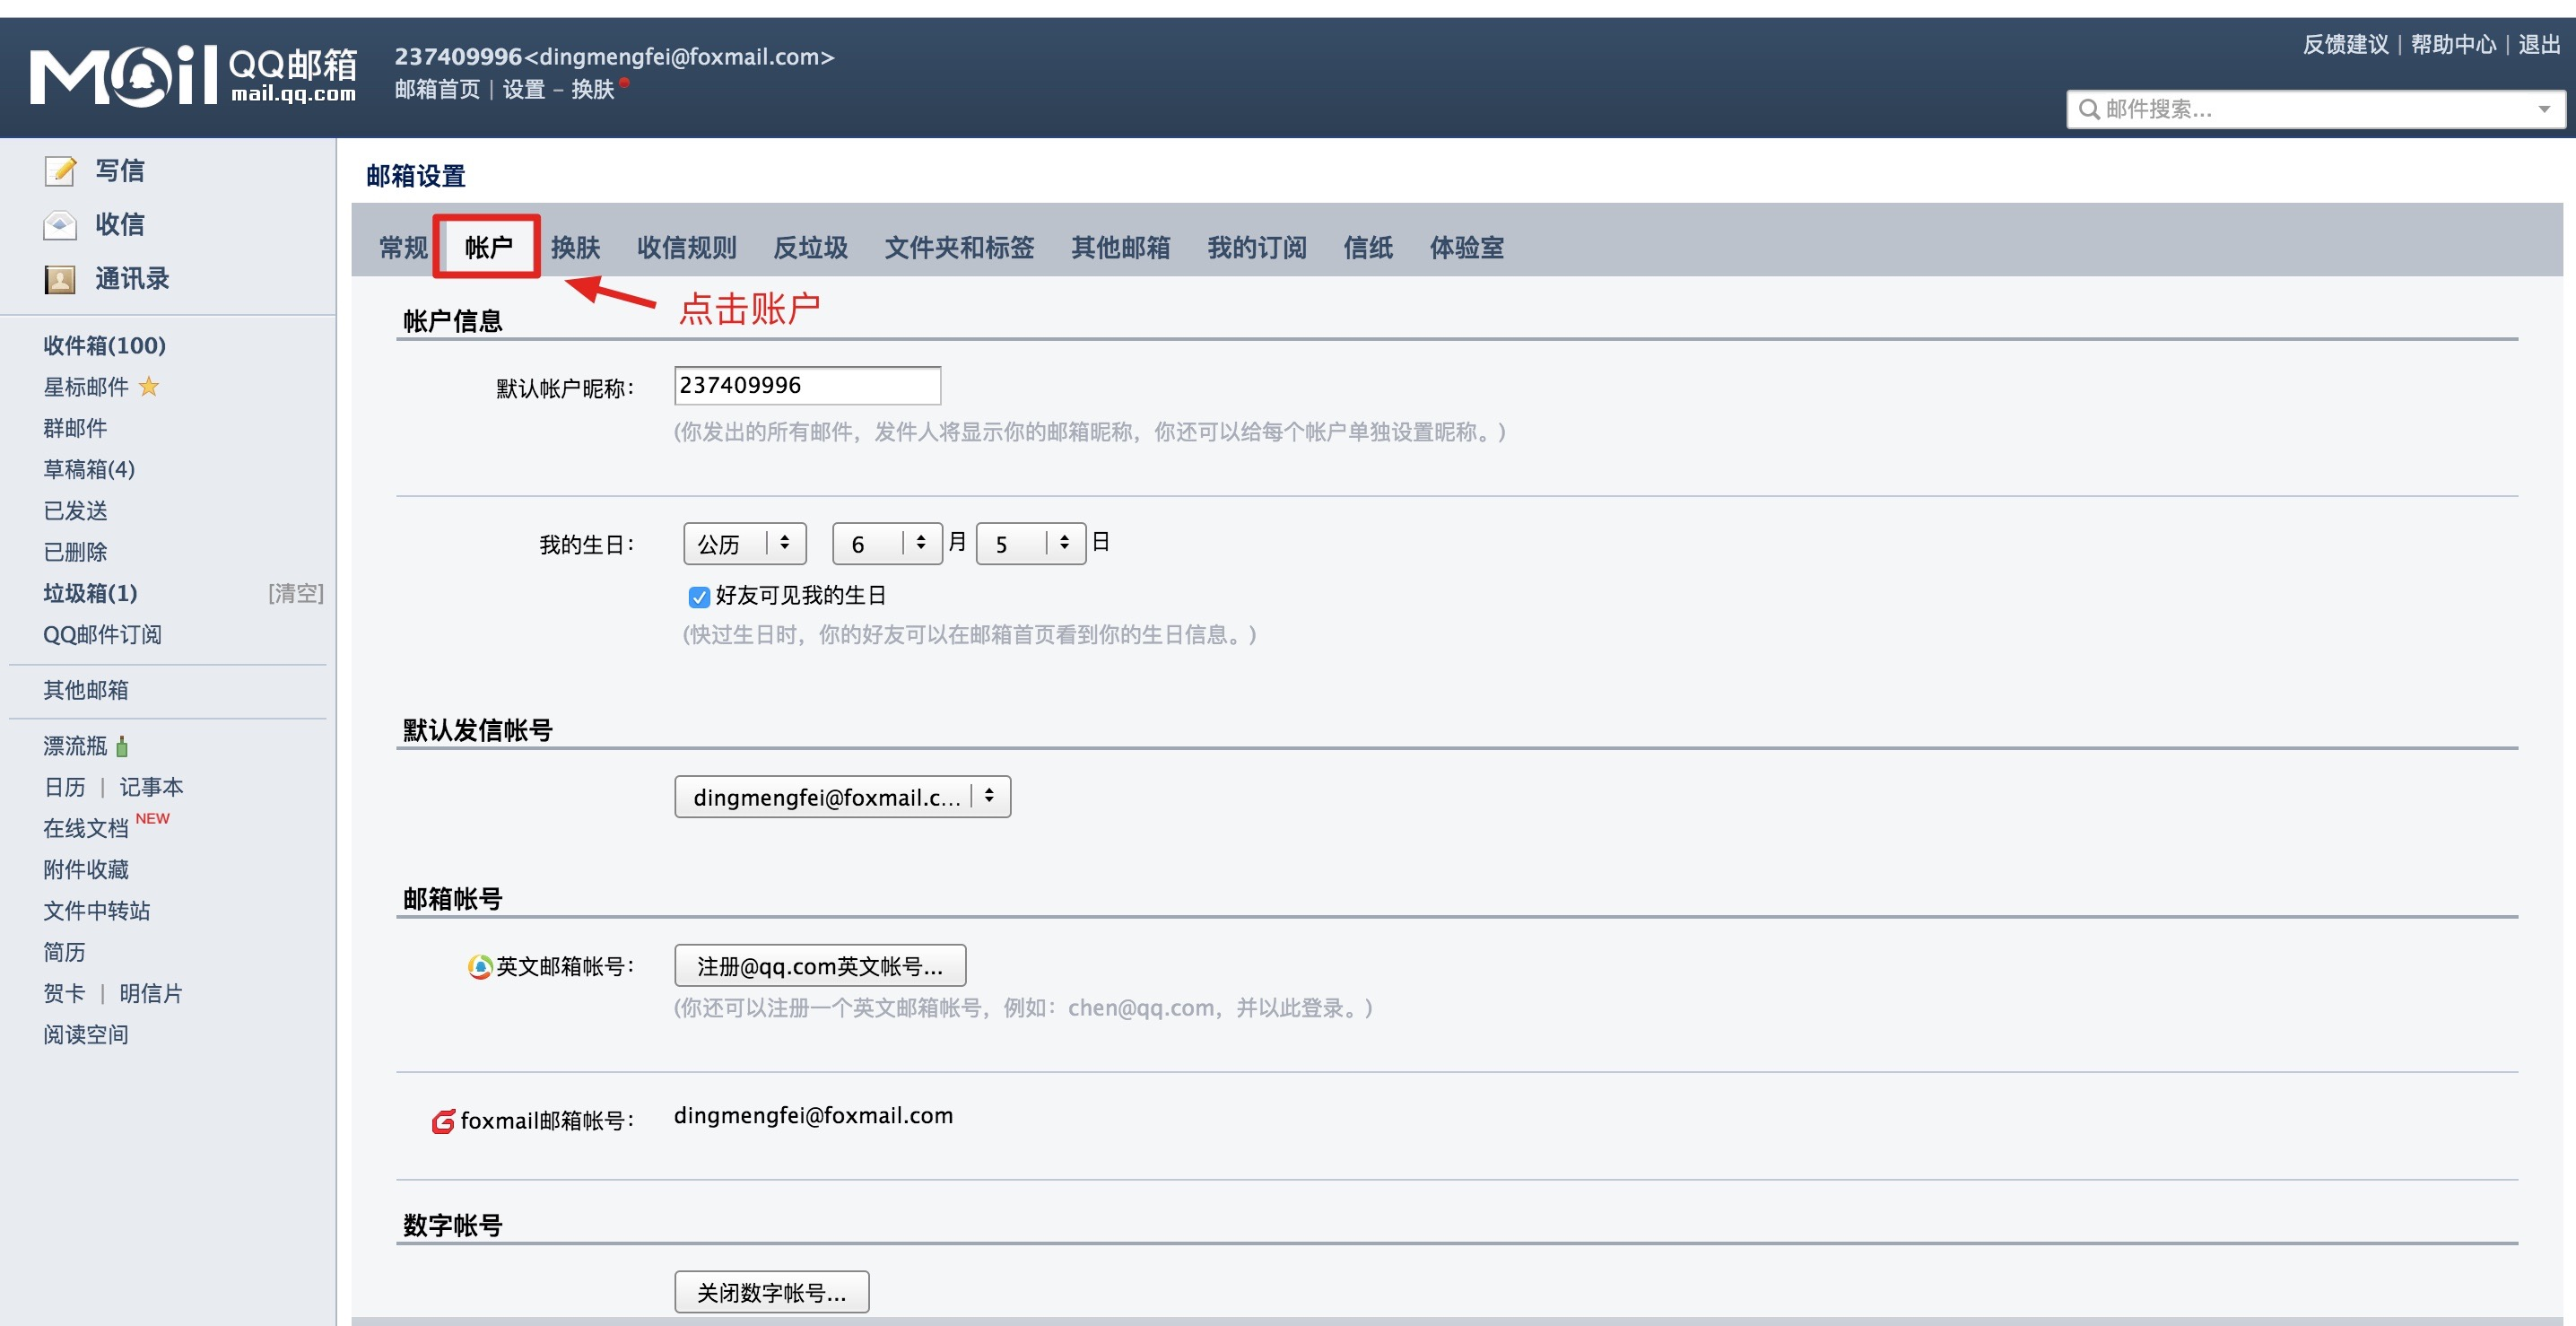
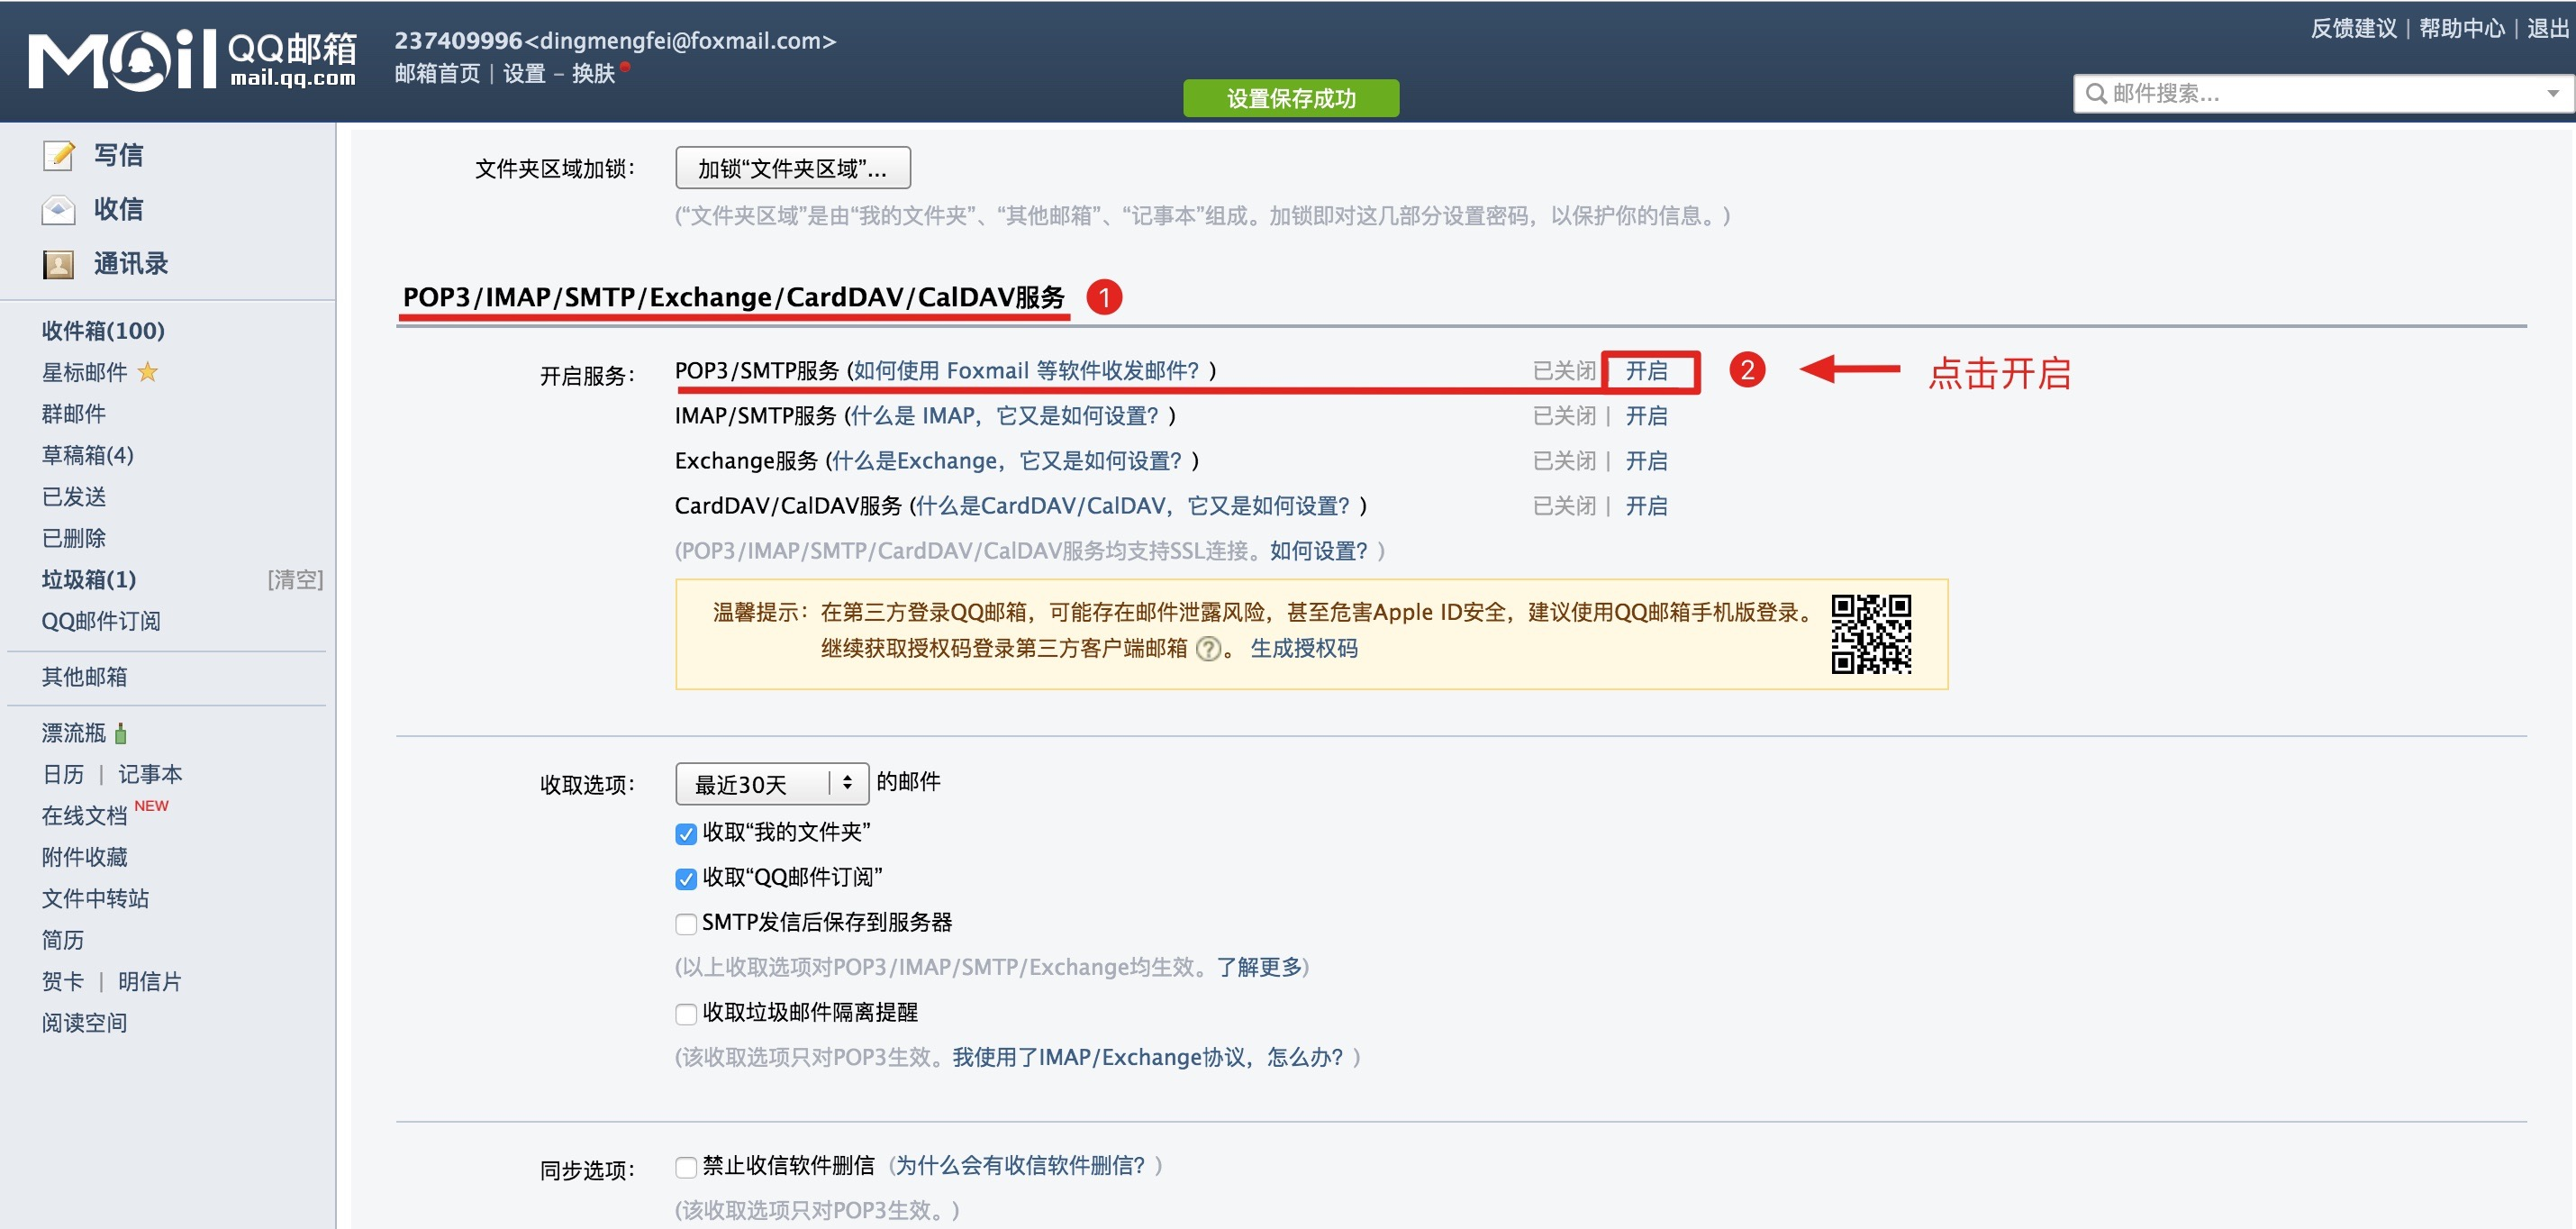
跳转页面后,点击账户,将页面往下拖动,您会看到:
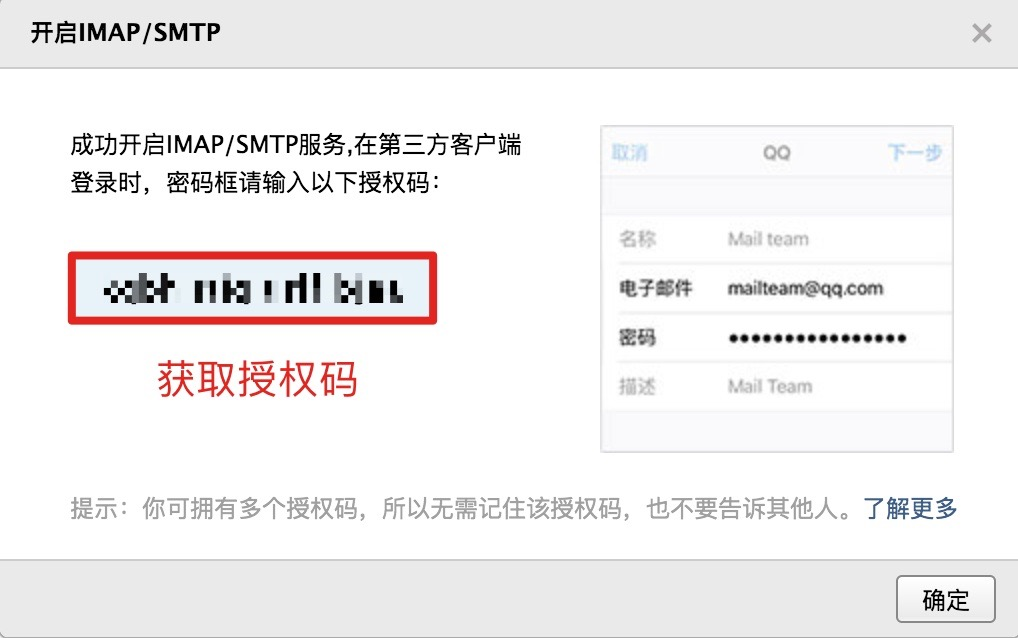
验证成功过后,即可获取授权码:
四、开始编码
4.1 定义功能类
先定义一个邮件服务的接口类, MailService.java:
package site.exception.springbootmail.service;

/**
 * @author 犬小哈(微信号: 小哈学Java)
 * @site 个人网站: www.exception.site
 * @date 2019/4/10
 * @time 下午4:19
 * @discription
 **/
public interface MailService {

    /**
     * 发送简单文本的邮件
     * @param to
     * @param subject
     * @param content
     * @return
     */
    boolean send(String to, String subject, String content);

    /**
     * 发送 html 的邮件
     * @param to
     * @param subject
     * @param html
     * @return
     */
    boolean sendWithHtml(String to, String subject, String html);

    /**
     * 发送带有图片的 html 的邮件
     * @param to
     * @param subject
     * @param html
     * @param cids
     * @param filePaths
     * @return
     */
    boolean sendWithImageHtml(String to, String subject, String html, String[] cids, String[] filePaths);


    /**
     * 发送带有附件的邮件
     * @param to
     * @param subject
     * @param content
     * @param filePaths
     * @return
     */
    boolean sendWithWithEnclosure(String to, String subject, String content, String[] filePaths);

}
接口内定义了四个方法:
send(): 发送简单文本的邮件;sendWithHtml(): 发送 html 的邮件;sendWithImageHtml(): 发送带有图片的 html 的邮件;sendWithWithEnclosure: 发送带有附件的邮件;
完成接口的定义以后,我们再定义一个具体实现类,MailServiceImpl.java:
package site.exception.springbootmail.service.impl;

import org.slf4j.Logger;
import org.slf4j.LoggerFactory;
import org.springframework.beans.factory.annotation.Autowired;
import org.springframework.boot.autoconfigure.mail.MailProperties;
import org.springframework.core.io.FileSystemResource;
import org.springframework.mail.SimpleMailMessage;
import org.springframework.mail.javamail.JavaMailSender;
import org.springframework.mail.javamail.MimeMessageHelper;
import org.springframework.stereotype.Service;
import org.springframework.util.Assert;
import site.exception.springbootmail.service.MailService;

import javax.mail.internet.MimeMessage;

/**
 * @author 犬小哈(微信号: 小哈学Java)
 * @site 个人网站: www.exception.site
 * @date 2019/4/10
 * @time 下午4:19
 * @discription
 **/
@Service
public class MailServiceImpl implements MailService {

    private final static Logger logger = LoggerFactory.getLogger(MailServiceImpl.class);

    @Autowired
    private MailProperties mailProperties;
    @Autowired
    private JavaMailSender javaMailSender;

    /**
     * 发送简单文本的邮件
     * @param to
     * @param subject
     * @param content
     * @return
     */
    @Override
    public boolean send(String to, String subject, String content) {
        logger.info("## Ready to send mail ...");

        SimpleMailMessage simpleMailMessage = new SimpleMailMessage();
        // 邮件发送来源
        simpleMailMessage.setFrom(mailProperties.getUsername());
        // 邮件发送目标
        simpleMailMessage.setTo(to);
        // 设置标题
        simpleMailMessage.setSubject(subject);
        // 设置内容
        simpleMailMessage.setText(content);

        try {
            // 发送
            javaMailSender.send(simpleMailMessage);
            logger.info("## Send the mail success ...");
        } catch (Exception e) {
            logger.error("Send mail error: ", e);
            return false;
        }

        return true;
    }

    /**
     * 发送 html 的邮件
     * @param to
     * @param subject
     * @param html
     * @return
     */
    @Override
    public boolean sendWithHtml(String to, String subject, String html) {
        logger.info("## Ready to send mail ...");
        MimeMessage mimeMessage = javaMailSender.createMimeMessage();

        MimeMessageHelper mimeMessageHelper = null;
        try {
            mimeMessageHelper = new MimeMessageHelper(mimeMessage, true);
            // 邮件发送来源
            mimeMessageHelper.setFrom(mailProperties.getUsername());
            // 邮件发送目标
            mimeMessageHelper.setTo(to);
            // 设置标题
            mimeMessageHelper.setSubject(subject);
            // 设置内容,并设置内容 html 格式为 true
            mimeMessageHelper.setText(html, true);

            javaMailSender.send(mimeMessage);
            logger.info("## Send the mail with html success ...");
        } catch (Exception e) {
            e.printStackTrace();
            logger.error("Send html mail error: ", e);
            return false;
        }

        return true;
    }

    /**
     * 发送带有图片的 html 的邮件
     * @param to
     * @param subject
     * @param html
     * @param cids
     * @param filePaths
     * @return
     */
    @Override
    public boolean sendWithImageHtml(String to, String subject, String html, String[] cids, String[] filePaths) {
        logger.info("## Ready to send mail ...");
        MimeMessage mimeMessage = javaMailSender.createMimeMessage();

        MimeMessageHelper mimeMessageHelper = null;
        try {
            mimeMessageHelper = new MimeMessageHelper(mimeMessage, true);
            // 邮件发送来源
            mimeMessageHelper.setFrom(mailProperties.getUsername());
            // 邮件发送目标
            mimeMessageHelper.setTo(to);
            // 设置标题
            mimeMessageHelper.setSubject(subject);
            // 设置内容,并设置内容 html 格式为 true
            mimeMessageHelper.setText(html, true);

            // 设置 html 中内联的图片
            for (int i = 0; i < cids.length; i++) {
                FileSystemResource file = new FileSystemResource(filePaths[i]);
                // addInline() 方法 cid 需要 html 中的 cid (Content ID) 对应,才能设置图片成功,
                // 具体可以参见,下面 4.3.3 单元测试的参数设置
                mimeMessageHelper.addInline(cids[i], file);
            }

            javaMailSender.send(mimeMessage);
            logger.info("## Send the mail with image success ...");
        } catch (Exception e) {
            e.printStackTrace();
            logger.error("Send html mail error: ", e);
            return false;
        }

        return true;
    }

    /**
     * 发送带有附件的邮件
     * @param to
     * @param subject
     * @param content
     * @param filePaths
     * @return
     */
    @Override
    public boolean sendWithWithEnclosure(String to, String subject, String content, String[] filePaths) {
        logger.info("## Ready to send mail ...");
        MimeMessage mimeMessage = javaMailSender.createMimeMessage();

        MimeMessageHelper mimeMessageHelper = null;
        try {
            mimeMessageHelper = new MimeMessageHelper(mimeMessage, true);
            // 邮件发送来源
            mimeMessageHelper.setFrom(mailProperties.getUsername());
            // 邮件发送目标
            mimeMessageHelper.setTo(to);
            // 设置标题
            mimeMessageHelper.setSubject(subject);
            // 设置内容
            mimeMessageHelper.setText(content);

            // 添加附件
            for (int i = 0; i < filePaths.length; i++) {
                FileSystemResource file = new FileSystemResource(filePaths[i]);
                String attachementFileName = "附件" + (i + 1);
                mimeMessageHelper.addAttachment(attachementFileName, file);
            }

            javaMailSender.send(mimeMessage);
            logger.info("## Send the mail with enclosure success ...");
        } catch (Exception e) {
            logger.error("Send html mail error: ", e);
            return false;
        }
        return true;
    }
}
4.2 项目结构
完成上面功能类的编码后,看下项目结构如下:

4.3 单元测试,验证效果
4.3.1 简单文本发送
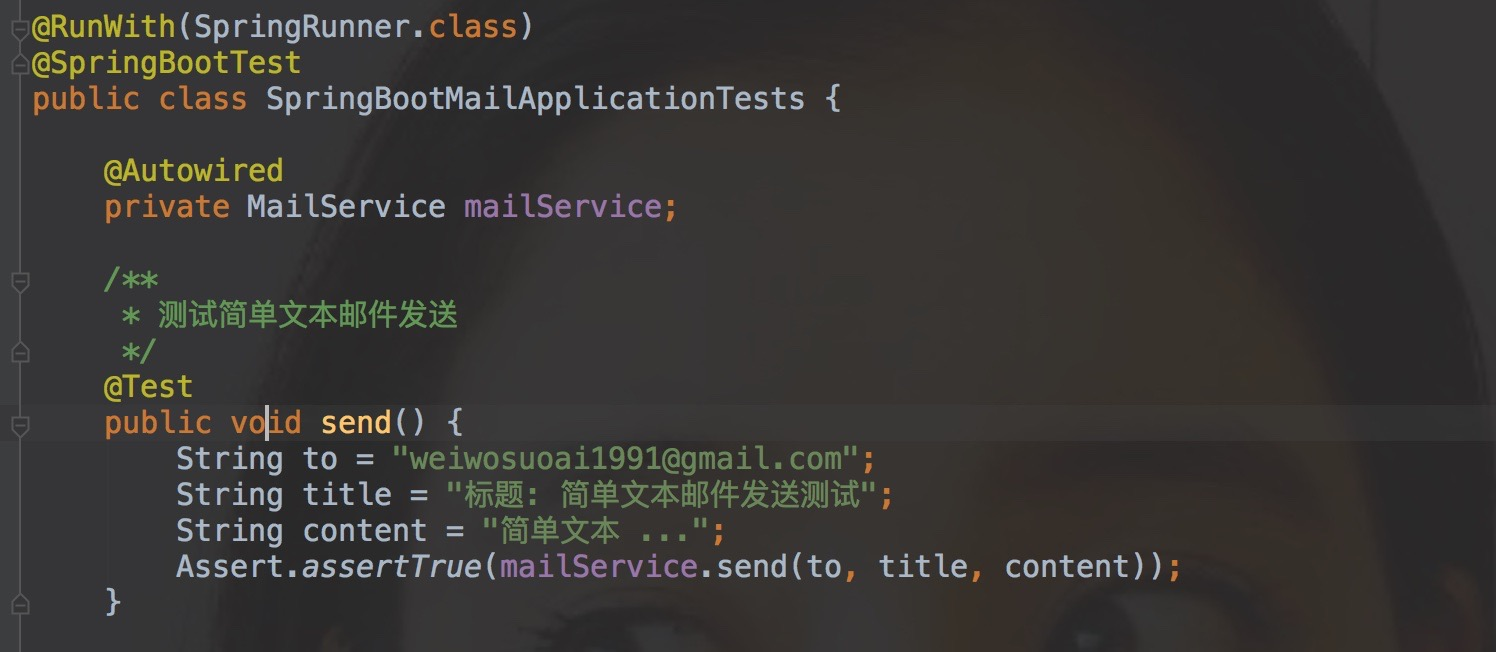
填写相关测试参数,包括目标邮箱地址,标题,内容,运行单元测试:
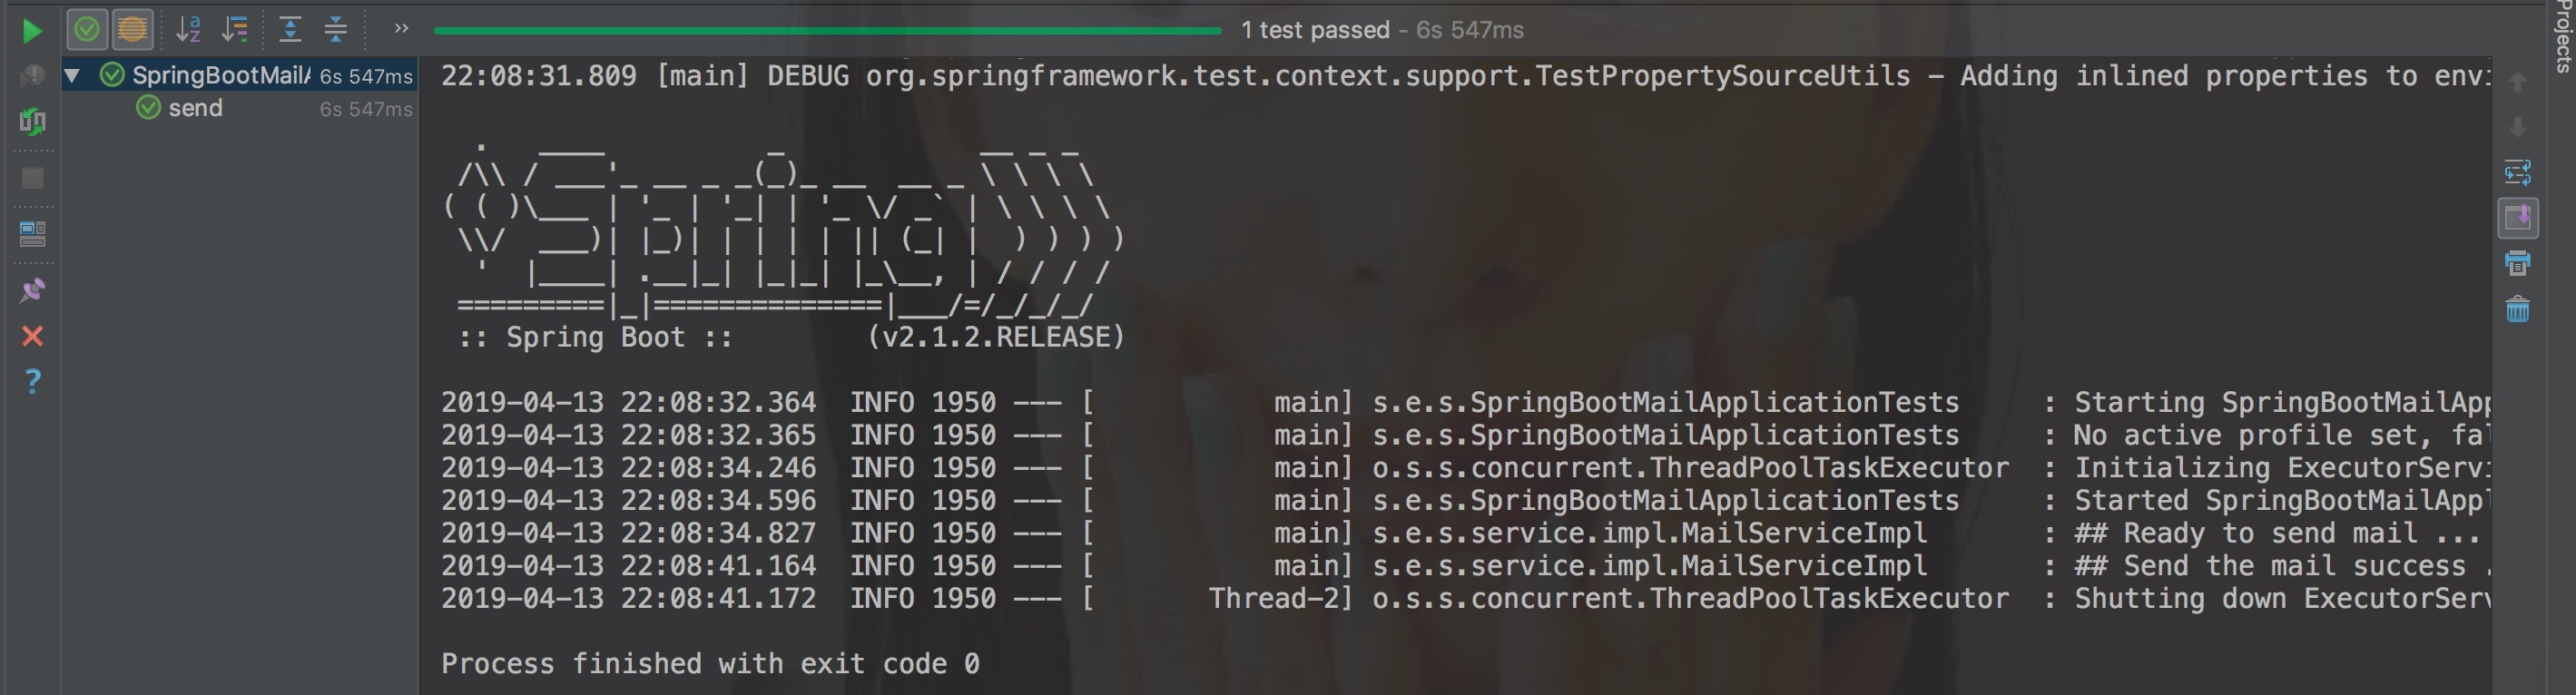
单元测试通过,再看下实际效果:
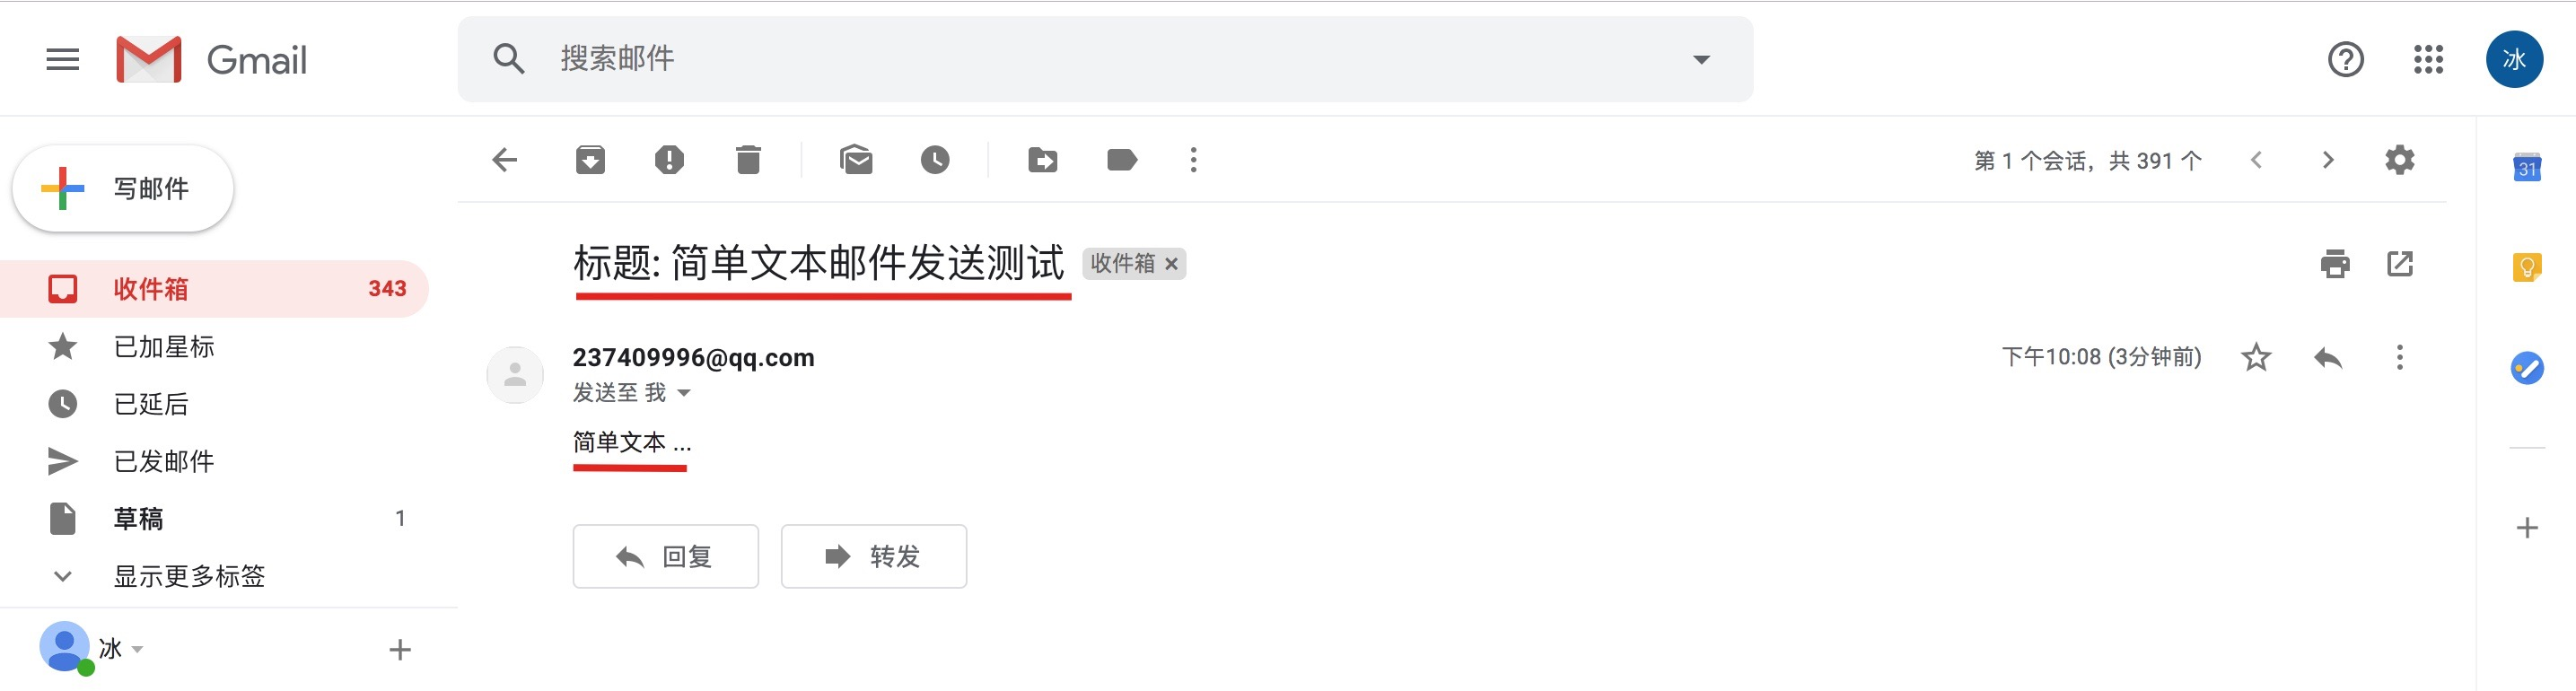
邮件正常发送。
4.3.2 发送 Html

填写相关测试参数,包括目标邮箱地址,标题,html 内容,运行单元测试通过,直接看效果:
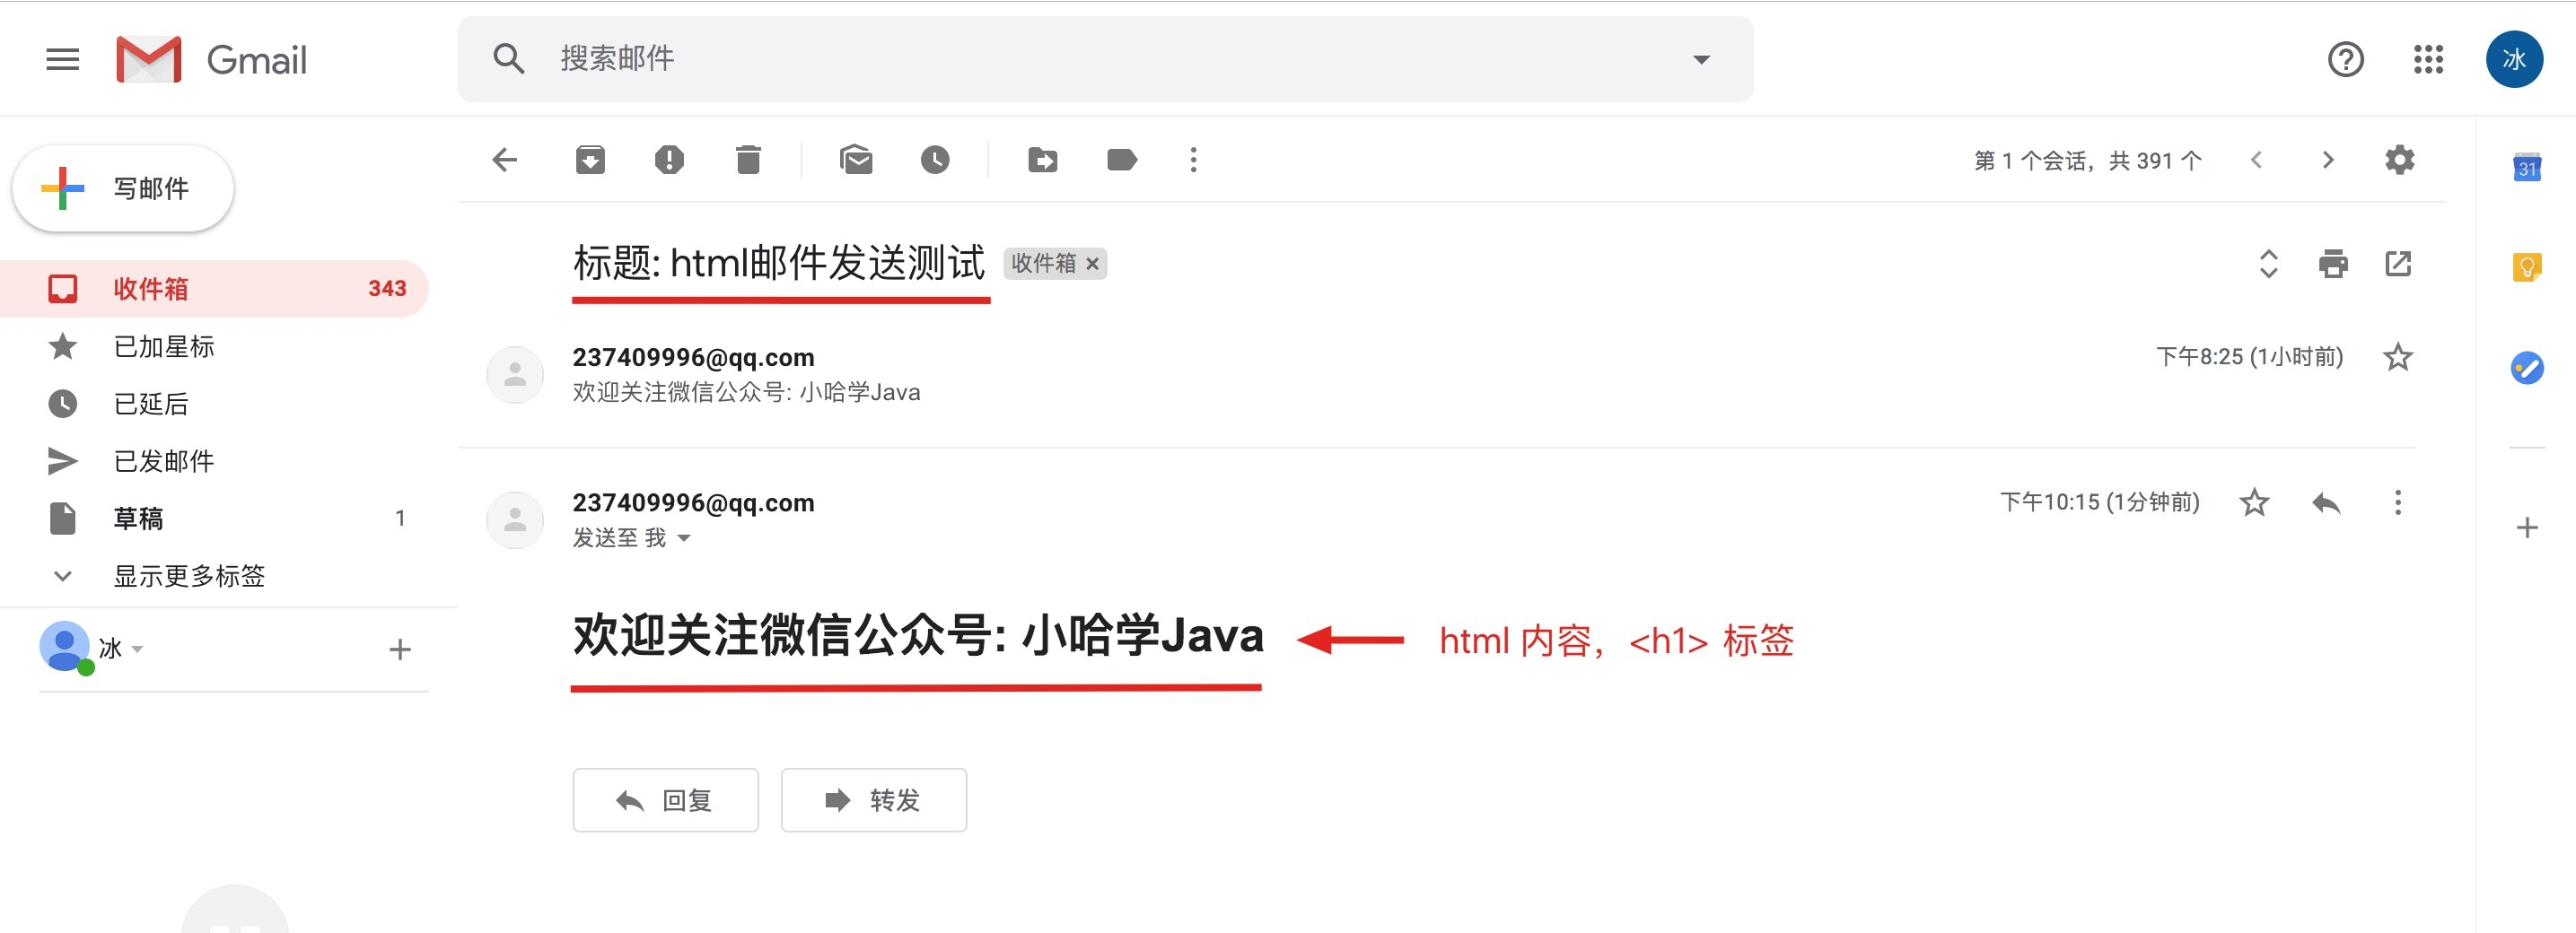
可以看到,邮件发送成功!
4.3.3 发送带有图片的 Html
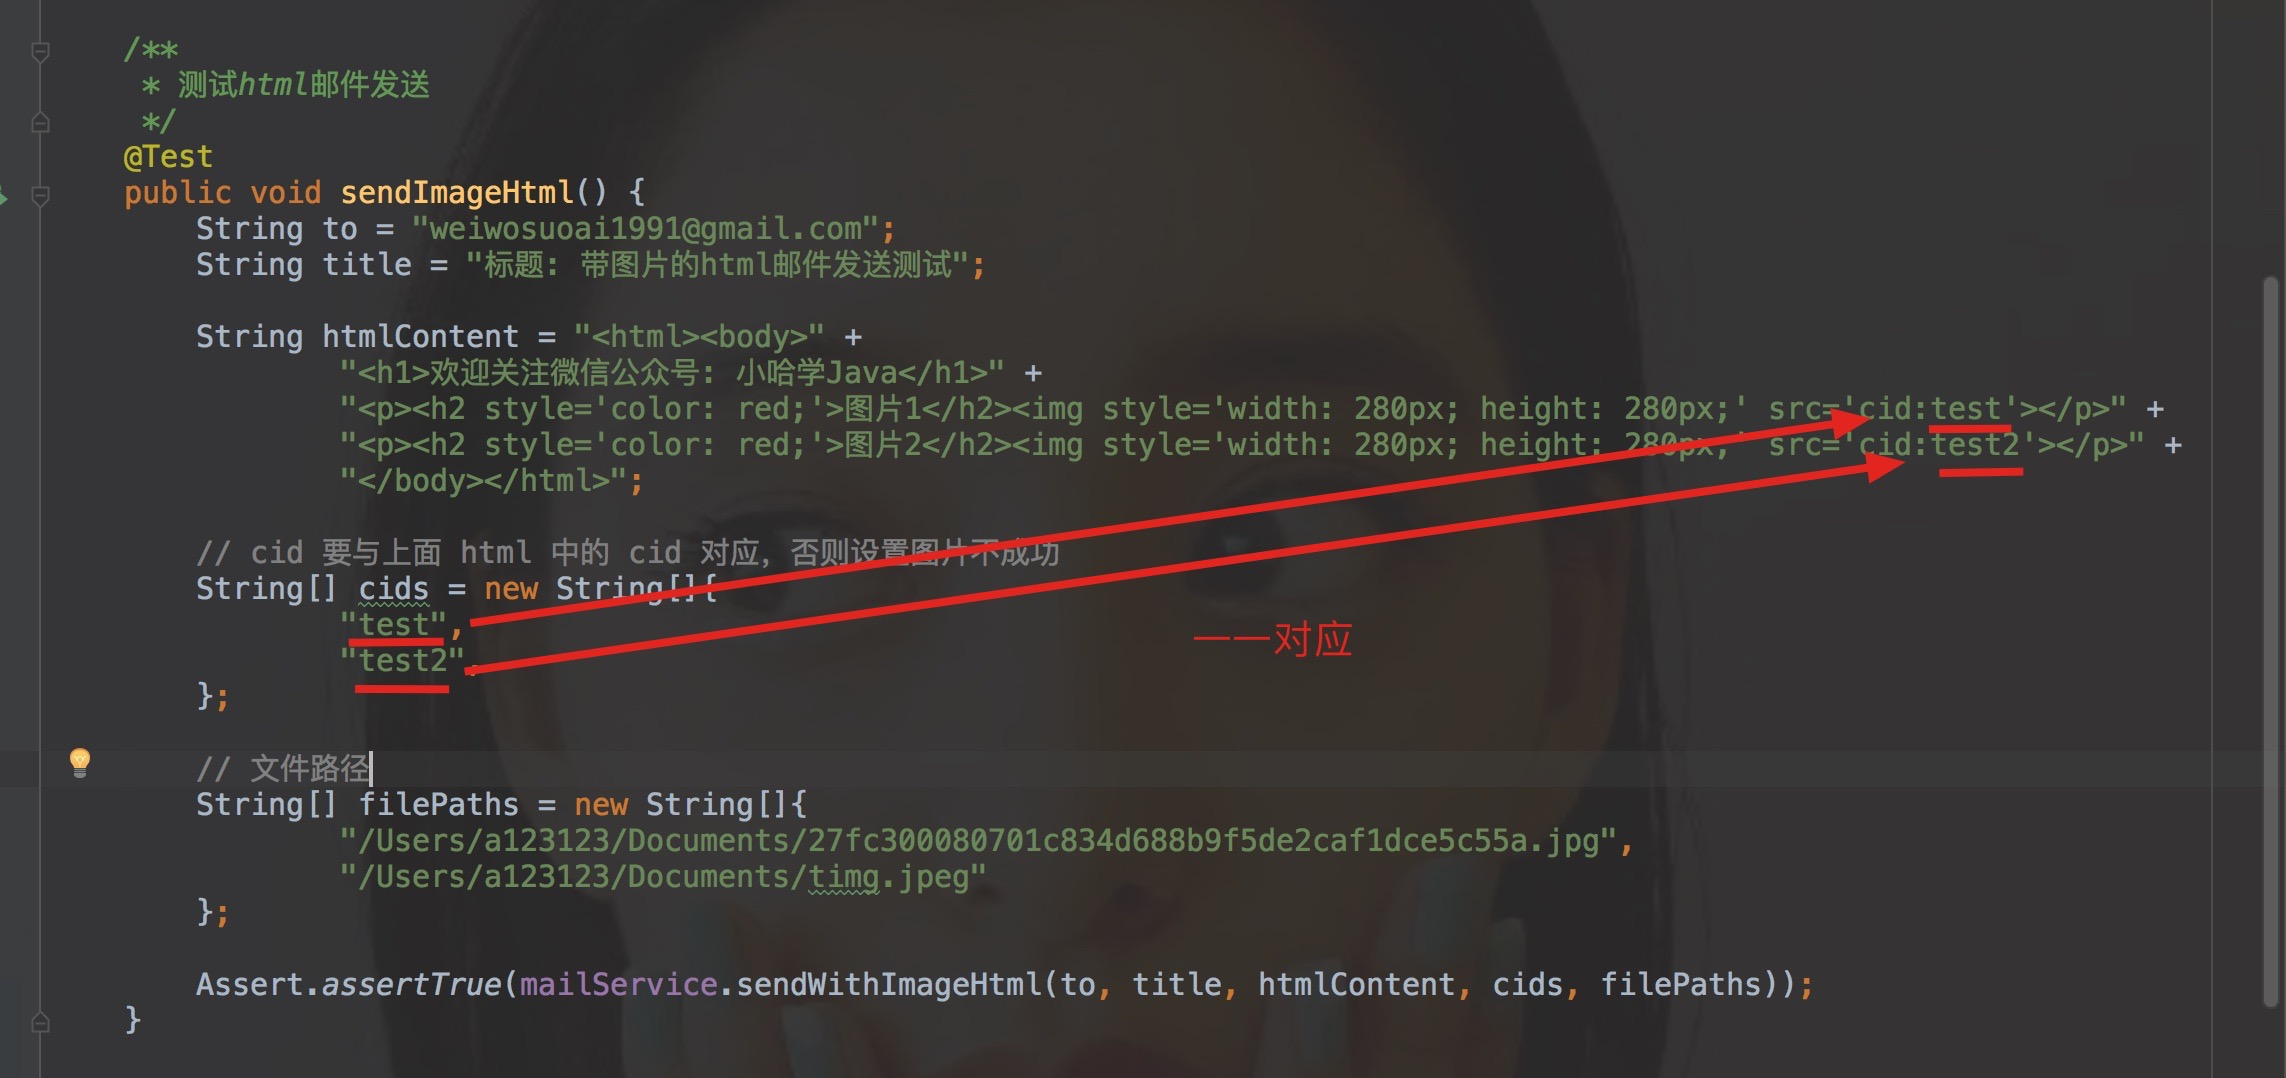
填写相关测试参数,包括目标邮箱地址,标题,html 内容,html 中包含了两张图片,并且 src 中的内容是 cid:{flag}的格式,前缀 cid:是固定的,您需要改变是后面的标志位,通过 addInline(cid, file) 来将 cid 和具体的图片文件对应起来。
运行单元测试通过,看看效果如何:
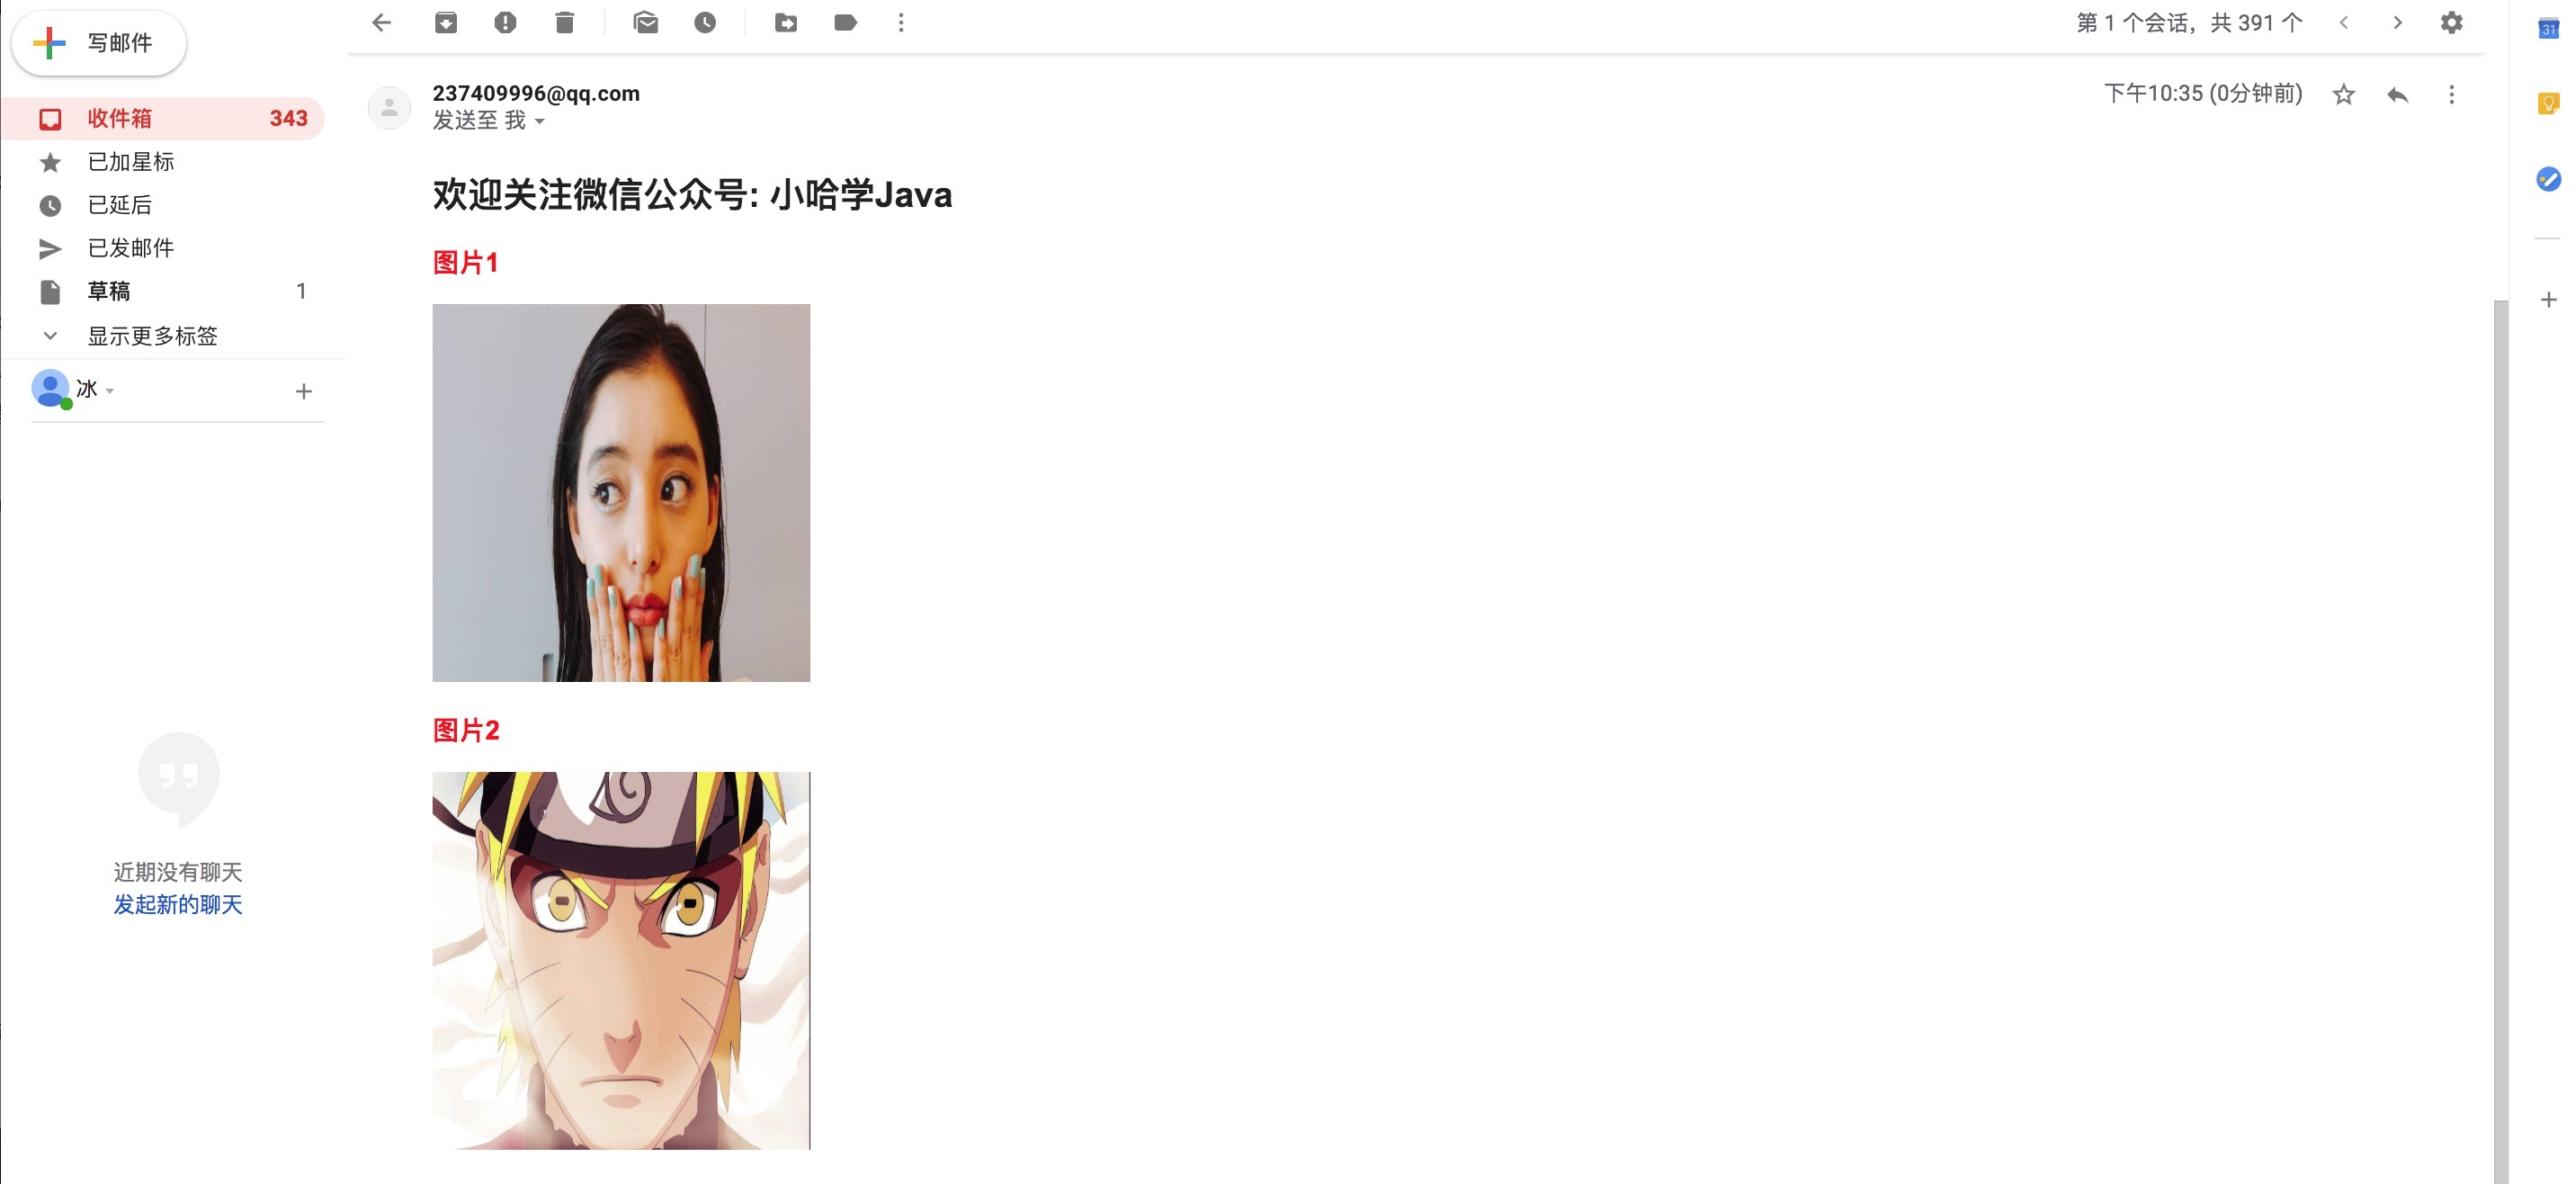
可以看到 html 中图片也是 OK 的。
PS: 这里笔者在测试发送给 QQ 邮箱的时候,图片显示不成功,暂时还没找到问题在哪,如果有哪位读者知道,不妨后台发个消息告诉一下笔者哈。
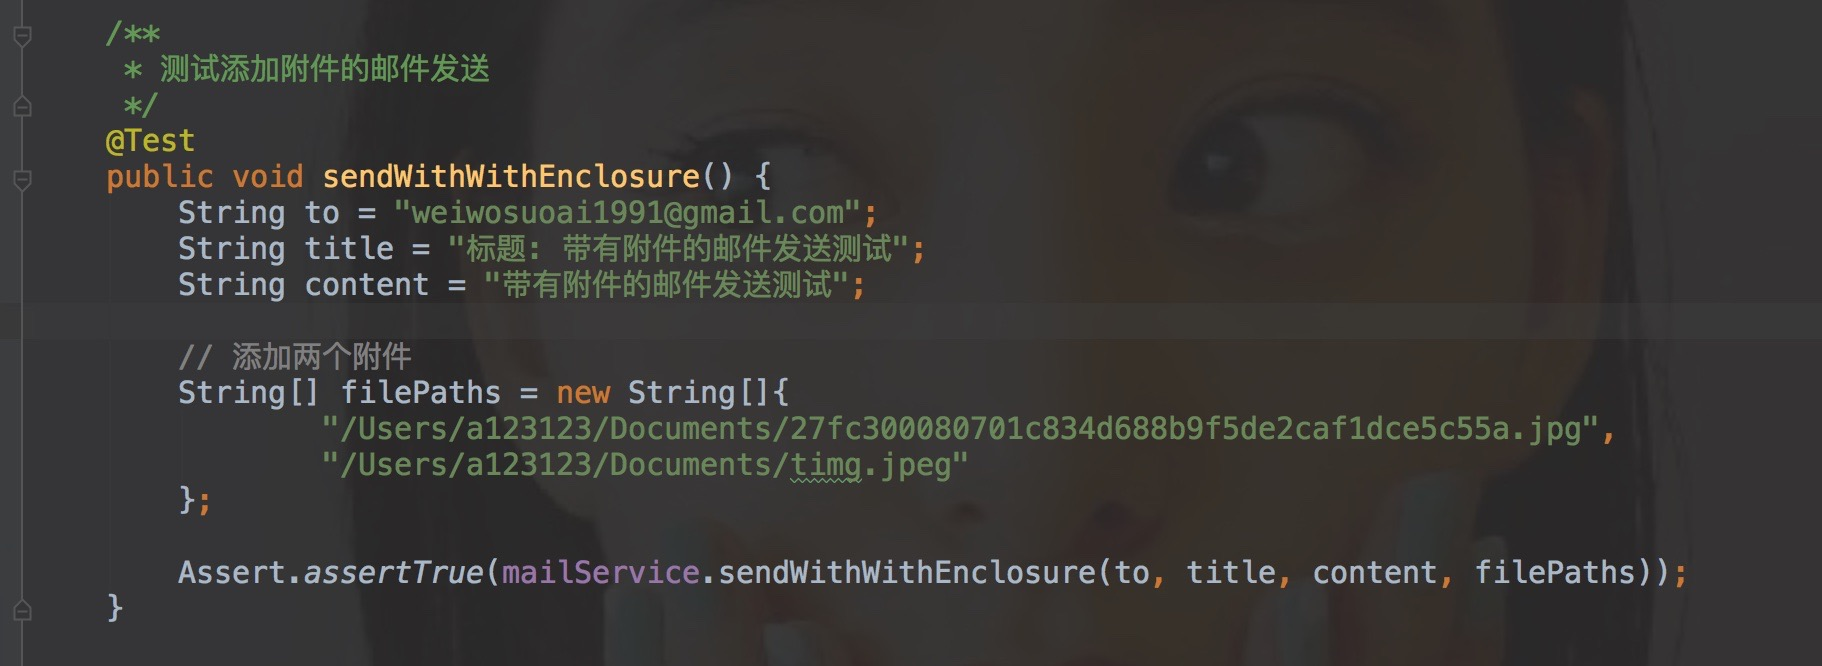
4.3.4 发送带有附件的邮件
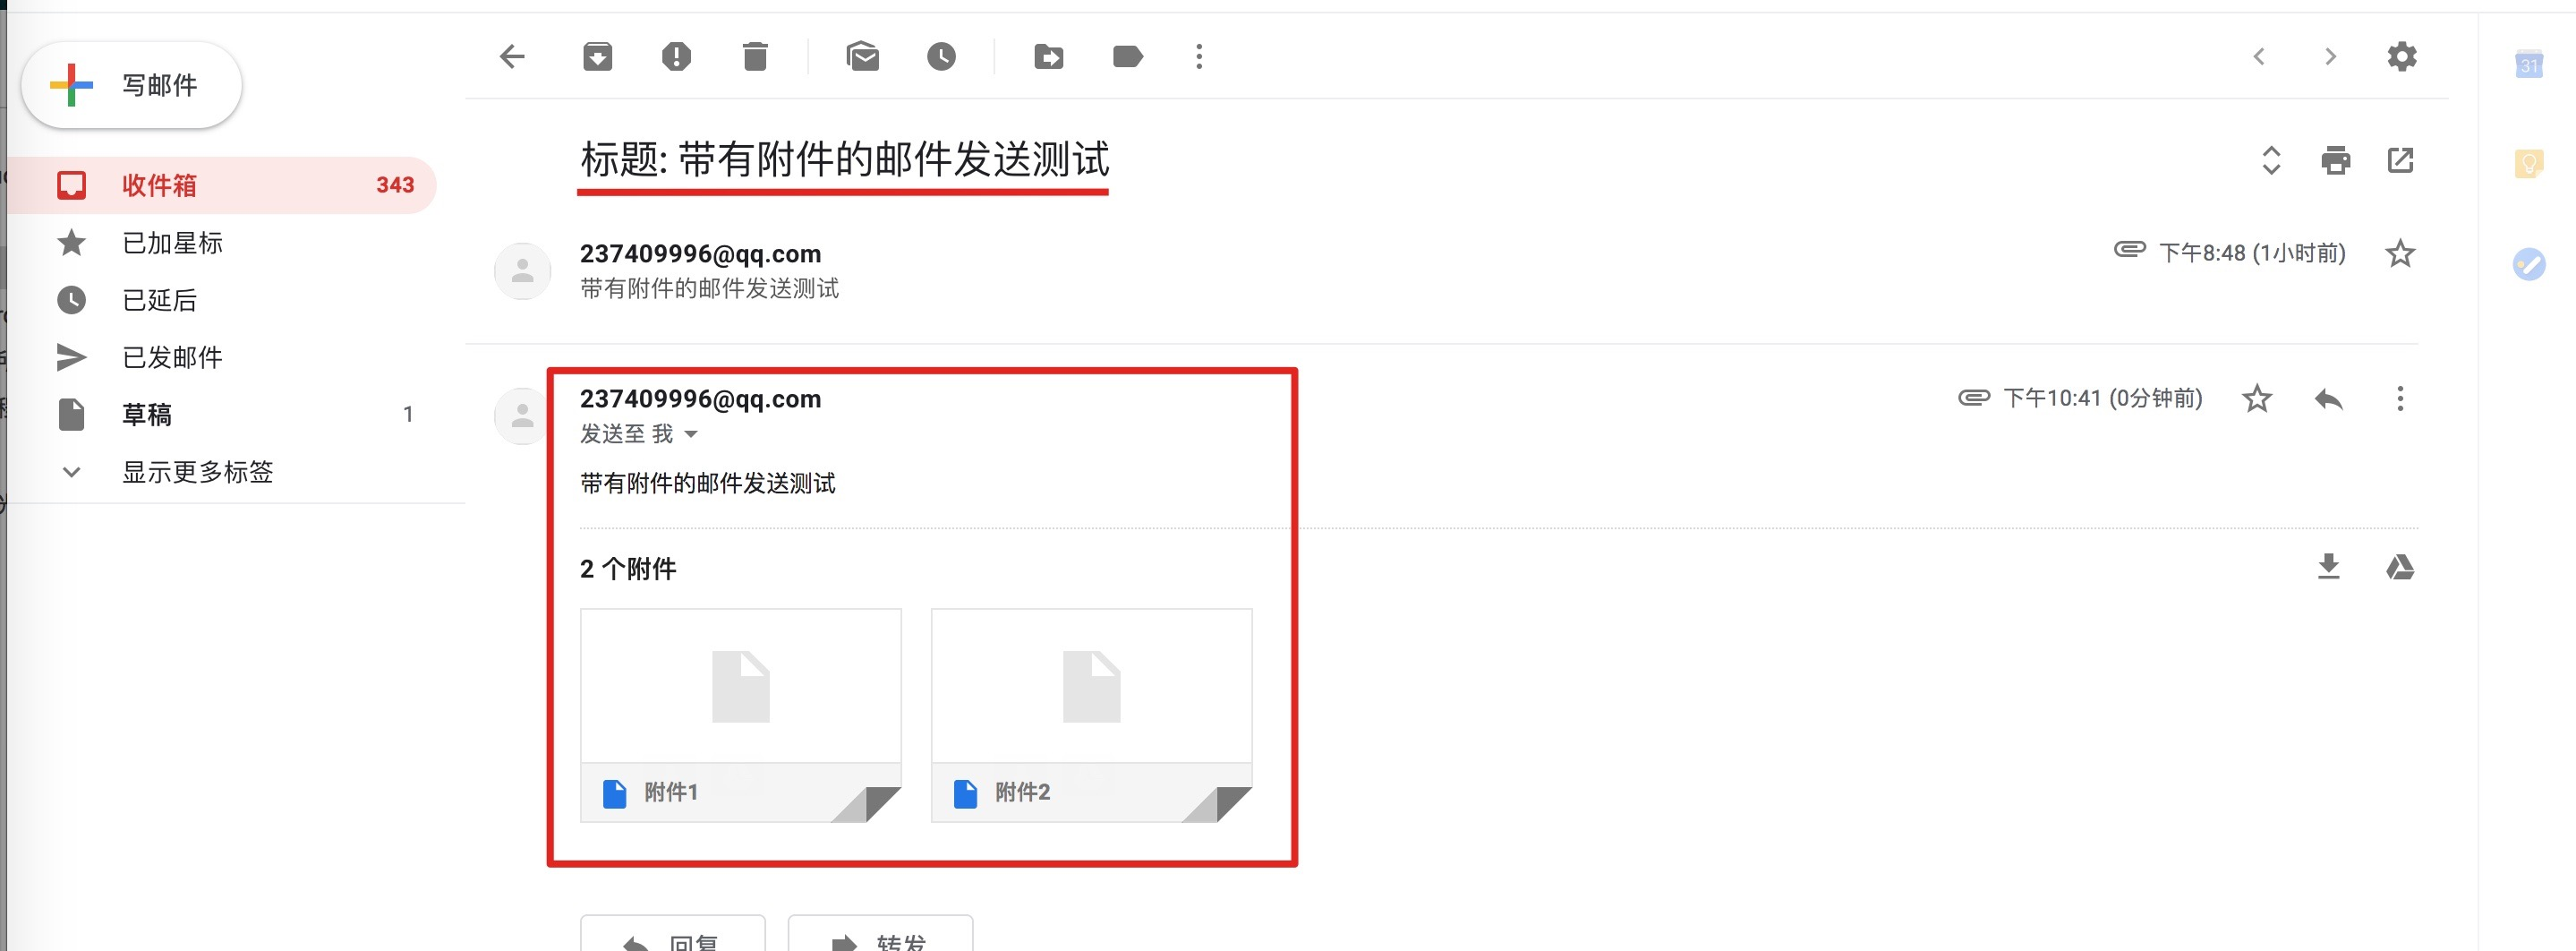
发送成功,到此所有的单元测试全部运行通过。
五、总结
本文中,我们学习如何在 Spring Boot 2.x 版本中集成发送邮件功能,包括发送简单文本,Html 内容,带有图片的 Html 内容,以及带有的附加的邮件,希望对您有所帮助!
六、GitHub 源码地址
七、赠送 | 面试&学习福利资源
最近在网上发现一个不错的 PDF 资源《Java 核心面试知识.pdf》分享给大家,不光是面试,学习,你都值得拥有!!!
获取方式: 关注公众号: 小哈学Java, 后台回复 资源,既可获取资源链接,下面是目录以及部分截图:
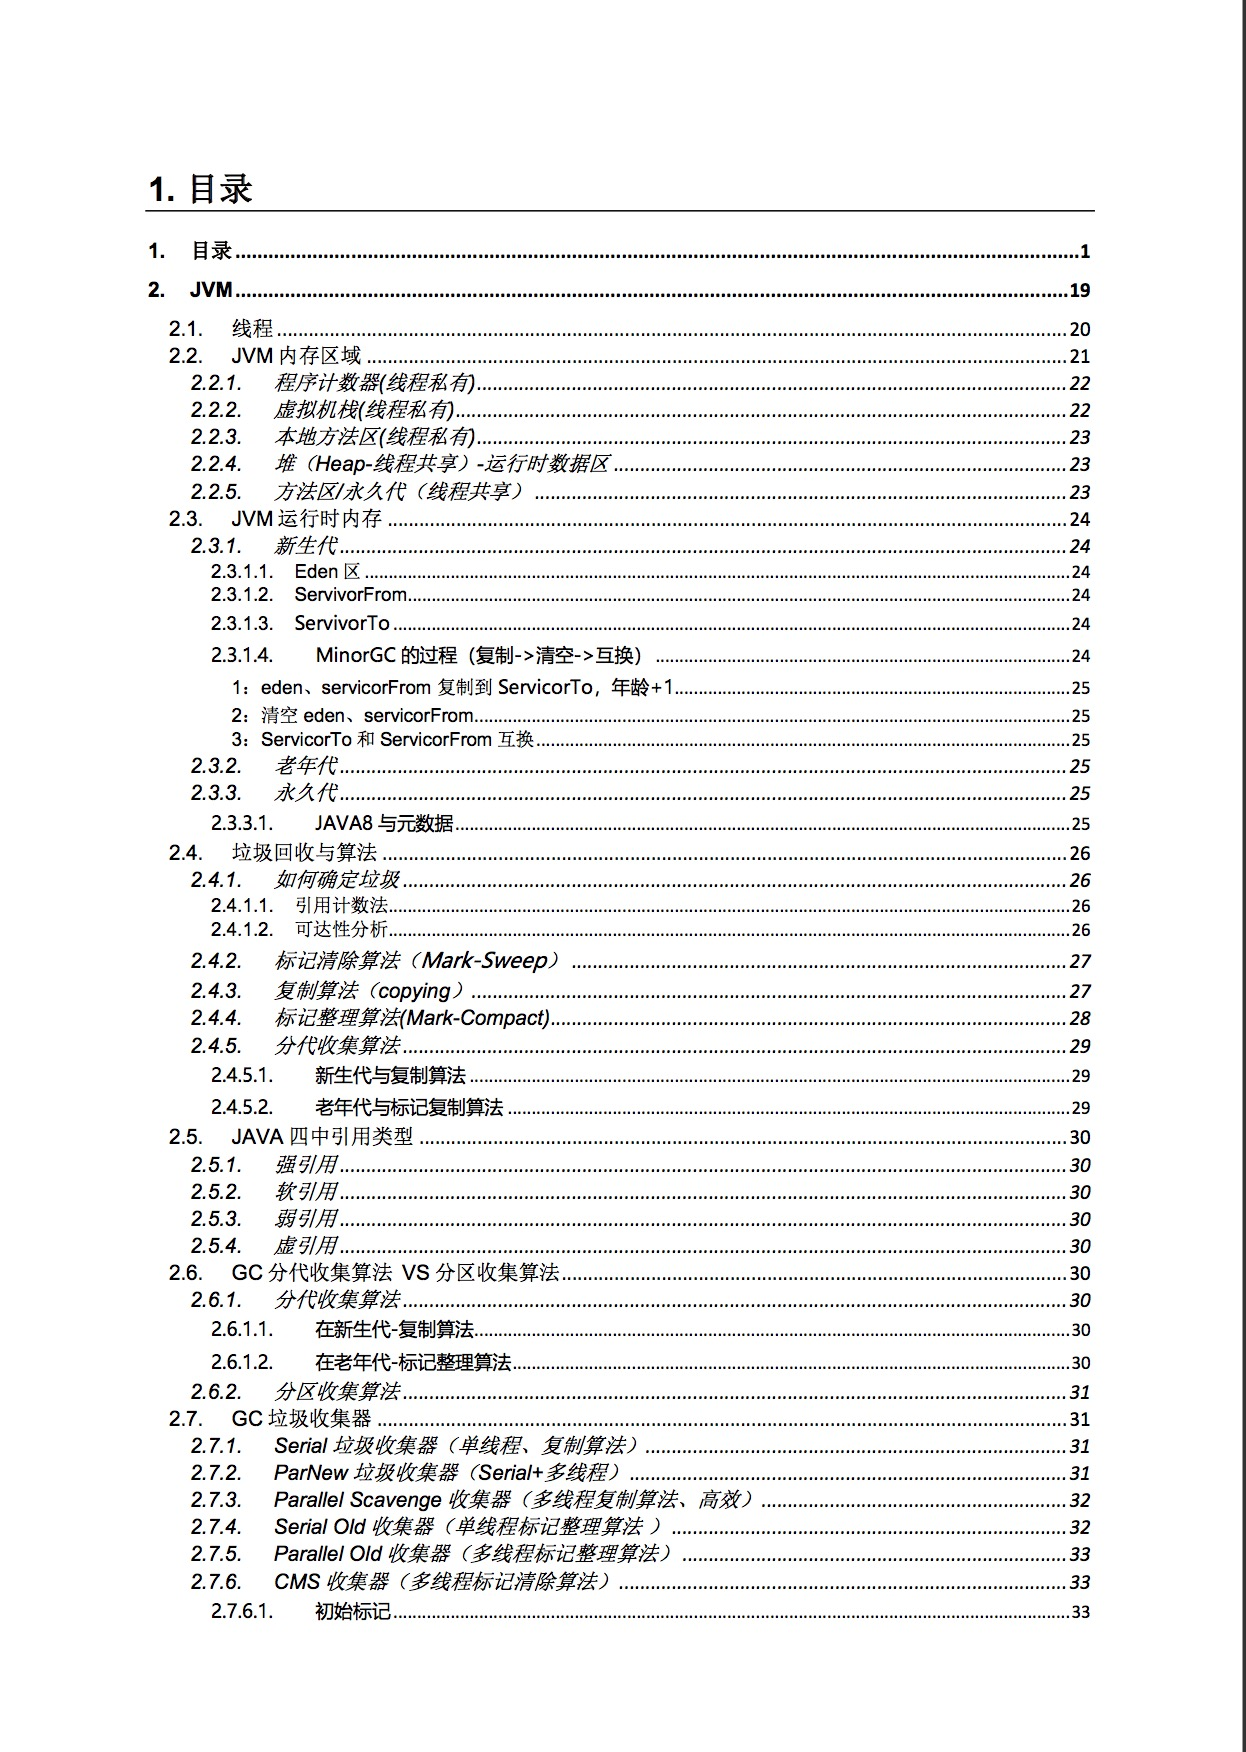
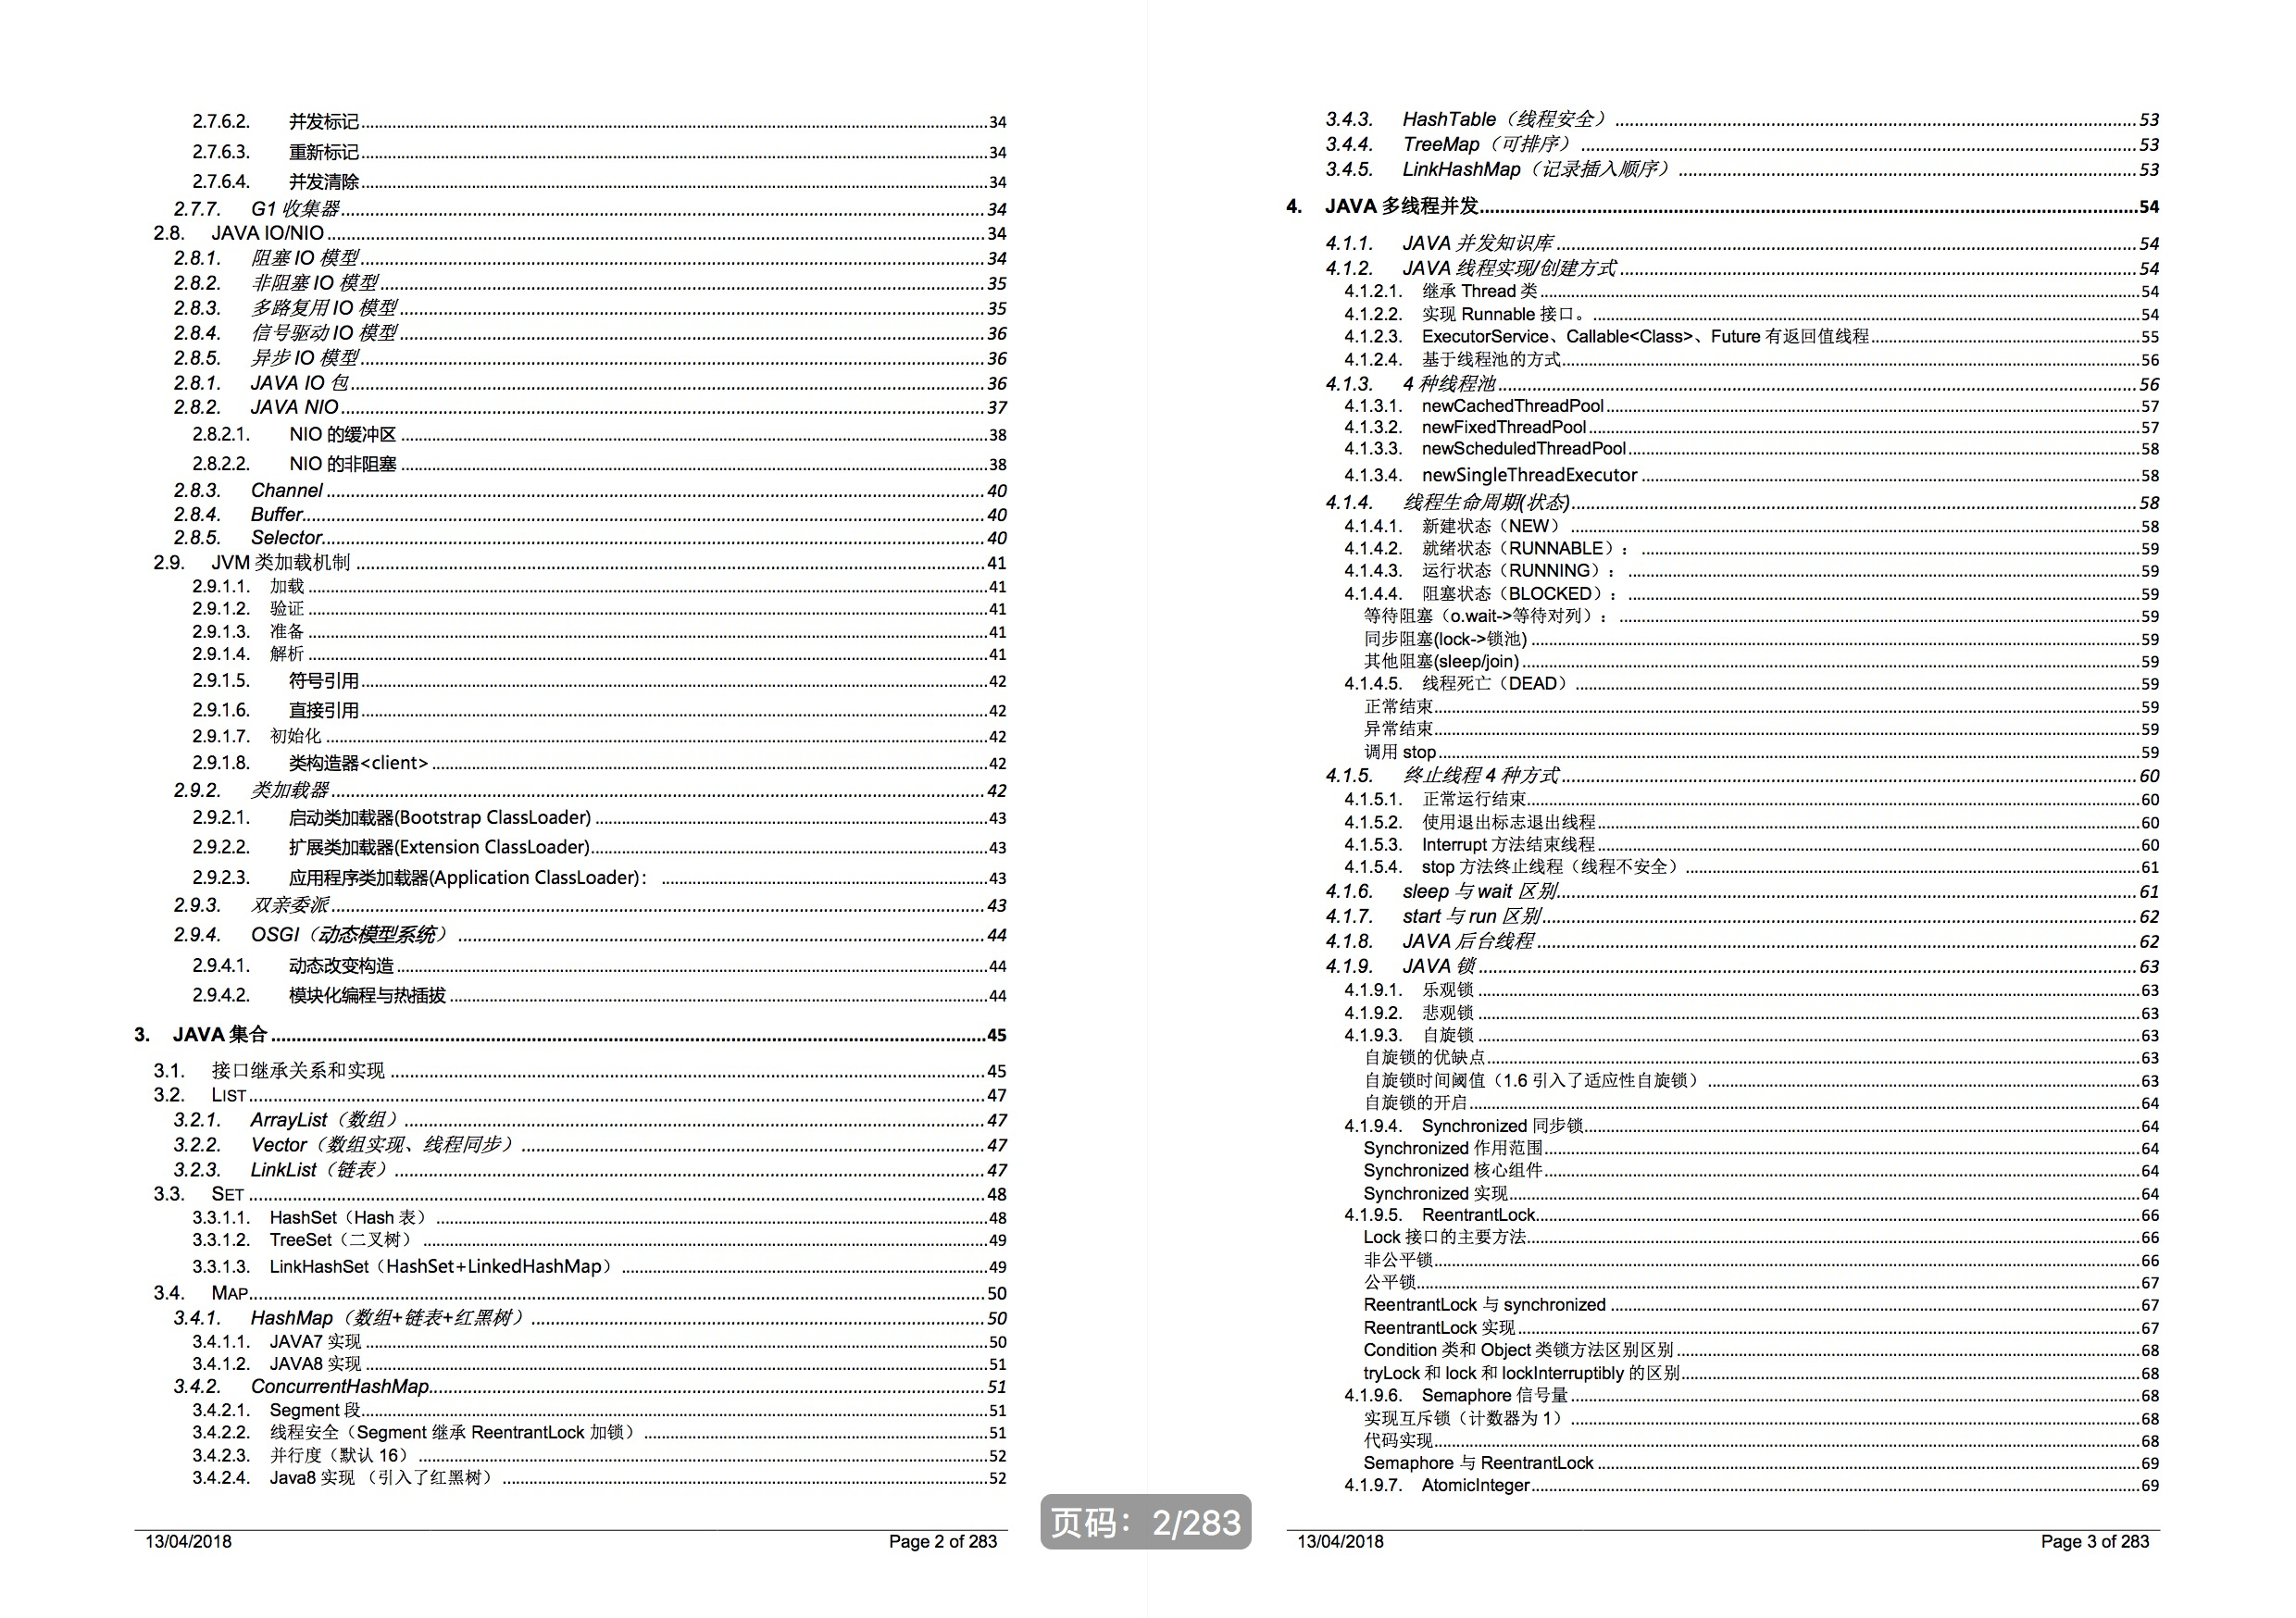
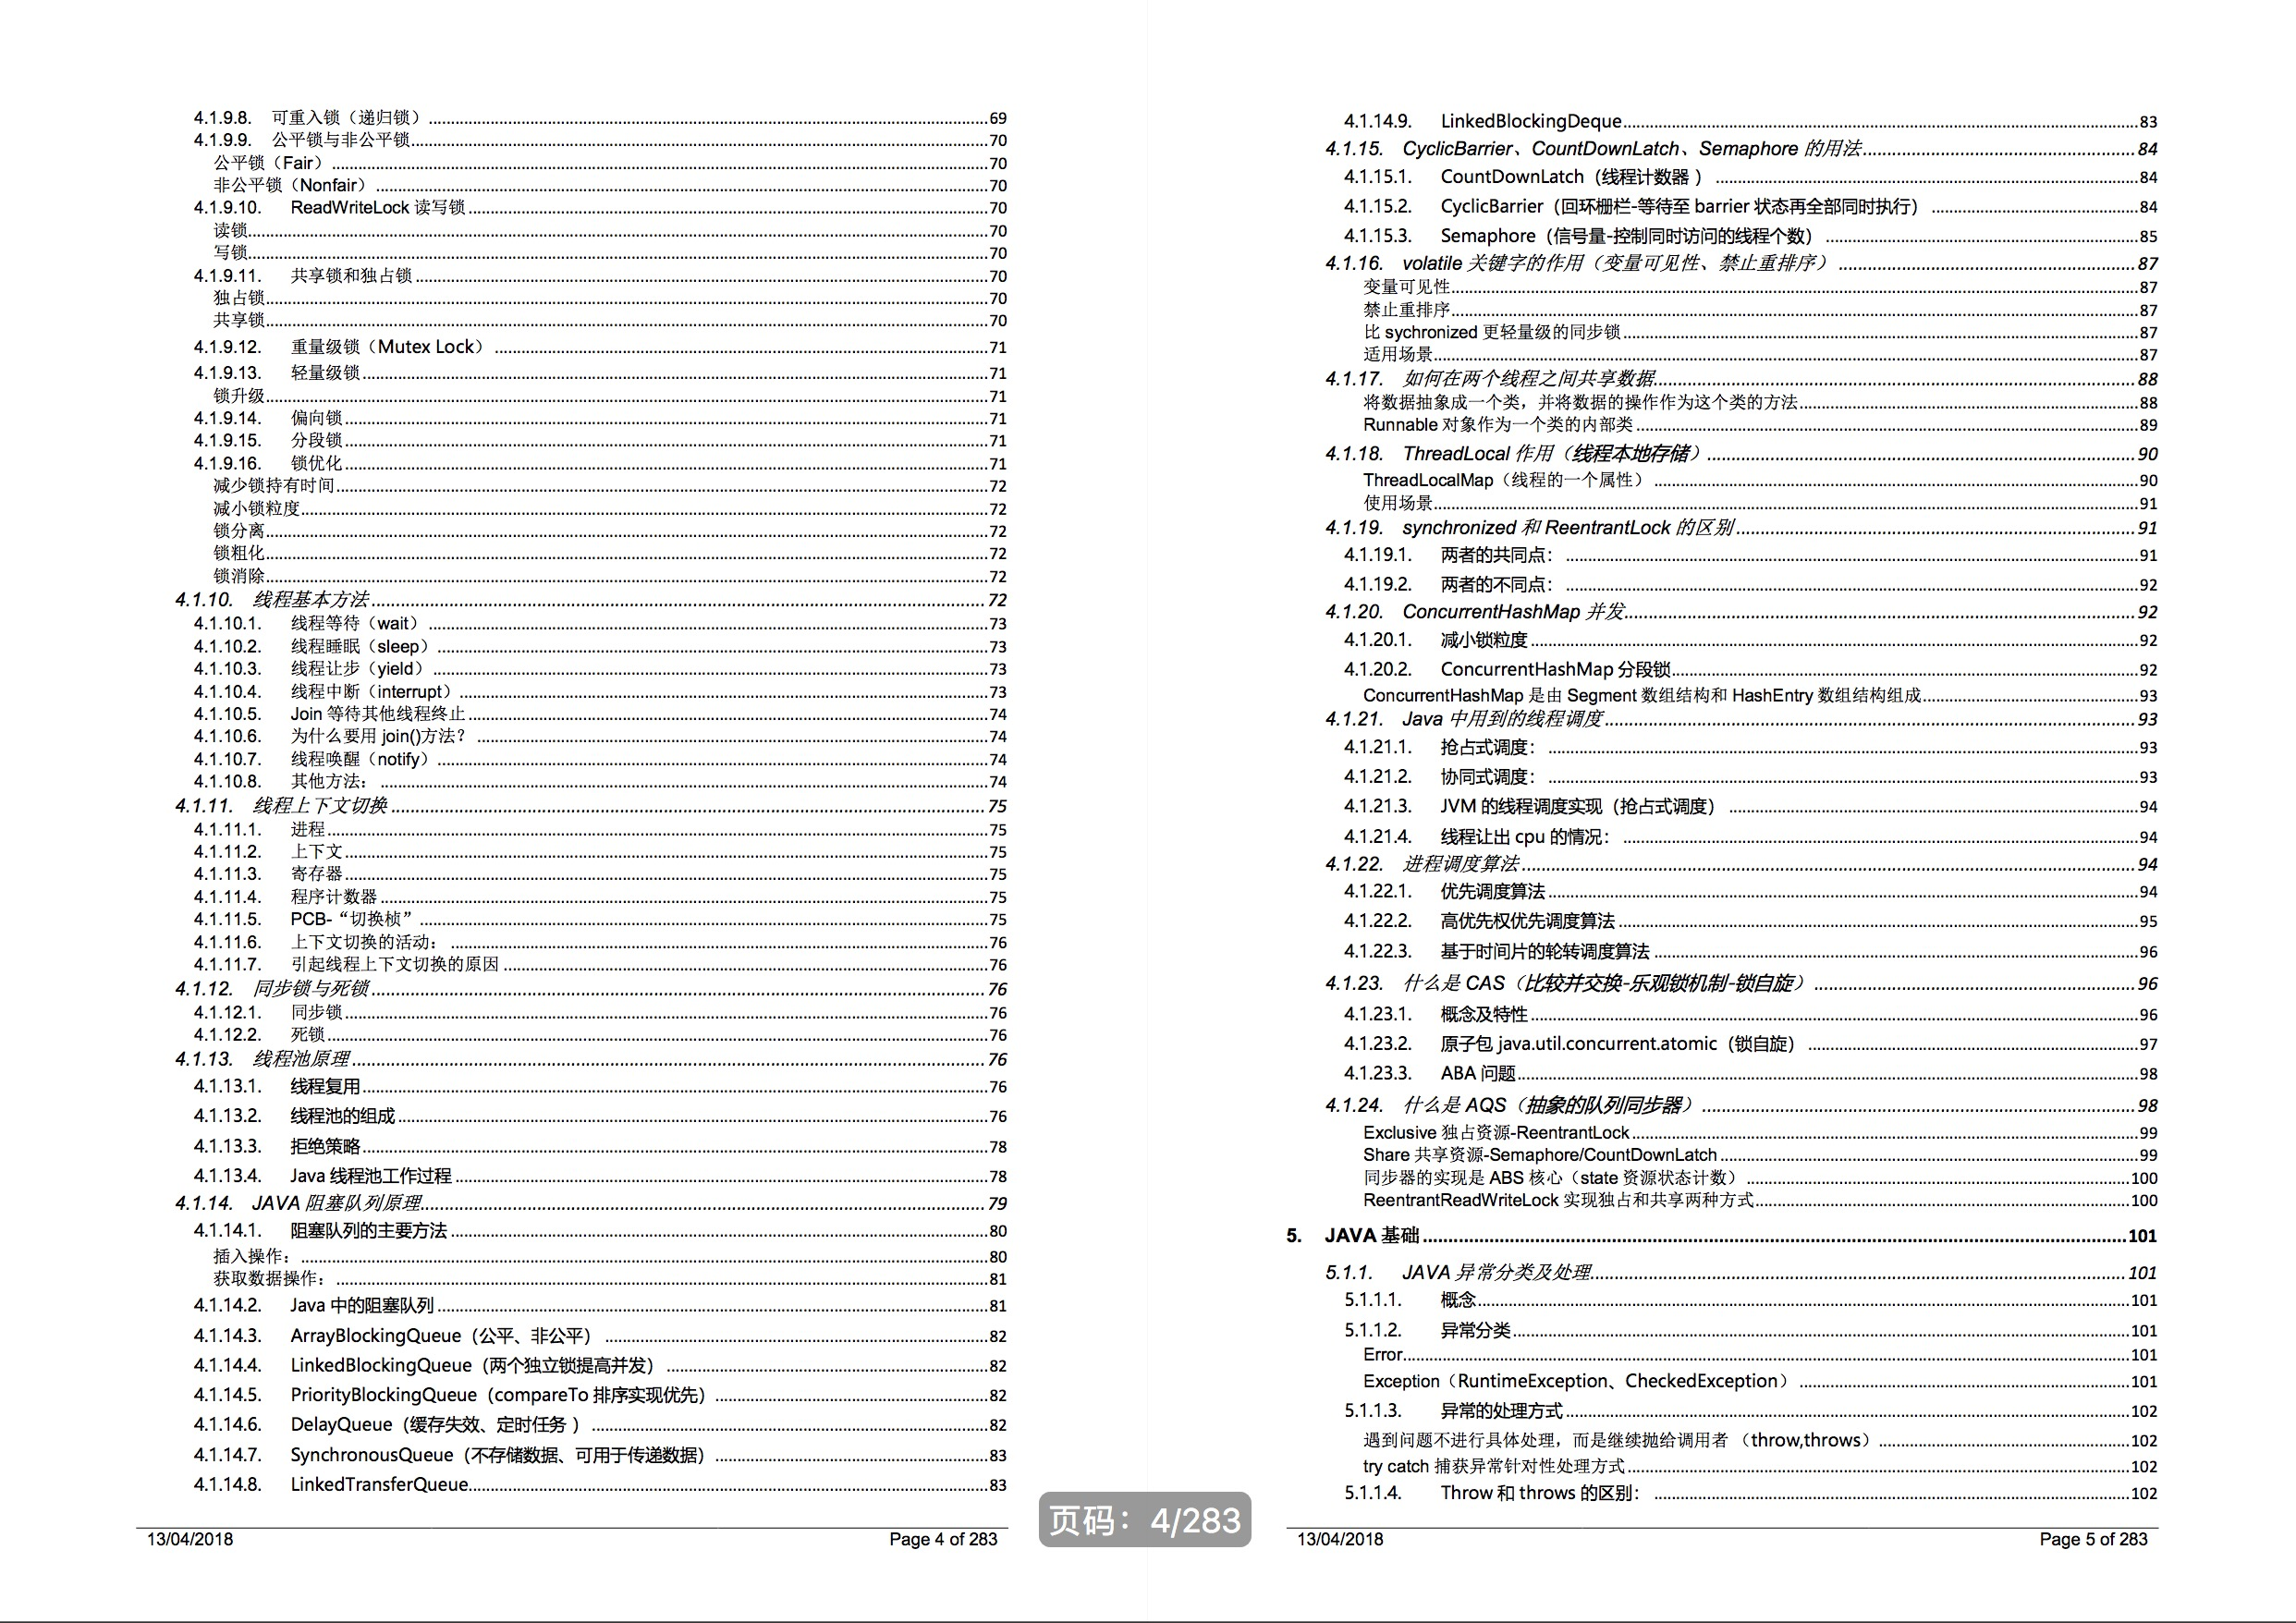
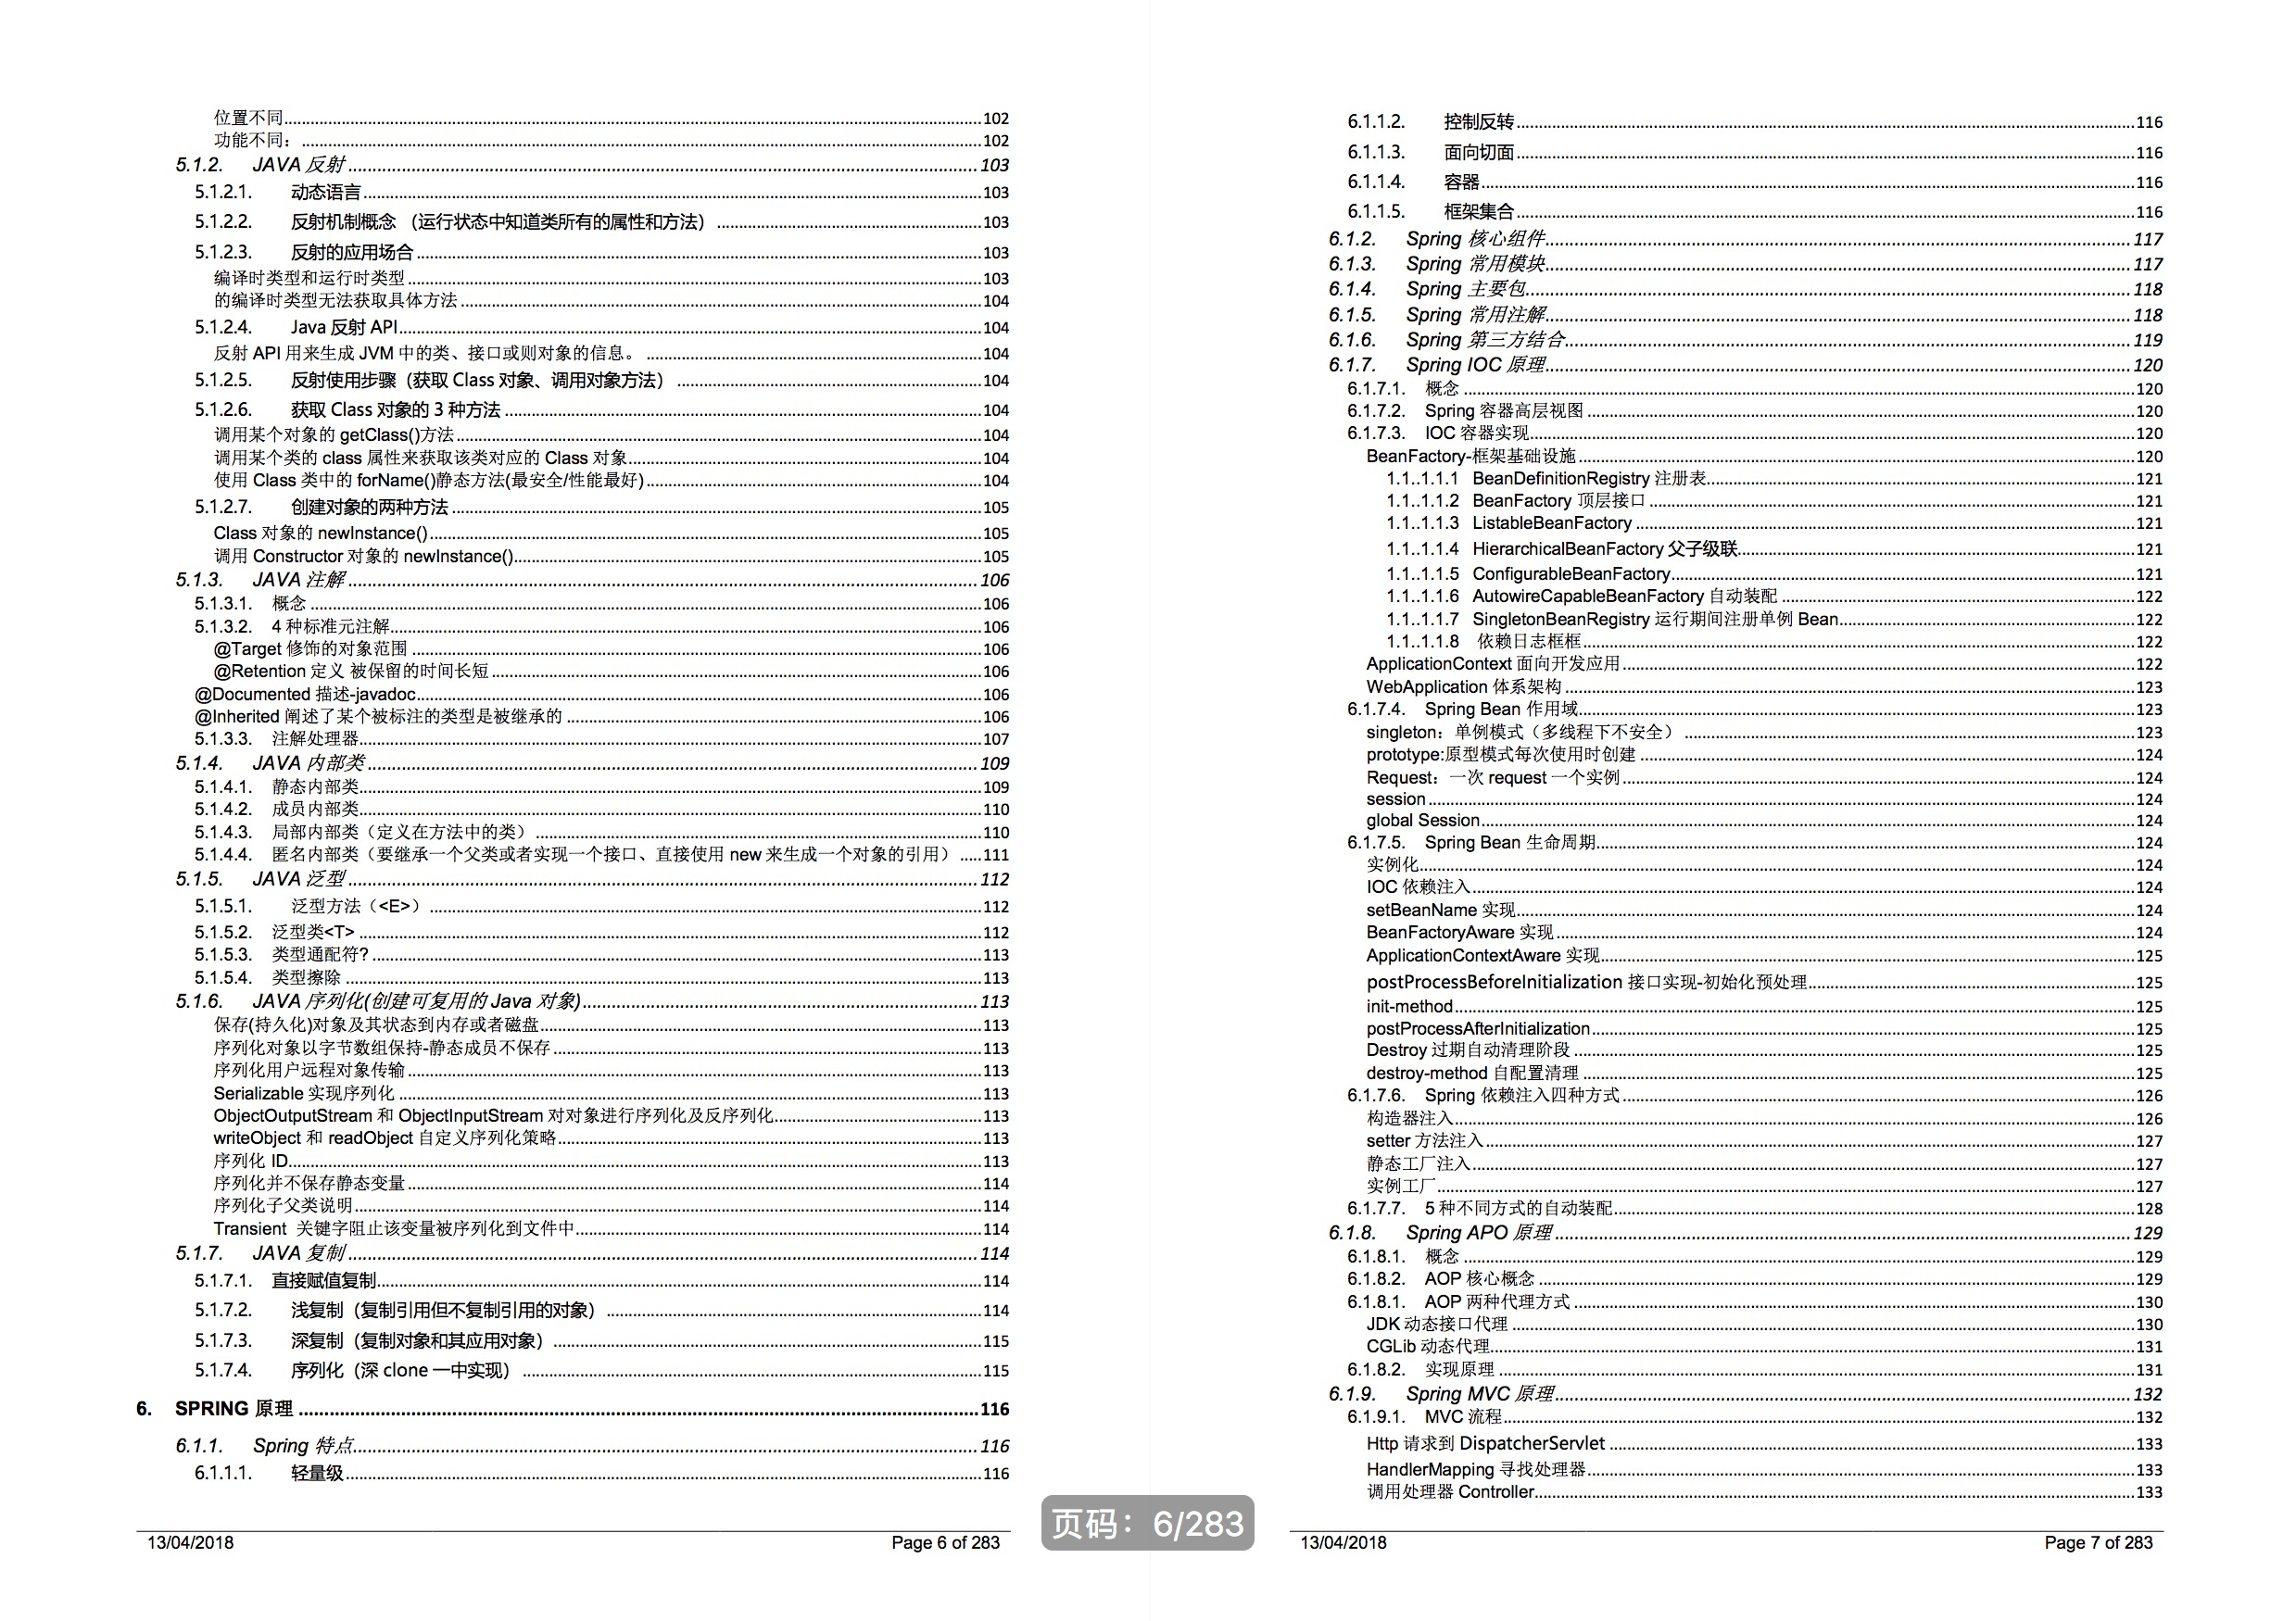
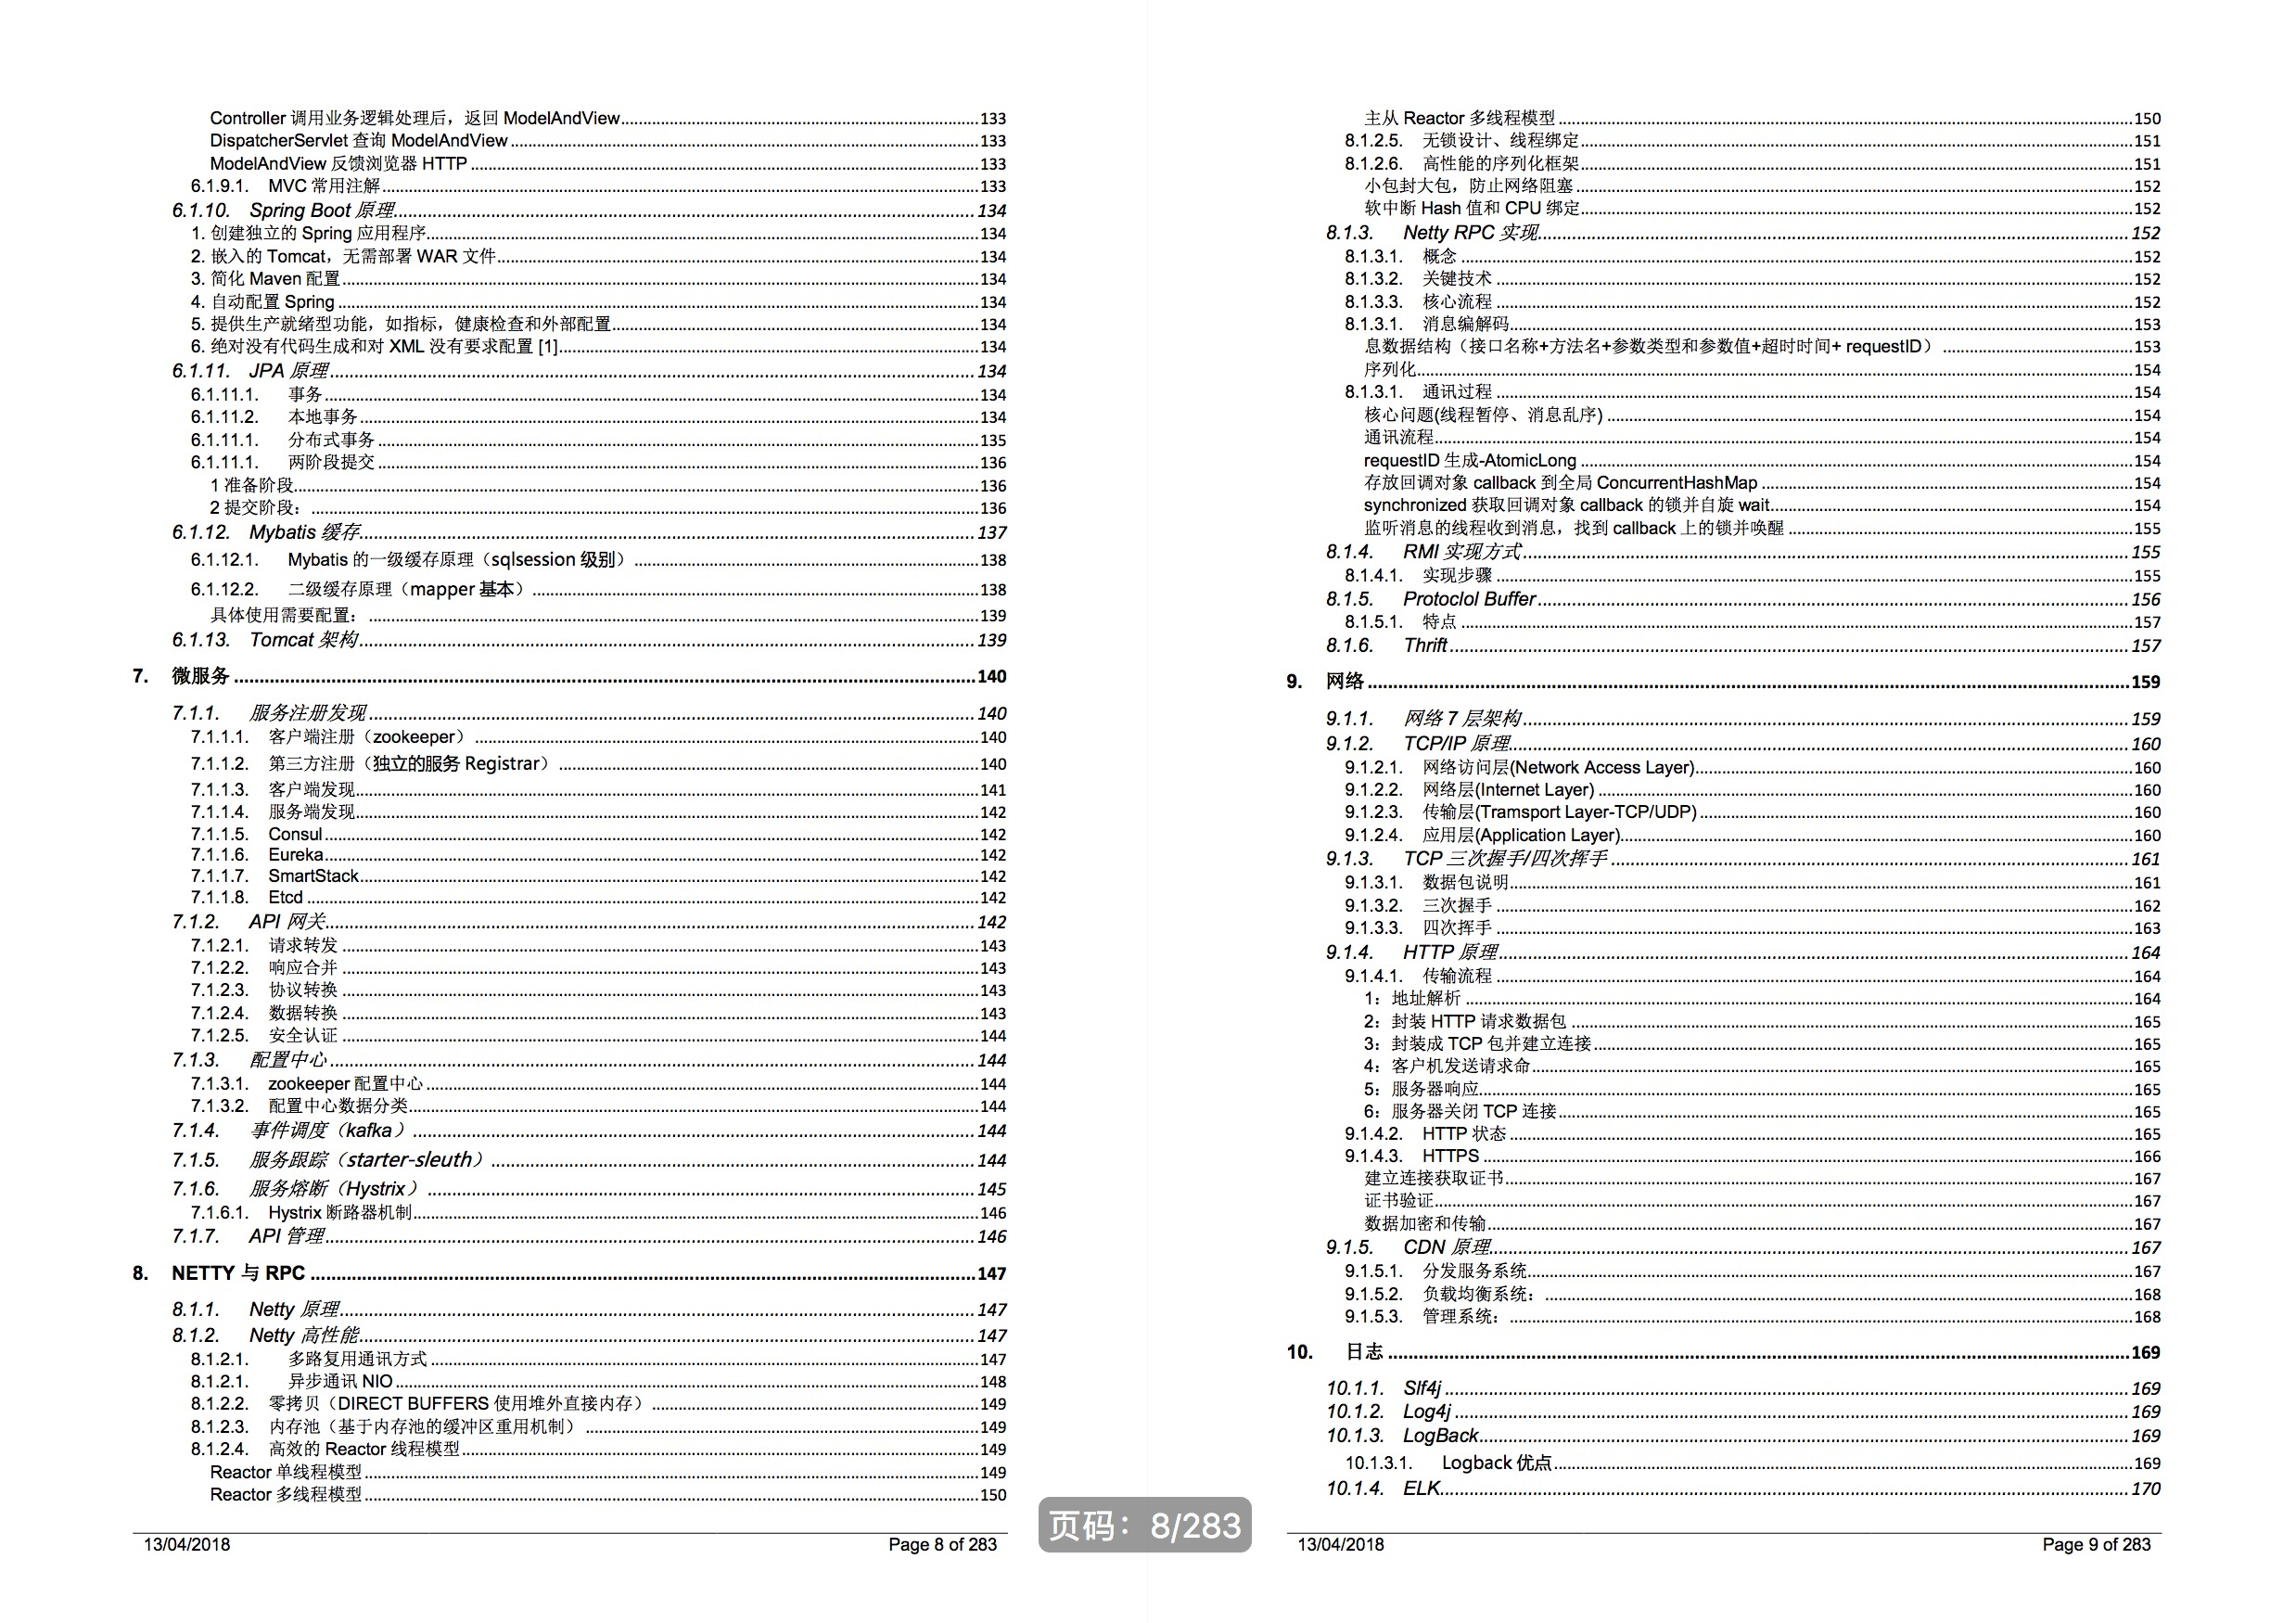
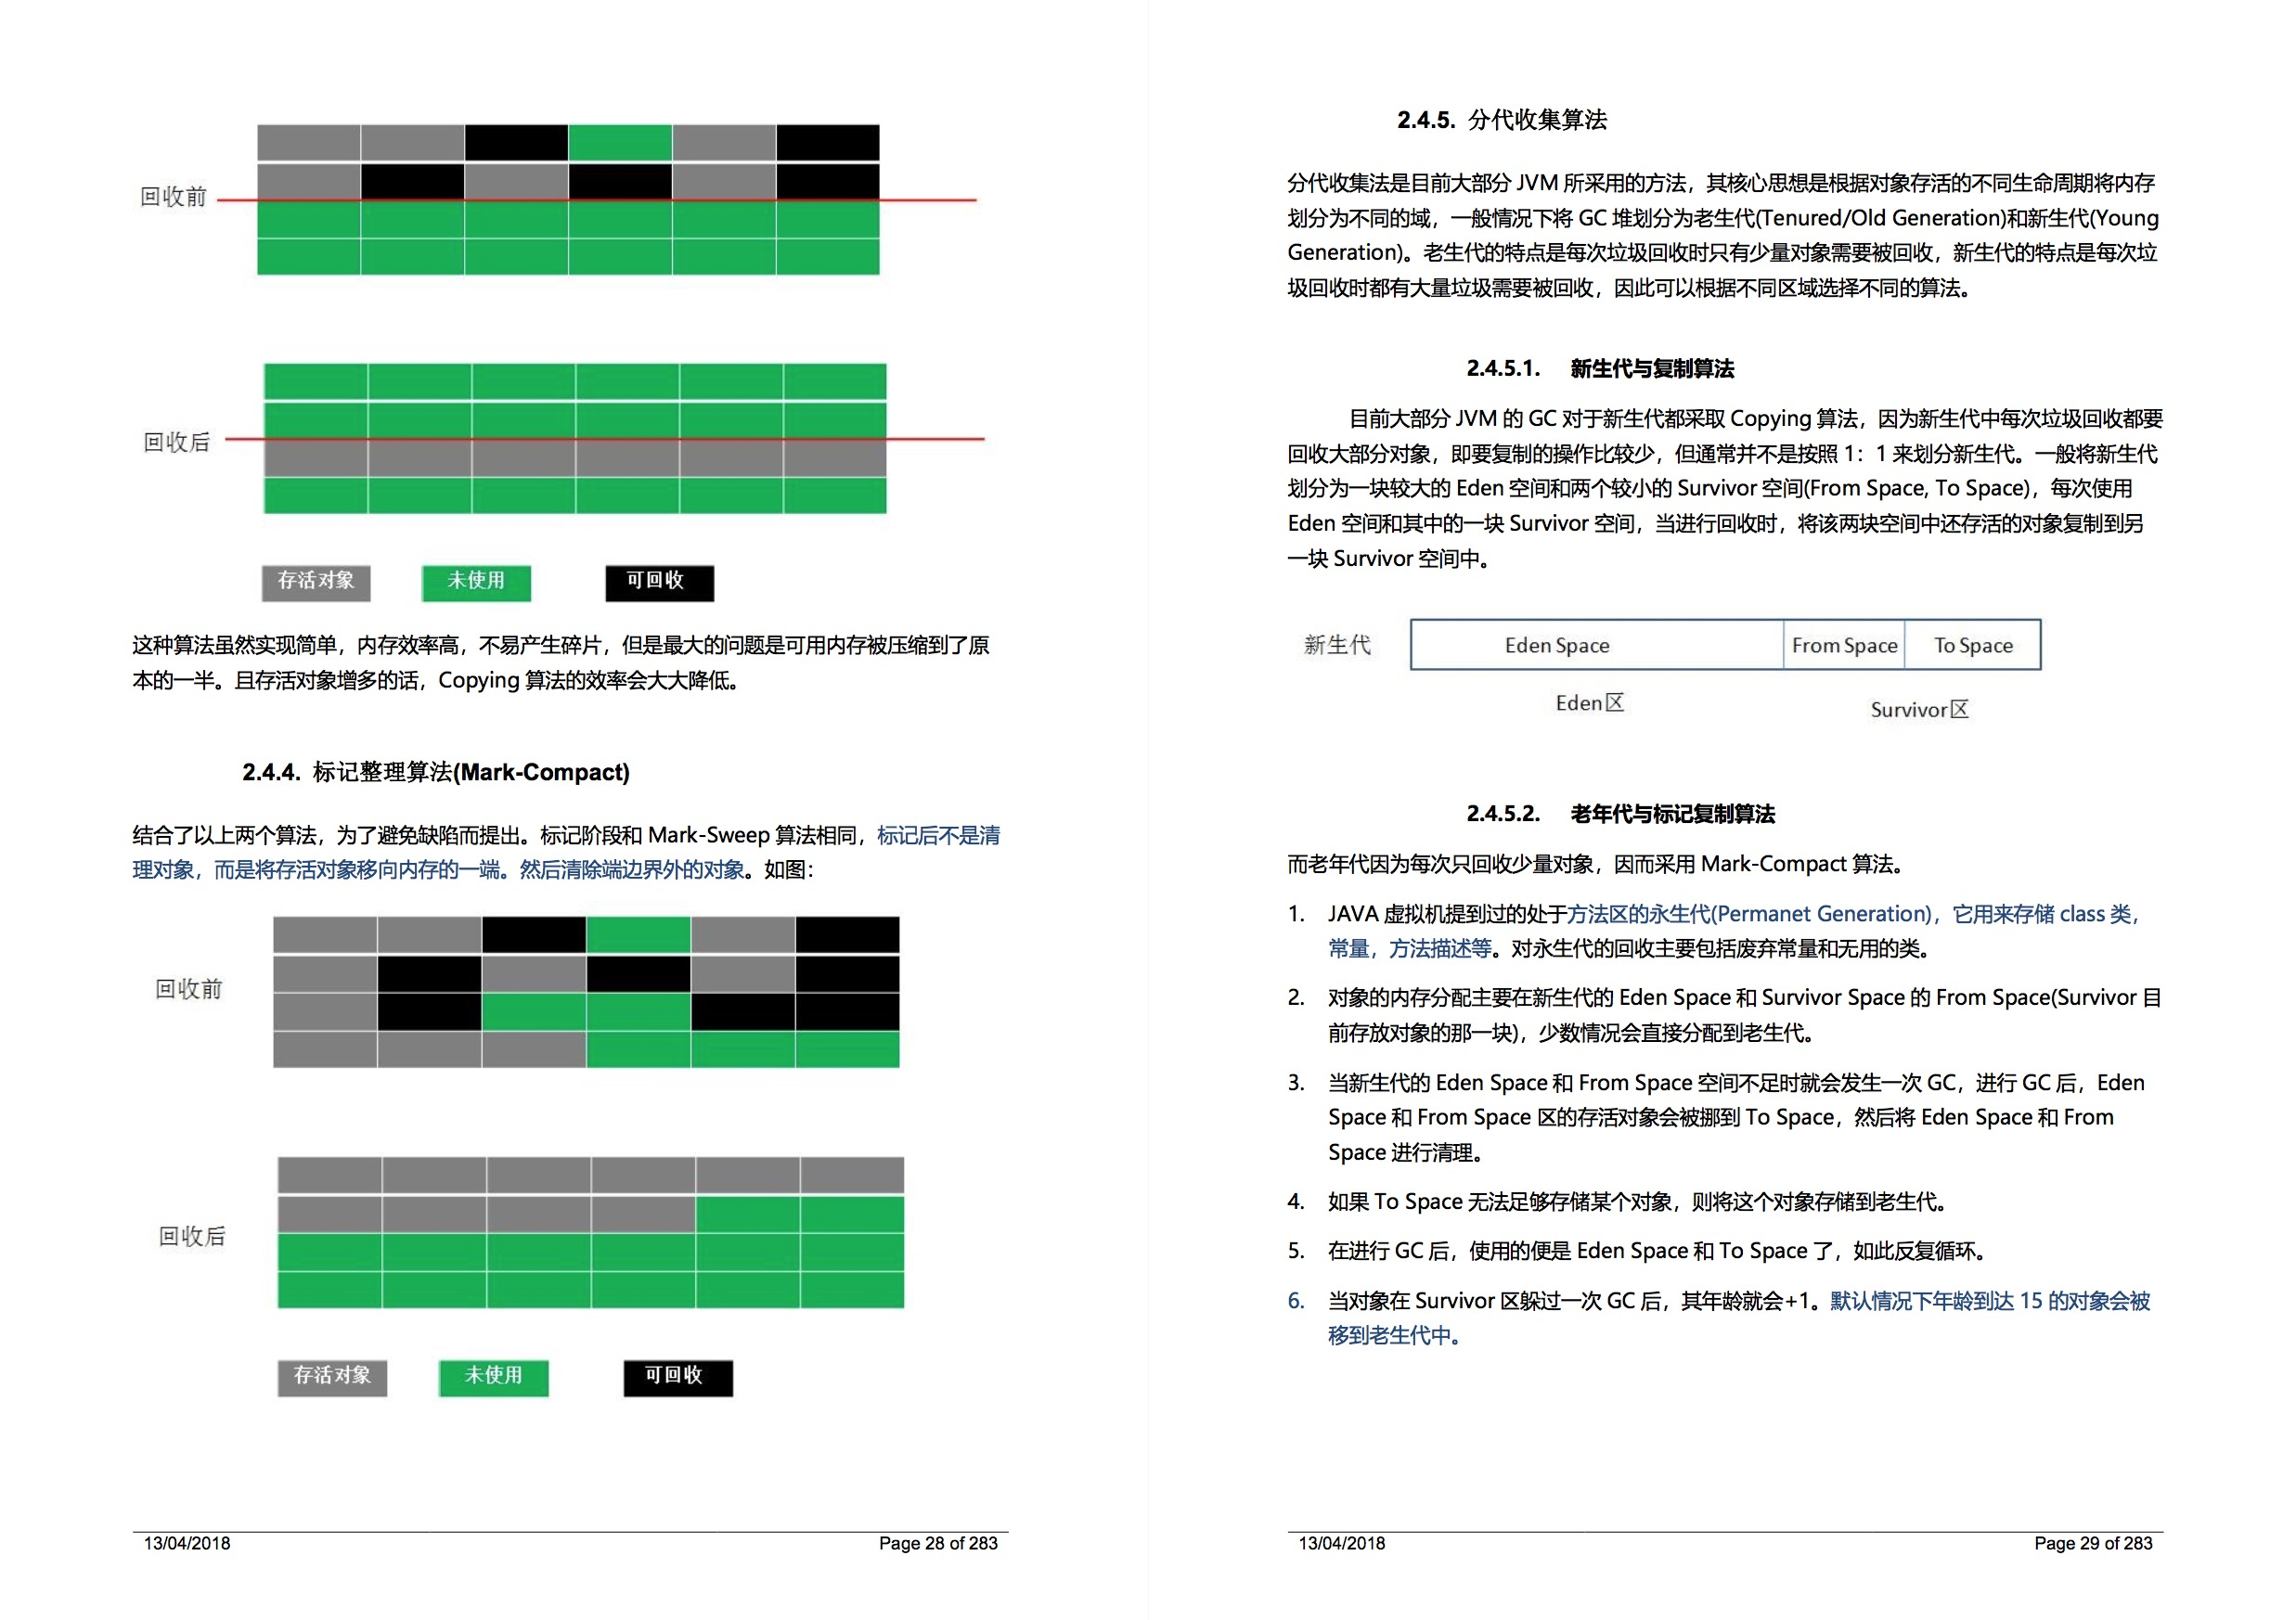
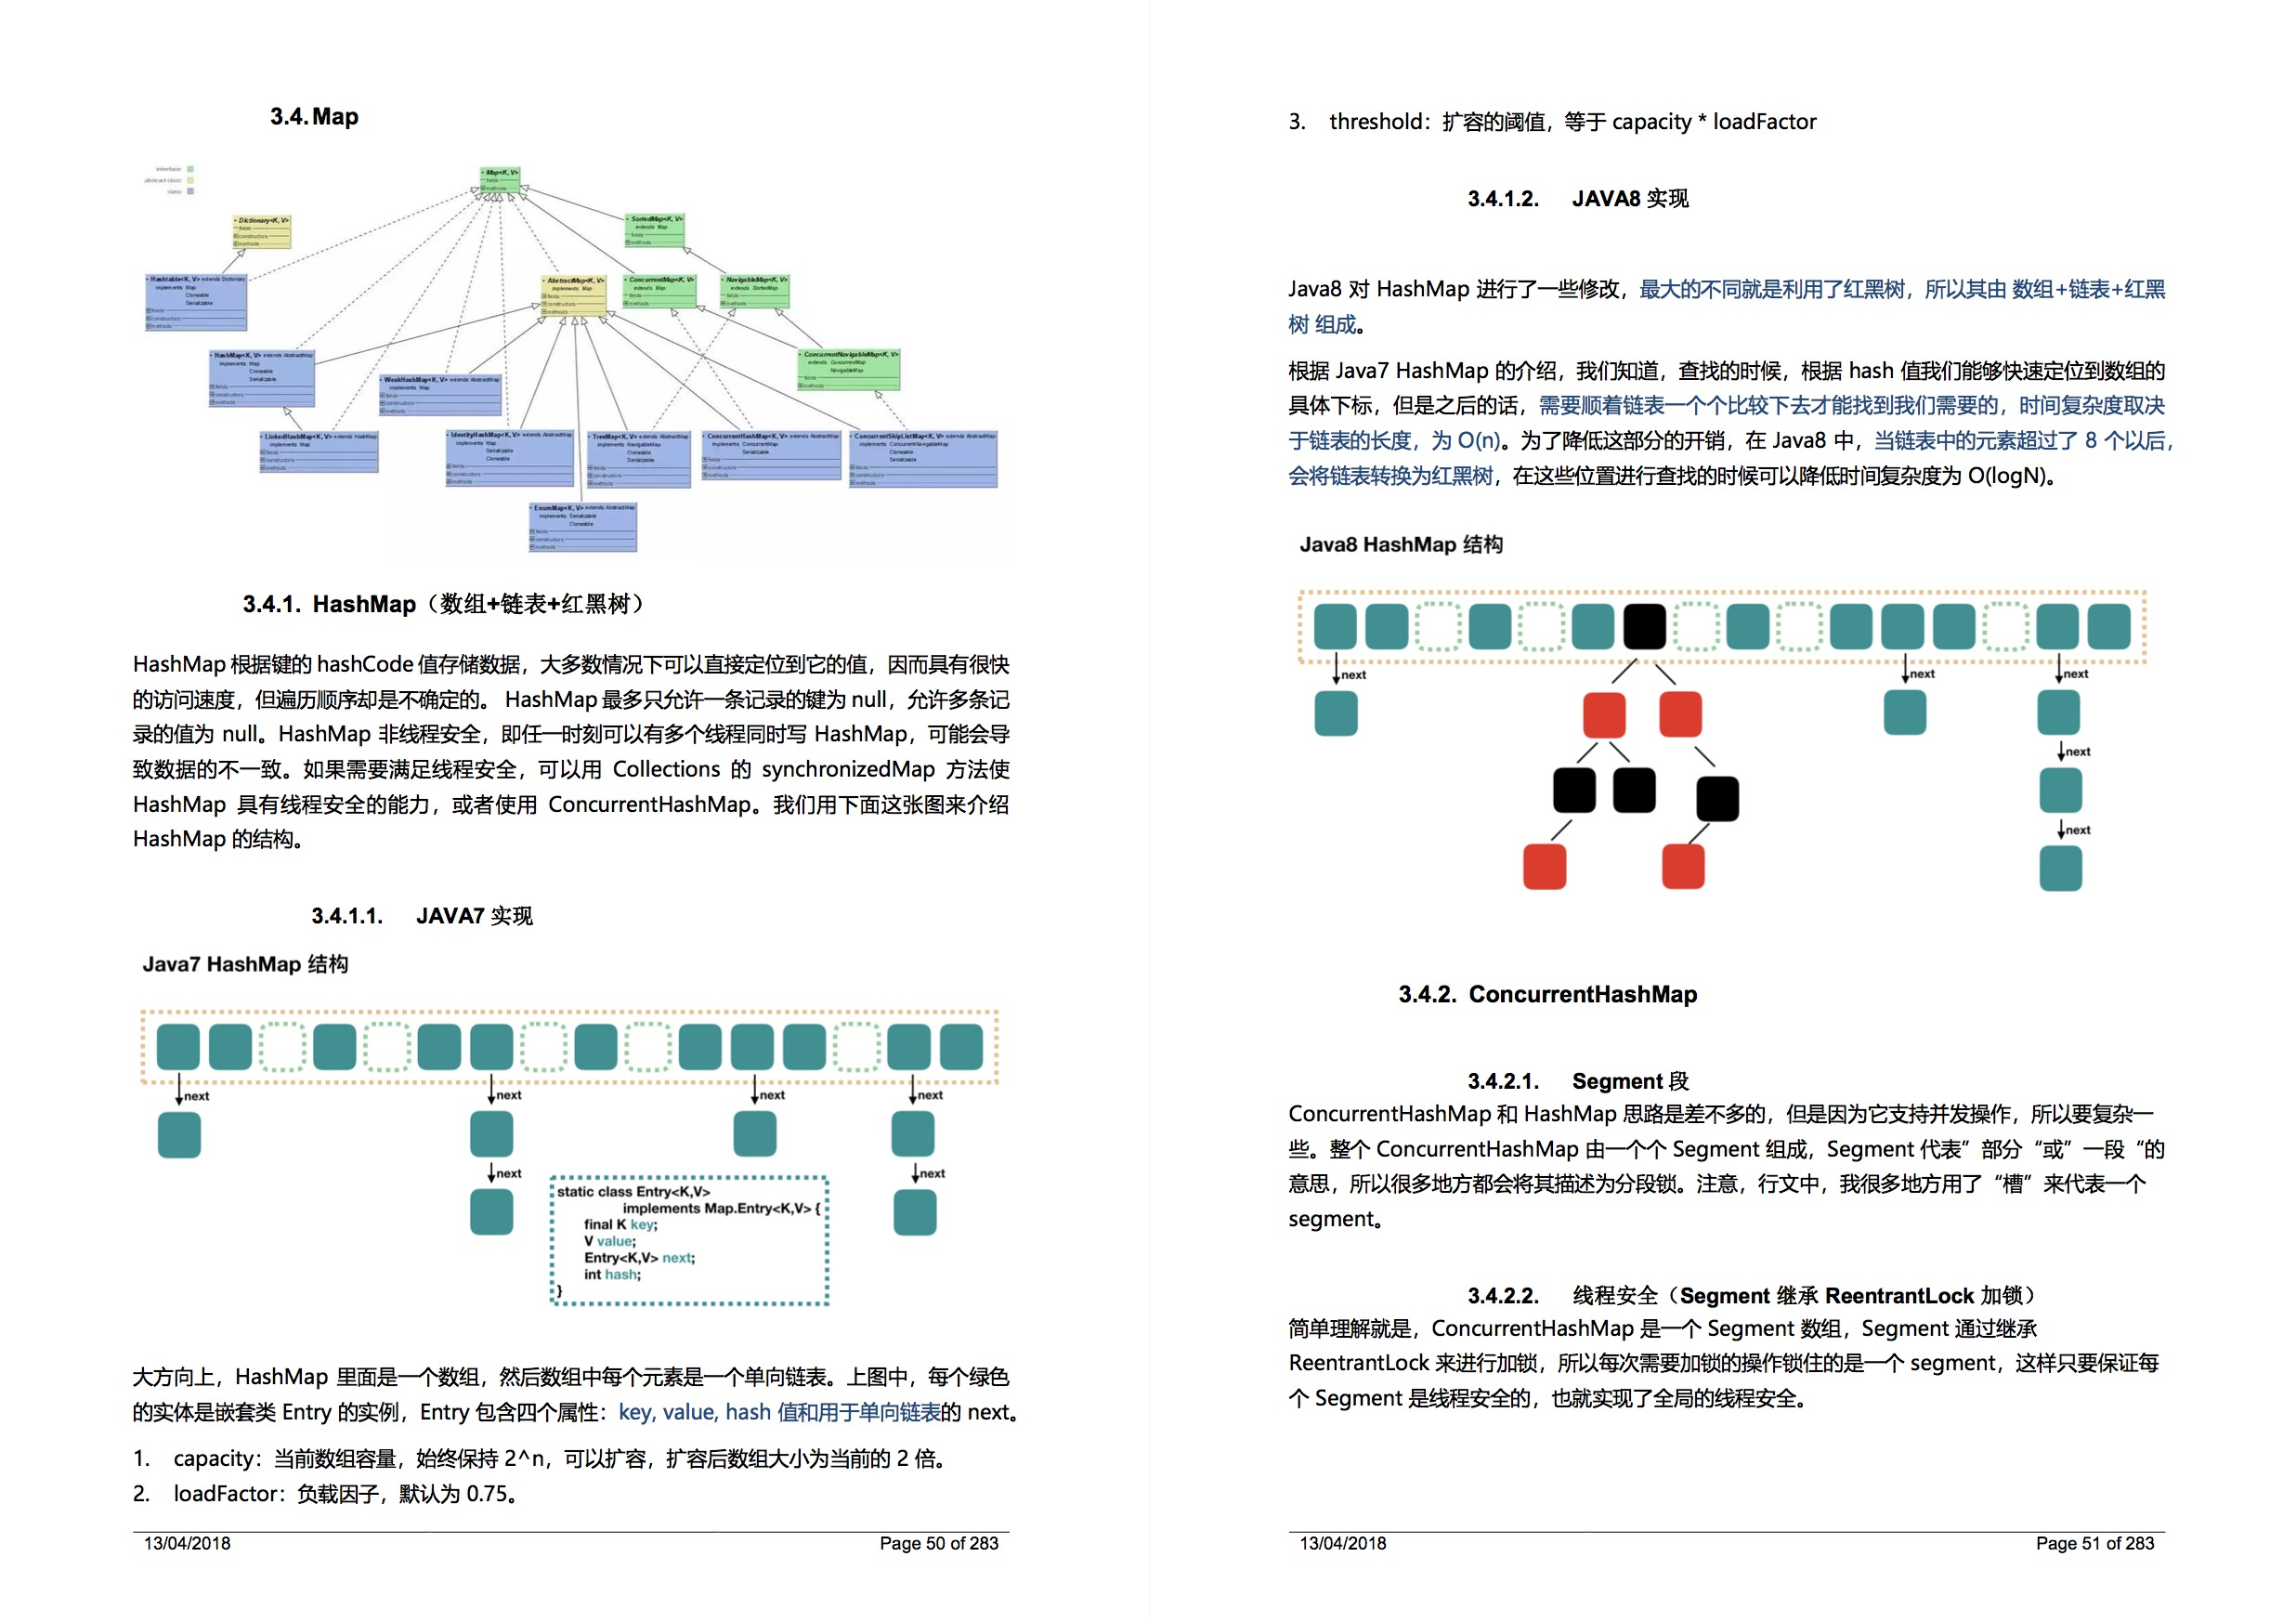
重要的事情说两遍,获取方式: 关注公众号: 小哈学Java, 后台回复 资源,既可获取资源链接 !!!
欢迎关注微信公众号: 小哈学Java