

关于 rollupjs 的教程已经非常多了,可是较少看到比较完整的工程样板,所以分享下我自己搭建的,已经在公司内部使用的样板工程。
先认识下目录结构
现在的前端为了打包一个插件,差不多下面的配置文件都是必须的;
哪怕代码仅仅一百多行,为了保证质量,少了谁都不能少了下面的配置文件;
如果是 typescript 写的,那就还要再加几个,怀念几年前 Happy Coding 的日子😀。
Project/
├── README.md
├── package.json
├── rollup.config.js
├── babel.config.js
├── bundle-analyzer-report.html        构建分析报告
├── jsdoc.json                         自动生成 api 文档
├── .gitignore
├── .eslintrc.js                        代码检查
├── .eslintignore
├── .editorconfig                       统一编辑器风格用的配置文件
├── coverage/                           测试覆盖率
├── dist/                               输出目录
├── dist-docs/                          文档输出目录
├── .vscode/                            vscode 编辑器配置目录
├── src/
|   ├── index.esm.js                    esm 输出用
|   └── index.js                        cjs 和 umd 输出用
└── test/
    ├── fixtures/
    ├── unit/
    └── .eslintrc.js
一、选择输出文件格式
因为要支持 nodejs 与浏览器,所以需要输出多种格式的文件,常见的输出格式是 cjs, esm 和 umd 三种格式,如果有必要也可以在加上 iife 的格式。
cjs是nodejs风格的文件,主要是为了给 node 端使用,属于 commonjs 规范
function foo () {}

exports.foo = foo
// or
module.exports = { foo }
esm搭配pkg.module字段 主要是构建工具(webpack, rollupjs)在用,属于 es module 规范
export function foo () {}

// or
export { foo }
- umd 就是个万金油,不管是浏览器和 nodejs,有或没有模块加载器,都可以正常使用,属于 umd 规范
(function (root, factory) {
    if (typeof define === 'function' && define.amd) {
        // AMD. Register as an anonymous module.
        define(['exports', 'b'], function (exports, b) {
            factory((root.commonJsStrictGlobal = exports), b);
        });
    } else if (typeof exports === 'object' && typeof exports.nodeName !== 'string') {
        // CommonJS
        factory(exports, require('b'));
    } else {
        // Browser globals
        factory((root.commonJsStrictGlobal = {}), root.b);
    }
}(typeof self !== 'undefined' ? self : this, function (exports, b) {
    // Use b in some fashion.

    // attach properties to the exports object to define
    // the exported module properties.
    exports.action = function () {};
}));
- iife 格式就是自执行文件,以前比较常见,主要是为了进行闭包和隔离代码的作用域,不知道是什么规范
(function () {
    // 代码写这里
}())
推荐输出:cjs, esm 和 umd 三种格式的文件
二、 选择 rollupjs 插件
1. 选择代码转换插件(浏览器兼容用)
推荐 babel 和 buble,具体选择看个人选择,这里给出我选择的理由
babel 的使用场景
- 在项目中使用,需要兼容的浏览器种类比较多
- 用到最新的 ECMAScript 语法,比如 async/await 等
buble 的使用场景
- 环境可控的情况下,搭配构建工具使用
- 不需要考虑最新的语法,(截止 2019/05/02,不支持 async/await 和 class properties 语法转换)
- 期望编译后的代码较少(主要是助手函数代码)
目前两种都在用, babel 用于项目,buble 用于插件,因为插件可以进行后编译处理,免去代码冗余的问题
2. 选择测试框架
推荐一:
断言工具用 nodejs 自带的 assert 或其他的都可以
推荐二:
真心好用,可惜还没有去深入了解,正在入手中
没有 e2e 的推荐,因为我也不熟
3. 其他插件
// 清理文件
import clear from 'rollup-plugin-clear'

// 执行进度(可选)
import progress from 'rollup-plugin-progress'

// 代码检查
import { eslint } from 'rollup-plugin-eslint'

// 去除不需要打包的外部依赖
import externals from 'rollup-plugin-node-externals'

// 字符串替换,类似 webpack 的 DefinePlugin
import replace from 'rollup-plugin-replace'

// 模块引用
import commonjs from 'rollup-plugin-commonjs'
import resolve from 'rollup-plugin-node-resolve'

// json 文件处理(可选)
import json from 'rollup-plugin-json'

// 代码压缩
import { terser } from 'rollup-plugin-terser'

// 查看构建后的文件大小
import filesize from 'rollup-plugin-filesize'

// 用于分析构建后的代码
import visualizer from 'rollup-plugin-visualizer'
三、编写开发与构建配置
1. 配置 package.json
{
  // nodejs 入口
  "main": "./dist/lib.commonjs.js",
  // webpack,rollupjs 入口
  "module": "./dist/lib.esm.js",
  "scripts": {
    // 用 cross-env 解决不同操作系统之间环境变量设置方式不一致的问题
    "dev": "cross-env NODE_ENV=development rollup -cw rollup.config.js",
    "build": "cross-env NODE_ENV=production rollup -c rollup.config.js"
  }
}
2. 配置 rollup.config.js
rollupjs 支持输出对象或数组形式的配置,所以不需要拆分成多个配置文件.
const isProd = process.env.NODE_ENV === 'production'
// 配置输出格式
export default mergeConfig(baseConfig, [
{
input: 'src/index.esm.js',
output: {
banner,
file: 'dist/lib.esm.js',
format: 'es'
}
},
{
input: 'src/index.js',
output: {
file: 'dist/lib.commonjs.js',
format: 'cjs'
}
},
{
input: './src/index.js',
output: {
file: `./dist/lib${isProd ? '.min' : ''}.js`,
format: 'umd'
},
plugins: [
isProd && terser(),
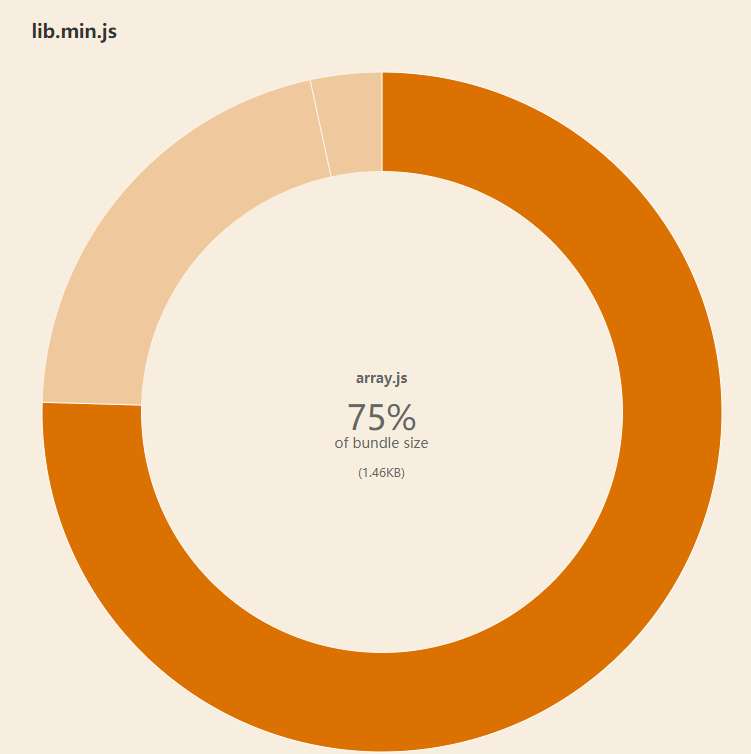
process.env.npm_config_report && visualizer({
title: `${pkg.name} - ${pkg.author.name}`,
filename: 'bundle-analyzer-report.html'
})
]
}
])
3. 配置 babel.config.js
module.exports = {
  presets: [
    ['@babel/preset-env',{
        // rollupjs 会处理模块,所以设置成 false
        modules: false
    }]
  ],
  plugins: [
     // 避免 babel 将 async/await 转成 Generator
     // 这样兼容性更好
    'transform-async-to-promises'
  ]
}
4. 配置 .eslintrc.js
module.exports = {
  root: true,
  env: {
    // 用于跳过各自环境的全局变量,也可以分开使用 node 和 browser 属性
    'shared-node-browser': true,
    es6: true
  },
  rules: {
    // 构建时避免 console 和 debugger 被一起构建上去
    'no-console': process.env.NODE_ENV === 'production' ? 'error' : 'off',
    'no-debugger': process.env.NODE_ENV === 'production' ? 'error' : 'off'
  },
  // 为了语法解析
  parserOptions: {
    parser: 'babel-eslint',
    sourceType: 'module'
  }
}
5. 查看效果
# 执行构建命令
$ npm run build --report

# 执行构建命令并且生成 html 报告
$ npm run build --report
四、编写测试配置
1. 配置 package.json
{
"scripts": {
// test 还可能包含测试数据文件,所以不能直接使用通配符
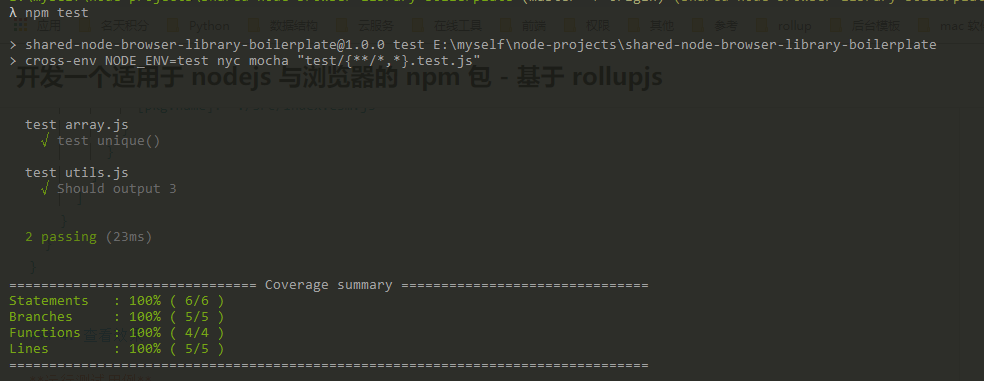
"test": "cross-env NODE_ENV=test nyc mocha \"test/{**/*,*}.test.js\"",
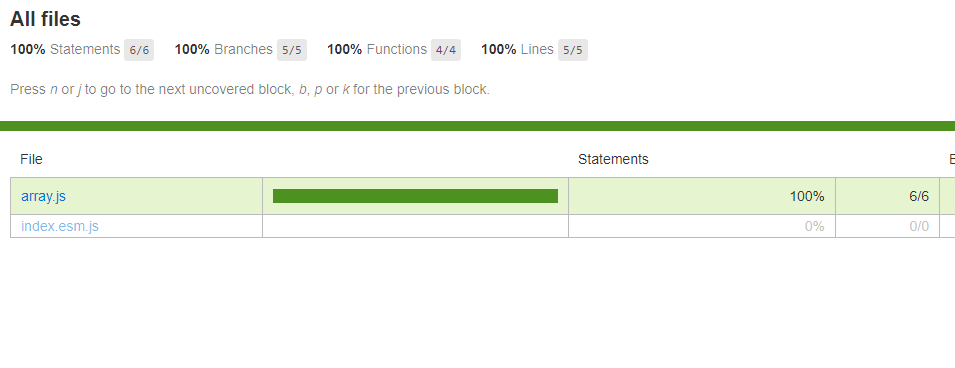
"report": "nyc report --reporter=html"
},
// 配置 nyc 插件
"nyc": {
"require": [
// 为了能跑 es6 的代码
"@babel/register"
],
"reporter": [
"text-summary"
]
}
}
2. 配置 test/.eslintrc
{
  "env": {
    // eslint 预设了 mocha 的全局变量,所以设置为 true 就可以了
    "mocha": true
  }
}
注意 eslint 的配置会继承项目根目录的 eslint 的配置信息
3. 配置 babel.config.js
const pkg = require('./package.json')

module.exports = {
  presets: [
    ['@babel/preset-env', {
      // 测试时模块需要转换
      modules: process.env.NODE_ENV === 'test' ? 'commonjs' : false
    }]
  ],
  // 配置测试时用到的插件
  env: {
    test: {
      plugins: [
        'istanbul',
        'inline-json-import',
        // 路径别名,不然就只能用长长的路径进行模块引用了
        ['module-resolver',
          {
            root: ['./src/'],
            alias: {
              [pkg.name]: './src/index.esm.js'
            }
          }
        ]
      ]
    }
  }
}
4. 查看效果
# 运行测试命令
$ npm test
# 查看测试报告
$ npm run report
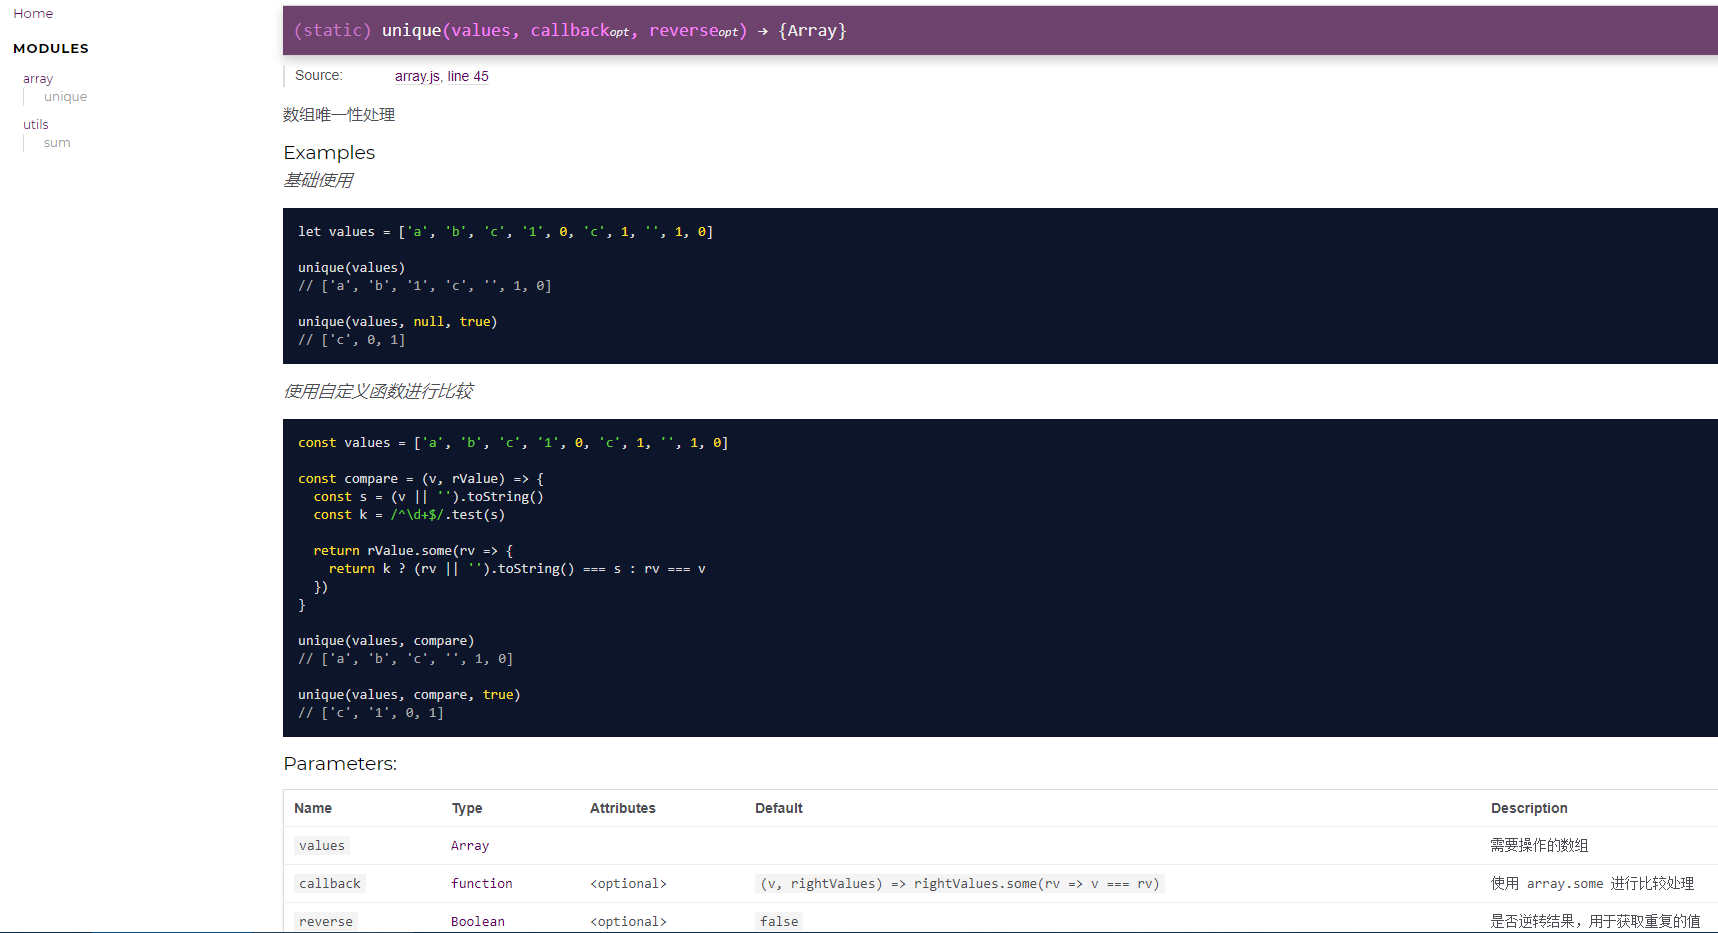
五、添加 API 生成工具
这里使用的是 jsdoc 工具
1. 配置 package.json
{
  "scripts": {
    "build:docs": "jsdoc -c jsdoc.json"
  }
}
2. 配置 jsdoc.json
{
  "source": {
    "include": ["src"]
  },
  "templates": {
    "cleverLinks": false,
    "monospaceLinks": false
  },
  "tags": {
    "allowUnknownTags": false
  },
  "opts": {
    "verbose": true,
    "recurse": true,
    "encoding": "utf8",
    "readme": "README.md",
    "destination": "dist-docs",
     // 建议添加,因为这样可以一个版本一个文档
    "package": "package.json"
  }
}
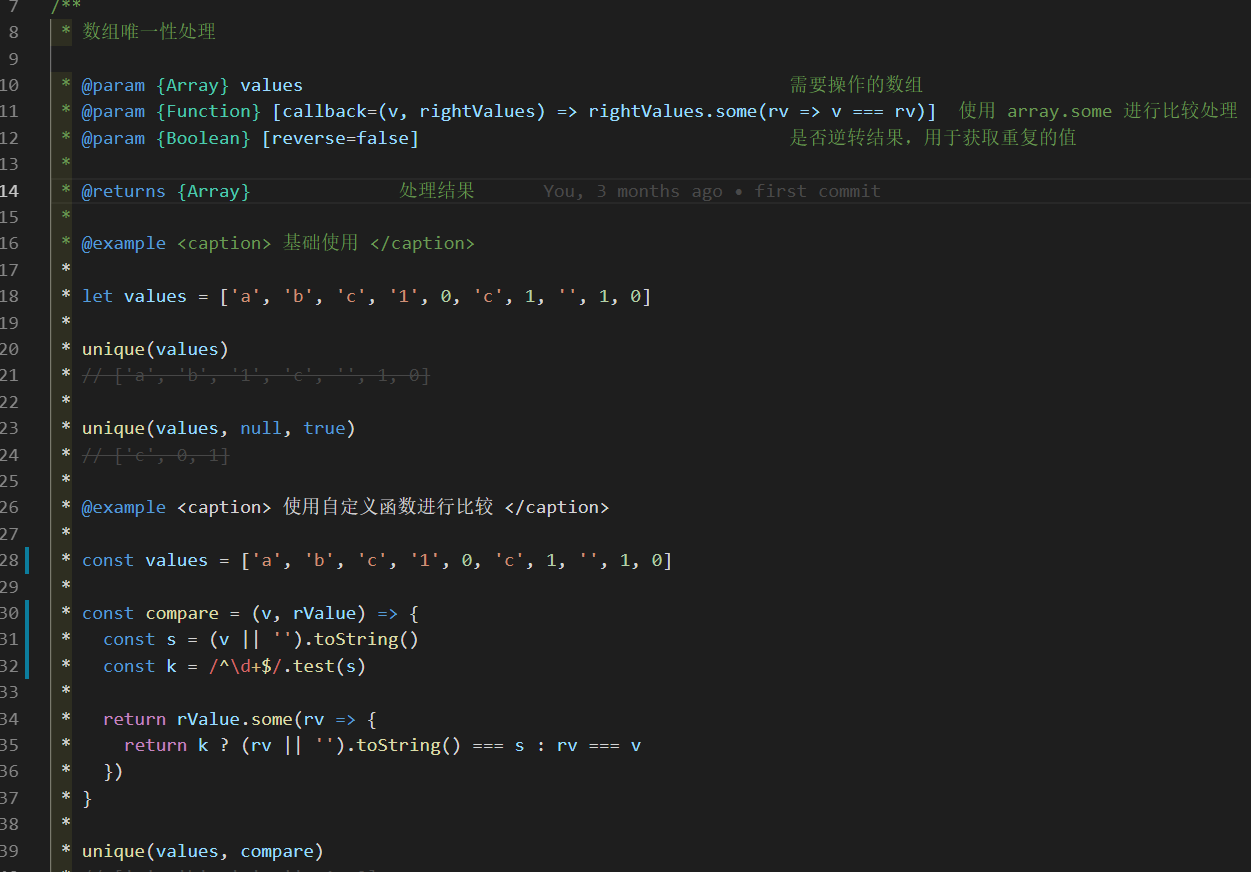
3. 写注释
4. 查看效果

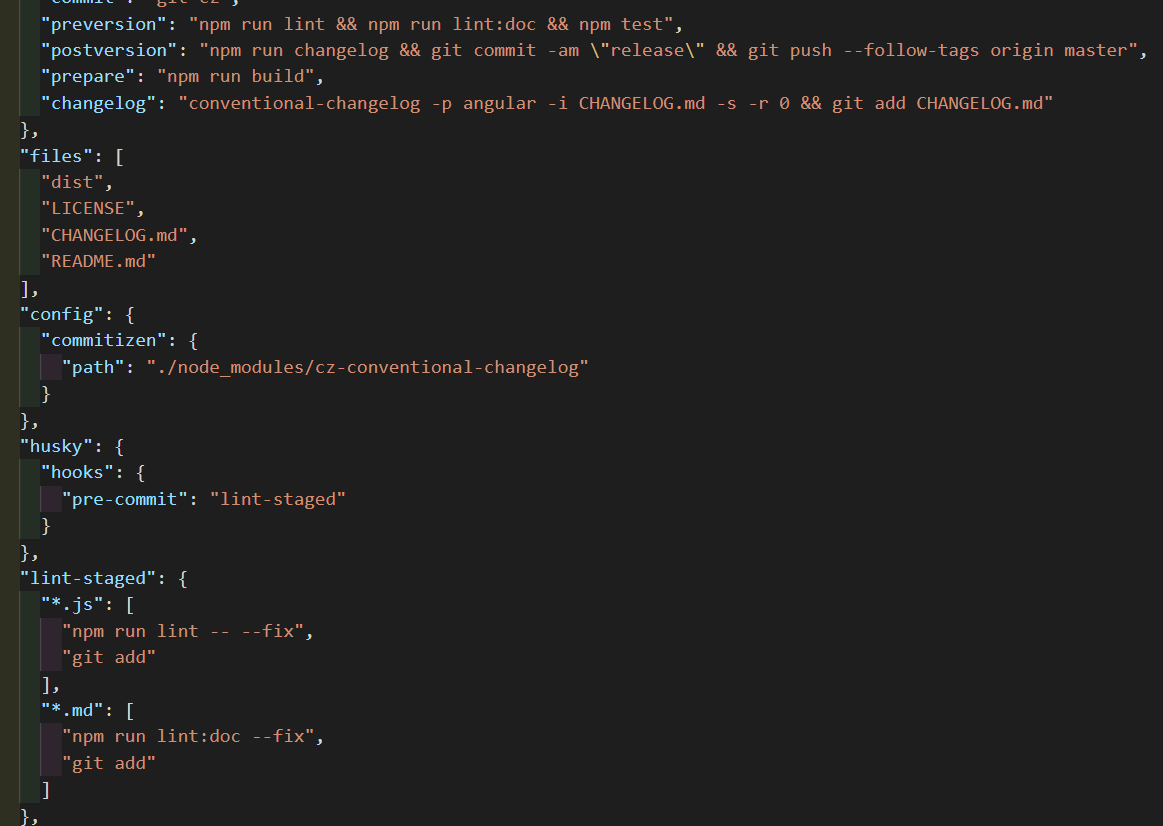
六、非开发配置
还可以做的事情有:
- 版本号更新的前后处理
- git 提交前的代码检查
- changelog 自动生成
这些都是需要人工去配置的,当全部配置完毕后,一个拥有完善功能的项目也就配置完毕,这样的项目才可以被认为是一个工程了吧。
最后献上我的 github 地址,欢迎 fork