

一、前言
谈到贝塞尔曲线可能不少人会浮现它高大上的数学公式。然而,在实际应用中,并不需要我们去完全理解或者推导出公式才能应用得上。实际情况是,即使真的只是一个学渣,我们应该也能很轻松的掌握贝塞尔曲线的大致原理及其在开发中的实际应用。
二、白话贝塞尔曲线的原理
贝塞尔曲线有一阶、二阶、三阶....一直到 N 阶。实际应用中我们常用的是二阶、三阶,高阶可以由低阶来实现。咱们这里以二阶为例来讲解一下贝塞尔曲线的基本原理。
二阶贝塞尔曲线三要素
1 个起点,1 个终点,1 个控制点
这个是我们要知道的第一个知识点,而三阶的话就是 2 个控制点,四阶的话就是 3 个,以此类推,N 阶的话就是 N - 1 个控制点。而起点和终点始终只有一个。
下面我们来手动画一个贝塞尔曲线。
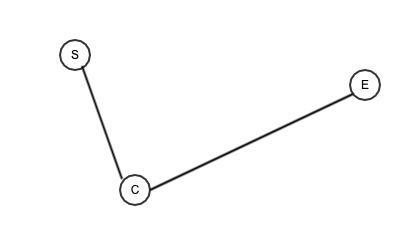
- 绘制 1 个起点,1 个终点和 1 个控制点,分别为 S 、E、C。然后将 SC、CE 分别连线。如下图所示。
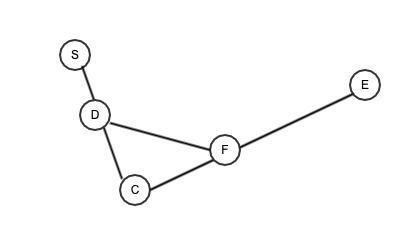
- 从点 S 向 C 出发找到一个 D 点,从 C 向 E 出发找到一个 F 点,使得
SD / SC = CF / CE
然后连接 DF。如下图所示。
- 在 DF 之间找到点 M,使得
SD / SC = CF / CE = DM / DF
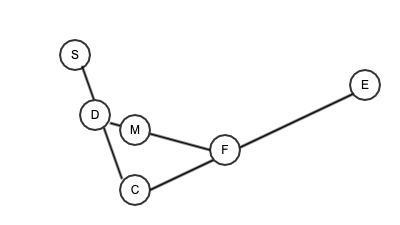
总结下: (1) 二阶贝塞尔中,起初是 3 个点,然后我们再找 2 个点,然后再找 1 个点。这个点就是我们要找到的点。 (2) 我们需要由 S 向 C 出发,由 C 向 E 出现,找到所有的 D 和 F,再找到所有的 M。 (3) 将所有的 M 连接起来就构造出了最后的所需要的贝塞尔曲线了。
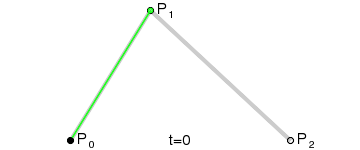
对于更高阶的三阶甚至N阶,其过程是一样的。再借用一个图,来详细观察一下其构造的过程。
关于贝塞尔曲线的原理,介绍这么多就够了,再说就是多余。如果实在还不明白或者想深入的,推荐以下链接。当然,更建议自己多琢磨琢磨。
贝塞尔曲线 总结 贝塞尔曲线扫盲 贝塞尔曲线游戏 bezier-circle
三、贝塞尔曲线在 Android 自定义 View 中的实战
Android 中提供了一个 Path 类,其有 2 个方法 Path#quadTo() 和 Path#cubicTo()。分别用于构造二阶和三阶贝塞尔曲线的。其原型分别如下。
quadTo() 方法
/**
     * Add a quadratic bezier from the last point, approaching control point
     * (x1,y1), and ending at (x2,y2). If no moveTo() call has been made for
     * this contour, the first point is automatically set to (0,0).
     *
     * @param x1 The x-coordinate of the control point on a quadratic curve
     * @param y1 The y-coordinate of the control point on a quadratic curve
     * @param x2 The x-coordinate of the end point on a quadratic curve
     * @param y2 The y-coordinate of the end point on a quadratic curve
     */
    public void quadTo(float x1, float y1, float x2, float y2)
cubicTo() 方法
 /**
     * Add a cubic bezier from the last point, approaching control points
     * (x1,y1) and (x2,y2), and ending at (x3,y3). If no moveTo() call has been
     * made for this contour, the first point is automatically set to (0,0).
     *
     * @param x1 The x-coordinate of the 1st control point on a cubic curve
     * @param y1 The y-coordinate of the 1st control point on a cubic curve
     * @param x2 The x-coordinate of the 2nd control point on a cubic curve
     * @param y2 The y-coordinate of the 2nd control point on a cubic curve
     * @param x3 The x-coordinate of the end point on a cubic curve
     * @param y3 The y-coordinate of the end point on a cubic curve
     */
    public void cubicTo(float x1, float y1, float x2, float y2,
                        float x3, float y3)
参数中,后面的点代表终点,中间的点代表控制点。看起来高大上的贝塞尔曲线,在 Android 中我们主要掌握这 2 个方法的应用基本就可拿下了。当然,实际开发过程中,还有其他问题需要解决,比如拆解,寻找起点,终点和控制点等有时候也是技术活。
下面来看两个实际的案例。
完整的 demo github.com/ly20050516/…。对于不喜欢看文字讲解的,可以直接下载源码进行调试看效果。
3.1 经典案例 —— 流动的水波
先上效果图。
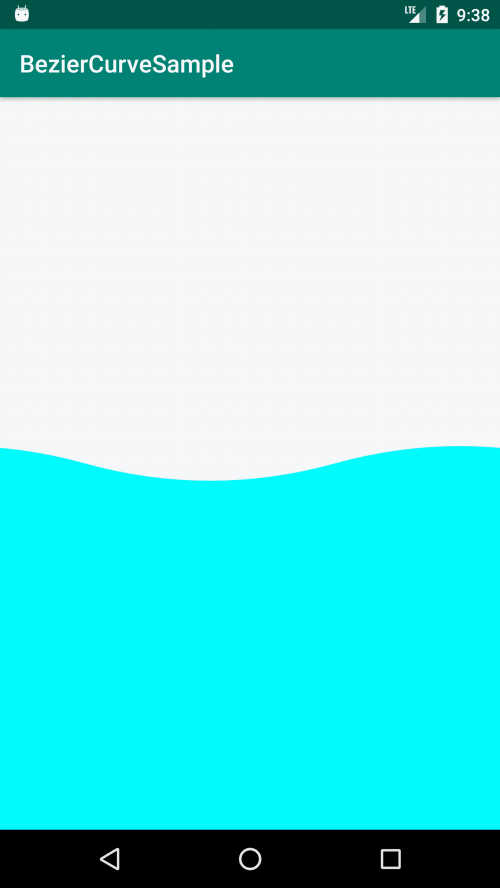
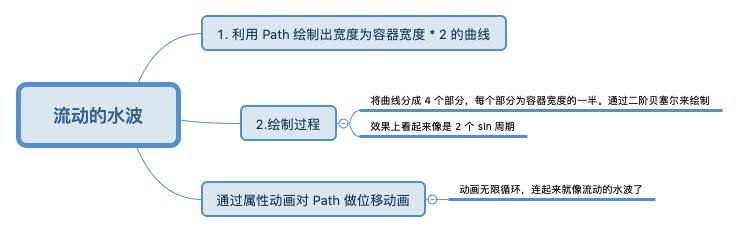
主要步骤如下:
核心代码如下:
        // 重置 path
        path.reset();
        // 将 path 移到起点 (0,h)
        path.moveTo(0,h);
        // 绘制第 1 部分,终点为 (w / 2,h),控制点为 (w / 4,h + WAVE_AMPLITTUDE),得到一条下凹的曲线
        path.quadTo(w / 4,h + WAVE_AMPLITTUDE,w / 2,h);
        // 第 2 部分再以 (w / 2,h) 为起点,以 (w,h) 为终点,以 (w * 3 / 4,h - WAVE_AMPLITTUDE) 为控制点,得到一条上凸的曲线
        path.quadTo(w * 3 / 4,h - WAVE_AMPLITTUDE,w,h);
        // 第 3 部分和第 4 部分就是重复第 1 部分和第 2 部分。只是注意坐标的计算
        path.quadTo(w * 5 / 4,h + WAVE_AMPLITTUDE,w * 3 / 2,h);
        path.quadTo(w * 7 / 4,h - WAVE_AMPLITTUDE,w * 2,h);
        // 然后将 path 封闭得到一填充区域
        path.lineTo(w * 2,getHeight());
        path.lineTo(0,getHeight());
        path.close();

        // 下面的 offset 由属性动画来控制其值,变化范围为 (0,width)
        matrix.reset();
        // 随着动画的不断更新来变换 path 的 offset,从而形成流动的动画
        matrix.postTranslate(-offset,0);
        path.transform(matrix);

        // 最后绘制出需要的曲面,对,不是曲线了
        canvas.drawPath(path,paint);
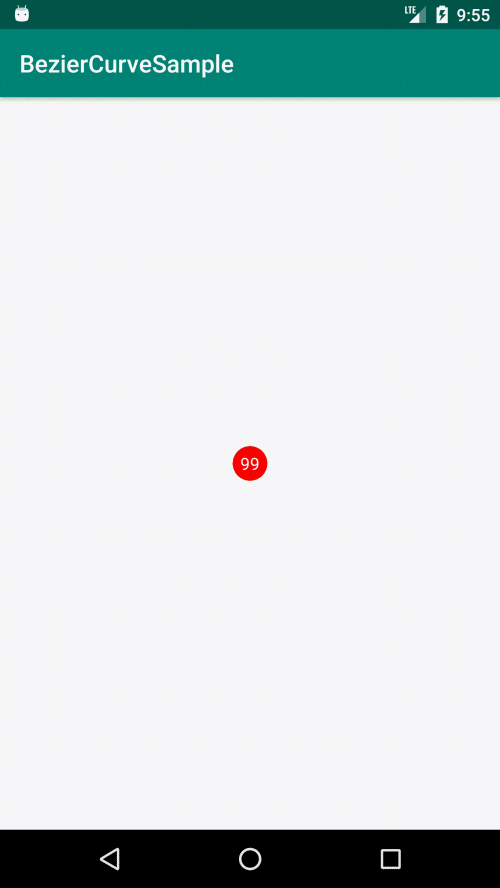
3.2 经典案例 —— 仿 QQ 拖拽清除 tips
效果图如下
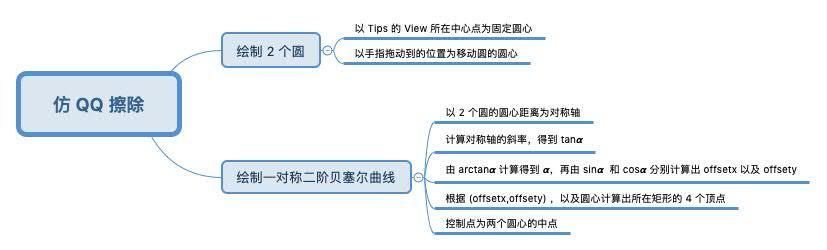
主要步骤:
核心代码:
// 计算 2 点之间的距离
        float distance = (float) Math.sqrt(Math.pow((tipsViewMoveX - tipsViewX), 2) + Math.pow((tipsViewMoveY - tipsViewY), 2));
        // 圆的半径随着距离越来越远变和越来越小
        radius = -distance / 15 + DEFAULT_RADIUS;

        if (radius <= 0) {
            isLimit = true;
            return;
        }

        if(tipsViewMoveX - tipsViewX == 0 || tipsViewMoveY - tipsViewY == 0) {
            return;
        }

        /**
         * 计算偏移量 offsetX 以及 offsetY
         *
         * 直线的斜率 k = (y2 - y1) / (x2 - x1) = tan𝞪,所以这里 Math.atan(k) 就是计算出来的角度,再根据角度分别计算出 offsetX 与 offsetY。
         *
         */
        float offsetX = (float) (radius * Math.sin(Math.atan((tipsViewMoveY - tipsViewY) / (tipsViewMoveX - tipsViewX))));
        float offsetY = (float) (radius * Math.cos(Math.atan((tipsViewMoveY - tipsViewY) / (tipsViewMoveX - tipsViewX))));

        float x1 = tipsViewX - offsetX;
        float y1 = tipsViewY + offsetY;

        float x2 = tipsViewMoveX - offsetX;
        float y2 = tipsViewMoveY + offsetY;

        float x3 = tipsViewMoveX + offsetX;
        float y3 = tipsViewMoveY - offsetY;

        float x4 = tipsViewX + offsetX;
        float y4 = tipsViewY - offsetY;

        // 重置 path
        path.reset();
        // 移到点 (x1,y1)
        path.moveTo(x1,y1);
        // 以 (x1,y1) 为起点,(x2,y2) 为终点,控制点为两圆心的中心点,画一条二阶贝塞尔曲线
        path.quadTo(controllerX,controllerY,x2,y2);
        // 画直线
        path.lineTo(x3,y3);
        // 再对称画一条二阶贝塞尔曲线
        path.quadTo(controllerX,controllerY,x4,y4);
        // 画直线,封闭区域
        path.lineTo(x1,y1);
四、总结
贝塞尔曲线在 Android 中的应用本身并不难,主要掌握好 Path#quadTo() 和 Path#cubicTo() 这两个方法的使用即可。难就难在对目标图形的拆分以及计算起点,终点和控制点上。
