


前言
我们知道 Spring Boot 能快速的搭建起一个应用,简化了大量的配置过程,那到底有多"简"呢?
我们通过一个例子来说明,平时我们通过 Spring和Spring MVC 搭建一个helloword的 Web 应用,需要做以下工作:
-
- 配置 pom.xml 添加
Spring、Spring MVC框架的依赖,同时还需要考虑这些不同的框架的不同版本是否存在不兼容的问题。
- 配置 pom.xml 添加
-
- 配置 Web.xml,加载 Spring、Spring MVC。
-
- 配置 Spring 。
-
- 配置 Spring MVC。
-
- 编写业务逻辑代码。
而使用 Spring Boot 搭建的话,需要做以下工作:
-
- 配置 pom.xml 继承 Spring Boot 的
pom.xml,添加 Web 起步依赖。
- 配置 pom.xml 继承 Spring Boot 的
-
- 创建启动引导类。
-
- 编写业务逻辑代码。
单从步骤数量上看就知道通过 Spring、Spring MVC 搭建比通过 Spring Boot 搭建更复杂,需要编写大量的配置,这还仅仅是在很少框架和 Spring 整合情况下,如果需要将多个第三方框架和 Spring 整合,恐怕就要陷入"配置地狱"了,此外这些配置基本都是固化的,也就是搭建新的应用,你仍然需要再次编写相同的配置信息,特别是在微服务这么火的当下,一个应用可能由十几个甚至几十个小型服务无组成,如果每个小型服务都重复的做着这些配置工作......。
那有没有什么办法解决这个局面呢?答案是有的,那就是使用 Spring Boot,上从上面的例子就可以发现,使用 Spring Boot 的最大优点就是减少了配置的工作,那么是不是说使用 Spring Boot 就不需要这些配置过程了?当然不是,而是 Spring Boot 帮我们把这些工作给做了。
那 Spring Boot 是如何帮我们把这些配置工作给做了呢?这就是本文需要探讨的问题了,在探讨之前,我们需要了解两个概念起步依赖和自动配置,这里暂且知道这两个东西是Spring Boot的核心、是Spring Boot的精华所在、是我们不需要再进行大量配置工作的原因所在就行了。
起步依赖
起步依赖说白了就是Spring Boot通过对常用的依赖进行再一次封装,例如我们平时需要搭建一个Web应用的时候,一般都会导入以下几个依赖:
<dependency>
    <groupId>org.springframework</groupId>
    <artifactId>spring-webmvc</artifactId>
    <version>5.1.3.RELEASE</version>
</dependency>

<dependency>
    <groupId>org.springframework</groupId>
    <artifactId>spring-web</artifactId>
    <version>5.1.3.RELEASE</version>
</dependency>
也就是需要将spring-web和spring mvc分别导入,而使用Spring Boot的话只需要导入一个:
<dependency>
    <groupId>org.springframework.boot</groupId>
    <artifactId>spring-boot-starter-web</artifactId>
</dependency>
也就是只需要导入一个名为web的起步依赖即可,我们点spring-boot-starter-web进去可以看到,其实这个起步依赖集成了常用的 web 依赖,如下:
<dependency>
  <groupId>org.springframework.boot</groupId>
  <artifactId>spring-boot-starter</artifactId>
  <version>2.1.4.RELEASE</version>
  <scope>compile</scope>
</dependency>
<dependency>
  <groupId>org.springframework.boot</groupId>
  <artifactId>spring-boot-starter-json</artifactId>
  <version>2.1.4.RELEASE</version>
  <scope>compile</scope>
</dependency>
<dependency>
  <groupId>org.springframework.boot</groupId>
  <artifactId>spring-boot-starter-tomcat</artifactId>
  <version>2.1.4.RELEASE</version>
  <scope>compile</scope>
</dependency>
<dependency>
  <groupId>org.hibernate.validator</groupId>
  <artifactId>hibernate-validator</artifactId>
  <version>6.0.16.Final</version>
  <scope>compile</scope>
</dependency>
<dependency>
  <groupId>org.springframework</groupId>
  <artifactId>spring-web</artifactId>
  <version>5.1.6.RELEASE</version>
  <scope>compile</scope>
</dependency>
<dependency>
  <groupId>org.springframework</groupId>
  <artifactId>spring-webmvc</artifactId>
  <version>5.1.6.RELEASE</version>
  <scope>compile</scope>
</dependency>
也就是前面所说的,Spring Boot的起步依赖说白了就是对常用的依赖进行再一次封装,方便我们引入,简化了 pom.xml 配置,但是更重要的是将依赖的管理交给了 Spring Boot,我们无需关注不同的依赖的不同版本是否存在冲突的问题,Spring Boot 都帮我们考虑好了,我们拿来用即可!
在使用 Spring Boot 的起步依赖之前,我们需要在pom.xml中添加配置:
<parent>
    <groupId>org.springframework.boot</groupId>
    <artifactId>spring-boot-starter-parent</artifactId>
    <version>2.1.4.RELEASE</version>
    <relativePath/> <!-- lookup parent from repository -->
</parent>
即让pom.xml继承 Spring Boot 的pom.xml,而 Spring Boot 的pom.xml里面定义了常用的框架的依赖以及相应的版本号。
总结一下 Spring Boot 的起步依赖的优点:
-
- 无需考虑不同框架的不同版本的冲突问题。
-
- 简化了
pom.xml配置。
- 简化了
自动配置
如果将开发一个应用比喻成装修房子的过程,那么 Spring Boot 就像是一个全能型公司一样存在,而起步依赖可以比喻成购买装修用品的过程,自动配置比喻成用装修用品进行装修的过程。
我们可以通过 Spring Boot 的起步依赖获取到你想要的涂料、瓷砖、装饰品等, Spring Boot 公司会根据最佳的组合将这些装修用品打包好给我们,我们无需考虑各种装修用品是否搭配、是否冲突等问题。
通过起步依赖我们获取到了想要的装修用品,那接下来我们需要做的就是进行装修了,前面我们说过 Spring Boot 就像一个全能型公司一样,所以我们在他那里购买装修用品之后,他不仅将装修用品送上门还会帮我们完成装修(自动配置),让我们享受一站式的服务,从购买装饰品(起步依赖)到装修完成(自动配置)都不用我们考虑,我们只需要在装修完成之后入住(编写自己的业务逻辑代码)即可。
说了这么多,我们还不知道Spring Boot是如何完成自动配置的,接下来我们来分析 Spring Boot 神奇的自动配置!
首先我们知道 Spring Boot 启动需要有一个启动引导类,这个类除了是应用的入口之外,还发挥着配置的 Spring Boot 的重要作用。下面是一个简单的启动引导类:
@SpringBootApplication
public class DemoApplication {

    public static void main(String[] args) {
        SpringApplication.run(DemoApplication.class, args);
    }

}
我们发现有一个名为@SpringBootApplication的注解,点击进去可以发现,这个注解发挥着多个注解的作用:
@Target({ElementType.TYPE})
@Retention(RetentionPolicy.RUNTIME)
@Documented
@Inherited
@SpringBootConfiguration
@EnableAutoConfiguration
@ComponentScan(
    excludeFilters = {@Filter(
    type = FilterType.CUSTOM,
    classes = {TypeExcludeFilter.class}
), @Filter(
    type = FilterType.CUSTOM,
    classes = {AutoConfigurationExcludeFilter.class}
)}
)
这里简要的说下@SpringBootConfiguration和@ComponentScan注解。前者实质为@Configuration注解,这个注解相比大家都接触过,也就是起到声明这个类为配置类的作用,而后者起到开启自动扫描组件的作用。
这里需要重点分析的是@EnableAutoConfiguration这个注解,这个注解的作用是开启 Spring Boot 的自动配置功能,我们来分析一下它是如何开启的,点击进去可以看到:
@Target({ElementType.TYPE})
@Retention(RetentionPolicy.RUNTIME)
@Documented
@Inherited
@AutoConfigurationPackage
@Import({AutoConfigurationImportSelector.class})
public @interface EnableAutoConfiguration {
    String ENABLED_OVERRIDE_PROPERTY = "spring.boot.enableautoconfiguration";

    Class<?>[] exclude() default {};

    String[] excludeName() default {};
}
@EnableAutoConfiguration这个注解同样发挥着多个注解的功能,我们重点分析@Import({AutoConfigurationImportSelector.class})这个注解,我们知道@import的作用是将组件添加到 Spring 容器中,而在这里即是将AutoConfigurationImportSelector这个组件添加到 Spring 容器中。
我们进一步分析AutoConfigurationImportSelector
protected AutoConfigurationImportSelector.AutoConfigurationEntry getAutoConfigurationEntry(AutoConfigurationMetadata autoConfigurationMetadata, AnnotationMetadata annotationMetadata) {
    if (!this.isEnabled(annotationMetadata)) {
        return EMPTY_ENTRY;
    } else {
        AnnotationAttributes attributes = this.getAttributes(annotationMetadata);
        List<String> configurations = this.getCandidateConfigurations(annotationMetadata, attributes);
        configurations = this.removeDuplicates(configurations);
        Set<String> exclusions = this.getExclusions(annotationMetadata, attributes);
        this.checkExcludedClasses(configurations, exclusions);
        configurations.removeAll(exclusions);
        configurations = this.filter(configurations, autoConfigurationMetadata);
        this.fireAutoConfigurationImportEvents(configurations, exclusions);
        return new AutoConfigurationImportSelector.AutoConfigurationEntry(configurations, exclusions);
    }
}

protected List<String> getCandidateConfigurations(AnnotationMetadata metadata, AnnotationAttributes attributes) {
    List<String> configurations = SpringFactoriesLoader.loadFactoryNames(this.getSpringFactoriesLoaderFactoryClass(), this.getBeanClassLoader());
    Assert.notEmpty(configurations, "No auto configuration classes found in META-INF/spring.factories. If you are using a custom packaging, make sure that file is correct.");
    return configurations;
}
有一个名为getAutoConfigurationEntry的方法,这个方法发挥的作用是扫描ClassPath下的所有jar包的spring.factories文件,将spring.factories文件key为EnableAutoConfiguration的所有值取出,然后这些值其实是类的全限定名,也就是自动配置类的全限定名,然后 Spring Boot 通过这些全限定名进行类加载(反射),将这些自动配置类添加到 Spring 容器中。
那这些自动配置类有哪些?发挥什么作用呢?我们接着往下看,我们找到一个名为spring-boot-autoconfigure-2.1.4.RELEASE.jar的 jar 包,打开它的spring.factories文件,发现这个文件有key为EnableAutoConfiguration的键值对
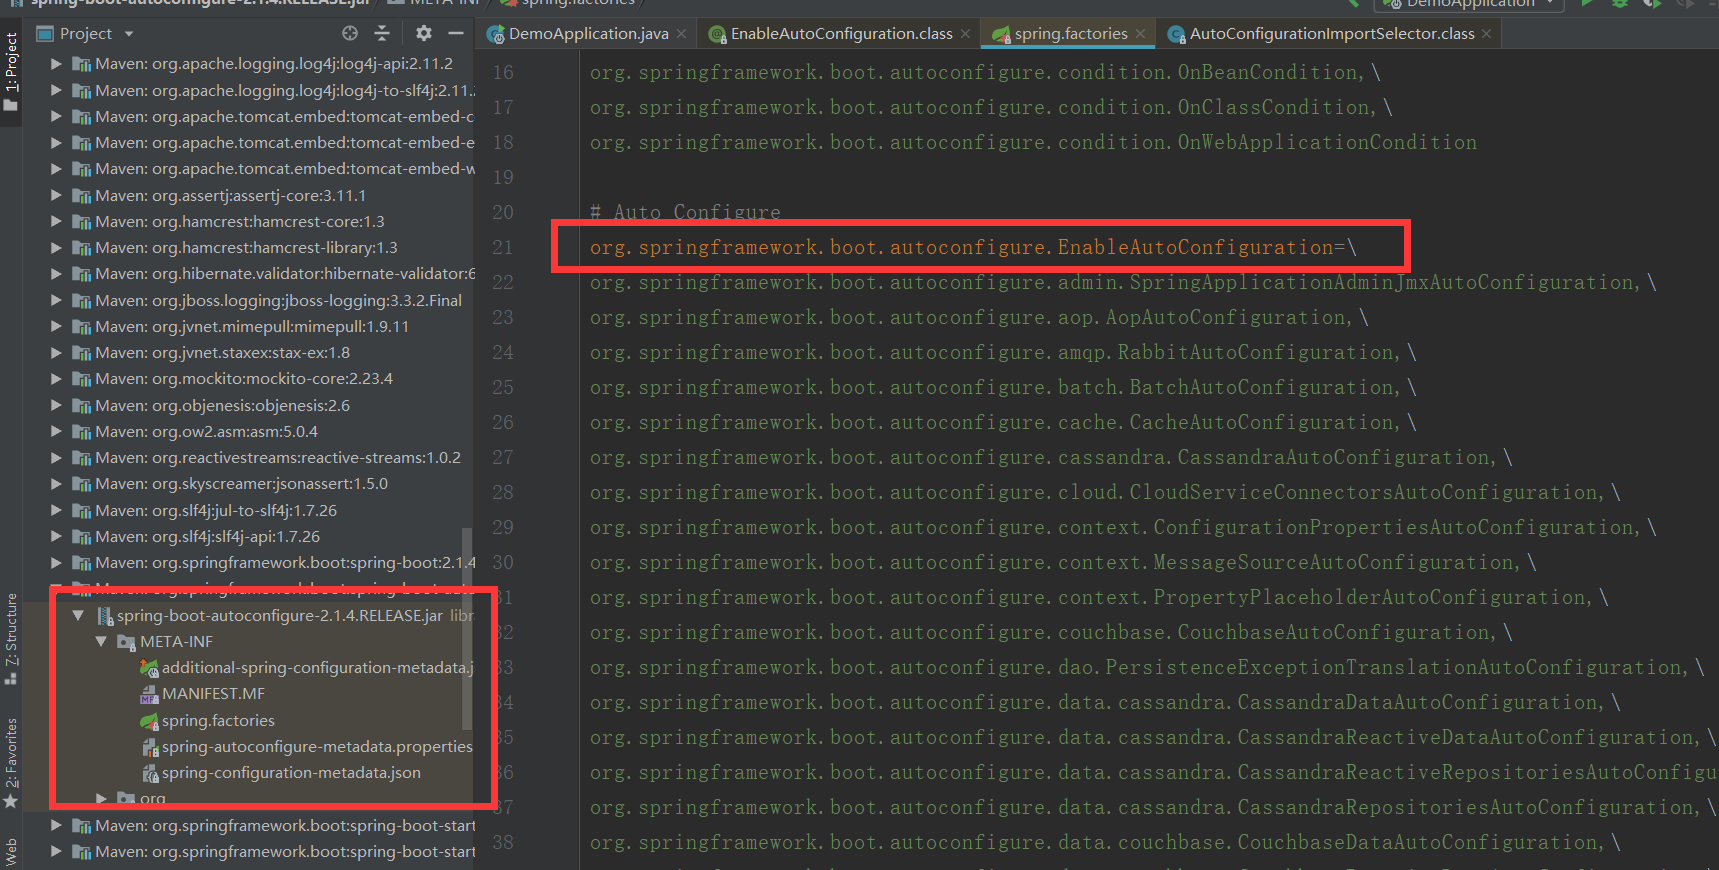
# Auto Configure
org.springframework.boot.autoconfigure.EnableAutoConfiguration=\
org.springframework.boot.autoconfigure.admin.SpringApplicationAdminJmxAutoConfiguration,\
org.springframework.boot.autoconfigure.aop.AopAutoConfiguration,\
org.springframework.boot.autoconfigure.amqp.RabbitAutoConfiguration,\
org.springframework.boot.autoconfigure.batch.BatchAutoConfiguration,\
org.springframework.boot.autoconfigure.cache.CacheAutoConfiguration,\
org.springframework.boot.autoconfigure.cassandra.CassandraAutoConfiguration,\
org.springframework.boot.autoconfigure.cloud.CloudServiceConnectorsAutoConfiguration,\

......
也就是这个jar包有自动配置类,可以发现这些自动配置配都是以xxxAutoConfiguration的命名规则来取名的,这些自动配置类包含我了们常用的框架的自动配置类,比如aop、elasticsearch、redis和web等等,基本能满足我们日常开发的需求。
那这些自动配置类又是如何发挥配置作用的呢,我们取一个较为简单的配置类进行分析,名为HttpEncodingAutoConfiguration,它的部分代码如下:
@Configuration  //声明这个类为配置类
@EnableConfigurationProperties({HttpProperties.class})  //开启ConfigurationProperties功能,同时将配置文件和HttpProperties.class绑定起来
@ConditionalOnWebApplication(  //只有在web应用下自动配置类才生效
    type = Type.SERVLET
)
@ConditionalOnClass({CharacterEncodingFilter.class}) //只有存在CharacterEncodingFilter.class情况下 自动配置类才生效
@ConditionalOnProperty( //判断配置文件是否存在某个配置spring.http.encoding,如果存在其值为enabled才生效,如果不存在这个配置类也生效。
    prefix = "spring.http.encoding",
    value = {"enabled"},
    matchIfMissing = true
)

//将字符编码过滤器组件添加到 Spring 容器中
@Bean
@ConditionalOnMissingBean
public CharacterEncodingFilter characterEncodingFilter() {
    CharacterEncodingFilter filter = new OrderedCharacterEncodingFilter();
    filter.setEncoding(this.properties.getCharset().name());
    filter.setForceRequestEncoding(this.properties.shouldForce(org.springframework.boot.autoconfigure.http.HttpProperties.Encoding.Type.REQUEST));
    filter.setForceResponseEncoding(this.properties.shouldForce(org.springframework.boot.autoconfigure.http.HttpProperties.Encoding.Type.RESPONSE));
    return filter;
}

@Bean
public HttpEncodingAutoConfiguration.LocaleCharsetMappingsCustomizer localeCharsetMappingsCustomizer() {
    return new HttpEncodingAutoConfiguration.LocaleCharsetMappingsCustomizer(this.properties);
}
首先它同样有许多注解,我们一个一个分析:
- Configuration:这个注解声明了这个类为配置类(和我们平时写的配置类一样,同样是在类上加这个注解)。
- EnableConfigurationProperties:开启
ConfigurationProperties功能,也就是将配置文件和HttpProperties.class这个类绑定起来,将配置文件的相应的值和HttpProperties.class的变量关联起来,可以点击HttpProperties.class进去看看,下面截取了部分代码进行分析:
@ConfigurationProperties(
    prefix = "spring.http"
)

public static final Charset DEFAULT_CHARSET;
private Charset charset;
private Boolean force;
private Boolean forceRequest;
private Boolean forceResponse;
private Map<Locale, Charset> mapping;
通过ConfigurationProperties指定前缀,将配置文件application.properties前缀为spring.http的值和HttpProperties.class的变量关联起来,通过类的变量可以发现,我们可以设置的属性是charset、force、forceRequest、forceResponse和mapping。也就是我们除了使用 Spring Boot 默认提供的配置信息之外,我们还可以通过配置文件指定配置信息。
- ConditionalOnWebApplication:这个注解的作用是自动配置类在 Web 应用中才生效。
- ConditionalOnClass:只有在存在
CharacterEncodingFilter这个类的情况下自动配置类才会生效。 - ConditionalOnProperty:判断配置文件是否存在某个配置 spring.http.encoding ,如果存在其值为 enabled 才生效,如果不存在这个配置类也生效。
可以发现后面几个注解都是ConditionalXXXX的命名规则,这些注解是 Spring 制定的条件注解,只有在符合条件的情况下自动配置类才会生效。
接下来的characterEncodingFilter方法,创建一个CharacterEncodingFilter的对象,也就是字符编码过滤器,同时设置相关属性,然后将对象返回,通过@Bean注解,将返回的对象添加到 Spring 容器中。这样字符编码过滤器组件配置好了,而平时的话,我们需要在 web.xml 进行如下配置:
  <filter>
       <filter-name>springUtf8Encoding</filter-name>
       <filter-class>org.springframework.web.filter.CharacterEncodingFilter</filter-class>
       <init-param>
           <param-name>encoding</param-name>
           <param-value>utf-8</param-value>
       </init-param>
       <init-param>
           <param-name>forceEncoding</param-name>
           <param-value>true</param-value>
       </init-param>
    </filter>
    <filter-mapping>
       <filter-name>springUtf8Encoding</filter-name>
       <url-pattern>/*</url-pattern>
   </filter-mapping>
到这里是不是感受到了 Spring Boot 自动配置带来的好处了?
接下来的localeCharsetMappingsCustomizer方法同理,就不分析了。
最后我们用一句话总结一下 Spring Boot 的自动配置:Spring Boot 启动的时候,会扫描ClassPath下的所有 jar 包,将其spring.factories文件中key为EnableAutoConfiguration的所有值取出,然后这些值其实是类的全限定名,也就是自动配置类的全限定名,然后 Spring Boot 通过这些全限定名进行类加载(反射),将这些自动配置类添加到 Spring 容器中。这些自动配置类根据不同的条件(@ConditionalXXX)决定自动配置类是否生效,生效的话自动配置类会将相关组件添加到 Spring 容器中,也就不用我们再进行配置!
总结
看了网上挺多的文章都说的不是很清楚,所以按照自己的理解写下了这篇总结,有误之处欢迎指出。
原文地址:ddnd.cn/2019/05/10/…
