

前言
接下来几篇文章我会记录一些Spring相关的知识,也算是我学习Spring的学习笔记吧,这一篇先看一下Spring Bean的生命周期。
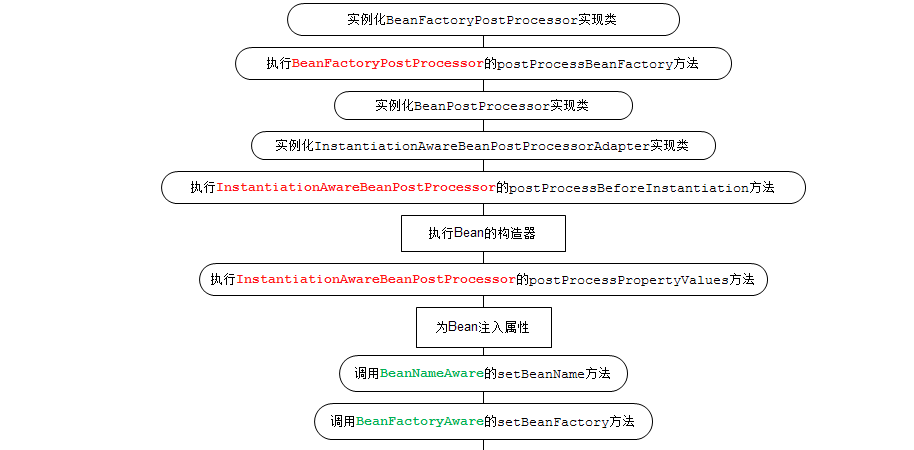
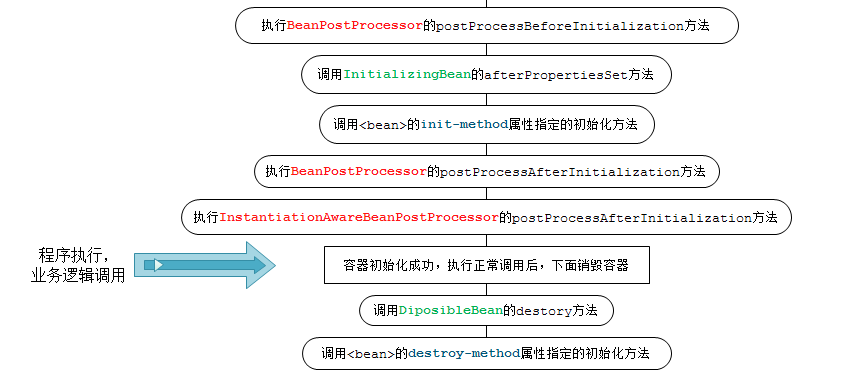
一、生命周期流程图
Spring Bean的完整生命周期从创建Spring容器开始,直到最终Spring容器销毁Bean,这其中包含了一系列关键点。
二、各种接口方法分类
Bean的完整生命周期经历了各种方法调用,这些方法可以划分为以下几类:
1、Bean自身的方法:这个包括了Bean本身调用的方法和通过配置文件中<bean>的init-method和destroy-method指定的方法
2、Bean级生命周期接口方法:这个包括了BeanNameAware、BeanFactoryAware、InitializingBean和DiposableBean这些接口的方法
3、容器级生命周期接口方法:这个包括了InstantiationAwareBeanPostProcessor 和 BeanPostProcessor 这两个接口实现,一般称它们的实现类为“后处理器”。
4、工厂后处理器接口方法:这个包括了AspectJWeavingEnabler, ConfigurationClassPostProcessor, CustomAutowireConfigurer等等非常有用的工厂后处理器接口的方法。工厂后处理器也是容器级的。在应用上下文装配配置文件之后立即调用。
三、演示
我们用一个简单的Spring Bean来演示一下Spring Bean的生命周期。
1. 首先是一个简单的Spring Bean,调用Bean自身的方法和Bean级生命周期接口方法,为了方便演示,它实现了BeanNameAware、BeanFactoryAware、InitializingBean和DiposableBean这4个接口,同时有2个方法,对应配置文件中<bean>的init-method和destroy-method。如下:
package com.study.vo;

import org.springframework.beans.BeansException;
import org.springframework.beans.factory.*;

public class Person implements BeanFactoryAware, BeanNameAware, InitializingBean, DisposableBean {

    private String name;
    private String address;
    private int phone;

    private BeanFactory beanFactory;
    private String beanName;

    public Person() {
        System.out.println("【构造器】调用Person的构造器实例化");
    }

    public String getName() {
        return name;
    }

    public void setName(String name) {
        System.out.println("【注入属性】注入属性name");
        this.name = name;
    }

    public String getAddress() {
        return address;
    }

    public void setAddress(String address) {
        System.out.println("【注入属性】注入属性address");
        this.address = address;
    }

    public int getPhone() {
        return phone;
    }

    public void setPhone(int phone) {
        System.out.println("【注入属性】注入属性phone");
        this.phone = phone;
    }

    @Override
    public String toString() {
        return "Person [address=" + address + ", name=" + name + ", phone=" + phone + "]";
    }

    // 这是BeanFactoryAware接口方法
    @Override
    public void setBeanFactory(BeanFactory arg0) throws BeansException {
        System.out.println("【BeanFactoryAware接口】调用BeanFactoryAware.setBeanFactory()");
        this.beanFactory = arg0;
    }

    // 这是BeanNameAware接口方法
    @Override
    public void setBeanName(String arg0) {
        System.out.println("【BeanNameAware接口】调用BeanNameAware.setBeanName()");
        this.beanName = arg0;
    }

    // 这是InitializingBean接口方法
    @Override
    public void afterPropertiesSet() throws Exception {
        System.out.println("【InitializingBean接口】调用InitializingBean.afterPropertiesSet()");
    }

    // 这是DiposibleBean接口方法
    @Override
    public void destroy() throws Exception {
        System.out.println("【DiposibleBean接口】调用DiposibleBean.destory()");
    }

    // 通过的init-method属性指定的初始化方法
    public void myInit() {
        System.out.println("【init-method】调用的init-method属性指定的初始化方法");
    }

    // 通过的destroy-method属性指定的初始化方法
    public void myDestory() {
        System.out.println("【destroy-method】调用的destroy-method属性指定的初始化方法");
    }
}
2. 接下来是演示BeanPostProcessor接口的方法,如下:
package com.study.vo;

import org.springframework.beans.BeansException;
import org.springframework.beans.factory.config.BeanPostProcessor;

public class MyBeanPostProcessor implements BeanPostProcessor {

    public MyBeanPostProcessor() {
        super();
        System.out.println("这是BeanPostProcessor实现类构造器!!");
        // TODO Auto-generated constructor stub
    }

    @Override
    public Object postProcessAfterInitialization(Object arg0, String arg1) throws BeansException {
        System.out.println("【BeanPostProcessor接口】调用方法postProcessAfterInitialization对属性进行更改!");
        return arg0;
    }

    @Override
    public Object postProcessBeforeInitialization(Object arg0, String arg1) throws BeansException {
        System.out.println("【BeanPostProcessor接口】调用方法postProcessBeforeInitialization对属性进行更改!");
        return arg0;
    }
}
如上,BeanPostProcessor接口包括2个方法postProcessAfterInitialization和postProcessBeforeInitialization,这两个方法的第一个参数都是要处理的Bean对象,第二个参数都是Bean的name。返回值也都是要处理的Bean对象。这里要注意。
3. InstantiationAwareBeanPostProcessor 接口本质是BeanPostProcessor的子接口,一般我们继承Spring为其提供的适配器类InstantiationAwareBeanPostProcessor Adapter来使用它,如下:
package com.study.vo;

import org.springframework.beans.BeansException;
import org.springframework.beans.PropertyValues;
import org.springframework.beans.factory.config.InstantiationAwareBeanPostProcessorAdapter;

import java.beans.PropertyDescriptor;

public class MyInstantiationAwareBeanPostProcessor extends InstantiationAwareBeanPostProcessorAdapter {

    public MyInstantiationAwareBeanPostProcessor() {
        super();
        System.out.println("这是InstantiationAwareBeanPostProcessorAdapter实现类构造器!!");
    }

    // 接口方法、实例化Bean之前调用
    @Override
    public Object postProcessBeforeInstantiation(Class beanClass, String beanName) throws BeansException {
        System.out.println("InstantiationAwareBeanPostProcessor调用postProcessBeforeInstantiation方法");
        return null;
    }

    // 接口方法、实例化Bean之后调用
    @Override
    public Object postProcessAfterInitialization(Object bean, String beanName) throws BeansException {
        System.out.println("InstantiationAwareBeanPostProcessor调用postProcessAfterInitialization方法");
        return bean;
    }

    // 接口方法、设置某个属性时调用
    @Override
    public PropertyValues postProcessPropertyValues(PropertyValues pvs, PropertyDescriptor[] pds, Object bean, String beanName) throws BeansException {
        System.out.println("InstantiationAwareBeanPostProcessor调用postProcessPropertyValues方法");
        return pvs;
    }
}
这个有3个方法,其中第二个方法postProcessAfterInitialization就是重写了BeanPostProcessor的方法。第三个方法postProcessPropertyValues用来操作属性,返回值也应该是PropertyValues对象。
4. 演示工厂后处理器接口方法,如下:
package com.study.vo;

import org.springframework.beans.BeansException;
import org.springframework.beans.factory.config.BeanDefinition;
import org.springframework.beans.factory.config.BeanFactoryPostProcessor;
import org.springframework.beans.factory.config.ConfigurableListableBeanFactory;

public class MyBeanFactoryPostProcessor implements BeanFactoryPostProcessor {

    public MyBeanFactoryPostProcessor() {
        super();
        System.out.println("这是BeanFactoryPostProcessor实现类构造器!!");
    }

    @Override
    public void postProcessBeanFactory(ConfigurableListableBeanFactory arg0) throws BeansException {
        System.out.println("【BeanFactoryPostProcessor接口】调用postProcessBeanFactory方法");
        BeanDefinition bd = arg0.getBeanDefinition("person");
        bd.getPropertyValues().addPropertyValue("phone", "110");
    }

}
5、配置文件如下applicationContext.xml,很简单,使用ApplicationContext,处理器不用手动注册:
<?xml version="1.0" encoding="UTF-8"?>
<beans xmlns="http://www.springframework.org/schema/beans"
       xmlns:xsi="http://www.w3.org/2001/XMLSchema-instance" xmlns:p="http://www.springframework.org/schema/p"
       xsi:schemaLocation="http://www.springframework.org/schema/beans http://www.springframework.org/schema/beans/spring-beans.xsd">

    <bean id="beanPostProcessor" class="com.study.vo.MyBeanPostProcessor">
    </bean>

    <bean id="instantiationAwareBeanPostProcessor" class="com.study.vo.MyInstantiationAwareBeanPostProcessor">
    </bean>

    <bean id="beanFactoryPostProcessor" class="com.study.vo.MyBeanFactoryPostProcessor">
    </bean>

    <bean id="person" class="com.study.vo.Person" init-method="myInit"
          destroy-method="myDestory" scope="singleton" p:name="张三" p:address="广州"
          p:phone="159000000" />
</beans>
6. 编写一个测试类
package com.study;

import com.study.vo.Person;
import org.springframework.context.ApplicationContext;
import org.springframework.context.support.ClassPathXmlApplicationContext;

public class Main {

    public static void main(String[] args) {
        System.out.println("现在开始初始化容器");

        ApplicationContext factory = new ClassPathXmlApplicationContext("applicationContext.xml");
        System.out.println("容器初始化成功");
        //得到Preson,并使用
        Person person = factory.getBean("person", Person.class);
        System.out.println(person);
        System.out.println("现在开始关闭容器!");
        ((ClassPathXmlApplicationContext) factory).registerShutdownHook();
    }
}
运行结果
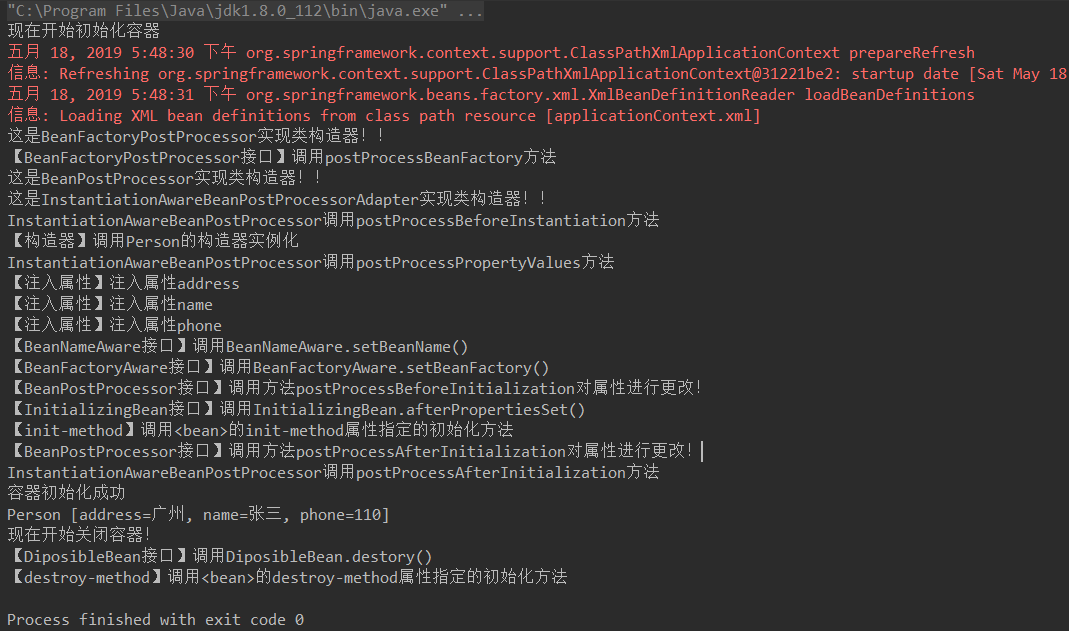
小结
分析运行结果可以得知spring的初始化流程,通过编写这样的demo能够更加深刻的理解spring bean的生命周期
