

前言
Google 在 2017 年的 I/O 大会上宣布支持使用 Kotlin 语言来开发 Android 应用程序,和 Java 同为一级开发语言。而今年的 I/O大会上, Google 正式宣布,Kotlin 将由一级开发语言转为第一开发语言,未来 Google 提供的 API 都会优先以 Kotlin 为准。当然 Java 和 C++ 开发也会继续支持下去,暂时还没有放弃 Java 的时间表。
据有关统计说,目前已有超过 50% 的专业 Android 开发者选择使用 Kotlin,并且 Kotlin 目前是 Github 中上升最快的编程语言。
从谷歌的推广力度及目前的使用程度来看,使用 Kotlin 开发已成为趋势,所以现在开始一起学习吧!
相关资料:
官方网站
官方学习文档
Kotlin 中文网站
特点及优势
- 兼容性:Kotlin 与 JDK 6 完全兼容,保障了 Kotlin 应用程序可以在较旧的 Android 设备 上运行而无任何问题。Kotlin 工具在 Android Studio 中会完全支持,并且兼容 Android 构 建系统。
- 性能:由于非常相似的字节码结构,Kotlin 应用程序的运行速度与 Java 类似。 随着 Kotlin 对内联函数的支持,使用 lambda 表达式的代码通常比用 Java 写的代码运行得更 快。
- 互操作性:Kotlin 可与 Java 进行 100% 的互操作,允许在 Kotlin 应用程序中使用所有现 有的 Android 库 。所以 Android 开发者可以无缝的过渡为使用 Kotlin 进行开发。
AndroidStudio 开发
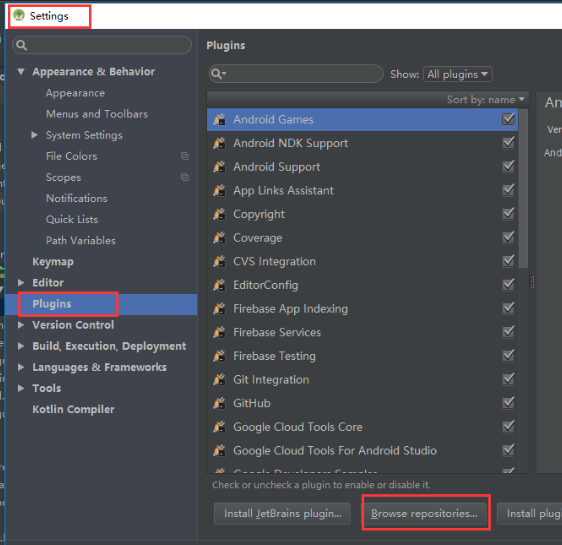
- 首先打开 AndroidStudio ,打开 Settings --> Plugins --> Browse repositories
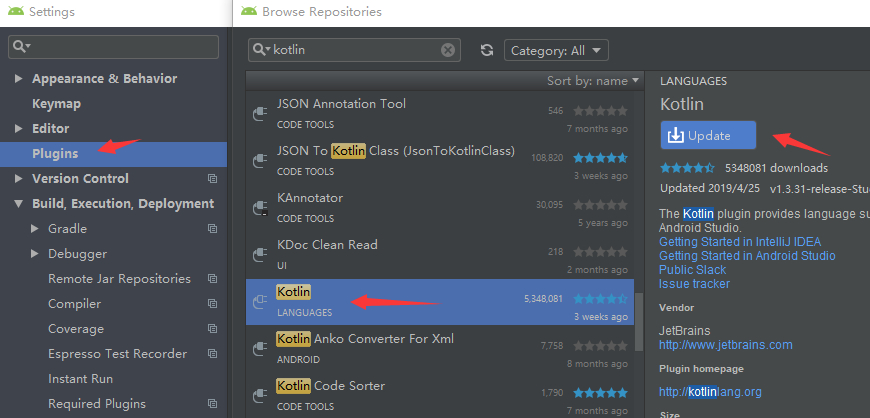
- 搜索 Kotlin ,如果没有安装过的需要安装然后重启,安装过的可以进行更新然后重启 Studio
- 创建项目,选择 Kotlin 语言

结构介绍
- 看一下自动生成的 MainActivity 代码
class MainActivity : AppCompatActivity() {

    override fun onCreate(savedInstanceState: Bundle?) {
        super.onCreate(savedInstanceState)
        setContentView(R.layout.activity_main)
    }
}
- 项目根目录的 build.gradle 文件,会发现多了一行 Kotlin 的配置
dependencies {
        classpath 'com.android.tools.build:gradle:3.4.0'
        classpath "org.jetbrains.kotlin:kotlin-gradle-plugin:$kotlin_version"
        // NOTE: Do not place your application dependencies here; they belong
        // in the individual module build.gradle files
    }
- APP 模块下的 build.gradle 文件,会发现多了两个插件
//第一个就是支持 Kotlin 的插件
apply plugin: 'kotlin-android'
//使用第二个插件,从此告别 findViewById 的困扰
apply plugin: 'kotlin-android-extensions'
Kotlin Android Extensions 是 Kotlin 的一个插件,它包含在普通的那个插件中,这就允许以惊人的无缝方式从 Activity,Fragment 和 View 中恢复 View。
该插件将生成一些额外的代码,允许你访问布局 XML 的 View,就像它们是在布局中定义的属性一样,你可以使用 id 的名称。
它还构建本地视图缓存。所以首次使用一个属性时,它会做一个普通的 findViewById。而接下来,View 则是从缓存中恢复,因此访问速度更快。
Activity 中使用 TextView
- 布局文件如下,TextView 的 ID 为 mTvName
<?xml version="1.0" encoding="utf-8"?>
<android.support.constraint.ConstraintLayout
        xmlns:android="http://schemas.android.com/apk/res/android"
        xmlns:tools="http://schemas.android.com/tools"
        xmlns:app="http://schemas.android.com/apk/res-auto"
        android:layout_width="match_parent"
        android:layout_height="match_parent"
        tools:context=".MainActivity">

    <TextView
            android:id="@+id/mTvName"
            android:layout_width="wrap_content"
            android:layout_height="wrap_content"
            app:layout_constraintBottom_toBottomOf="parent"
            app:layout_constraintLeft_toLeftOf="parent"
            app:layout_constraintRight_toRightOf="parent"
            app:layout_constraintTop_toTopOf="parent"/>

</android.support.constraint.ConstraintLayout>
- 在 Activity 中直接使用 View 的 ID 进行属性设置
mTvName.text = "nice to meet you"
之所以可以这样使用,因为 Studio 导入了 View 的合成属性 (其中 activity_main 为布局文件名)
import kotlinx.android.synthetic.main.activity_main.*
是不是瞬间爽翻了,再也不用 findViewById 了,这可以节省不少时间,代码量也减少了很多,这也是 Kotlin 的一大优势。
本小节就介绍到这里,下一小节我们会学习 Kotlin 的基本语法。
