现在应该很多地方都会使用到高斯模糊的效果,想当初在Android上实现差点没要了我的老命,那么在 Flutter 中实现会是如何?
什么是BackdropFilter,怎么使用
Flutter 提供了 BackdropFilter 来实现高斯模糊的效果,照例打开源码:
class BackdropFilter extends SingleChildRenderObjectWidget {
  /// Creates a backdrop filter.
  ///
  /// The [filter] argument must not be null.
  const BackdropFilter({
    Key key,
    @required this.filter,
    Widget child,
  }) : assert(filter != null),
       super(key: key, child: child);

  /// The image filter to apply to the existing painted content before painting the child.
  ///
  /// For example, consider using [ImageFilter.blur] to create a backdrop
  /// blur effect
  final ui.ImageFilter filter;
}
可以看到必须要传一个 ImageFilter filter ,而且注释上也写了
For example, consider using [ImageFilter.blur] to create a backdrop blur effect
例如,考虑使用 ImageFilter.blur 来说创建一个背景模糊的效果。
而且,在类的上面还有很长的一段注释:
/// A widget that applies a filter to the existing painted content and then
/// paints [child].
///
/// The filter will be applied to all the area within its parent or ancestor
/// widget's clip. If there's no clip, the filter will be applied to the full
/// screen.
///
/// {@youtube 560 315 https://www.youtube.com/watch?v=dYRs7Q1vfYI}
///
/// {@tool sample}
/// If the [BackdropFilter] needs to be applied to an area that exactly matches
/// its child, wraps the [BackdropFilter] with a clip widget that clips exactly
/// to that child.
///
/// ```dart
/// Stack(
///   fit: StackFit.expand,
///   children: <Widget>[
///     Text('0' * 10000),
///     Center(
///       child: ClipRect(  // <-- clips to the 200x200 [Container] below
///         child: BackdropFilter(
///           filter: ui.ImageFilter.blur(
///             sigmaX: 5.0,
///             sigmaY: 5.0,
///           ),
///           child: Container(
///             alignment: Alignment.center,
///             width: 200.0,
///             height: 200.0,
///             child: Text('Hello World'),
///           ),
///         ),
///       ),
///     ),
///   ],
/// )
/// ```
最前面一段话说的是:如果你不设置他大小的话,这个组件将是全屏的。
然后!他放出来了一个 YouTube 的视频!还有一段Demo
那话不多说,我们直接运行官方给出来的Demo,看看是什么效果:
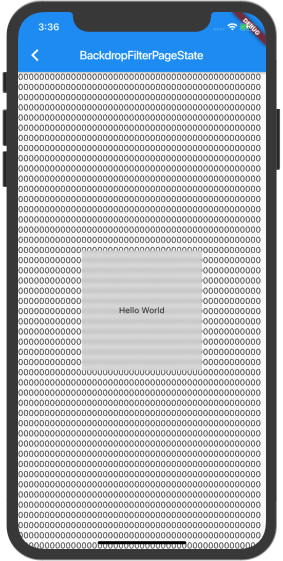
当这一大串 0 显示在我眼前的时候我差点瞎了。
不过可以看到使用 BackdropFilter 非常简单就实现了高斯模糊的效果。
自定义高斯模糊组件
那我们可以按照Demo的思路来封装几个背景是高斯模糊的控件:
class BlurOvalWidget extends StatelessWidget {
  final Widget _widget;
  double _padding = 10;

  BlurOvalWidget(this._widget, {double padding = 0}) {
    if (padding != 0) this._padding = padding;
  }

  @override
  Widget build(BuildContext context) {
    return ClipOval(
      child: BackdropFilter(
        filter: ImageFilter.blur(
          sigmaX: 10,
          sigmaY: 10,
        ),
        child: Container(
          color: Colors.white10,
          padding: EdgeInsets.all(_padding),
          child: _widget,
        ),
      ),
    );
  }
}
我们使用的是无状态的小部件,构造函数里需要传入一个widget,用来放在模糊的背景上面。
然后我们的build 方法直接返回一个圆形的模糊背景,横纵向模糊的数值为10,值越大,模糊的效果就越大。
不能光有圆形的模糊背景,再来一个圆角矩形的:
class BlurRectWidget extends StatelessWidget {
  final Widget _widget;
  double _padding = 10;

  BlurRectWidget(this._widget, {double padding = 0}) {
    if (padding != 0) this._padding = padding;
  }

  @override
  Widget build(BuildContext context) {
    return Container(
      margin: EdgeInsets.symmetric(horizontal: 50),
      child: ClipRRect(
        borderRadius: BorderRadius.all(Radius.circular(10)),
        child: BackdropFilter(
          filter: ImageFilter.blur(
            sigmaX: 20,
            sigmaY: 20,
          ),
          child: Container(
            color: Colors.white10,
            padding: EdgeInsets.all(_padding),
            child: _widget,
          ),
        ),
      ),
    );
  }
}
代码基本一样,只不过就是把 ClipOval 换成了 ClipRRect
现在我们用封装好的两个 widget 来实现一个比较简单的页面:
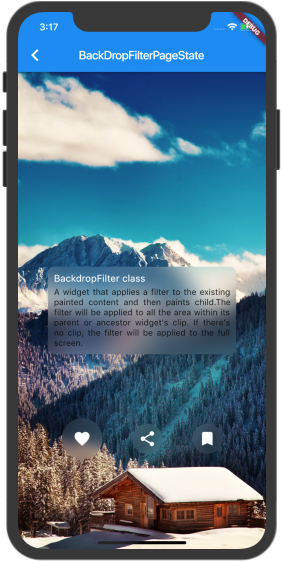
上面的文字用到了我们定义的圆角矩形,下面的用到了我们定义的圆形。
代码如下,比较简单,就是普通的搭建页面:
class _BackdropFilterPageState extends State<BackdropFilterPage> {
  @override
  Widget build(BuildContext context) {
    return Scaffold(
      appBar: AppBar(
        title: Text('BackdropFilterPageState'),
      ),
      body: Stack(
        fit: StackFit.expand,
        children: <Widget>[
          Image.asset(
            'images/bg.jpg',
            fit: BoxFit.cover,
          ),
          Center(
            child: BlurRectWidget(
              Column(
                mainAxisSize: MainAxisSize.min,
                crossAxisAlignment: CrossAxisAlignment.start,
                children: <Widget>[
                  Text(
                    'BackdropFilter class',
                    style: TextStyle(
                      fontSize: 16,
                      color: Colors.white,
                    ),
                  ),
                  Padding(
                    padding: const EdgeInsets.only(top: 5.0),
                    child: Text(
                      'A widget that applies a filter to the existing painted content and then paints child.'
                      'The filter will be applied to all the area within its parent or ancestor widget\'s clip. If there\'s no clip, the filter will be applied to the full screen.',
                      style: TextStyle(fontSize: 14, color: Colors.black87),
                      textAlign: TextAlign.justify,
                    ),
                  ),
                ],
              ),
            ),
          ),
          Container(
            alignment: Alignment.bottomCenter,
            margin: EdgeInsets.only(bottom: 150),
            child: Row(
              mainAxisSize: MainAxisSize.min,
              children: <Widget>[
                BlurOvalWidget(
                  IconButton(
                    onPressed: (){
                      Navigator.of(context).push(MaterialPageRoute(builder: (context){
                        return BlurImagePage();
                      }));
                    },
                    icon: Icon(
                      Icons.favorite,
                      color: Colors.white,
                    ),
                    iconSize: 30,
                  ),
                ),
                Padding(
                  padding: const EdgeInsets.symmetric(horizontal: 50.0),
                  child: BlurOvalWidget(
                    Icon(
                      Icons.share,
                      color: Colors.white,
                      size: 30,
                    ),
                  ),
                ),
                BlurOvalWidget(
                  Icon(
                    Icons.bookmark,
                    color: Colors.white,
                    size: 30,
                  ),
                ),
              ],
            ),
          ),
        ],
      ),
    );
  }
}
如何把高斯模糊当做前景
那这个时候就有人问了,只能把模糊放在背景里吗,不能用来当前景吗?
当然可以,不然我还费这么多话干什么?
先看一下效果图:
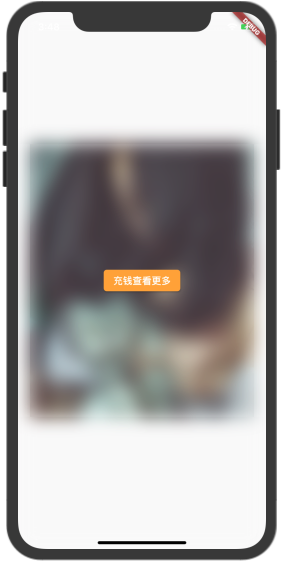
怎么样,是不是你要的感觉🌝,有没有一种想要充钱的冲动!
当然,这种效果实现起来也是非常的简单,我们只需要把 BackdropFilter 的 child 设置为一个 Container(),并且设置上颜色(我这里使用的是 Colors.white10),然后放在 Stack 中就ok啦。
代码如下:
class BlurImagePage extends StatelessWidget {
  @override
  Widget build(BuildContext context) {
    return Scaffold(
      body: Container(
          alignment: Alignment.center,
          child: Stack(
            alignment: Alignment.center,
            children: <Widget>[
              Container(
                margin: EdgeInsets.symmetric(horizontal: 20),
                child: Image.asset(
                  'images/wanimal.png',
                  fit: BoxFit.cover,
                ),
              ),
              Positioned.fill(
                child: BackdropFilter(
                  filter: ImageFilter.blur(
                    sigmaX: 15,
                    sigmaY: 15,
                  ),
                  child: Container(
                    color: Colors.white10,
                  ),
                ),
              ),
              RaisedButton(
                textColor: Colors.white,
                shape: RoundedRectangleBorder(borderRadius: BorderRadius.all(Radius.circular(5))),
                color: Colors.orangeAccent,
                child: Text('充钱查看更多', style: TextStyle(fontSize: 16),),
                onPressed: (){},
              )
            ],
          )),
    );
  }
}
先放我们需要被遮住的 widget,然后放上我们的模糊 widget,再然后就可以让用户充钱了。
小结
BackdropFilter 不仅仅只可以做高斯模糊的效果,也可以用来做旋转,倾斜等。
只不过我们常用的是高斯模糊,其原理一样。
了解更多可以移步 Flutter 官网:flutter.dev/
原文代码移步Giuhub:github.com/wanglu1209/…
图我就不传了,23333.