

React应用程序从根本上来说是一棵组件树,可以相互通信数据。在组件之间传递数据通常是无痛的。但是,随着应用程序树的增长,在保持可读代码库的同时传递数据变得更加困难。
假设我们有以下树结构:
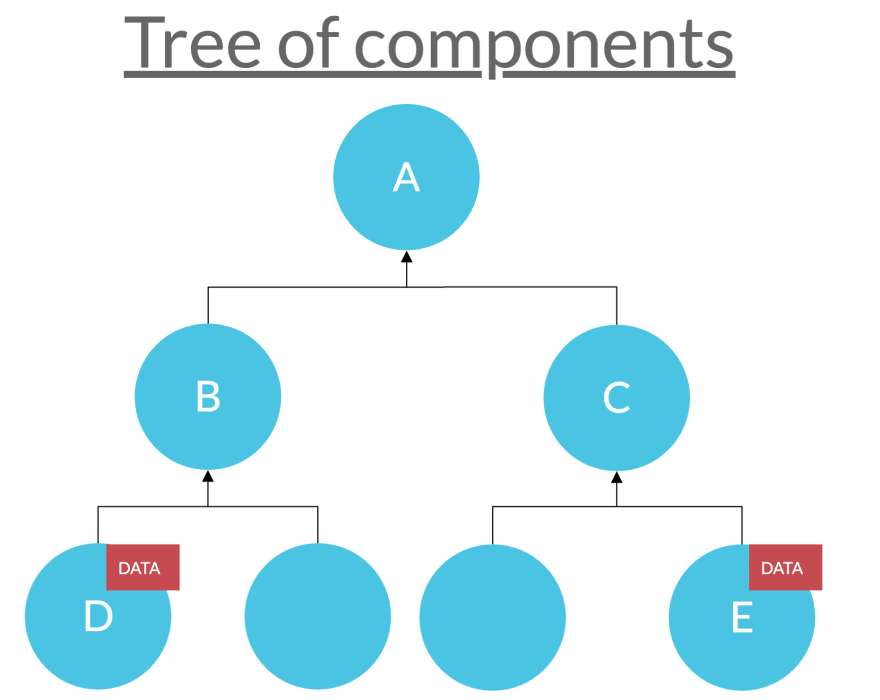
这里有一个简单的树,有3个层次。在该树中,节点D和节点E都操纵一些类似的数据:假设用户输入节点D中的一些文本,我们希望在节点E中显示该文本。
我们如何将数据从节点D传递到节点E?
本文介绍了三种解决此问题的可行方法:
- Prop钻取
- Redux
- React's context API
本文的目的是比较这些方法,并表明,当解决一个常见问题时,例如我们刚才所说的问题,可以坚持使用React的context API。
方法1: Prop钻取
这样做的方法是天真的通过props将数据从子节点传递到父节点,再将数据从父节点传递到子节点,如:D->B->A 然后 A->C->E。
这里的想法是使用onUserInput从子节点到父节点触发的函数将输入数据从节点D传送到节点A的state状态,然后我们将该数据从节点A的state状态传递到节点E.
我们从节点D开始:
class NodeD extends Component {
  render() {
    return (
      <div className="Child element">
        <center> D </center>
        <textarea
          type="text"
          value={this.props.inputValue}
          onChange={e => this.props.onUserInput(e.target.value)}
        />
      </div>
    );
  }
}
当用户键入内容时,onChange监听函数将从prop的onUserInput 触发该函数并传入用户输入。节点D prop中的该函数将触发节点B prop中onUserInput另一个函数,如下:
class NodeB extends Component {
  render() {
    return (
      <div className="Tree element">
        <center> B</center>
        <NodeD onUserInput={inputValue => this.props.onUserInput(inputValue)} />
      </div>
    );
  }
}
最后,当到达根节点A时,onUserInput在节点B prop中触发将把节点A中的状态改变为用户输入的值。
class NodeA extends Component {
  state = {
    inputValue: ""
  };

  render() {
    return (
      <div className="Root element">
        <center> A </center>
        <NodeB
          onUserInput={inputValue => this.setState({ inputValue: inputValue })}
        />
        <NodeC inputValue={this.state.inputValue} />
      </div>
    );
  }
}
inputValue值将通过props从节点C传递给子节点E:
class NodeE extends Component {
  render() {
    return (
      <div className="Child element">
        <center> E </center>
        {this.props.inputValue}
      </div>
    );
  }
}
看到它已经为我们的代码添加了一些复杂性,即使它只是一个小例子。您可以想象一下应用程序增长时的情况吗?🤔
这种方法依赖于树的深度,因此对于更大的深度,我们需要经历更大的组件层。这可能太长而无法实现,过于重复并且会增加代码复杂性。
方法2: 使用Redux
另外一种方法是使用像Redux一样的状态管理库。
Redux is a predictable state container for JavaScript apps. The state of our whole application is stored in an object tree within a single store, which your app components depend on. Every component is connected directly to the global store, and the global store life cycle is independent of the components' life cycle.
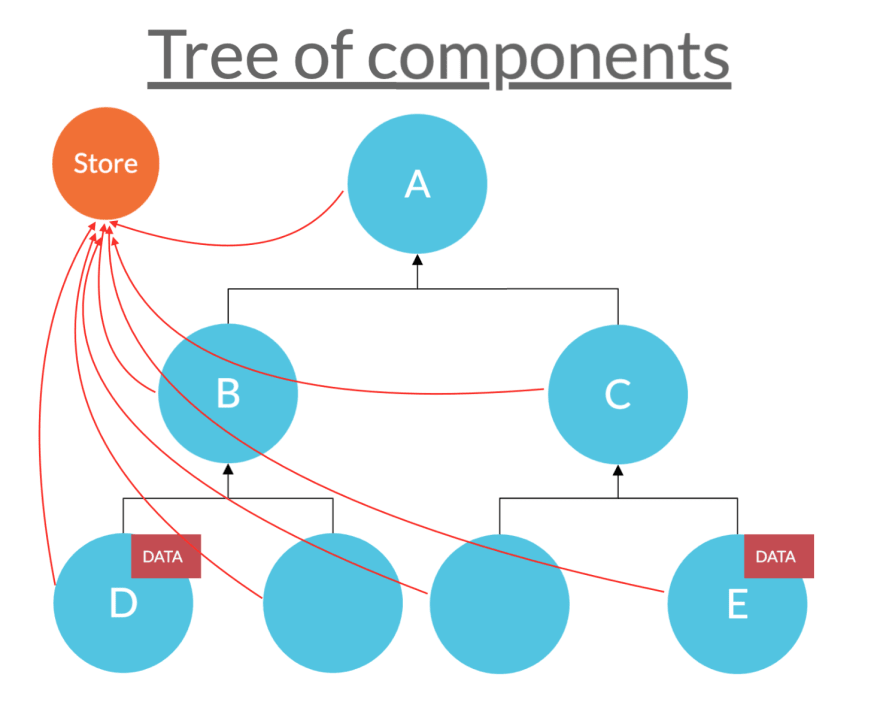
我们首先定义应用程序的状态:我们感兴趣的数据是用户在节点D中输入的内容。我们希望将这些数据提供给节点E.为此,我们可以在store中提供这些数据。然后,节点E可以订阅它以便访问数据。
我们会稍微回到store。
第一步: 定义Reducer
接下里是定义我们的reducer。我们的reducer具体说明了应用程序的状态是如何根据传递到store的actions响应更改的。
定义的reducer如下:
const initialState = {
  inputValue: ""
};

const reducer = (state = initialState, action) => {
  if (action.type === "USER_INPUT") {
    return {
      inputValue: action.inputValue
    };
  }
  return state;
};
在用户输入任何内容之前,我们知道我们的状态数据或inputValue将是一个空字符串。因此,我们使用空字符串inputValue为reducer定义默认初始状态。
这里的逻辑是:一旦用户在节点D键入内容,无论用户输入了什么,我们“触发”或者说派发了一个action来更新state状态。这里的“更新”不是指“突变”或者改变了当前状态,而是说返回了一个新状态。
if语句将派发的action根据其类型映射到要返回的新状态。所以我们已经知道派发的action是一个包含类型键的对象。我们如何获得新状态的用户输入值?我们只是在操作对象中添加另一个名为inputValue的键,在我们的reducer块中,我们使新状态的inputValue具有该输入值action.inputValue。所以我们的应用程序的行为将遵循这种架构:
{ type: "SOME_TYPE", inputValue: "some_value" }
最终,我们的dispatch声明将如下所示:
dispatch({ type: "SOME_TYPE", inputValue: "some_value" })
当我们从任何组件调用dispatch语句时,我们传入操作的类型和用户输入值。
好的,现在我们知道应用程序是如何工作的:在我们的输入节点D中,我们dispatch一个USER_INPUT类型的动作并传入用户刚输入的任何值,在我们的显示节点E中我们传递当前的值即用户输入为应用程序的状态。
第二步: 定义Store
为了使我们的store可用,我们将它传递给从react-redux import的Provider组件,接下来把App包裹在里面。由于我们知道节点D和E将使用该store中的数据,因此我们希望Provider组件包含这些节点的公共父节点,因此要么是根节点A,要么是整个App组件。让我们选择App组件包含在我们的Provider组件中:
import reducer from "./store/reducer";
import { createStore } from "redux";
import { Provider } from "react-redux";

const store = createStore(reducer);
ReactDOM.render(
  <Provider store={store}>
    <App />
  </Provider>,
  document.getElementById("root")
);
目前我们已经设置了store和reducer,接下里在节点D和节点E中搞事情。
第三步: 实现用户输入逻辑
首先我们看一下节点D,我们感兴趣用户在textarea元素中输入了什么。这意味着两件事:
- 我们需要实现onChange事件监听器,并且无论用户输入什么,将它存储在Store中。
- 我们需要将value属性作为textarea存储在store中的值。
但在做任何这些之前,我们需要设置一些东西:
我们首先需要将节点D组件连接到我们的store。为此,我们使用react-redux中的connect()函数。它为连接的组件提供了store所需的数据,以及可用于将操作分派给store的功能。
This is why we use the two mapStateToProps and mapDispatchToProps which deal with the store's state and dispatch respectively. We want our node D component to be subscribed to our store updates, as in, our app's state updates. This means that any time the app's state is updated, mapStateToProps will be called. The results of mapStateToProps is an object which will be merged into our node D's component props. Our mapDispatchToProps function lets us create functions that dispatch when called, and pass those functions as props to our component. We will make use of this by returning new function that calls dispatch() which passes in an action.
在我们的例子中,对于mapStateToProps函数,我们只对inputValue感兴趣,所以我们返回一个对象{ inputValue: state.inputValue }。对于mapDispatchToProps,我们返回一个函数onUserInput,该函数将输入值作为参数,并使用USER_INPUT类型派发action。返回的新状态对象mapStateToProps和onUserInput函数合并到我们组件的props中。所以我们定义我们的组件:
class NodeD extends Component {
  render() {
    return (
      <div className="Child element">
        <center> D </center>
        <textarea
          type="text"
          value={this.props.inputValue}
          onChange={e => this.props.onUserInput(e.target.value)}
        />
      </div>
    );
  }
}
const mapStateToProps = state => {
  return {
    inputValue: state.inputValue
  };
};

const mapDispatchToProps = dispatch => {
  return {
    onUserInput: inputValue =>
      dispatch({ type: "USER_INPUT", inputValue: inputValue })
  };
};
export default connect(
  mapStateToProps,
  mapDispatchToProps
)(NodeD);
我们完成了节点D!现在让我们转到节点E,在那里我们要显示用户输入。
第四步:实现用户输出逻辑
我们希望在此节点上显示用户输入数据。我们已经知道这些数据基本上是我们应用程序的当前状态,就像我们的store一样。所以最终,我们希望访问该store并显示其数据。为此,我们首先需要使用connect()我们之前使用的相同功能具有mapStateToProps的函数将节点E组件订阅到store的更新。之后,我们只需要使用this.props.val从组件的props中访问store中的数据:
class NodeE extends Component {
  render() {
    return (
      <div className="Child element">
        <center> E </center>
        {this.props.val}
      </div>
    );
  }
}
const mapStateToProps = state => {
  return {
    val: state.inputValue
  };
};

export default connect(mapStateToProps)(NodeE);
我们终于完成了Redux!🎉你可以看看我们刚刚在这里做了些什么。
在更复杂的示例的情况下,比如使用具有更多共享/操作存储的组件的树,我们将需要在每个组件处使用这两个mapStateToProps和mapDispatchToProps函数。在这种情况下,通过为每个组件创建单独的文件夹,将我们的操作类型和reducers与组件分开可能更明智。
......谁有时间?
方法3: 使用React's context API
现在让我们使用上下文API重做相同的示例。
React Context API已经存在了一段时间,但直到React的16.3.0版才能在生产中使用它变得安全。这里的逻辑接近Redux的逻辑:我们有一个上下文对象,它包含我们希望从其他组件访问的一些全局数据。
首先,我们创建一个上下文对象,其中包含应用程序的初始状态作为默认状态 然后我们创建一个Provider和一个Consumer组件:
const initialState = {
  inputValue: ""
};

const Context = React.createContext(initialState);

export const Provider = Context.Provider;
export const Consumer = Context.Consumer;
我们的
Provider组件具有作为子项的所有组件,我们希望从中访问上下文数据。就像Provider上面的Redux版本一样。为了提取或操纵上下文,我们使用Consumer相当于组件。
我们希望我们的Provider组件包装整个App,就像上面的Redux版本一样。然而,这Provider与我们见过的前一个有点不同。在我们的App组件中,我们使用一些数据初始化默认状态,我们可以通过值支持我们的Provider组件来共享。
在我们的示例中,我们将共享this.state.inputValue以及操作状态的函数,如我们的onUserInput函数。
class App extends React.Component {
  state = {
    inputValue: ""
  };

  onUserInput = newVal => {
    this.setState({ inputValue: newVal });
  };

  render() {
    return (
      <Provider
        value={{ val: this.state.inputValue, onUserInput: this.onUserInput }}
      >
        <div className="App">
          <NodeA />
        </div>
      </Provider>
    );
  }
}
现在我们可以继续使用Consumer组件访问Provider组件的数据:)
对于用户输入数据的节点D:
const NodeD = () => {
  return (
    <div className="Child element">
      <center> D </center>
      <Consumer>
        {({ val, onUserInput }) => (
          <textarea
            type="text"
            value={val}
            onChange={e => onUserInput(e.target.value)}
          />
        )}
      </Consumer>
    </div>
  );
};
对于我们在其中显示用户输入的节点E:
const NodeE = () => {
  return (
    <div className="Child element ">
      <center> E </center>
      <Consumer>{context => <p>{context.val}</p>}</Consumer>
    </div>
  );
};
我们完成了示例的context api版本!🎉这不是很难吧?在这里查看
如果我们希望能够访问更多context的组件,该怎么办?我们可以使用Provider组件包装它们,并使用Consumer组件来访问/操作上下文!简单 :)
好的,但我应该使用哪一个
我们可以看到我们的Redux版本的示例比Context版本花了更多的时间。我们已经可以看到Redux了:
- 需要更多行的代码,并且可以是太“样板”与更复杂的例子(多个组件来访问存储)。
- 增加复杂性:在处理许多组件时,将reducer和action类型从组件分离到唯一的文件夹/文件可能更明智。
- 介绍学习曲线:一些开发人员发现自己很难学习Redux,因为它需要你学习一些新的概念:reducer,dispatch,action,thunk,middleware ......
如果您正在处理一个更复杂的应用程序,并希望查看您的应用程序的所有dispatch操作的历史记录,“点击”其中任何一个并跳转到该时间点,然后绝对考虑使用Redux的漂亮的dope devTools扩展!
但是,如果你只想让一些数据全局化以便从一堆组件中访问它,你可以从我们的例子中看到Redux和React的Context API都做了大致相同的事情。所以在某种程度上,你不必使用Redux!
