

Netty新连接接入流程
1.检测新链接->2.创建NioSocketChannel->3.分配线程及注册selector->4.向selector注册读事件
检测新连接
步骤
- processSelectedKey(key,channel)入口
- NioMessageUnsafe.read()
- doReadMessages() while循环
- javaChannel().accept()
- doReadMessages() while循环
- NioMessageUnsafe.read()
分析
- processSelectedKey(key,channel)入口
    private void processSelectedKey(SelectionKey k, AbstractNioChannel ch) {
        final AbstractNioChannel.NioUnsafe unsafe = ch.unsafe();
        try {
            int readyOps = k.readyOps();
            // 省略代码...
            if ((readyOps & (SelectionKey.OP_READ | SelectionKey.OP_ACCEPT)) != 0 || readyOps == 0) {
                // 调用与ServerSocketChannel绑定的
                unsafe.read();
            }
        } catch (CancelledKeyException ignored) {
            unsafe.close(unsafe.voidPromise());
        }
    }
doReadMessages()
    @Override
    protected int doReadMessages(List<Object> buf) throws Exception {
        // 接收客户端连接
        SocketChannel ch = SocketUtils.accept(javaChannel());
        try {
            if (ch != null) {
                // netty创建自己的客户端channel
                buf.add(new NioSocketChannel(this, ch));
                return 1;
            }
        } catch (Throwable t) {
            //省略代码...
        }

        return 0;
    }
创建NioSocketChannel
步骤
- new NioSocketChannel(parent,ch) 入口
- AbstractNioByteChannel(p,ch,op_read)
- configureBlocking(false)&save op
- create id,unsafe,pipeline
- new NioSocketChannelConfig()
- setTcpNoDelay(true)
- AbstractNioByteChannel(p,ch,op_read)
分析
- new NioSocketChannel(parent,ch) 入口
    public NioSocketChannel(Channel parent, SocketChannel socket) {
        super(parent, socket);
        // 创建channel对应的config
        config = new NioSocketChannelConfig(this, socket.socket());
    }
    protected AbstractNioByteChannel(Channel parent, SelectableChannel ch) {
        // 指定channel关注读事件
        super(parent, ch, SelectionKey.OP_READ);
    }
    protected AbstractNioChannel(Channel parent, SelectableChannel ch, int readInterestOp) {
        super(parent);
        this.ch = ch;
        this.readInterestOp = readInterestOp;
        try {
            ch.configureBlocking(false);
        } catch (IOException e) {
            //省略代码..
        }
    }
- 其他过程服务端channel创建类似,我们说下这点setTcpNoDelay(true)
    public SocketChannelConfig setTcpNoDelay(boolean tcpNoDelay) {
        try {
            // 如果不是安卓就true
            javaSocket.setTcpNoDelay(tcpNoDelay);
        } catch (SocketException e) {
            throw new ChannelException(e);
        }
        return this;
    }
    当开启nagle算法时,客户端首先发送大小为1字节的第一个分组,随后其它分组到达发送缓冲区,由于上一个分组的应答还没有收到,所以TCP会先缓存新来的这4个小分组,并将其重新分组,组成一个大小为8(2+3+1+2)字节的”较大的”小分组。当第一个小分组的应答收到后,客户端将这个8字节的分组发送。总共发送的报文段(分组)个数为2。当传输数据存在大量交互数据时,nagle算法可以有效减少网络中的报文段个数
    /**
     * Disable Nagle's algorithm for this connection.  Written data
     * to the network is not buffered pending acknowledgement of
     * previously written data.
     */
    @Native public final static int TCP_NODELAY = 0x0001;
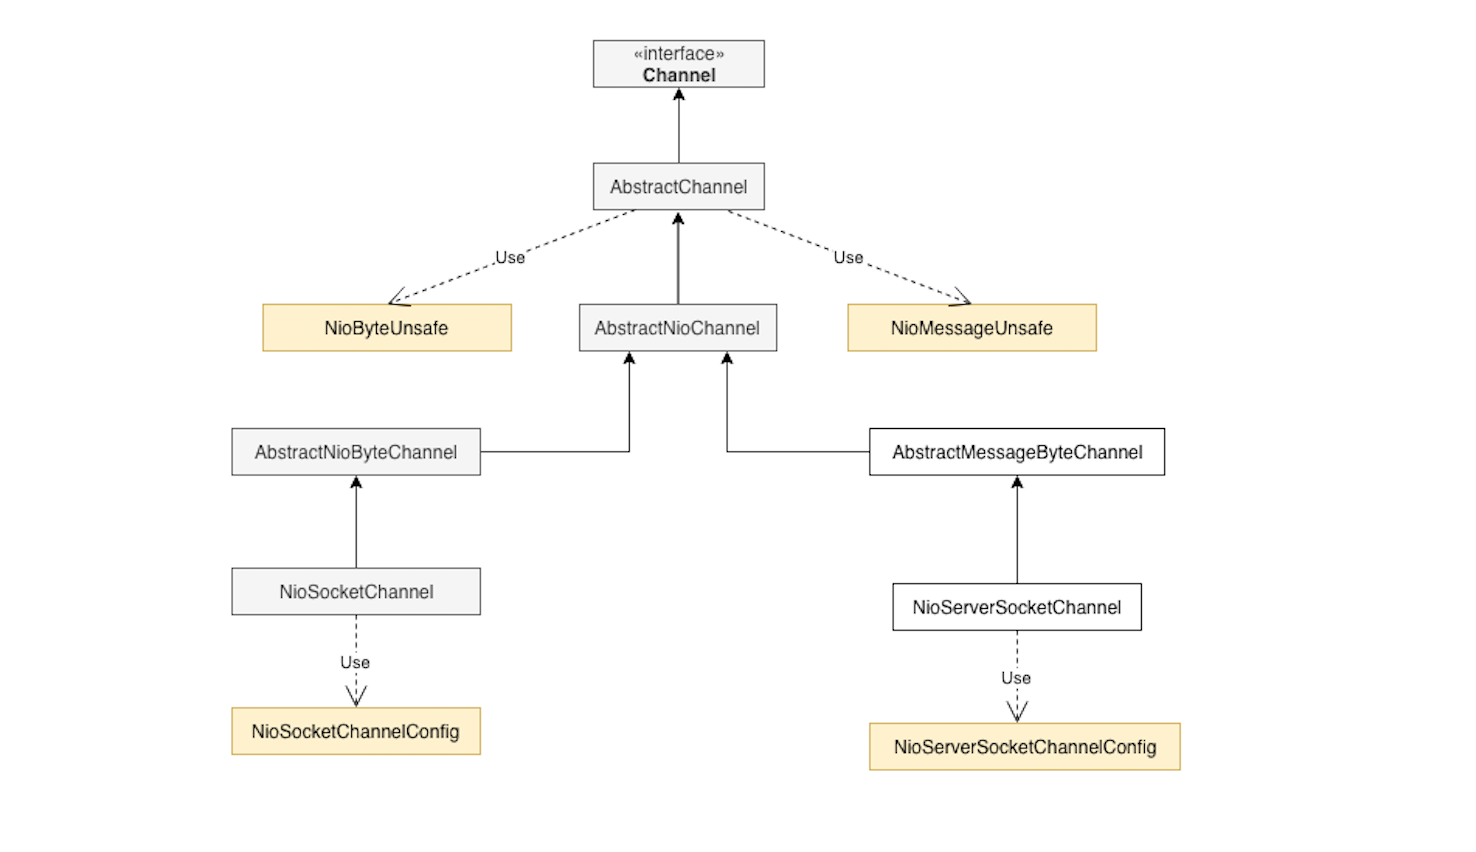
Netty中的Channel的分类
步骤
- NioServerSocketChannel
- NioSocketChannel
分析
- 一个简化的类图
之前创建Channel过程中,客户端和服务端channel有公共成员变量。它们的类继承关系如图:
新连接NioEventLoop分配和selector注册
步骤
服务端Channel的pipeline构成 Head --> ServerBootstrapAcceptor --> tail
- ServerBootstrapAcceptor
- 添加childHandler
- 设置options和attrs
- Chooser选择NioEventLopp并注册selector
分析
- 在服务端channel创建的时候会在pipeline中添加个ServerBootstrapAcceptor。
    p.addLast(new ChannelInitializer<Channel>() {
        @Override
        public void initChannel(final Channel ch) throws Exception {
            final ChannelPipeline pipeline = ch.pipeline();
            ChannelHandler handler = config.handler();
            if (handler != null) {
                pipeline.addLast(handler);
            }

            ch.eventLoop().execute(new Runnable() {
                @Override
                public void run() {
                    pipeline.addLast(new ServerBootstrapAcceptor(
                            ch, currentChildGroup, currentChildHandler, currentChildOptions, currentChildAttrs));
                }
            });
        }
    });
- 创建ServerBootstrapAcceptor 过程最终要的一点就是初始化childGroup,因为一会要从中选择EventLoop的其中一个,并将channel注册上去
- 上面的doReadMessages对于连接事件,其实读到的是NioSocketChannel
    int size = readBuf.size();
    for (int i = 0; i < size; i ++) {
        readPending = false;
        // 关键点在这,这句话的意思是  serverSocketChannel.pipeline().fireChannelRead(nioSocketChannel)
        pipeline.fireChannelRead(readBuf.get(i));
    }

    // serverAcceptor的channelRead方法
    public void channelRead(ChannelHandlerContext ctx, Object msg) {
        // 省略代码 ...
        // child 也就是我们上面说的 nioSocketChannel
        final Channel child = (Channel) msg;
        // 那么这句话的意思就是 把nioSocketChannel注册到EventLoop的其中一个的selector上
        childGroup.register(child).addListener(...);
    }
- NioSocketChannel注册过程
    public ChannelFuture register(Channel channel) {
        // next()其实就是我们之前在EventLoop中提到的EventLoop选择的问题,这块是个轮询详情请看EventLoop那篇文章
        return next().register(channel);
    }
    public ChannelFuture register(final ChannelPromise promise) {
        ObjectUtil.checkNotNull(promise, "promise");
        // 这块其实是调用与客户端Channel所对应的unsafe
        promise.channel().unsafe().register(this, promise);
        return promise;
    }
    // 一直跟到最后的register.
    protected void doRegister() throws Exception {
        boolean selected = false;
        for (;;) {
            try {
                // 这块还没有监听具体的事件
                selectionKey = javaChannel().register(eventLoop().unwrappedSelector(), 0, this);
                return;
            } catch (CancelledKeyException e) {
                ...
            }
        }
    }
- 设置selector的interestOps
    // readInterestOp上边设置的是OP_READ,也就是监听读事件
    protected void doBeginRead() throws Exception {
        ...
        final int interestOps = selectionKey.interestOps();
        if ((interestOps & readInterestOp) == 0) {
            selectionKey.interestOps(interestOps | readInterestOp);
        }
    }
