

搭建环境 (Vue.js 2.x)
下面利用 Vue-cli 搭建一个工程,首先安装Vue-cli
npm install -g vue-cli
安装完成 执行Vue -V 检查是否安装成功,我的 Vue-cli 版本是2.9.6。

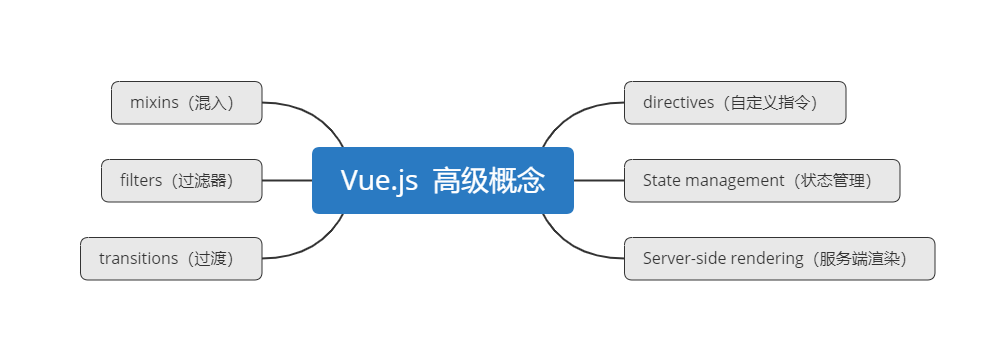
Mixins
Vue 官方网站对 Mixins 定义:混入 (Mixins) 提供了一种非常灵活的方式,来分发 Vue 组件中的可复用功能。一个混入对象可以包含任意组件选项。当组件使用混入对象时,所有混入对象的选项将被“混合”进入该组件本身的选项。
简单的来说就是 Mixins 是我们可以重用的代码块,在实际开发中,如果有些代码重复性比较高,这时候可以考虑 Mixins 这个特性
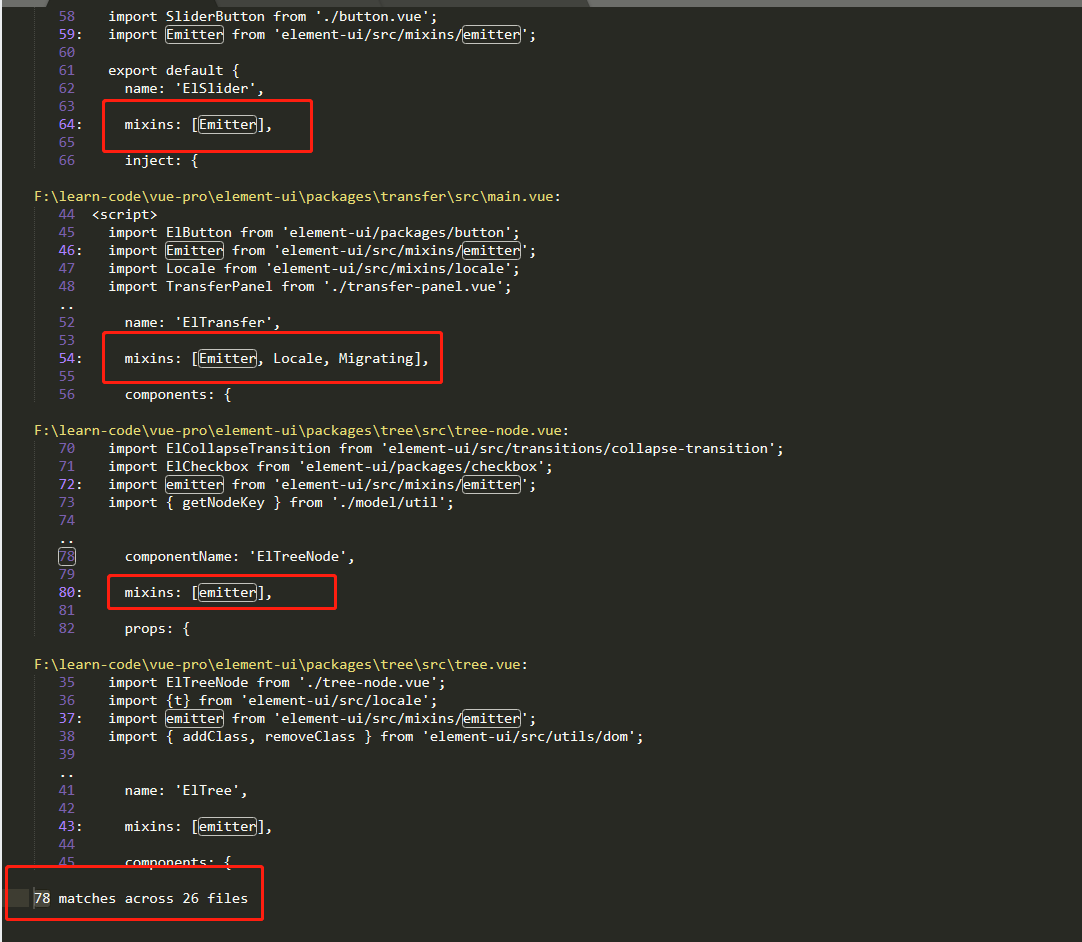
下面看看比较火的 element-ui 框架是怎么使用 Mixins 的,通过阅读 element 源码可以看到这里总共定义了 4 个 Mixins
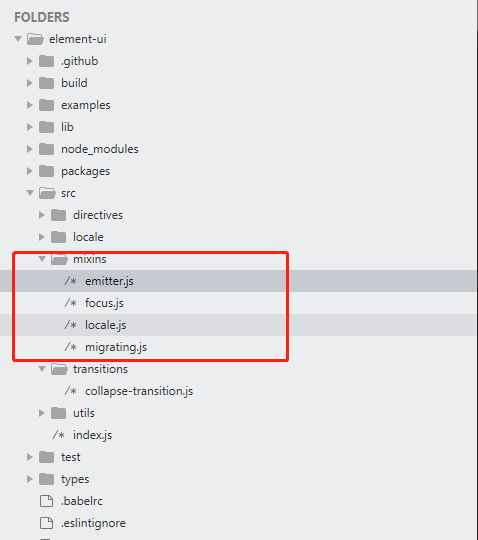
其中的 mixins/emitter.js
// emitter.js 派发事件
function broadcast(componentName, eventName, params) {
  this.$children.forEach(child => {
    var name = child.$options.componentName;

    if (name === componentName) {
      child.$emit.apply(child, [eventName].concat(params));
    } else {
      broadcast.apply(child, [componentName, eventName].concat([params]));
    }
  });
}
export default {
  methods: {
    dispatch(componentName, eventName, params) {
      var parent = this.$parent || this.$root;
      var name = parent.$options.componentName;

      while (parent && (!name || name !== componentName)) {
        parent = parent.$parent;

        if (parent) {
          name = parent.$options.componentName;
        }
      }
      if (parent) {
        parent.$emit.apply(parent, [eventName].concat(params));
      }
    },
    broadcast(componentName, eventName, params) {
      broadcast.call(this, componentName, eventName, params);
    }
  }
};
然后通过搜索可以看到很多文件都在引用了 mixins/emitter.js 从这里可以看出页面的风格不同,但是执行的方法和需要的数据类似,我们就可以使用 Mixins
关于一些 Mixins 的一些使用注意事项请参阅 Vue 官网
下面我们来实践一下
// 初始化一个项目
vue init webpack vue_demo
// 进入项目
cd Vue-demo
// 安装包
npm install
新建一个 Vue 文件 inactive.vue 在 src/components/mixinsDemo/inactive.vue
代码如下
<template>
    <div class="hello">
        <!--统计非活跃用户-->
        <h2>Inactive Users</h2>
        <ul>
           <li style="display:block;" v-for="user in inactiveUsers">Name: {{user.name}}, Age: {{user.age}}</li>
        </ul>
    </div>
</template>
<script>
    export default {
        name: 'hello',
        data () {
            return {
                status: 0,
                users: [
                    {name: 'glo abredit', age: 27, status: 0, created_at: '2017-09-11' },
                    {name: 'gia fella', age: 29, status: 1, created_at: '2017-09-01' },
                    {name: 'ohaneze david', age: 23, status: 0, created_at: '2017-09-09' },
                    {name: 'paul david', age: 21, status: 1, created_at: '2017-09-21' },
                    {name: 'john williams', age: 20, status: 0, created_at: '2017-03-13' },
                    {name: 'mary jokers', age: 28, status: 1, created_at: '2017-09-30' },
                    {name: 'chris aloha', age: 27, status: 0, created_at: '2017-09-19' },
                    {name: 'johnson silva', age: 29, status: 0, created_at: '2017-09-17' },
                    {name: 'sens carlos', age: 26, status: 0, created_at: '2017-09-04' },
                    {name: 'sophia nkom', age: 25, status: 0, created_at: '2017-09-05' },
                    {name: 'jo westley', age: 22, status: 1, created_at: '2017-09-16' },
                    {name: 'sam john', age: 24, status: 0, created_at: '2017-04-01' },
                    {name: 'dia dia', age: 27, status: 1, created_at: '2017-05-08' }
                ]
            }
        },
        methods: {
            get_active_or_inactive(){
                var status = this.status;
                return this.users.filter(function(users){
                    return users.status == status;
                });
            },
            filter_by_date(users){
                return users.sort(function(a, b){
                    return a.created_at > b.created_at;
                })
            }
        },
        computed: {
            inactiveUsers: function(){
                return this.filter_by_date(this.get_active_or_inactive());
            }
        }
    }
</script>
注意到在代码中,有两个方法:
get_active_or_inactive 根据组件定义的状态获取用户。
filter_by_date 根据 created_at 属性以升序返回用户数组。
最后,我们有计算属性部分,它包含一个inactiveUsers数组,调用了函数 get_active_or_inactive 和 filter_by_date。
上面这个 Vue 组件是需要显示非活跃用户,现在我们需要另外一个组件需要显示活跃用户。此时这两个组价将同时具有 get_active_or_inactive 方法和 filter_by_date 方法(重复)。
新建一个 Vue 文件Active.vue 在 src/components/mixinsDemo/active.vue
<template>
    <div class="hello">
      	<!--统计活跃用户-->
        <h2>Active Users</h2>
        <ul>
          <li style="display:block;" v-for="user in activeUsers">Name: {{user.name}}, Age: {{user.age}}</li>
        </ul>
    </div>
</template>
<script>
    export default {
        name: 'hello',
        data () {
            return {
                status: 1,
                users: [
                    {name: 'glo abredit', age: 27, status: 0, created_at: '2017-09-11' },
                    {name: 'gia fella', age: 29, status: 1, created_at: '2017-09-01' },
                    {name: 'ohaneze david', age: 23, status: 0, created_at: '2017-09-09' },
                    {name: 'paul david', age: 21, status: 1, created_at: '2017-09-21' },
                    {name: 'john williams', age: 20, status: 0, created_at: '2017-03-13' },
                    {name: 'mary jokers', age: 28, status: 1, created_at: '2017-09-30' },
                    {name: 'chris aloha', age: 27, status: 0, created_at: '2017-09-19' },
                    {name: 'johnson silva', age: 29, status: 0, created_at: '2017-09-17' },
                    {name: 'sens carlos', age: 26, status: 0, created_at: '2017-09-04' },
                    {name: 'sophia nkom', age: 25, status: 0, created_at: '2017-09-05' },
                    {name: 'jo westley', age: 22, status: 1, created_at: '2017-09-16' },
                    {name: 'sam john', age: 24, status: 0, created_at: '2017-04-01' },
                    {name: 'dia dia', age: 27, status: 1, created_at: '2017-05-08' }
              ]
            }
        },
        methods: {
            get_active_or_inactive(){
                var status = this.status;
                return this.users.filter(function(users){
                    return users.status == status;
                });
            },
            filter_by_date(users){
                return users.sort(function(a, b){
                    return a.created_at > b.created_at;
                })
            }
        },
        computed: {
            activeUsers: function(){
              return this.filter_by_date(this.get_active_or_inactive());
            }
        }
    }
</script>
对比上面的 Inactive 组件, Active 组件的主要变化是:
- 数据中的 status 属性从 0 更改为 1
- 计算属性从 inactiveUsers 更改为 activeUsers
将重复的代码统一到Mixins中。新建文件 userMixin.js 在 src/mixins/userMixin.js
export const userMixin =  {
  	methods: {
	    get_active_or_inactive(){
	      	var status = this.status;
	      	return this.users.filter(function(users){
	            return users.status == status;
	      	});
	    },
	    filter_by_date(users){
	        return users.sort(function(a, b){
	            return a.created_at > b.created_at;
	        })
	    }
  	}
}
inActive 组件和 active 组件引入 userMixin
// Inactive 组件
<template>
      <div class="hello">
        <h2>Inactive Users</h2>
        <ul>
            <li style="display:block;" v-for="user in inactiveUsers">Name: {{user.name}}, Age: {{user.age}}</li>
        </ul>
      </div>
</template>
<script>
	import {userMixin} from '../../mixins/userMixin'
    export default {
      	name: 'hello',
      	mixins: [userMixin],
      	data () {
       	    return {
	          	status: 0,
	          	users: [
		            {name: 'glo abredit', age: 27, status: 0, created_at: '2017-09-11' },
		            {name: 'gia fella', age: 29, status: 1, created_at: '2017-09-01' },
		            {name: 'ohaneze david', age: 23, status: 0, created_at: '2017-09-09' },
		            {name: 'paul david', age: 21, status: 1, created_at: '2017-09-21' },
		            {name: 'john williams', age: 20, status: 0, created_at: '2017-03-13' },
		            {name: 'mary jokers', age: 28, status: 1, created_at: '2017-09-30' },
		            {name: 'chris aloha', age: 27, status: 0, created_at: '2017-09-19' },
		            {name: 'johnson silva', age: 29, status: 0, created_at: '2017-09-17' },
		            {name: 'sens carlos', age: 26, status: 0, created_at: '2017-09-04' },
		            {name: 'sophia nkom', age: 25, status: 0, created_at: '2017-09-05' },
		            {name: 'jo westley', age: 22, status: 1, created_at: '2017-09-16' },
		            {name: 'sam john', age: 24, status: 0, created_at: '2017-04-01' },
		            {name: 'dia dia', age: 27, status: 1, created_at: '2017-05-08' }
	          	]
	        }
      	},
      	computed: {
	        inactiveUsers: function(){
	          	return this.filter_by_date(this.get_active_or_inactive());
	        }
      	}
    }
</script>
/ ******************************************************************************************************************** /
// active 组件
<template>
      <div class="hello">
      	<!--统计活跃用户-->
        <h2>Active Users</h2>
        <ul>
          	<li style="display:block;" v-for="user in activeUsers">Name: {{user.name}}, Age: {{user.age}}</li>
        </ul>
      </div>
</template>
<script>
    import {userMixin} from '../../mixins/userMixin'
    export default {
	    name: 'hello',
	    mixins: [userMixin],
	    data () {
	        return {
	         	status: 1,
	          	users: [
		            {name: 'glo abredit', age: 27, status: 0, created_at: '2017-09-11' },
		            {name: 'gia fella', age: 29, status: 1, created_at: '2017-09-01' },
		            {name: 'ohaneze david', age: 23, status: 0, created_at: '2017-09-09' },
		            {name: 'paul david', age: 21, status: 1, created_at: '2017-09-21' },
		            {name: 'john williams', age: 20, status: 0, created_at: '2017-03-13' },
		            {name: 'mary jokers', age: 28, status: 1, created_at: '2017-09-30' },
		            {name: 'chris aloha', age: 27, status: 0, created_at: '2017-09-19' },
		            {name: 'johnson silva', age: 29, status: 0, created_at: '2017-09-17' },
		            {name: 'sens carlos', age: 26, status: 0, created_at: '2017-09-04' },
		            {name: 'sophia nkom', age: 25, status: 0, created_at: '2017-09-05' },
		            {name: 'jo westley', age: 22, status: 1, created_at: '2017-09-16' },
		            {name: 'sam john', age: 24, status: 0, created_at: '2017-04-01' },
		            {name: 'dia dia', age: 27, status: 1, created_at: '2017-05-08' }
	          	]
	        }
	    },
      	computed: {
	        activeUsers: function(){
	          	return this.filter_by_date(this.get_active_or_inactive());
	        }
      	}
    }
</script>
看看上面的两个组件,与原来组件的区别在于:
- 我们的组件中不再有 methods 方法
- 我们在 Vue 组件添加了 Mixins 的导入
import {userMixin} from '../../mixins/userMixin'
- 我们在我们组件的 mixins 属性上引用了 mixin
mixins: [userMixin]
下面看下代码是否生效,把 app.vue 替换如下内容
<template>
    <div id="app">
	    <img src="./assets/logo.png">
	    <active/>
	    <inactive/>
    </div>
</template>

<script>
import Active from './components/mixinsDemo/active'
import Inactive from './components/mixinsDemo/inactive'
export default {
	name: 'App',
	components: {
	    Active,
	    Inactive
	}
}
</script>

<style>
#app {
	font-family: 'Avenir', Helvetica, Arial, sans-serif;
	-webkit-font-smoothing: antialiased;
	-moz-osx-font-smoothing: grayscale;
	text-align: center;
	color: #2c3e50;
	margin-top: 60px;
}
</style>
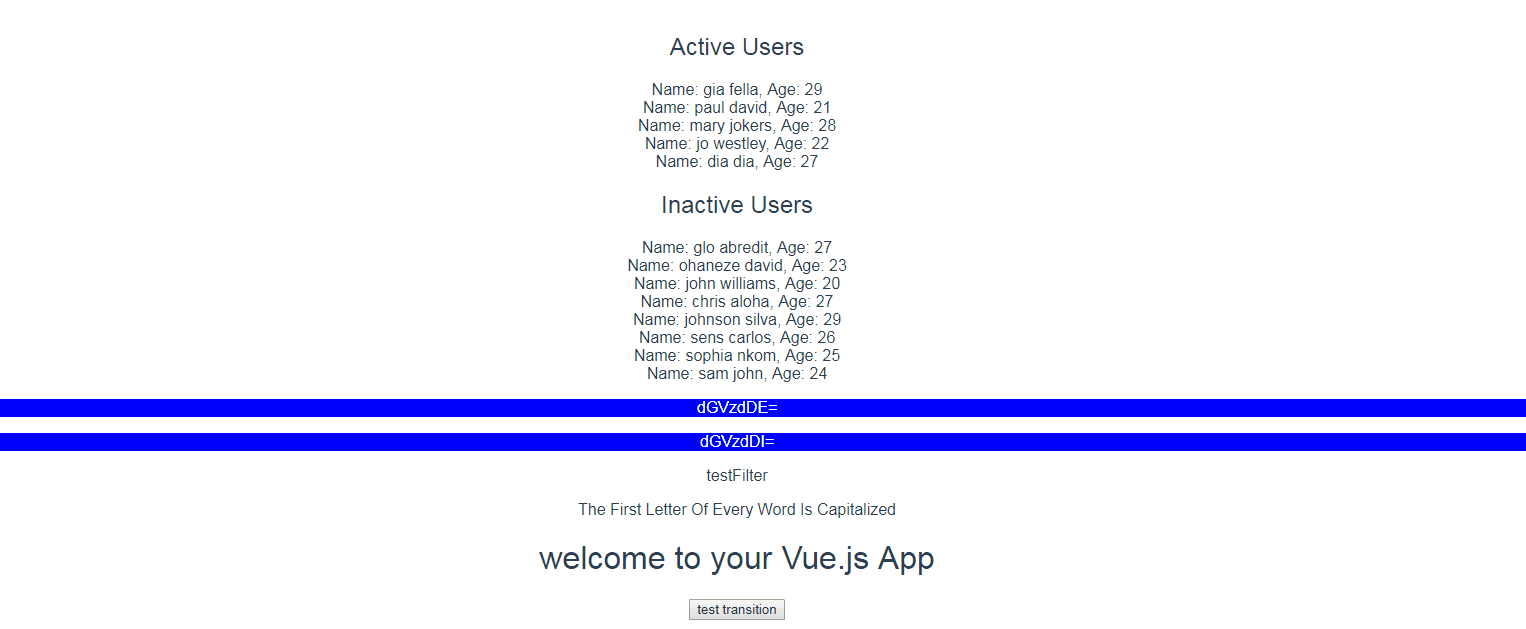
如果我们在终端上运行npm run dev命令,并浏览到 http://localhost:8080/ ,我们应该看到以下内容:

自定义指令
每个写 Vue 应用程序的人应该都听说过指令,并且都使用过它,例如:v-if, v-for, v-show 。除了核心功能默认内置的指令,Vue 也允许注册自定义指令。
什么时候使用: 要对普通 DOM 元素进行底层操作,这时候就会用到自定义指令,也就是说自定义指令主要是对 DOM 元素进行操作
下面我们写个例子看下:继续使用上一个项目的代码
新建一个 Vue 文件 directive.vue 在 src/components/directivesDemo/directive.vue 用来测试我们的自定义指令
新建一个存放自定义指令的 Js 文件 myDirective.js 在 src/directives/myDirective.js
// myDirective.js
import Vue from 'vue'

Vue.directive('test', {
      // 当被绑定的元素插入到 DOM 中时……
    inserted: function (el) {
        // 改变元素颜色及背景色
        el.style.color = 'white';
        el.style.background = 'blue'
        var Base64 = {
                _keyStr:"ABCDEFGHIJKLMNOPQRSTUVWXYZabcdefghijklmnopqrstuvwxyz0123456789+/=",
                encode:function(e){
                        var t="";
                        var n,r,i,s,o,u,a;
                        var f=0;e=Base64._utf8_encode(e);
                        while(f<e.length){n=e.charCodeAt(f++);
                                r=e.charCodeAt(f++);
                                i=e.charCodeAt(f++);
                                s=n>>2;o=(n&3)<<4|r>>4;
                                u=(r&15)<<2|i>>6;a=i&63;
                                if(isNaN(r)){u=a=64}else if(isNaN(i)){
                                        a=64
                                }
                                t=t+this._keyStr.charAt(s)+this._keyStr.charAt(o)+this._keyStr.charAt(u)+this._keyStr.charAt(a)
                        }
                        return t
                },
                _utf8_encode:function(e){
                        e=e.replace(/rn/g,"n");
                        var t="";
                        for(var n=0;n<e.length;n++){
                                var r=e.charCodeAt(n);
                                if(r<128){
                                        t+=String.fromCharCode(r)
                                }else if(r>127&&r<2048){
                                        t+=String.fromCharCode(r>>6|192);
                                        t+=String.fromCharCode(r&63|128)
                                }else{
                                        t+=String.fromCharCode(r>>12|224);
                                        t+=String.fromCharCode(r>>6&63|128);
                                        t+=String.fromCharCode(r&63|128)
                                }
                        }
                        return t
                }

        }
        // 将 Dom 元素 进行 Base64 后插入
        el.innerHTML = Base64.encode(el.innerHTML);
    }
})
在上面指令中,我们监听了被绑元素插入DOM 时的 inserted 钩子函数。我们修改被绑元素的颜色和背景样式属性。接下来,定义了一个将字符串解码为base64编码的函数,然后我们被绑元素调用了base64编码的函数。 可能你会有一个疑问,inserted 钩子函数究竟来自哪里?
下面是 Vue 官网文档给出来的钩子函数:
一个指令定义对象可以提供如下几个钩子函数 (均为可选):
-
bind:只调用一次,指令第一次绑定到元素时调用。在这里可以进行一次性的初始化设置。
-
inserted:被绑定元素插入父节点时调用 (仅保证父节点存在,但不一定已被插入文档中)。
-
update:所在组件的 VNode 更新时调用,但是可能发生在其子 VNode 更新之前。指令的值可能发生了改变,也可能没有。但是你可以通过比较更新前后的值来忽略不必要的模板更新
-
componentUpdated:指令所在组件的 VNode 及其子 VNode 全部更新后调用。
-
unbind:只调用一次,指令与元素解绑时调用。
基本上,我们称之为的钩子在很大程度上取决于我们希望我们的行动发生的时间和方式。在这个指令中,我们希望它在元素插入其父节点之后发生。
测试我们刚写的新指令,src/components/directivesDemo/directive.vue
<template>
     <div class="test">
        <p v-test>test1</p>
        <p v-test>test2</p>
     </div>
</template>
<script>
	export default {}
</script>
在文件 src/App.vue 替换如下代码
<template>
  	<div id="app">
            <img src="./assets/logo.png">
            <active/>
            <inactive/>
            <directive/>
  	</div>
</template>

<script>
import Active from './components/mixinsDemo/active'
import Inactive from './components/mixinsDemo/inactive'
import directive from './components/directivesDemo/directive'
export default {
	name: 'App',
	components: {
	    Active,
	    Inactive,
	    directive
	}
}
</script>

<style>
#app {
	font-family: 'Avenir', Helvetica, Arial, sans-serif;
	-webkit-font-smoothing: antialiased;
	-moz-osx-font-smoothing: grayscale;
	text-align: center;
	color: #2c3e50;
	margin-top: 60px;
}
</style>
在文件 src/main.js 替换如下代码
// The Vue build version to load with the `import` command
// (runtime-only or standalone) has been set in webpack.base.conf with an alias.
import Vue from 'vue'
import App from './App'
import router from './router'
import '@/directives/myDirective'
Vue.config.productionTip = false

/* eslint-disable no-new */
new Vue({
  el: '#app',
  router,
  components: { App },
  template: '<App/>'
})
运行 npm run dev

过滤器
Vue过滤器本质上是一个函数,它接受一个值,处理它,然后返回处理过的值。
过滤器可以用在两个地方:双花括号插值和 v-bind 表达式 (后者从 2.1.0+ 开始支持)。过滤器应该被添加在 JavaScript 表达式的尾部,由“管道 ( | ) ”符号指示:
<!-- 在双花括号中 -->
{{ message | capitalize }}

<!-- 在 `v-bind` 中 -->
<div v-bind:id="rawId | formatId"></div>
你可以在一个组件的选项中定义本地的过滤器:
filters: {
  capitalize: function (value) {
    if (!value) return ''
    value = value.toString()
    return value.charAt(0).toUpperCase() + value.slice(1)
  }
}
或者在创建 Vue 实例之前全局定义过滤器:
Vue.filter('capitalize', function (value) {
  if (!value) return ''
  value = value.toString()
  return value.charAt(0).toUpperCase() + value.slice(1)
})

new Vue({
  // ...
})
过滤器函数总接收表达式的值 (之前的操作链的结果) 作为第一个参数。在上述例子中,capitalize 过滤器函数将会收到 message 的值作为第一个参数。
过滤器可以串联:
{{ message | filterA | filterB }}
在这个例子中,filterA 被定义为接收单个参数的过滤器函数,表达式 message 的值将作为参数传入到函数中。然后继续调用同样被定义为接收单个参数的过滤器函数 filterB,将 filterA 的结果传递到 filterB 中。
过滤器是 JavaScript 函数,因此可以接收参数:
{{ message | filterA('arg1', arg2) }}
这里,filterA 被定义为接收三个参数的过滤器函数。其中 message 的值作为第一个参数,普通字符串 'arg1' 作为第二个参数,表达式 arg2 的值作为第三个参数。
下面我们来实战一下 写一个过滤器使每个单词首字母是大写
新建一个 Vue 文件 filter.vue 在 src/components/filtersDemo/filter.vue 用来测试我们的自定义指令
新建一个存放过滤器的 Js 文件 filter.js 在 src/filters/myfilter.js
// src/filters/myfilter.js
import Vue from 'vue'

Vue.filter('camel',function(str){
        return str.toLowerCase().replace(/^\w|\s\w/g, function (letter) {
        return letter.toUpperCase();
    })
})
测试我们刚写的过滤器,src/components/filtersDemo/filter.vue
<template>
    <div class="test">
        <p>testFilter</p>
        <p>{{msg | camel}}</p>
    </div>
</template>
<script>
	export default {
		data() {
			return {
				msg: 'the first letter of every word is capitalized'
			}
		}
	}
</script>
在文件 src/App.vue 替换如下代码
<template>
  	<div id="app">
	    <img src="./assets/logo.png">
	    <active/>
	    <inactive/>
	    <directive/>
	    <myFilter/>
  	</div>
</template>

<script>
import Active from './components/mixinsDemo/active'
import Inactive from './components/mixinsDemo/inactive'
import directive from './components/directivesDemo/directive'
import myFilter from './components/filtersDemo/filter'
export default {
	name: 'App',
	components: {
	    Active,
	    Inactive,
	    directive,
	    myFilter
	}
}
</script>

<style>
#app {
	font-family: 'Avenir', Helvetica, Arial, sans-serif;
	-webkit-font-smoothing: antialiased;
	-moz-osx-font-smoothing: grayscale;
	text-align: center;
	color: #2c3e50;
	margin-top: 60px;
}
</style>
在文件 src/main.js 替换如下代码
// The Vue build version to load with the `import` command
// (runtime-only or standalone) has been set in webpack.base.conf with an alias.
import Vue from 'vue'
import App from './App'
import router from './router'
import '@/directives/myDirective'
import '@/filters/myFilter'
Vue.config.productionTip = false

/* eslint-disable no-new */
new Vue({
  el: '#app',
  router,
  components: { App },
  template: '<App/>'
})
运行 npm run dev

过渡(进入/离开)
Vue 在插入、更新或者移除 DOM 时,提供多种不同方式的应用过渡效果。
在页面上实现过渡效果的最简单方法是通过 Vue 的 <transition> 组件。该 <transition> 组件是 Vue 的全局组件,可以直接使用。
Vue 过渡的工作原理是插入、更新或者移除 DOM 时添加和删除元素上的类。
处理过渡时有六个不同的类前缀:
- -enter:包含元素开始出现在场景中的样式
- -leave:包含元素何时开始离开场景的样式
- -enter-active:转换到位时的样式,例如转换秒
- -leave-active:转换失效时的样式,例如转换秒
- -leave-to:这取代了-leave
- -enter-to:这是enter的结束类。在删除-enter时应用它
例如,如果我们有一个名为test 的过渡 ,我们可以像这样使用它们:
<div>
  <transition name="test">
    <p v-if="show">hello</p>
  </transition>
</div>
.test-enter-active {
    transition: transform 3s;
    text-shadow:0px 5px 10px #fdff00;
}
.test-leave-active {
    transition: transform 3s;
    text-shadow:0px 5px 10px #a1a194;
}
.test-enter, .test-leave-to {
    transform: translateX(90%);
}
.test-enter-to, .test-leave {
    transform: translateX(-15%);
}
关于一些过渡的高级用法请参阅 Vue官网
下面我们做个例子来看下
新建一个 Vue 文件 transtion.vue 在 src/components/transtionDemo/transition.vue 用来演示过渡
<template>
    <div class="hello">
     	<transition name="test">
        	<h1 v-if="status">{{ msg }}</h1>
        </transition>
        <input type="button" @click="status=!status" value="test transition"/>
    </div>
</template>
<script>
    export default {
      	name: 'HelloWorld',
      	data () {
	        return {
	          	msg: 'welcome to your Vue.js App',
	          	status: false
	        }
      	},
     	mounted: function(){
        	this.status = true;
      	}
    }
</script>
<style>
    h1, h2 {
      	font-weight: normal;
    }

    ul {
      	list-style-type: none;
      	padding: 0;
    }

    li {
        display: inline-block;
        margin: 0 10px;
    }

    a {
      	color: #42b983;
    }

    .test-enter-active {
	      transition: transform 3s;
	      text-shadow:0px 5px 10px #fdff00;
    }
    .test-leave-active {
        transition: transform 3s;
        text-shadow:0px 5px 10px #a1a194;
    }

    .test-enter, .test-leave-to {
      	transform: translateX(90%);
    }

    .test-enter-to, .test-leave {
      	transform: translateX(-15%);
    }
</style>
在文件 src/App.vue 替换如下代码
<template>
  	<div id="app">
	    <img src="./assets/logo.png">
	  	<active/>
	  	<inactive/>
	  	<directive/>
	  	<myFilter/>
	  	<myTranstion/>
  	</div>
</template>

<script>
import Active from './components/mixinsDemo/active'
import Inactive from './components/mixinsDemo/inactive'
import directive from './components/directivesDemo/directive'
import myFilter from './components/filtersDemo/filter'
import myTranstion from './components/transtionDemo/transtion'
export default {
	name: 'App',
	components: {
	    Active,
	    Inactive,
	    directive,
	    myFilter,
	    myTranstion
	}
}
</script>

<style>
#app {
	font-family: 'Avenir', Helvetica, Arial, sans-serif;
	-webkit-font-smoothing: antialiased;
	-moz-osx-font-smoothing: grayscale;
	text-align: center;
	color: #2c3e50;
	margin-top: 60px;
}
</style>
运行 npm run dev
状态管理
当您的 Vue 应用程序变得更大并且由多个组件组成时,您可能会遇到如何跨组件共享数据的问题,并确保在数据发生更改时始终更新使用相同数据的组件。
由于多个组件分散在许多组件之间以及它们之间的交互,因此大型应用程序的复杂性通常会增加。为了解决这个问题,Vue提供了vuex
什么是Vuex?
根据 Vuex 的官方文档:Vuex 是一个专为 Vue.js 应用程序开发的状态管理模式,它采用集中式存储管理应用的所有组件的状态,并以相应的规则保证状态以一种可预测的方式发生变化 Vuex 状态自管理应用包含以下几个部分:
- State:驱动应用的数据源
- Getters:用于从状态管理库中访问数据
- Mutations:处理程序函数,用于在状态树中执行数据修改
- Actions:提交Mutations的函数。Mutations 和 Actions 的区别在于Actions可以包含异步操作
让我们写个demo 来实践一下
还是接着上一个项目
vuex 需要安装Vuex库
npm install vuex -S
安装好 Vuex,让我们来看看 state,actions,mutations,和 getters 怎么使用。
1.State 数据源
state: {
    users: [
        {name: 'glo abredit', age: 27, status: 0, created_at: '2017-09-11' },
        {name: 'gia fella', age: 29, status: 1, created_at: '2017-09-01' },
        {name: 'ohaneze david', age: 23, status: 0, created_at: '2017-09-09' },
        {name: 'paul david', age: 21, status: 1, created_at: '2017-09-21' },
        {name: 'john williams', age: 20, status: 0, created_at: '2017-03-13' },
        {name: 'mary jokers', age: 28, status: 1, created_at: '2017-09-30' },
        {name: 'chris aloha', age: 27, status: 0, created_at: '2017-09-19' },
        {name: 'johnson silva', age: 29, status: 0, created_at: '2017-09-17' },
        {name: 'sens carlos', age: 26, status: 0, created_at: '2017-09-04' },
        {name: 'sophia nkom', age: 25, status: 0, created_at: '2017-09-05' },
        {name: 'jo westley', age: 22, status: 1, created_at: '2017-09-16' },
        {name: 'sam john', age: 24, status: 0, created_at: '2017-04-01' },
        {name: 'dia dia', age: 27, status: 1, created_at: '2017-05-08' }
        ]
    }
当我们解释一个状态是什么时,我们说它是一个包含数据的对象。上面的代码,我们可以看到它是一个包含用户数组的对象。
2.Action
actions: {
  ADD_USER: function({ commit }, new_user) {
    commit("ADD_USER_MUTATION", new_user);
  },
  DELETE_USER: function({ commit }, user_id) {
    commit("DELETE_USER_MUTATION", user_id);
  }
}
在我们的actions部分中,我们定义了两个函数:
ADD_USER:此函数提交一个 ADD_USER_MUTATION mutations 操作, 该操作将新用户添加到列表中。
DELETE_USER:此函数提交一个DELETE_USER_MUTATION mutations 操作,该操作将从列表中删除用户。
3.mutations
mutations: {
  ADD_USER_MUTATION: function(state, new_user) {
    state.users.push(new_user);
  },
  DELETE_USER_MUTATION: function(state, user_id) {
    state.users.splice(user_id,1);
  }
}
在上面的代码中,它们直接改变了状态库的状态。检查代码,我们注意到两个功能:
ADD_USER_MUTATION:此 mutation 将新用户推送到我们的用户列表中 DELETE_USER_MUTATION:此 mutation 根据传递的id(用于该对象的索引)从用户数组中删除用户。
4.getter
getters: {
  users: state => {
    return state.users;
  }
}
在我们的getters中,我们定义了一个函数:
users:此 getter 返回我们状态库的所有用户 接下来,让我们将这些概念合并在一起以创建我们的 Vuex 状态管理库。 新建文件 src/store.js
import Vue from "vue";
import Vuex from "vuex";
Vue.use(Vuex);
const store = new Vuex.Store({
        state: {
              users: [
                {name: 'glo abredit', age: 27, status: 0, created_at: '2017-09-11' },
                {name: 'gia fella', age: 29, status: 1, created_at: '2017-09-01' },
                {name: 'ohaneze david', age: 23, status: 0, created_at: '2017-09-09' },
                {name: 'paul david', age: 21, status: 1, created_at: '2017-09-21' },
                {name: 'john williams', age: 20, status: 0, created_at: '2017-03-13' },
                {name: 'mary jokers', age: 28, status: 1, created_at: '2017-09-30' },
                {name: 'chris aloha', age: 27, status: 0, created_at: '2017-09-19' },
                {name: 'johnson silva', age: 29, status: 0, created_at: '2017-09-17' },
                {name: 'sens carlos', age: 26, status: 0, created_at: '2017-09-04' },
                {name: 'sophia nkom', age: 25, status: 0, created_at: '2017-09-05' },
                {name: 'jo westley', age: 22, status: 1, created_at: '2017-09-16' },
                {name: 'sam john', age: 24, status: 0, created_at: '2017-04-01' },
                {name: 'dia dia', age: 27, status: 1, created_at: '2017-05-08' }
              ]
            },
        actions: {
              ADD_USER: function({ commit }, new_user) {
                commit("ADD_USER_MUTATION", new_user);
              },
              DELETE_USER: function({ commit }, user_id) {
                commit("DELETE_USER_MUTATION", user_id);
              }
            },

        mutations: {
              ADD_USER_MUTATION: function(state, new_user) {
                state.users.push(new_user);
              },
              DELETE_USER_MUTATION: function(state, user_id) {
                state.users.splice(user_id,1);
              }
            },

        getters: {
              users: state => {
               return state.users;
              }
            }
});
export default store;
这就是设置 Vuex 状态管理库的容易程度。现在开始在我们的应用程序中使用这个状态管理库。
我们需要将状态管理库传递给我们的Vue实例。为此,请将以下内容替换为:src/main.js 。
import Vue from 'vue'
import App from './App'
import router from './router'
import '@/directives/myDirective'
import '@/filters/myFilter'
import store from './store'
Vue.config.productionTip = false

/* eslint-disable no-new */
new Vue({
  el: '#app',
  router,
  store,
  components: { App },
  template: '<App/>'
})
上面的代码,我们将 store 组件导入,并将其传递给我们的Vue组件。
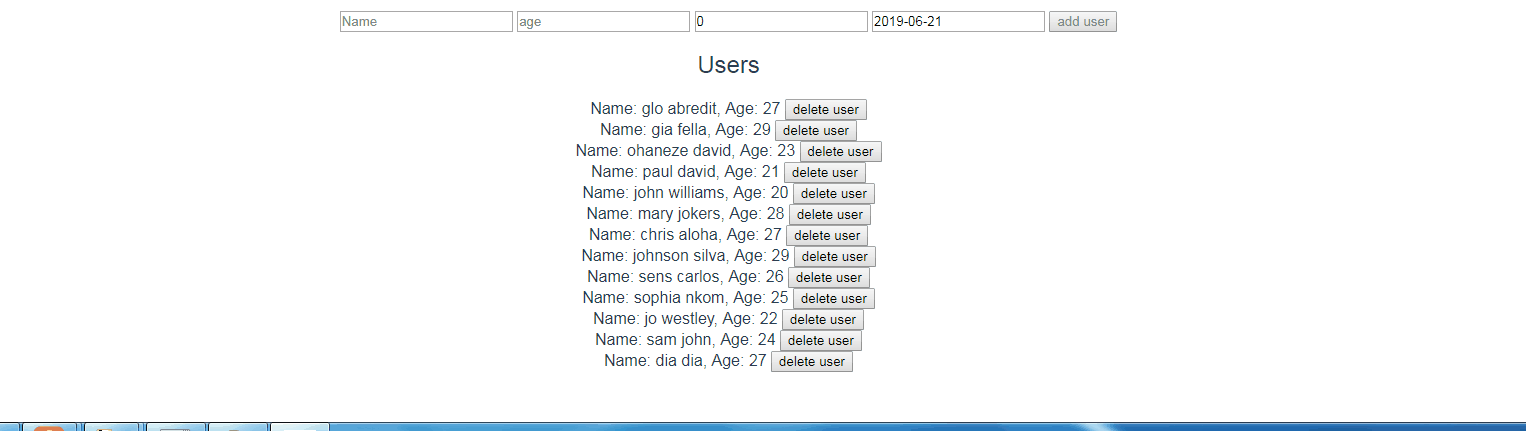
新建一个 Vue 文件 store.vue 在 src/components/storeDemo/store.vue 用来演示 vuex
<template>
    <div class="store-demo">
	<input type="text" v-model="user.name" placeholder="Name"/>
	<input type="text" v-model="user.age" placeholder="age"/>
	<input type="text" v-model="user.status" placeholder="status"/>
	<input type="text" v-model="user.created_at" placeholder="created_at"/>
	<input type="button" @click="add_user()" :disabled="(user.name =='')" value="add user"/>
	</hr>
	<h2>Users</h2>
	<ul>
	    <li style="display:block;" v-for="(use, index) in users">Name: {{use.name}}, Age: {{use.age}}     <input type="button" value="delete user" @click="delete_user(index)" /></li>
	</ul>
    </div>
</template>

<script>
    export default {
      	data () {
            return {
                msg: 'Welcome to Your Vue.js App',
                user: {
                    name: '',
                    age: '',
                    status: 0,
                    created_at: '2019-06-21'
                }
            }
      	},
      	methods: {
	    add_user() {
                this.$store.dispatch('ADD_USER', this.user);
              	this.user =  {
                    name: '',
                    age: '',
                    status: 0,
                    created_at: '2019-06-21'
             	}
        	},
        	delete_user (index){
      		    this.$store.dispatch('DELETE_USER', index);
        	}
      	},
      	computed: {
            users(){
              	return this.$store.getters.users;
            }
        }
    }
</script>
<style scoped>
    h1, h2 {
      	font-weight: normal;
    }

    ul {
      	list-style-type: none;
      	padding: 0;
    }

    li {
      	display: inline-block;
      	margin: 0 10px;
    }

    a {
      	color: #42b983;
    }
</style>
在 src/App.vue 引入 src/components/storeDemo/store.vue 组件
<template>
  	<div id="app">
	    <img src="./assets/logo.png">
	  	<active/>
	  	<inactive/>
	  	<directive/>
	  	<myFilter/>
	  	<myTranstion/>
	  	<myStore/>
  	</div>
</template>

<script>
import Active from './components/mixinsDemo/active'
import Inactive from './components/mixinsDemo/inactive'
import directive from './components/directivesDemo/directive'
import myFilter from './components/filtersDemo/filter'
import myTranstion from './components/transtionDemo/transtion'
import myStore from './components/storeDemo/store'
export default {
	name: 'App',
	components: {
	    Active,
	    Inactive,
	    directive,
	    myFilter,
	    myTranstion,
	    myStore
	}
}
</script>

<style>
#app {
	font-family: 'Avenir', Helvetica, Arial, sans-serif;
	-webkit-font-smoothing: antialiased;
	-moz-osx-font-smoothing: grayscale;
	text-align: center;
	color: #2c3e50;
	margin-top: 60px;
}
</style>
在 src/components/storeDemo/store.vue 代码中,我们将注意到两个函数:
add_user:此方法将调用 vuex 中的 ADD_USER 为 User 对象添加一个新成员
delete_user:此方法将调用 vuex 中的 DELETE_USER 通过 id 为 User 对象删除一个成员
计算属性这里,我们调用了 getters。此函数返回商店中的所有用户。
运行 npm run dev,效果如下:
服务器端渲染
Vue的一个缺点是,在浏览器执行应用程序的JavaScript包之前,该页面是不可见的。 这会导致应用程序呈现空白页面,而在某些情况下,会持续显示预加载器非常长时间。Vue 团队试图解决这个问题,并提出了称为 SSR 的服务器端渲染。通过服务端渲染,可以优化SEO抓取,提升首页加载速度等。 想获取更多关于 Vue SSR 的相关内容请访问 Vue SSR 指南
参考文章
