Sentry 是一个使用 python 写的异常监控服务,并有支持很多语言的 SDK。
这里有官方部署文档和 compose file: github.com/getsentry/o…
在当前部署 sentry 时 (2019/06/20),文档处于这个 commit 的位置 github.com/getsentry/o…
虽然每次部署服务时的首选是看看有没有官方以及社区 star 较多的 compose file,但是他们的 compose file 也是要大致看一看的
本文链接: shanyue.tech/post/sentry…
虽然这篇文章介绍 Sentry 的部署,但还是推荐 Saas 版,省了运维麻烦,而且功能也更加齐全
Requirements
- Docker 1.10.0+
- Compose 1.17.0+ (optional)
- 最少 3G 的内存 (这是官方要求,以下经测试,消耗了 600MB 左右)
反向代理 (可选)
由于我使用了 traefik 作为方向代理,直接修改 docker-compose.yml,添加 label,并把端口映射给隐去
你需要把 sentry.hostname.com 替换为你将要设置的域名
web:
  <<: *defaults
  expose:
    - 9000
  labels:
    - "traefik.frontend.rule=Host:sentry.hostname.com"
如果使用 nginx 作为反向代理,设置 proxy-pass 即可,不细讲。
部署
这里有官方部署文档和 compose file: github.com/getsentry/o…,以下是我的部署命令
# 安装之前,先看一下内存使用情况
$ free -h
              total        used        free      shared  buff/cache   available
Mem:           3.7G        1.0G        204M        140M        2.5G        2.2G
Swap:            0B          0B          0B

$ git clone git@github.com:getsentry/onpremise.git
$ cd onpremise

# 创建 name volume,方便持久化,其实挂载的时候指定目录也是一样的。
$ docker volume create --name=sentry-data && docker volume create --name=sentry-postgres
sentry-data
sentry-postgres

# `-n` 代表不覆盖文件,可以理解为 `redis` 的 `setnx` 命令
$ cp -n .env.example .env

# 生成 key 放到 .env 文件中
$ docker-compose run --rm web config generate-secret-key

# 生成数据库,并在这一步设置超级用户
$ docker-compose run --rm web upgrade

# 启动服务
$ docker-compose up -d

# docker ps 查看,启动成功,如果你没有设置 traefik,PORTS 那一列会把端口号映射到 Host
$ docker ps
CONTAINER ID        IMAGE                    COMMAND                  CREATED             STATUS              PORTS                    NAMES
0acc4dedf59f        onpremise_web            "/entrypoint.sh run …"   4 seconds ago       Up 3 seconds        9000/tcp                 onpremise_web_1
8eebadc9e2ff        onpremise_worker         "/entrypoint.sh run …"   2 minutes ago       Up 2 minutes        9000/tcp                 onpremise_worker_1
9cce91ae40d3        onpremise_cron           "/entrypoint.sh run …"   2 minutes ago       Up 2 minutes        9000/tcp                 onpremise_cron_1

# 查看 Host 的内存消耗,与刚开始大约 600MB
$ free -h
              total        used        free      shared  buff/cache   available
Mem:           3.7G        1.6G        1.0G        165M        1.1G        1.6G
Swap:            0B          0B          0B

# 单独查看 sentry 的内存消耗,大约加起来 600MB,与刚才的数据相一致
$ docker stats | head -7
CONTAINER ID        NAME                         CPU %               MEM USAGE / LIMIT     MEM %               NET I/O             BLOCK I/O           PIDS
0acc4dedf59f        onpremise_web_1              0.00%               331MiB / 3.702GiB     8.73%               328kB / 4.99MB      7.68MB / 0B         19
8eebadc9e2ff        onpremise_worker_1           0.00%               138.3MiB / 3.702GiB   3.65%               2.69MB / 9.54MB     34.5MB / 0B         7
9cce91ae40d3        onpremise_cron_1             0.00%               97.52MiB / 3.702GiB   2.57%               869kB / 1.24MB      37.8MB / 156kB      3
01788eef014f        onpremise_memcached_1        0.00%               8.871MiB / 3.702GiB   0.23%               261kB / 154kB       11.2MB / 0B         10
66a27f681af3        onpremise_postgres_1         0.00%               5.297MiB / 3.702GiB   0.14%               1.94MB / 1.45MB     83MB / 96.8MB       8
645fd1e25d78        onpremise_smtp_1             0.00%               800KiB / 3.702GiB     0.02%               672B / 0B           5.27MB / 57.3kB     2
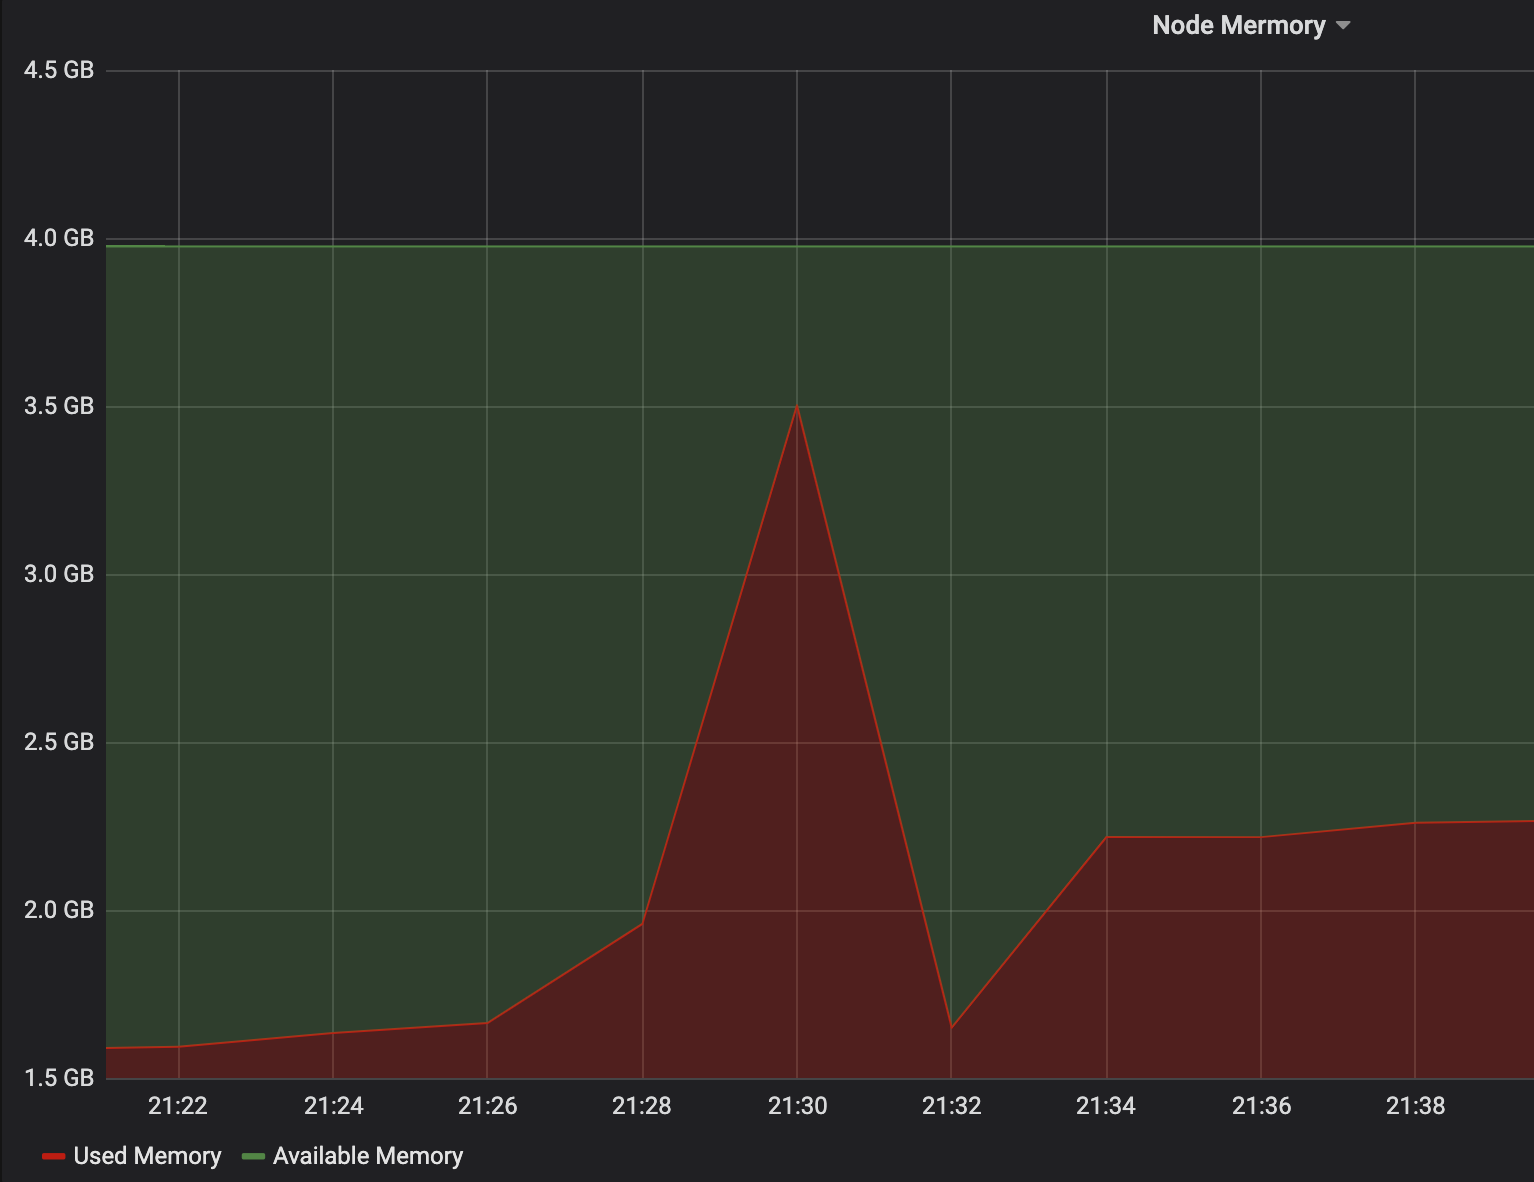
从十五分钟的内存使用图表中可以看出部署完成后有一个尖峰,后逐渐平稳了下来。
进入反向代理设置的域名 sentry.hostname.com,部署成功
欢迎关注我的公众号山月行,在这里记录着我的技术成长,欢迎交流