

好记性不如烂笔头。生活中多做笔记,不仅可以方便自己,还可以方便他人。
(下面的源码大部分是来自API 28)
1. View的知识前提
View的绘制是从上往下一层层迭代下来的:DecorView-->ViewGroup(--->ViewGroup)-->View,所以,在学习view的绘制原理前,我们来先看看DecorView。
1.1 DecorView的视图结构
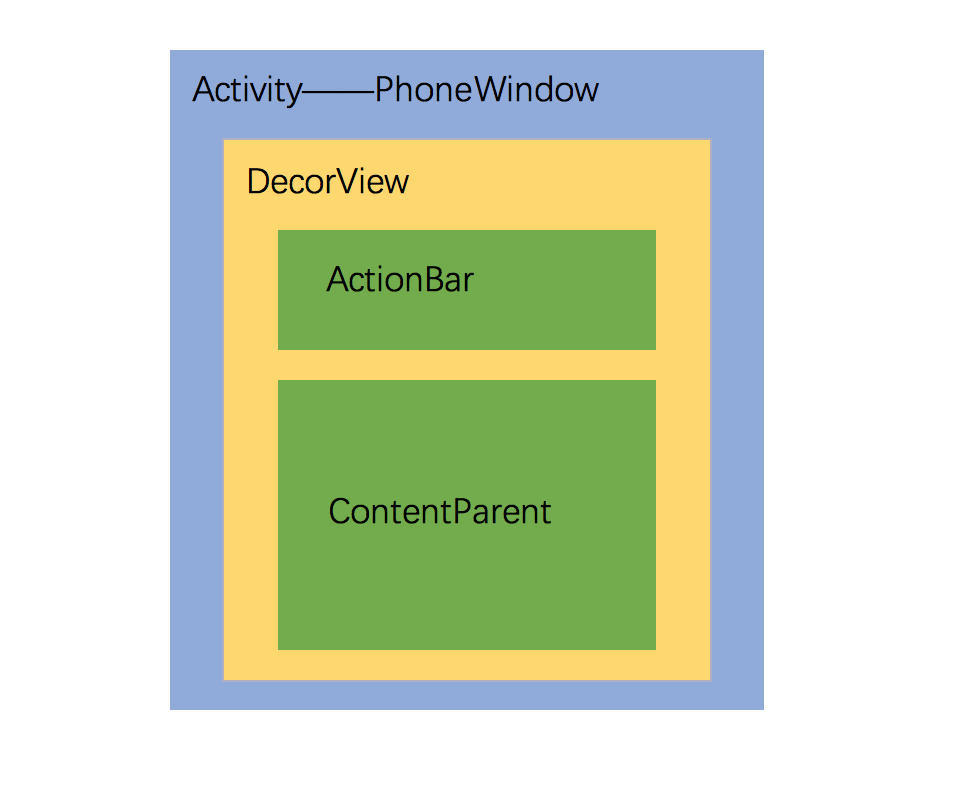
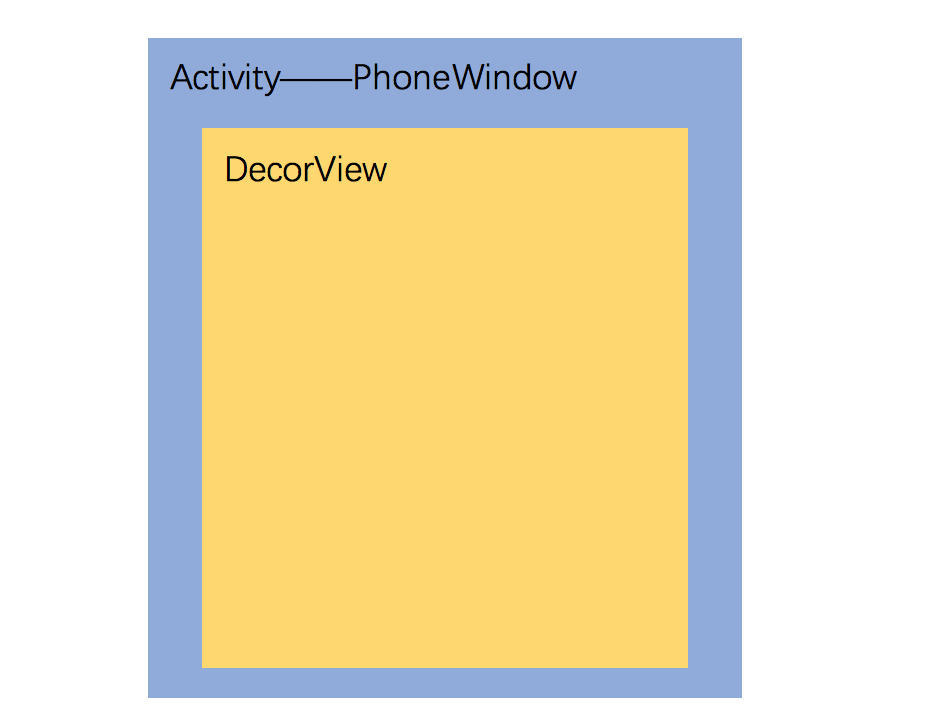
Android 中 Activity 是作为应用程序的载体存在,代表着一个完整的用户界面,提供了一个窗口来绘制各种视图。每个activity都对应一个窗口window,这个窗口是PhoneWindow的实例,PhoneWindow对应的布局是DecirView,是一个FrameLayout,DecorView内部又分为两部分,一部分是ActionBar,另一部分是ContentParent,即activity在setContentView对应的布局。
1.2 从源码看DecorView
activity在启动的时候都会在onCreate中执行setContentView方法:
    @Override
    protected void onCreate(Bundle savedInstanceState) {
        super.onCreate(savedInstanceState);
        setContentView(R.layout.activity_main);
    }
以setContentView为切入点,分析Activity、PhoneWindow、DecorView、ActionBar和ContentParent的关系。
进入setContentView
    /**
     * Set the activity content from a layout resource.  The resource will be
     * inflated, adding all top-level views to the activity.
     *
     * @param layoutResID Resource ID to be inflated.
     *
     * @see #setContentView(android.view.View)
     * @see #setContentView(android.view.View, android.view.ViewGroup.LayoutParams)
     */
    public void setContentView(@LayoutRes int layoutResID) {
        getWindow().setContentView(layoutResID);
        initWindowDecorActionBar();
    }
进入activity的setContentView,发现里面调用的是getWindow()的setContentView(layoutResID)。
继续看getWindow()
    /**
     * Retrieve the current {@link android.view.Window} for the activity.
     * This can be used to directly access parts of the Window API that
     * are not available through Activity/Screen.
     *
     * @return Window The current window, or null if the activity is not
     *         visual.
     */
    public Window getWindow() {
        return mWindow;
    }
      final void attach(...这里省略代码) {
        attachBaseContext(context);

        mFragments.attachHost(null /*parent*/);

        mWindow = new PhoneWindow(this, window, activityConfigCallback);
        mWindow.setWindowControllerCallback(this);
        ...这里省略代码
    }
从上面的源码可以看出setContentView里面的是getWindow()其实是PhoneWindow,这也正如前面所说的,每个activity都对应一个窗口window,这个窗口是PhoneWindow的实例。
继续,进入PhoneWindow里面看看:
    // This is the top-level view of the window, containing the window decor.
    private DecorView mDecor;
PhoneWindow里面有一个DecorView对象mDecor,再看看setContentView方法
      @Override
    public void setContentView(int layoutResID) {
        // Note: FEATURE_CONTENT_TRANSITIONS may be set in the process of installing the window
        // decor, when theme attributes and the like are crystalized. Do not check the feature
        // before this happens.
        if (mContentParent == null) {
            installDecor();
        } else if (!hasFeature(FEATURE_CONTENT_TRANSITIONS)) {
            mContentParent.removeAllViews();
        }

        if (hasFeature(FEATURE_CONTENT_TRANSITIONS)) {
            final Scene newScene = Scene.getSceneForLayout(mContentParent, layoutResID,
                    getContext());
            transitionTo(newScene);
        } else {
            mLayoutInflater.inflate(layoutResID, mContentParent);
        }
        mContentParent.requestApplyInsets();
        final Callback cb = getCallback();
        if (cb != null && !isDestroyed()) {
            cb.onContentChanged();
        }
        mContentParentExplicitlySet = true;
    }
首次进来mContentParent应该是null,进入installDecor()看看:
    private void installDecor() {
        mForceDecorInstall = false;
        if (mDecor == null) {
            mDecor = generateDecor(-1);
            mDecor.setDescendantFocusability(ViewGroup.FOCUS_AFTER_DESCENDANTS);
            mDecor.setIsRootNamespace(true);
            if (!mInvalidatePanelMenuPosted && mInvalidatePanelMenuFeatures != 0) {
                mDecor.postOnAnimation(mInvalidatePanelMenuRunnable);
            }
        } else {
            mDecor.setWindow(this);
        }
        if (mContentParent == null) {
            mContentParent = generateLayout(mDecor);

            .....此处省略代码
        }
    }
在installDecor里,mDecor=generateDecor(-1),再看看这个方法里是怎么生成DecorView的:
    protected DecorView generateDecor(int featureId) {
        // System process doesn't have application context and in that case we need to directly use
        // the context we have. Otherwise we want the application context, so we don't cling to the
        // activity.
        Context context;
        if (mUseDecorContext) {
            Context applicationContext = getContext().getApplicationContext();
            if (applicationContext == null) {
                context = getContext();
            } else {
                context = new DecorContext(applicationContext, getContext());
                if (mTheme != -1) {
                    context.setTheme(mTheme);
                }
            }
        } else {
            context = getContext();
        }
        return new DecorView(context, featureId, this, getAttributes());
    }
里面是直接new了一个DecorView。
看到这里,PhoneWindow和DecorView的关系就一目了然了
那问题来了,DecorView是如何跟ActionBar和ContentParent关联起来的呢?
继续回头看源码的installDecor()方法:
    private void installDecor() {
        mForceDecorInstall = false;
        if (mDecor == null) {
            mDecor = generateDecor(-1);
            mDecor.setDescendantFocusability(ViewGroup.FOCUS_AFTER_DESCENDANTS);
            mDecor.setIsRootNamespace(true);
            if (!mInvalidatePanelMenuPosted && mInvalidatePanelMenuFeatures != 0) {
                mDecor.postOnAnimation(mInvalidatePanelMenuRunnable);
            }
        } else {
            mDecor.setWindow(this);
        }
        if (mContentParent == null) {
            mContentParent = generateLayout(mDecor);

            .....此处省略代码
        }
    }
发现mContentParent是通过generateLayout(mDecor)生成的,那看看generateLayout方法:
    protected ViewGroup generateLayout(DecorView decor) {
        // Apply data from current theme.

        TypedArray a = getWindowStyle();

        ...此处省略代码

        int layoutResource;
        int features = getLocalFeatures();
        // System.out.println("Features: 0x" + Integer.toHexString(features));
        if ((features & (1 << FEATURE_SWIPE_TO_DISMISS)) != 0) {
            ...此处省略代码
        } else {
            // Embedded, so no decoration is needed.
            layoutResource = R.layout.screen_simple;
            // System.out.println("Simple!");
        }

        mDecor.startChanging();
        mDecor.onResourcesLoaded(mLayoutInflater, layoutResource);

        ViewGroup contentParent = (ViewGroup)findViewById(ID_ANDROID_CONTENT);
        ...此处省略代码

        return contentParent;
    }
    /**
     * The ID that the main layout in the XML layout file should have.
     */
    public static final int ID_ANDROID_CONTENT = com.android.internal.R.id.content;
generateLayout方法里面根据不同的配置初始化的代码特别多,我省略了一些其他代码
generateLayout方法里面,mDecor加载了R.layout.screen_simple布局
    <LinearLayout xmlns:android="http://schemas.android.com/apk/res/android"
    android:layout_width="match_parent"
    android:layout_height="match_parent"
    android:fitsSystemWindows="true"
    android:orientation="vertical">
    <ViewStub android:id="@+id/action_mode_bar_stub"
              android:inflatedId="@+id/action_mode_bar"
              android:layout="@layout/action_mode_bar"
              android:layout_width="match_parent"
              android:layout_height="wrap_content"
              android:theme="?attr/actionBarTheme" />
    <FrameLayout
         android:id="@android:id/content"
         android:layout_width="match_parent"
         android:layout_height="match_parent"
         android:foregroundInsidePadding="false"
         android:foregroundGravity="fill_horizontal|top"
         android:foreground="?android:attr/windowContentOverlay" />
</LinearLayout>
可以看到,R.layout.screen_simple是一个垂直的线性布局,上面的ViewStub就是APP的appBar,下面的FrameLayout的id为content!,activity所加载的xml页面就是加载到这个布局里面
再看看mDecor.onResourcesLoaded(mLayoutInflater, layoutResource)这个方法
    void onResourcesLoaded(LayoutInflater inflater, int layoutResource) {
        ...此处省略代码

        mDecorCaptionView = createDecorCaptionView(inflater);
        final View root = inflater.inflate(layoutResource, null);
        if (mDecorCaptionView != null) {
            if (mDecorCaptionView.getParent() == null) {
                addView(mDecorCaptionView,
                        new ViewGroup.LayoutParams(MATCH_PARENT, MATCH_PARENT));
            }
            mDecorCaptionView.addView(root,
                    new ViewGroup.MarginLayoutParams(MATCH_PARENT, MATCH_PARENT));
        } else {

            // Put it below the color views.
            addView(root, 0, new ViewGroup.LayoutParams(MATCH_PARENT, MATCH_PARENT));
        }
        mContentRoot = (ViewGroup) root;
        initializeElevation();
    }
从上面的方法来看,root这个View所代表的的就是 R.layout.screen_simple,然后DecorView调用addView将root加载到DecorView里面
奇怪了,只看到ContentParent初始化,没看到ActionBar初始化啊?
再回头看看Activity最开始的源码:
/**
     * Set the activity content from a layout resource.  The resource will be
     * inflated, adding all top-level views to the activity.
     *
     * @param layoutResID Resource ID to be inflated.
     *
     * @see #setContentView(android.view.View)
     * @see #setContentView(android.view.View, android.view.ViewGroup.LayoutParams)
     */
    public void setContentView(@LayoutRes int layoutResID) {
        getWindow().setContentView(layoutResID);
        initWindowDecorActionBar();
    }
原来ActionBar是在这里初始化的,看看initWindowDecorActionBar():
      /**
     * Creates a new ActionBar, locates the inflated ActionBarView,
     * initializes the ActionBar with the view, and sets mActionBar.
     */
    private void initWindowDecorActionBar() {
        Window window = getWindow();

        // Initializing the window decor can change window feature flags.
        // Make sure that we have the correct set before performing the test below.
        window.getDecorView();

        if (isChild() || !window.hasFeature(Window.FEATURE_ACTION_BAR) || mActionBar != null) {
            return;
        }

        mActionBar = new WindowDecorActionBar(this);
        mActionBar.setDefaultDisplayHomeAsUpEnabled(mEnableDefaultActionBarUp);

        mWindow.setDefaultIcon(mActivityInfo.getIconResource());
        mWindow.setDefaultLogo(mActivityInfo.getLogoResource());
    }
    @RestrictTo({Scope.LIBRARY_GROUP})
    public WindowDecorActionBar(View layout) {
        assert layout.isInEditMode();

        this.init(layout);
    }
      private void init(View decor) {
        this.mOverlayLayout = (ActionBarOverlayLayout)decor.findViewById(id.decor_content_parent);
        if (this.mOverlayLayout != null) {
            this.mOverlayLayout.setActionBarVisibilityCallback(this);
        }

        this.mDecorToolbar = this.getDecorToolbar(decor.findViewById(id.action_bar));
        this.mContextView = (ActionBarContextView)decor.findViewById(id.action_context_bar);
        this.mContainerView = (ActionBarContainer)decor.findViewById(id.action_bar_container);
        if (this.mDecorToolbar != null && this.mContextView != null && this.mContainerView != null) {
            this.mContext = this.mDecorToolbar.getContext();
            int current = this.mDecorToolbar.getDisplayOptions();
            boolean homeAsUp = (current & 4) != 0;
            if (homeAsUp) {
                this.mDisplayHomeAsUpSet = true;
            }

            ActionBarPolicy abp = ActionBarPolicy.get(this.mContext);
            this.setHomeButtonEnabled(abp.enableHomeButtonByDefault() || homeAsUp);
            this.setHasEmbeddedTabs(abp.hasEmbeddedTabs());
            TypedArray a = this.mContext.obtainStyledAttributes((AttributeSet)null, styleable.ActionBar, attr.actionBarStyle, 0);
            if (a.getBoolean(styleable.ActionBar_hideOnContentScroll, false)) {
                this.setHideOnContentScrollEnabled(true);
            }

            int elevation = a.getDimensionPixelSize(styleable.ActionBar_elevation, 0);
            if (elevation != 0) {
                this.setElevation((float)elevation);
            }

            a.recycle();
        } else {
            throw new IllegalStateException(this.getClass().getSimpleName() + " can only be used " + "with a compatible window decor layout");
        }
    }
ActionBar和ContentParent并非是添加到DecorView上去的,而是本身就存在于DecorView,
对于有ActionBar的activity,DecorView的默认布局是screen_action_bar.xml,里面就会包含ActionBar和ContentParent 对于没有ActionBar的Activity,会根据Activity所带的参数选择decorView的默认布局,例如screen_simple.xml
选择DecorView的默认布局的相关的判断逻辑是installDecor方法中调用generateLayout完成的.
看到这里,DecorView和ContentParent、ActionBar的关系就一目了然了
1.3 DecorView建立与viewRootImpl的联系
在ActivityThread的handleLaunchActivity中启动Activity,当onCreate()方法执行完毕,上面所述的DecorView创建动作也完毕了,在handleLaunchActivity方法里会继续调用到ActivityThread的handleResumeActivity方法,看看这个方法的源码:
  @Override
    public void handleResumeActivity(IBinder token, boolean finalStateRequest, boolean isForward,
            String reason) {
        ...

        // TODO Push resumeArgs into the activity for consideration
        final ActivityClientRecord r = performResumeActivity(token, finalStateRequest, reason);
        ...

        if (r.window == null && !a.mFinished && willBeVisible) {
            r.window = r.activity.getWindow();
            View decor = r.window.getDecorView();
            decor.setVisibility(View.INVISIBLE);
            ViewManager wm = a.getWindowManager();
            WindowManager.LayoutParams l = r.window.getAttributes();
            a.mDecor = decor;
            l.type = WindowManager.LayoutParams.TYPE_BASE_APPLICATION;
            l.softInputMode |= forwardBit;
            if (r.mPreserveWindow) {
                a.mWindowAdded = true;
                r.mPreserveWindow = false;
                // Normally the ViewRoot sets up callbacks with the Activity
                // in addView->ViewRootImpl#setView. If we are instead reusing
                // the decor view we have to notify the view root that the
                // callbacks may have changed.
                ViewRootImpl impl = decor.getViewRootImpl();
                if (impl != null) {
                    impl.notifyChildRebuilt();
                }
            }
            if (a.mVisibleFromClient) {
                if (!a.mWindowAdded) {
                    a.mWindowAdded = true;
                    wm.addView(decor, l);
                } else {
                    // The activity will get a callback for this {@link LayoutParams} change
                    // earlier. However, at that time the decor will not be set (this is set
                    // in this method), so no action will be taken. This call ensures the
                    // callback occurs with the decor set.
                    a.onWindowAttributesChanged(l);
                }
            }

            ...
    }
在handleResumeActivity方法中,获取该activity所关联的window对象,DecorView对象,以及windowManager对象,而WindowManager是抽象类,它的实现类是WindowManagerImpl,所以后面调用的是WindowManagerImpl的addView方法,看看源码:
  public final class WindowManagerImpl implements WindowManager {
    private final WindowManagerGlobal mGlobal = WindowManagerGlobal.getInstance();
    ...
    @Override
    public void addView(View view, ViewGroup.LayoutParams params) {
        mGlobal.addView(view, params, mDisplay, mParentWindow);
    }
}
mGlobal则是WindowManagerGlobal的一个实例,那么我们接着看WindowManagerGlobal的addView方法:
  public void addView(View view, ViewGroup.LayoutParams params,
            Display display, Window parentWindow) {
        ...

        ViewRootImpl root;
        View panelParentView = null;

        synchronized (mLock) {
            ...

            root = new ViewRootImpl(view.getContext(), display); // 1

            view.setLayoutParams(wparams);

            mViews.add(view);
            mRoots.add(root);
            mParams.add(wparams);
        }

        // do this last because it fires off messages to start doing things
        try {
            root.setView(view, wparams, panelParentView); // 2
        } catch (RuntimeException e) {
            // BadTokenException or InvalidDisplayException, clean up.
            synchronized (mLock) {
                final int index = findViewLocked(view, false);
                if (index >= 0) {
                    removeViewLocked(index, true);
                }
            }
            throw e;
        }
    }
在上面的方法中,实例化了ViewRootImpl类,然后调用ViewRootImpl#setView方法,并把DecorView作为参数传递进去,在这个方法内部,会通过跨进程的方式向WMS(WindowManagerService)发起一个调用,从而将DecorView最终添加到Window上,在这个过程中,ViewRootImpl、DecorView和WMS会彼此关联,最后通过WMS调用ViewRootImpl#performTraverals方法开始View的测量、布局、绘制流程。(参考:Android View源码解读:浅谈DecorView与ViewRootImpl )
DecorView的相关知识就记录到这,下面开始view的绘制流程。
2. View的绘制流程
view绘制流程放在下一篇文章:重温View绘制原理(二)
