

一.了解推送
首先,通过一张图了解极光都做了什么
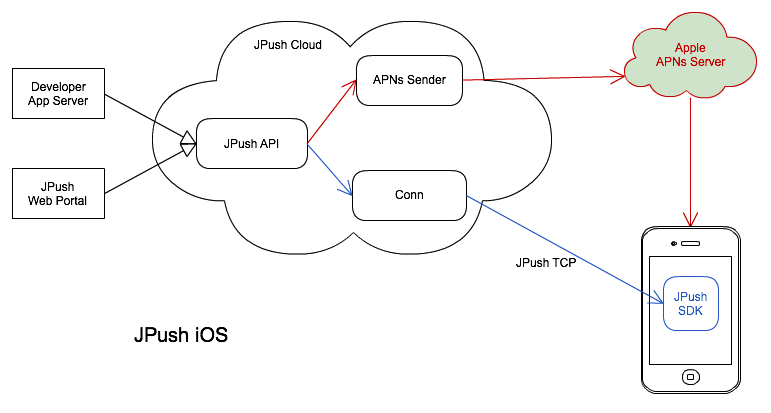
对,我们通过使用它的推送组件,完成 在线推送 和 远程推送 工作。
日常开发中,推送方式分为三种:
- 本地推送
不通过服务器和网络,而是通过系统通知中心推送的一种方式
- 远程推送
通过APNs推送服务器,在通知中心和锁屏栏显示
- 在线推送
通过长链接为应用内推送,和iOS原本的通知体系没有关系。
二.证书设置和创建应用
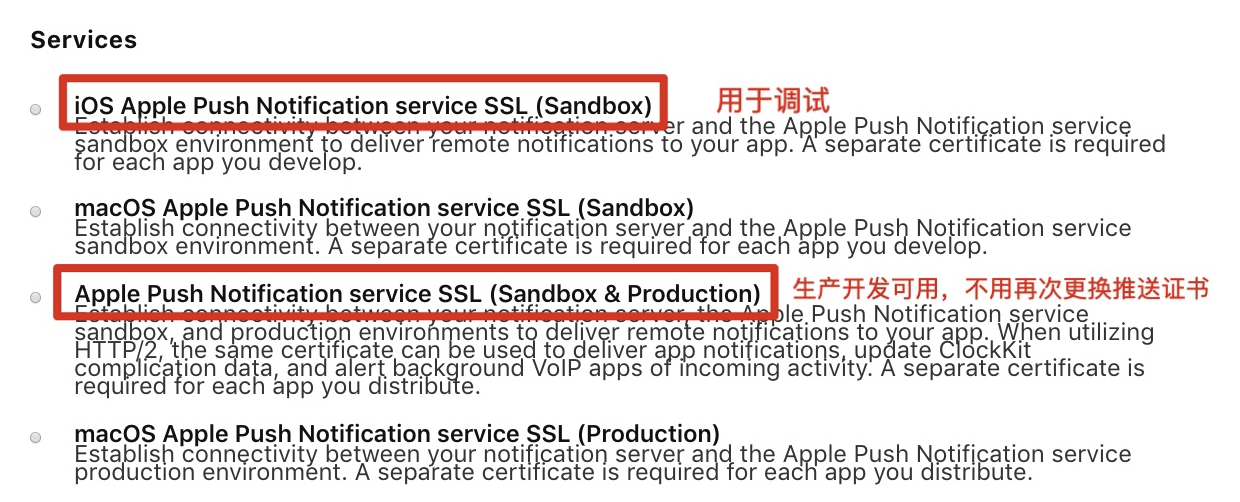
步骤1:Certificates,IDs&Profiles
开启Push Notification功能

生成推送证书,会得到一个aos.cer文件
生成描述文件Profile
可以根据推送场景,选择发展和发布文件
步骤2:Xcode设置
替换为推送准备的配置信息
开启Push Notification
检查bundleID是否与极光应用中的一致
步骤3:推送应用后台
创建应用,设置鉴权,打通推送和应用之间的通道
一旦配置好鉴权信息,只能是相同的bundleID,不能更改。需要更改bundleID需要联系极光人员进行替换

两种鉴权方式:
通过导入p12推送证书鉴权
由于生产证书也可以调试,所以可以直接导入生产证书,不需要导入调试证书,避免二次导入的重复操作
通过keys->auth key授权key来鉴权
选择key中的APNs服务,auth key在生产和开发环境可以通用,由于不会过期,所以只能下载一次,需要填写bundleID和teamID
三.集成
APNs通知消息
初始化
- (BOOL)application:(UIApplication *)application didFinishLaunchingWithOptions:(NSDictionary *)launchOptions {
    [self initloadAPNs];
    return YES;
}

- (void)initloadAPNs {
    //Required
//notice: 3.0.0 及以后版本注册可以这样写,也可以继续用之前的注册方式
JPUSHRegisterEntity * entity = [[JPUSHRegisterEntity alloc] init];
entity.types = JPAuthorizationOptionAlert|JPAuthorizationOptionBadge|JPAuthorizationOptionSound|JPAuthorizationOptionProvidesAppNotificationSettings;

if ([[UIDevice currentDevice].systemVersion floatValue] >= 8.0) {
    // 可以添加自定义 categories
    // NSSet<UNNotificationCategory *> *categories for iOS10 or later
    // NSSet<UIUserNotificationCategory *> *categories for iOS8 and iOS9
}
[JPUSHService registerForRemoteNotificationConfig:entity delegate:self];//<JPUSHRegisterDelegate>//协议
}
注册
- (void)application:(UIApplication *)application
didRegisterForRemoteNotificationsWithDeviceToken:(NSData *)deviceToken {
  /// Required - 注册 DeviceToken
  [JPUSHService registerDeviceToken:deviceToken];
}
注册失败回调
#pragma mark - 注册APNs失败接口
- (void)application:(UIApplication *)application didFailToRegisterForRemoteNotificationsWithError:(NSError *)error {
    //Optional
    NSLog(@"did Fail To Register For Remote Notifications With Error: %@", error);
}
控制台输出状态,如下表示接入成功
JGPush[569:185430] | JIGUANG | I - [JIGUANGDeviceTokenReport] upload device token success获取APNs推送内容
//获取APNs内容回调(iOS7-iOS10)
- (void)application:(UIApplication *)application didReceiveRemoteNotification:(NSDictionary *)userInfo fetchCompletionHandler:(void (^)(UIBackgroundFetchResult))completionHandler {
     NSLog(@"this is iOS7 Remote Notification");
    // Required, iOS 7 Support
    [JPUSHService handleRemoteNotification:userInfo];
    completionHandler(UIBackgroundFetchResultNewData);
}
//获取APNs内容回调(iOS6及以下)
- (void)application:(UIApplication *)application didReceiveRemoteNotification:(NSDictionary *)userInfo {

    // 取得 APNs 标准信息内容
    NSDictionary *aps = [userInfo valueForKey:@"aps"];
    NSString *content = [aps valueForKey:@"alert"]; //推送显示的内容
    NSInteger badge = [[aps valueForKey:@"badge"] integerValue]; //badge 数量
    NSString *sound = [aps valueForKey:@"sound"]; //播放的声音

    // 取得 Extras 字段内容
    NSString *customizeField1 = [userInfo valueForKey:@"customizeExtras"]; //服务端中 Extras 字段,key 是自己定义的
    NSLog(@"content =[%@], badge=[%d], sound=[%@], customize field  =[%@]",content,badge,sound,customizeField1);

    // Required, For systems with less than or equal to iOS 6
    [JPUSHService handleRemoteNotification:userInfo];
}
#pragma mark - 获取APNs内容 (iOS10以上)
//收到通知还,没在前面台展示
// iOS 10 Support
- (void)jpushNotificationCenter:(UNUserNotificationCenter *)center willPresentNotification:(UNNotification *)notification withCompletionHandler:(void (^)(NSInteger))completionHandler {
    // Required
    NSDictionary * userInfo = notification.request.content.userInfo;
    if (@available(iOS 10.0, *)) {
        if([notification.request.trigger isKindOfClass:[UNPushNotificationTrigger class]]) {
            [JPUSHService handleRemoteNotification:userInfo];
        }else {
            //本地通知
        }
    } else {
        // Fallback on earlier versions
    }
    if (@available(iOS 10.0, *)) {
        completionHandler(UNNotificationPresentationOptionAlert);// 需要执行这个方法,选择是否提醒用户,有 Badge、Sound、Alert 三种类型可以选择设置
    } else {
        // Fallback on earlier versions
    }
}
//收到通知,通知已经在前台展示
// iOS 10 Support
- (void)jpushNotificationCenter:(UNUserNotificationCenter *)center didReceiveNotificationResponse:(UNNotificationResponse *)response withCompletionHandler:(void (^)())completionHandler {
    // Required
    NSDictionary * userInfo = response.notification.request.content.userInfo;
    if (@available(iOS 10.0, *)) {
        if([response.notification.request.trigger isKindOfClass:[UNPushNotificationTrigger class]]) {
            [JPUSHService handleRemoteNotification:userInfo];
        }else {
            //本地通知
        }
    } else {
        // Fallback on earlier versions
    }
    completionHandler();  // 系统要求执行这个方法
}
#pragma mark- JPUSHRegisterDelegate
//获取APNs内容(iOS12及以上)
// iOS 12 Support
- (void)jpushNotificationCenter:(UNUserNotificationCenter *)center openSettingsForNotification:(UNNotification *)notification{

    if (@available(iOS 10.0, *)) {
        if (notification && [notification.request.trigger isKindOfClass:[UNPushNotificationTrigger class]]) {
            //从通知界面直接进入应用
        }else{
            //从通知设置界面进入应用
        }
    } else {
        // Fallback on earlier versions
    }
}
注:获取推送内容的另一种方法
- (BOOL)application:(UIApplication *)application didFinishLaunchingWithOptions:(NSDictionary *)launchOptions {
    // apn 内容获取:
    //如果为nil表示不是从通知进来的,如果有值表示从通知进来的
    NSDictionary *remoteNotification = [launchOptions objectForKey: UIApplicationLaunchOptionsRemoteNotificationKey];
    return YES;
}
JPush自定义消息
初始化和注册
- (BOOL)application:(UIApplication *)application didFinishLaunchingWithOptions:(NSDictionary *)launchOptions {
    [self initloadJPush];
    return YES;
}
appKey选择 Web Portal 上 的应用 ,点击“设置”获取其 appkey 值。请确保应用内配置的 appkey 与 Portal 上创建应用后生成的 appkey 一致。channel指明应用程序包的下载渠道,为方便分渠道统计,具体值由你自行定义,如:App Store。apsForProduction1.3.1 版本新增,用于标识当前应用所使用的 APNs 证书环境。0(默认值)表示采用的是开发证书,1 表示采用生产证书发布应用。注:此字段的值要与 Build Settings的Code Signing 配置的证书环境一致。advertisingIdentifier详见关于 IDFA。- (void)initloadJPush {
    // Required
    //启动SDK
    [JPUSHService setupWithOption:launchOptions appKey:appkey channel:channel apsForProduction:isProduction];

    // Optional
    // 获取 IDFA
    // 如需使用 IDFA 功能请添加此代码并在初始化方法的 advertisingIdentifier 参数中填写对应值
    NSString *advertisingId = [[[ASIdentifierManager sharedManager] advertisingIdentifier] UUIDString];
    //启动SDK,含IDFA方法
    [JPUSHService setupWithOption:launchOptions appKey:appkey channel:channel apsForProduction:isProduction advertisingIdentifier:advertisingId];
}
控制台输出状态,如下表示成功
JGPush[562:182045]  | JIGUANG | I - [JIGUANGLogin]
----- login result -----
uid:5460310207
registrationID:171976fa8a8620a14a4
idc:0
获取自定义推送内容
- (BOOL)application:(UIApplication *)application didFinishLaunchingWithOptions:(NSDictionary *) launchOptions{
    //注册通知
    NSNotificationCenter *defaultCenter = [NSNotificationCenter defaultCenter];
    [defaultCenter addObserver:self selector:@selector(networkDidReceiveMessage:) name:kJPFNetworkDidReceiveMessageNotification object:nil];
    return YES;
}
//实现回调
- (void)networkDidReceiveMessage:(NSNotification *)notification {
   NSDictionary * userInfo = [notification userInfo];
   NSString *content = [userInfo valueForKey:@"content"];
   NSString *messageID = [userInfo valueForKey:@"_j_msgid"];
   NSDictionary *extras = [userInfo valueForKey:@"extras"];
   NSString *customizeField1 = [extras valueForKey:@"customizeField1"]; //服务端传递的 Extras 附加字段,key 是自己定义的
}
取消角标操作
除了清除本地角标操作
还可以操作推送服务器的badge值
- (void)applicationWillEnterForeground:(UIApplication *)application {
    //程序进入前台,取消App右上角消息数量
    application.applicationIconBadgeNumber = 0;
}
四.开发和生产环境调试
推送方式分为 web JPush 和 App Service,这里只介绍极光开发者平台的推送。
极光推送包含的推送手段分为 发送通知 和 自定义消息。
发送通知(APNs通知)— 在App前台后台,退出状态下都可以,触发推送通知可以开启App
自定义消息(JPush)— 只在应用内推送,也就是要收到推送消息必须保证App在前台
五.iOS12推送新特性
新增加了自动分组,根据App应用的bundle ID进行推送分组
Thresd identifier对一个App的推送不同内容分组
分组摘要主要对分组栏的最下面一行的显示内容设置格式,默认:还有n个通知
六.定制推送
地理围栏
用途:在多条件推送的时候,选择一个地理围栏,当手机进入或者离开某个区域的时候,会收到推送通知。
遵循协议<JPUSHGeofenceDelegate>注入地理围栏方法
- (BOOL)application:(UIApplication *)application didFinishLaunchingWithOptions:(NSDictionary *)launchOptions {
    [JPUSHService registerLbsGeofenceDelegate:self withLaunchOptions:launchOptions];
}
//注入成功后,需要调用协议中的代理方法,才能实现回调后的事件响应
用来获取标签和别名
用途:在多条件推送的时候,选择对不同的目标人群,推送不同内容。
alias:标识唯一用户,可以跟登陆用户id绑定,保证同应用登陆不同账户可以唯一推送。
tag:对用户人群,类型标签,统一推送。如性别,年龄,爱好。
registrationID:JPush注册成功后会生成一个registrationid,用来表示设备的唯一标识,在指定推送中,可以根据用户的唯一标识来推送内容。
//获取registrationID标签
[JPUSHService registrationIDCompletionHandler:^(int resCode, NSString *registrationID) {
    NSLog(@"resCode : %d,registrationID: %@",resCode,registrationID);
}];
以上内容纯属个人分享,希望对iOS社区能有更多贡献。
