前言
在开发中,圆角和阴影效果是很常用的。实现的方法也很多,比如通过xml自定义shape,比如通过代码继承drawable,还有通过第三发框架实现。但是使用起来还是有些许不灵活,所以我们通过自定义子view的属性,然后通过父布局来控制子view的圆角,阴影等属性。
继承ConstraintLayout
开发中复杂的布局基本上都可以通过ConstraintLayout实现,所以我们继承ConstraintLayout实现一个EasyConstraintLayout能够为子view添加圆角和阴影效果。
public class EasyConstraintLayout extends ConstraintLayout {
    public EasyConstraintLayout(Context context, AttributeSet attrs) {
        super(context, attrs);
    }

   @Override
    public LinearLayout.LayoutParams generateLayoutParams(AttributeSet attrs) {
        return new LayoutParams(getContext(), attrs);
    }

    @Override
    protected boolean checkLayoutParams(ViewGroup.LayoutParams p) {
        return p instanceof LayoutParams;
    }
}
重写了两个方法,我们要用这些方法实现子view自定义属性的读取,在此之前要在xml中自定义一些属性
<?xml version="1.0" encoding="utf-8"?>
<resources>
    <!--为了方便扩展其他layout,定义在外层,命名以layout_开头,否则lint会报红警告-->
    <attr name="layout_radius" format="dimension" />
    <attr name="layout_shadowColor" format="color" />
    <attr name="layout_shadowEvaluation" format="dimension" />
    <attr name="layout_shadowDx" format="dimension" />
    <attr name="layout_shadowDy" format="dimension" />
    <!--用统一一个EasyLayout,用于封装读取自定义属性-->
    <declare-styleable name="EasyLayout">
        <attr name="layout_radius" />
        <attr name="layout_shadowColor" />
        <attr name="layout_shadowEvaluation" />
        <attr name="layout_shadowDx" />
        <attr name="layout_shadowDy" />
    </declare-styleable>
    <!--和EasyLayout属性列表一样,但是命名要以XXX_Layout格式,这样开发工具会提示自定义属性-->
    <declare-styleable name="EasyConstraintLayout_Layout">
        <attr name="layout_radius" />
        <attr name="layout_shadowColor" />
        <attr name="layout_shadowEvaluation" />
        <attr name="layout_shadowDx" />
        <attr name="layout_shadowDy" />
    </declare-styleable>
</resources>
重写LayoutParams,读取子View自定义属性
在EasyConstraintLayout内部定义一个静态类LayoutParams继承ConstraintLayout.LayoutParams,然后在构造方法中读取上面自定义的属性。我们通过裁剪的方式实现圆角效果,因此还有要获取子view的位置和大小。
static class LayoutParams extends ConstraintLayout.LayoutParams
                          implements EasyLayoutParams{
        private LayoutParamsData data;
        public LayoutParams(Context c, AttributeSet attrs) {
            super(c, attrs);
            data = new LayoutParamsData(c, attrs);
        }
        @Override
        public LayoutParamsData getData() {
            return data;
        }
    }
public interface EasyLayoutParams {
    LayoutParamsData getData();
}
public class LayoutParamsData {
    int radius;
    int shadowColor;
    int shadowDx;
    int shadowDy;
    int shadowEvaluation;

    public LayoutParamsData(Context context, AttributeSet attrs) {
        TypedArray a = context.obtainStyledAttributes(attrs, R.styleable.EasyLayout);
        radius = a.getDimensionPixelOffset(R.styleable.EasyLayout_layout_radius, 0);
        shadowDx = a.getDimensionPixelOffset(R.styleable.EasyLayout_layout_shadowDx, 0);
        shadowDy = a.getDimensionPixelOffset(R.styleable.EasyLayout_layout_shadowDy, 0);
        shadowColor = a.getColor(R.styleable.EasyLayout_layout_shadowColor, 0x99999999);
        shadowEvaluation = a.getDimensionPixelOffset(R.styleable.EasyLayout_layout_shadowEvaluation, 0);
        a.recycle();
    }
}
圆角和阴影实现原理
因为我们是通过父布局控制子view的圆角和阴影行为,所以我们重写drawChild来实现,drawChild之前,先通过paint的ShadowLayer属性把子View的阴影先画上,这个阴影需要裁剪掉子view自身的大小位置。然后再画子view,并且裁剪圆角部分,最终实现圆角阴影效果。 裁剪起初我们想到的是通过canvas的clipPath方法实现,但是发现会有很大的锯齿。所以改用paint的xfermode来裁剪阴影和子view。
onLayout初始化裁剪信息
在EasyConstraintLayout中初始化LayoutParamsData的paths
  @Override
    protected void onLayout(boolean changed, int left, int top, int right, int bottom) {
        super.onLayout(changed, left, top, right, bottom);
        for (int i = 0, size = getChildCount(); i < size; i++) {
            View v = getChildAt(i);
            ViewGroup.LayoutParams lp = v.getLayoutParams();
            if(lp instanceof EasyLayoutParams){
                EasyLayoutParams elp = (EasyLayoutParams) lp;
                elp.getData().initPaths(v);
            }
        }
    }
在LayoutParamsData中将裁剪阴影的path和裁剪子view的保存起来,新增两个属性
public class LayoutParamsData {
    Path widgetPath;
    Path clipPath;
    boolean needClip;
    boolean hasShadow;
  public LayoutParamsData(Context context, AttributeSet attrs) {
        …
        needClip = radius > 0;
        hasShadow = shadowEvaluation > 0;
    }
  public void initPaths(View v) {
        widgetPath = new Path();
        clipPath = new Path();
        clipPath.addRect(widgetRect, Path.Direction.CCW);
        clipPath.addRoundRect(
                widgetRect,
                radius,
                radius,
                Path.Direction.CW
        );
        widgetPath.addRoundRect(
                widgetRect,
                radius,
                radius,
                Path.Direction.CW
        );
    }
}
drawChild中画阴影,裁剪出圆角
我们在EasyConstraintLayout中初始化paint,并且关闭硬件加速,然后在drawChild中实现阴影逻辑,最终代码如下。
public class EasyConstraintLayout extends ConstraintLayout {
    private Paint shadowPaint;
    private Paint clipPaint;

    public EasyConstraintLayout(Context context, AttributeSet attrs) {
        super(context, attrs);
        shadowPaint = new Paint();
        shadowPaint.setAntiAlias(true);
        shadowPaint.setDither(true);
        shadowPaint.setFilterBitmap(true);
        shadowPaint.setStyle(Paint.Style.FILL);

        clipPaint = new Paint();
        clipPaint.setAntiAlias(true);
        clipPaint.setDither(true);
        clipPaint.setFilterBitmap(true);
        clipPaint.setStyle(Paint.Style.FILL);
        setLayerType(View.LAYER_TYPE_SOFTWARE, null);
    }

    @Override
    public ConstraintLayout.LayoutParams generateLayoutParams(AttributeSet attrs) {
        return new LayoutParams(getContext(), attrs);
    }

    @Override
    protected boolean checkLayoutParams(ViewGroup.LayoutParams p) {
        return p instanceof LayoutParams;
    }

    @Override
    protected void onLayout(boolean changed, int left, int top, int right, int bottom) {
        super.onLayout(changed, left, top, right, bottom);
        for (int i = 0, size = getChildCount(); i < size; i++) {
            View v = getChildAt(i);
            ViewGroup.LayoutParams lp = v.getLayoutParams();
            if (lp instanceof EasyLayoutParams) {
                EasyLayoutParams elp = (EasyLayoutParams) lp;
                elp.getData().initPaths(v);
            }
        }
    }

    @Override
    protected boolean drawChild(Canvas canvas, View child, long drawingTime) {
        ViewGroup.LayoutParams lp = child.getLayoutParams();
        boolean ret = false;
        if (lp instanceof EasyLayoutParams) {
            EasyLayoutParams elp = (EasyLayoutParams) lp;
            LayoutParamsData data = elp.getData();
            if (isInEditMode()) {//预览模式采用裁剪
                canvas.save();
                canvas.clipPath(data.widgetPath);
                ret = super.drawChild(canvas, child, drawingTime);
                canvas.restore();
                return ret;
            }
            if (!data.hasShadow && !data.needClip)
                return super.drawChild(canvas, child, drawingTime);
            //为解决锯齿问题,正式环境采用xfermode
            if (data.hasShadow) {
                int count = canvas.saveLayer(null, null, Canvas.ALL_SAVE_FLAG);
                shadowPaint.setShadowLayer(data.shadowEvaluation, data.shadowDx, data.shadowDy, data.shadowColor);
                shadowPaint.setColor(data.shadowColor);
                canvas.drawPath(data.widgetPath, shadowPaint);
                shadowPaint.setXfermode(new PorterDuffXfermode(PorterDuff.Mode.DST_OUT));
                shadowPaint.setColor(Color.WHITE);
                canvas.drawPath(data.widgetPath, shadowPaint);
                shadowPaint.setXfermode(null);
                canvas.restoreToCount(count);

            }
            if (data.needClip) {
                int count = canvas.saveLayer(child.getLeft(), child.getTop(), child.getRight(), child.getBottom(), null, Canvas.ALL_SAVE_FLAG);
                ret = super.drawChild(canvas, child, drawingTime);
                clipPaint.setXfermode(new PorterDuffXfermode(PorterDuff.Mode.CLEAR));
                clipPaint.setColor(Color.WHITE);
                canvas.drawPath(data.clipPath, clipPaint);
                clipPaint.setXfermode(null);
                canvas.restoreToCount(count);
            }
        }
        return ret;
    }

    static class LayoutParams extends ConstraintLayout.LayoutParams implements EasyLayoutParams {

        private LayoutParamsData data;

        public LayoutParams(Context c, AttributeSet attrs) {
            super(c, attrs);
            data = new LayoutParamsData(c, attrs);
        }

        @Override
        public LayoutParamsData getData() {
            return data;
        }
    }
}
使用方法
<?xml version="1.0" encoding="utf-8"?>
<io.github.iamyours.easylayout.EasyConstraintLayout xmlns:android="http://schemas.android.com/apk/res/android"
    xmlns:app="http://schemas.android.com/apk/res-auto"
    android:layout_width="match_parent"
    android:layout_height="match_parent"
    android:orientation="vertical">

    <View
        android:id="@+id/v_back"
        android:layout_width="match_parent"
        android:layout_height="150dp"
        android:layout_margin="10dp"
        android:background="#fff"
        app:layout_constraintLeft_toLeftOf="parent"
        app:layout_constraintTop_toTopOf="parent"
        app:layout_radius="4dp"
        app:layout_shadowColor="#3ccc"
        app:layout_shadowEvaluation="15dp" />

    <ImageView
        android:id="@+id/iv_head"
        android:layout_width="80dp"
        android:layout_height="80dp"
        android:layout_gravity="center_horizontal"
        android:layout_marginLeft="10dp"
        android:background="#eee"
        app:layout_constraintBottom_toBottomOf="@id/v_back"
        app:layout_constraintLeft_toLeftOf="@id/v_back"
        app:layout_constraintTop_toTopOf="@id/v_back"
        app:layout_radius="40dp"
        app:layout_shadowColor="#5f00"
        app:layout_shadowEvaluation="8dp" />

    <View
        android:layout_width="200dp"
        android:layout_height="200dp"
        android:layout_marginTop="30dp"
        android:background="#ccc"
        app:layout_constraintLeft_toLeftOf="parent"
        app:layout_constraintRight_toRightOf="parent"
        app:layout_constraintTop_toBottomOf="@id/v_back"
        app:layout_radius="30dp"
        app:layout_shadowColor="#8f0f"
        app:layout_shadowDx="4dp"
        app:layout_shadowDy="4dp"
        app:layout_shadowEvaluation="10dp" />
</io.github.iamyours.easylayout.EasyConstraintLayout>
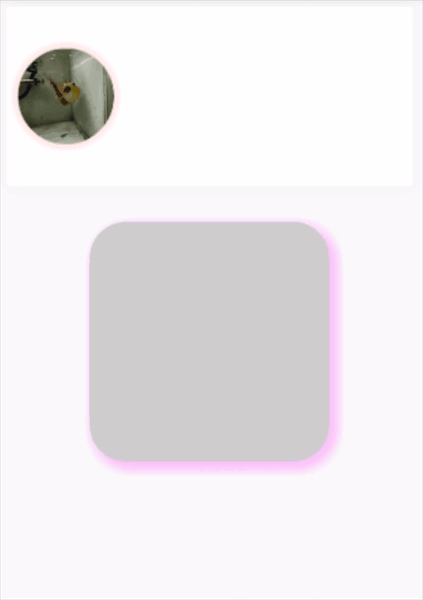
最终效果如下: