

文章作者:foochane
1 sqoop简单介绍
sqoop是apache旗下一款“Hadoop和关系数据库服务器之间传送数据”的工具。用于数据的导入和导出。
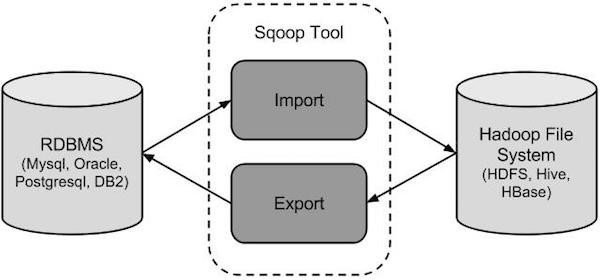
- 导入数据:MySQL,Oracle导入数据到Hadoop的HDFS、HIVE、HBASE等数据存储系统;
- 导出数据:从Hadoop的文件系统中导出数据到关系数据库mysql等
sqoop的工作机制是将导入或导出命令翻译成mapreduce程序来实现,在翻译出的mapreduce中主要是对inputformat和outputformat进行定制。
2 sqoop安装
安装sqoop前要先安装好java环境和hadoop环境。
sqoop只是一个工具,安装在那个节点都可以,只要有java环境和hadoop环境,并且能连接到对应数据库即可。
2.1 下载并解压
下载地址:mirror.bit.edu.cn/apache/sqoo… 下载:sqoop-1.4.7.bin__hadoop-2.6.0.tar.gz
解压到安装目录下
2.2 修改配置文件
将sqoop-env-template.sh复制一份重命名为sqoop-env.sh文件,在sqoop-env.sh文件中添加如下内容:
export HADOOP_COMMON_HOME=/usr/local/bigdata/hadoop-2.7.1
export HADOOP_MAPRED_HOME=/usr/local/bigdata/hadoop-2.7.1
export HIVE_HOME=/usr/local/bigdata/hive-2.3.5
2.3 安装mysql的jdbc启动
将 mysql-connector-java-5.1.45.jar 拷贝到sqoop的lib目录下。
$ sudo apt-get install libmysql-java #之前已经装过了
$ ln -s /usr/share/java/mysql-connector-java-5.1.45.jar /usr/local/bigdata/sqoop-1.4.7/lib
也可以自己手动复制 mysql-connector-java-5.1.45.jar。
2.4 验证sqoop
查看sqoop版本
$ bin/sqoop-version
Warning: /usr/local/bigdata/sqoop-1.4.7/bin/../../hcatalog does not exist! HCatalog jobs will fail.
Please set $HCAT_HOME to the root of your HCatalog installation.
Warning: /usr/local/bigdata/sqoop-1.4.7/bin/../../accumulo does not exist! Accumulo imports will fail.
Please set $ACCUMULO_HOME to the root of your Accumulo installation.
19/06/30 03:03:07 INFO sqoop.Sqoop: Running Sqoop version: 1.4.7
Sqoop 1.4.7
git commit id 2328971411f57f0cb683dfb79d19d4d19d185dd8
Compiled by maugli on Thu Dec 21 15:59:58 STD 20
会出现几个警告,暂时先不管。
验证sqoop到mysql业务库之间的连通性:
$ bin/sqoop-list-databases --connect jdbc:mysql://Master:3306 --username hiveuser --password 123456
$ bin/sqoop-list-tables --connect jdbc:mysql://Master:3306/metastore --username hiveuser --password 123456
3 sqoop数据导入
3.1 从MySql导数据到HDFS
先在mysql中,建表插入测试数据;
SET FOREIGN_KEY_CHECKS=0;

-- ----------------------------
-- Table structure for `emp`
-- ----------------------------
DROP TABLE IF EXISTS `emp`;
CREATE TABLE `emp` (
  `id` int(11) DEFAULT NULL,
  `name` varchar(100) DEFAULT NULL,
  `deg` varchar(100) DEFAULT NULL,
  `salary` int(11) DEFAULT NULL,
  `dept` varchar(10) DEFAULT NULL
) ENGINE=InnoDB DEFAULT CHARSET=latin1;

-- ----------------------------
-- Records of emp
-- ----------------------------
INSERT INTO `emp` VALUES ('1201', 'gopal', 'manager', '50000', 'TP');
INSERT INTO `emp` VALUES ('1202', 'manisha', 'Proof reader', '50000', 'TP');
INSERT INTO `emp` VALUES ('1203', 'khalil', 'php dev', '30000', 'AC');
INSERT INTO `emp` VALUES ('1204', 'prasanth', 'php dev', '30000', 'AC');
INSERT INTO `emp` VALUES ('1205', 'kranthi', 'admin', '20000', 'TP');

-- ----------------------------
-- Table structure for `emp_add`
-- ----------------------------
DROP TABLE IF EXISTS `emp_add`;
CREATE TABLE `emp_add` (
  `id` int(11) DEFAULT NULL,
  `hno` varchar(100) DEFAULT NULL,
  `street` varchar(100) DEFAULT NULL,
  `city` varchar(100) DEFAULT NULL
) ENGINE=InnoDB DEFAULT CHARSET=latin1;

-- ----------------------------
-- Records of emp_add
-- ----------------------------
INSERT INTO `emp_add` VALUES ('1201', '288A', 'vgiri', 'jublee');
INSERT INTO `emp_add` VALUES ('1202', '108I', 'aoc', 'sec-bad');
INSERT INTO `emp_add` VALUES ('1203', '144Z', 'pgutta', 'hyd');
INSERT INTO `emp_add` VALUES ('1204', '78B', 'old city', 'sec-bad');
INSERT INTO `emp_add` VALUES ('1205', '720X', 'hitec', 'sec-bad');

-- ----------------------------
-- Table structure for `emp_conn`
-- ----------------------------
DROP TABLE IF EXISTS `emp_conn`;
CREATE TABLE `emp_conn` (
  `id` int(100) DEFAULT NULL,
  `phno` varchar(100) DEFAULT NULL,
  `email` varchar(100) DEFAULT NULL
) ENGINE=InnoDB DEFAULT CHARSET=latin1;

-- ----------------------------
-- Records of emp_conn
-- ----------------------------
INSERT INTO `emp_conn` VALUES ('1201', '2356742', 'gopal@tp.com');
INSERT INTO `emp_conn` VALUES ('1202', '1661663', 'manisha@tp.com');
INSERT INTO `emp_conn` VALUES ('1203', '8887776', 'khalil@ac.com');
INSERT INTO `emp_conn` VALUES ('1204', '9988774', 'prasanth@ac.com');
INSERT INTO `emp_conn` VALUES ('1205', '1231231', 'kranthi@tp.com');
导入:
bin/sqoop import   \
--connect jdbc:mysql://Master:3306/test   \
--username root  \
--password root   \
--target-dir /sqooptest \
--fields-terminated-by ',' \
--table emp   \
--m 2 \
--split-by id;
- --connect:指定数据库
- --username:指定用户名
- --password:指定密码
- --table:指定要导入的表
- --target-dir:指定hdfs的目录
- --fields-terminated-by:指定文件分割符
- --m: 指定maptask个数,如果大于1,必须指定split-by参数,如指定为2,最后生产的文件会是两个
- --split-by:指定分片的字段
如果表的数据量不是很大就不用指定设置--m参数了
注意导入前前启动hdfs和yarn,并且提交的yarn上运行,而不是在本地运行。
示例:
$ bin/sqoop import   --connect jdbc:mysql://Master:3306/test   --username hadoop  --password 123456   --target-dir /sqooptest --fields-terminated-by ',' --table emp  --m 1  --split-by id;
Warning: /usr/local/bigdata/sqoop-1.4.7/bin/../../hcatalog does not exist! HCatalog jobs will fail.
Please set $HCAT_HOME to the root of your HCatalog installation.
Warning: /usr/local/bigdata/sqoop-1.4.7/bin/../../accumulo does not exist! Accumulo imports will fail.
Please set $ACCUMULO_HOME to the root of your Accumulo installation.
19/06/30 05:00:43 INFO sqoop.Sqoop: Running Sqoop version: 1.4.7
19/06/30 05:00:43 WARN tool.BaseSqoopTool: Setting your password on the command-line is insecure. Consider using -P instead.
19/06/30 05:00:44 INFO manager.MySQLManager: Preparing to use a MySQL streaming resultset.
19/06/30 05:00:44 INFO tool.CodeGenTool: Beginning code generation
Sun Jun 30 05:00:45 UTC 2019 WARN: Establishing SSL connection without server's identity verification is not recommended. According to MySQL 5.5.45+, 5.6.26+ and 5.7.6+ requirements SSL connection must be established by default if explicit option isn't set. For compliance with existing applications not using SSL the verifyServerCertificate property is set to 'false'. You need either to explicitly disable SSL by setting useSSL=false, or set useSSL=true and provide truststore for server certificate verification.
19/06/30 05:00:46 INFO manager.SqlManager: Executing SQL statement: SELECT t.* FROM `emp` AS t LIMIT 1
19/06/30 05:00:46 INFO manager.SqlManager: Executing SQL statement: SELECT t.* FROM `emp` AS t LIMIT 1
19/06/30 05:00:46 INFO orm.CompilationManager: HADOOP_MAPRED_HOME is /usr/local/bigdata/hadoop-2.7.1
Note: /tmp/sqoop-hadoop/compile/cd17c36add75dfe67edd3facf7538def/emp.java uses or overrides a deprecated API.
Note: Recompile with -Xlint:deprecation for details.
19/06/30 05:00:56 INFO orm.CompilationManager: Writing jar file: /tmp/sqoop-hadoop/compile/cd17c36add75dfe67edd3facf7538def/emp.jar
19/06/30 05:00:56 WARN manager.MySQLManager: It looks like you are importing from mysql.
19/06/30 05:00:56 WARN manager.MySQLManager: This transfer can be faster! Use the --direct
19/06/30 05:00:56 WARN manager.MySQLManager: option to exercise a MySQL-specific fast path.
19/06/30 05:00:56 INFO manager.MySQLManager: Setting zero DATETIME behavior to convertToNull (mysql)
19/06/30 05:00:56 INFO mapreduce.ImportJobBase: Beginning import of emp
SLF4J: Class path contains multiple SLF4J bindings.
SLF4J: Found binding in [jar:file:/usr/local/bigdata/hadoop-2.7.1/share/hadoop/common/lib/slf4j-log4j12-1.7.10.jar!/org/slf4j/impl/StaticLoggerBinder.class]
SLF4J: Found binding in [jar:file:/usr/local/bigdata/hbase-2.0.5/lib/slf4j-log4j12-1.7.25.jar!/org/slf4j/impl/StaticLoggerBinder.class]
SLF4J: See http://www.slf4j.org/codes.html#multiple_bindings for an explanation.
SLF4J: Actual binding is of type [org.slf4j.impl.Log4jLoggerFactory]
19/06/30 05:00:58 INFO Configuration.deprecation: mapred.jar is deprecated. Instead, use mapreduce.job.jar
19/06/30 05:01:06 INFO Configuration.deprecation: mapred.map.tasks is deprecated. Instead, use mapreduce.job.maps
19/06/30 05:01:07 INFO client.RMProxy: Connecting to ResourceManager at Master/192.168.233.200:8032
Sun Jun 30 05:01:55 UTC 2019 WARN: Establishing SSL connection without server's identity verification is not recommended. According to MySQL 5.5.45+, 5.6.26+ and 5.7.6+ requirements SSL connection must be established by default if explicit option isn't set. For compliance with existing applications not using SSL the verifyServerCertificate property is set to 'false'. You need either to explicitly disable SSL by setting useSSL=false, or set useSSL=true and provide truststore for server certificate verification.
19/06/30 05:01:56 INFO db.DBInputFormat: Using read commited transaction isolation
19/06/30 05:01:56 INFO mapreduce.JobSubmitter: number of splits:1
19/06/30 05:01:58 INFO mapreduce.JobSubmitter: Submitting tokens for job: job_1561868076549_0002
19/06/30 05:02:05 INFO impl.YarnClientImpl: Submitted application application_1561868076549_0002
19/06/30 05:02:06 INFO mapreduce.Job: The url to track the job: http://Master:8088/proxy/application_1561868076549_0002/
19/06/30 05:02:06 INFO mapreduce.Job: Running job: job_1561868076549_0002
19/06/30 05:02:47 INFO mapreduce.Job: Job job_1561868076549_0002 running in uber mode : false
19/06/30 05:02:48 INFO mapreduce.Job:  map 0% reduce 0%
19/06/30 05:03:35 INFO mapreduce.Job:  map 100% reduce 0%
19/06/30 05:03:36 INFO mapreduce.Job: Job job_1561868076549_0002 completed successfully
19/06/30 05:03:37 INFO mapreduce.Job: Counters: 30
        File System Counters
                FILE: Number of bytes read=0
                FILE: Number of bytes written=135030
                FILE: Number of read operations=0
                FILE: Number of large read operations=0
                FILE: Number of write operations=0
                HDFS: Number of bytes read=87
                HDFS: Number of bytes written=151
                HDFS: Number of read operations=4
                HDFS: Number of large read operations=0
                HDFS: Number of write operations=2
        Job Counters
                Launched map tasks=1
                Other local map tasks=1
                Total time spent by all maps in occupied slots (ms)=42476
                Total time spent by all reduces in occupied slots (ms)=0
                Total time spent by all map tasks (ms)=42476
                Total vcore-seconds taken by all map tasks=42476
                Total megabyte-seconds taken by all map tasks=43495424
        Map-Reduce Framework
                Map input records=5
                Map output records=5
                Input split bytes=87
                Spilled Records=0
                Failed Shuffles=0
                Merged Map outputs=0
                GC time elapsed (ms)=250
                CPU time spent (ms)=2700
                Physical memory (bytes) snapshot=108883968
                Virtual memory (bytes) snapshot=1934733312
                Total committed heap usage (bytes)=18415616
        File Input Format Counters
                Bytes Read=0
        File Output Format Counters
                Bytes Written=151
19/06/30 05:03:37 INFO mapreduce.ImportJobBase: Transferred 151 bytes in 150.6495 seconds (1.0023 bytes/sec)
19/06/30 05:03:37 INFO mapreduce.ImportJobBase: Retrieved 5 records.
查看是否导入成功:
$ hdfs dfs -cat /sqooptest/part-m-*
1201,gopal,manager,50000,TP
1202,manisha,Proof reader,50000,TP
1203,khalil,php dev,30000,AC
1204,prasanth,php dev,30000,AC
1205,kranthi,admin,20000,TP
3.2 从MySql导数据到Hive
命令:
bin/sqoop import \
--connect jdbc:mysql://Master:3306/test \
--username hadoop  \
--password 123456  \
--table emp  \
--hive-import  \
--split-by id  \
--m 1;
导入到hive,需要添加--hive-import参数,不用指定--target-dir其他参数跟导入到hdfs上一样。
3.3 导入表数据子集
有时候我们并不需要,导入数据表中的全部数据,sqoop也支持导入数据表的部分数据。
这是可以使用Sqoop的where语句。where子句的一个子集。它执行在各自的数据库服务器相应的SQL查询,并将结果存储在HDFS的目标目录。
where子句的语法如下:
--where <condition>
下面的命令用来导入emp_add表数据的子集。居住城市为:sec-bad
bin/sqoop import \
--connect jdbc:mysql://Master:3306/test \
--username hadoop \
--password 123456 \
--where "city ='sec-bad'" \
--target-dir /wherequery \
--table emp_add \
 --m 1
另外也可以使用select语句:
bin/sqoop import \
--connect jdbc:mysql://Master:3306/test \
--username hadoop \
--password 123456 \
--target-dir /wherequery2 \
--query 'select id,name,deg from emp WHERE id>1207 and $CONDITIONS' \
--split-by id \
--fields-terminated-by '\t' \
--m 2
3.4 增量导入
增量导入是仅导入新添加的表中的行的技术。
sqoop支持两种增量MySql导入到hive的模式,一种是append,即通过指定一个递增的列。另种是可以根据时间戳。
3.4.1 append
指定如下参数:
--incremental append
--check-column num_id
--last-value 0
--check-column 表示指定递增的字段,--last-value指定上一次到入的位置
如:
bin/sqoop import \
--connect jdbc:mysql://Master:3306/test \
--username hadoop \
--password 123456 \
--table emp --m 1 \
--incremental append \
--check-column id \
--last-value 1208
3.4.2 根据时间戳
命令中添加如下参数:
--incremental lastmodified
--check-column created
--last-value '2012-02-01 11:0:00'
就是只导入created 比2012-02-01 11:0:00更大的数据。
4 Sqoop的数据导出
将数据从HDFS把文件导出到RDBMS数据库,导出前目标表必须存在于目标数据库中。默认操作是从将文件中的数据使用INSERT语句插入到表中。更新模式下,是生成UPDATE语句更新表数据 语法
$ sqoop export (generic-args) (export-args)
导入过程
1、首先需要手动创建mysql中的目标表
mysql> USE db;
mysql> CREATE TABLE employee (
   id INT NOT NULL PRIMARY KEY,
   name VARCHAR(20),
   deg VARCHAR(20),
   salary INT,
   dept VARCHAR(10));
2、执行导出命令
bin/sqoop export \
--connect jdbc:mysql://Master:3306/test \
--username root \
--password root \
--table employee \
--export-dir /user/hadoop/emp/
3、验证表mysql命令行。
mysql>select * from employee;
如果给定的数据存储成功,那么可以找到数据在如下的employee表。
+------+--------------+-------------+-------------------+--------+
| Id   | Name         | Designation | Salary            | Dept   |
+------+--------------+-------------+-------------------+--------+
| 1201 | gopal        | manager     | 50000             | TP     |
| 1202 | manisha      | preader     | 50000             | TP     |
| 1203 | kalil        | php dev     | 30000               | AC     |
| 1204 | prasanth     | php dev     | 30000             | AC     |
| 1205 | kranthi      | admin       | 20000             | TP     |
| 1206 | satish p     | grp des     | 20000             | GR     |
+------+--------------+-------------+-------------------+--------+
