

📖 简介
jest 是facebook推出的一款测试框架,集成了 Mocha,chai,jsdom,sinon等功能。
Enzyme 是 Airbnb 开源的专为 React 服务的测试框架,它的 Api 像 Jquery 一样灵活,因为 Enzyme 是用 cheerio 库解析 html,cheerio 经常用于 node 爬虫解析页面,因此也被成为服务端的 Jquery
Enzyme is a JavaScript Testing utility for React that makes it easier to test your React Components' output. You can also manipulate, traverse, and in some ways simulate runtime given the output.

Enzyme's API is meant to be intuitive and flexible by mimicking jQuery's API for DOM manipulation and traversal.
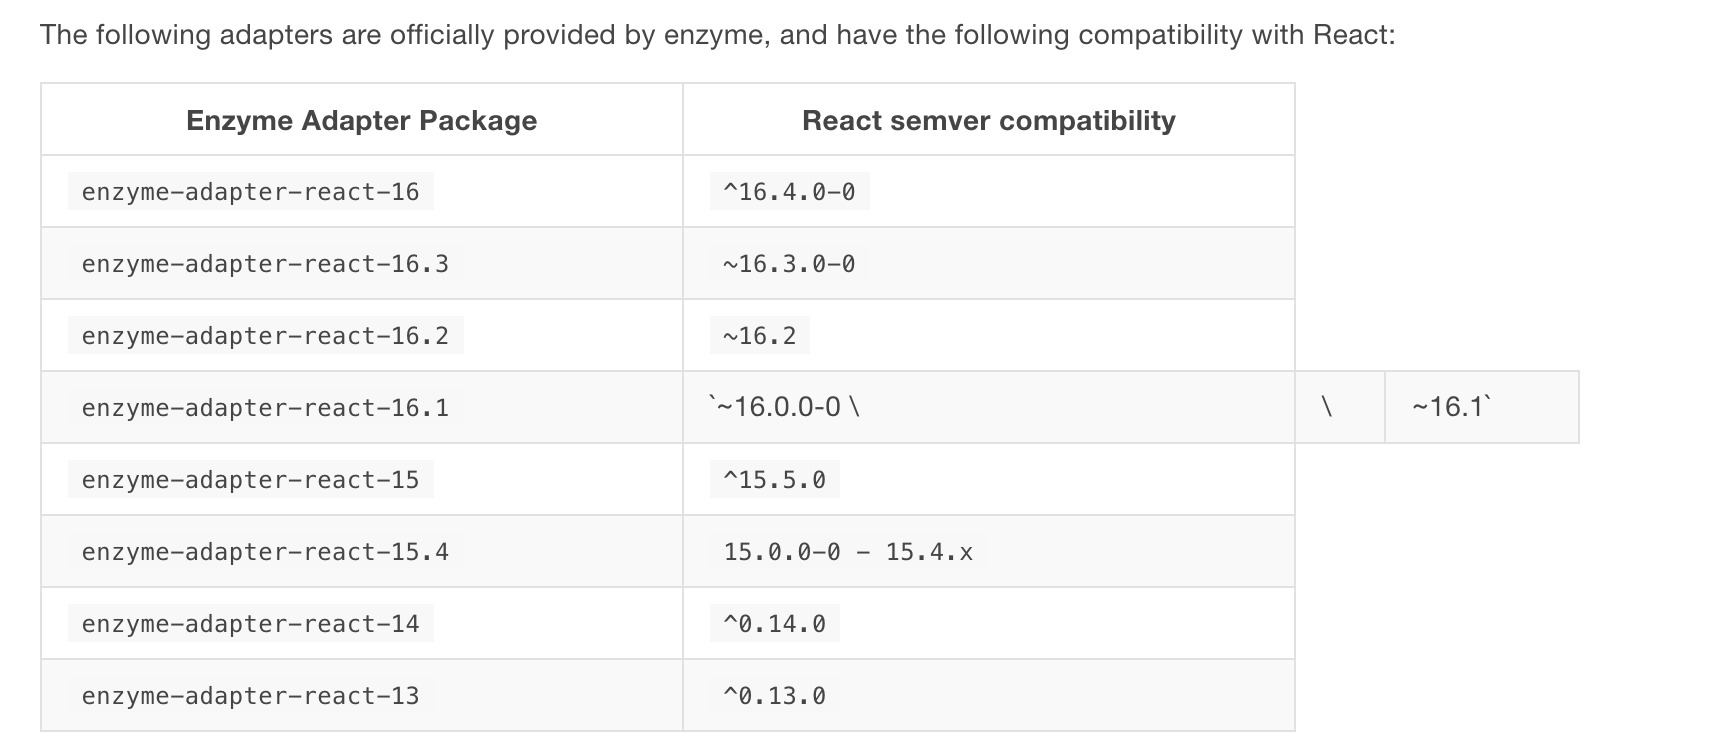
要完成渲染测试,还需要 Enzyme Adapter 库的支持,由于React 版本的不同,Enzyme Adapter的版本也不一样。Enzyme Adapter 顾名思义是为了适应不同的 React 版本,它和 React 版本对应关系如下图(官网):
💻 源码解析
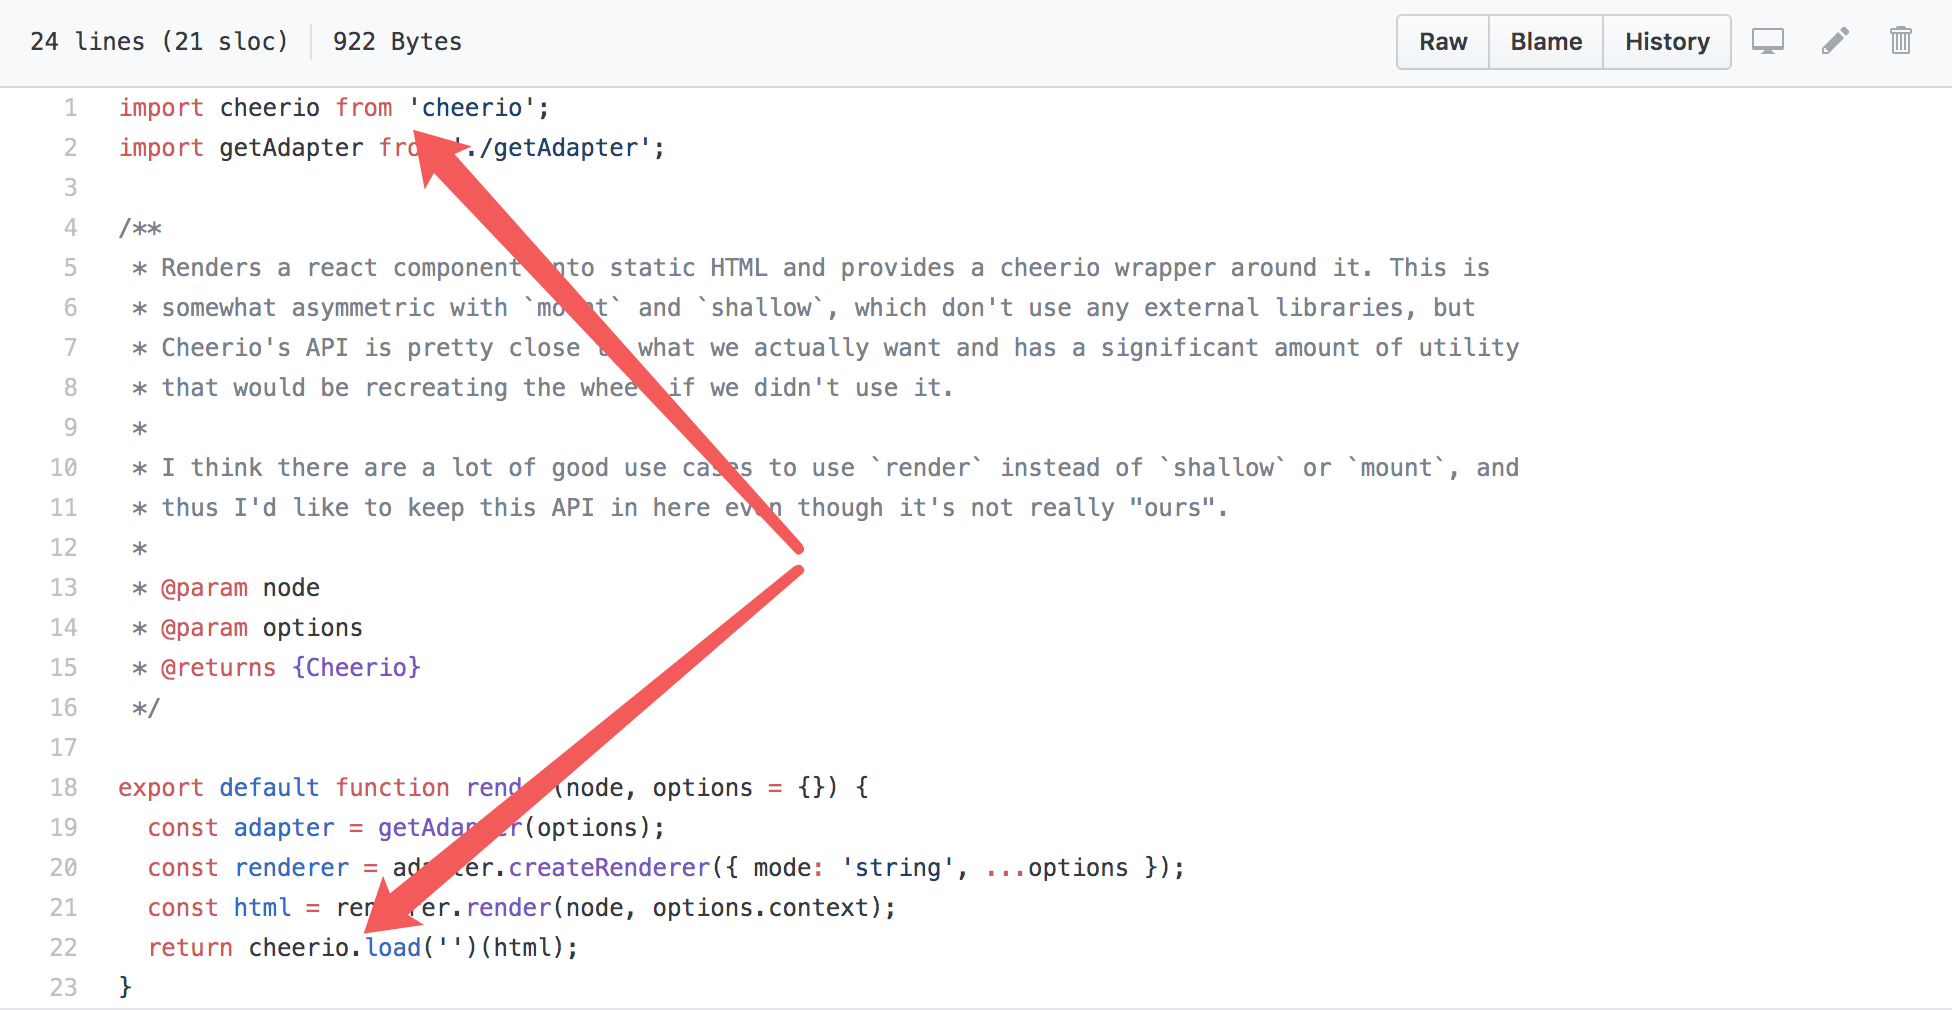
Enzyme 实现了一套类似于 Jquery 的 Api,它的核心代码是构建了一个 ReactWrapper 类或者 ShallowWrapper 包裹 React 组件,区别在于 ShallowWrapper 的类只会渲染组件的第一层,不渲染自组件,所以是一种浅渲染。这里以 ReactWrapper为例,它会输出可用于原子级操作 dom 的 api,以 children() api 为例,我们知道 jq 中的 children() api 可以获取某 dom 节点的全部子节点,Enzyme 是这样做的:
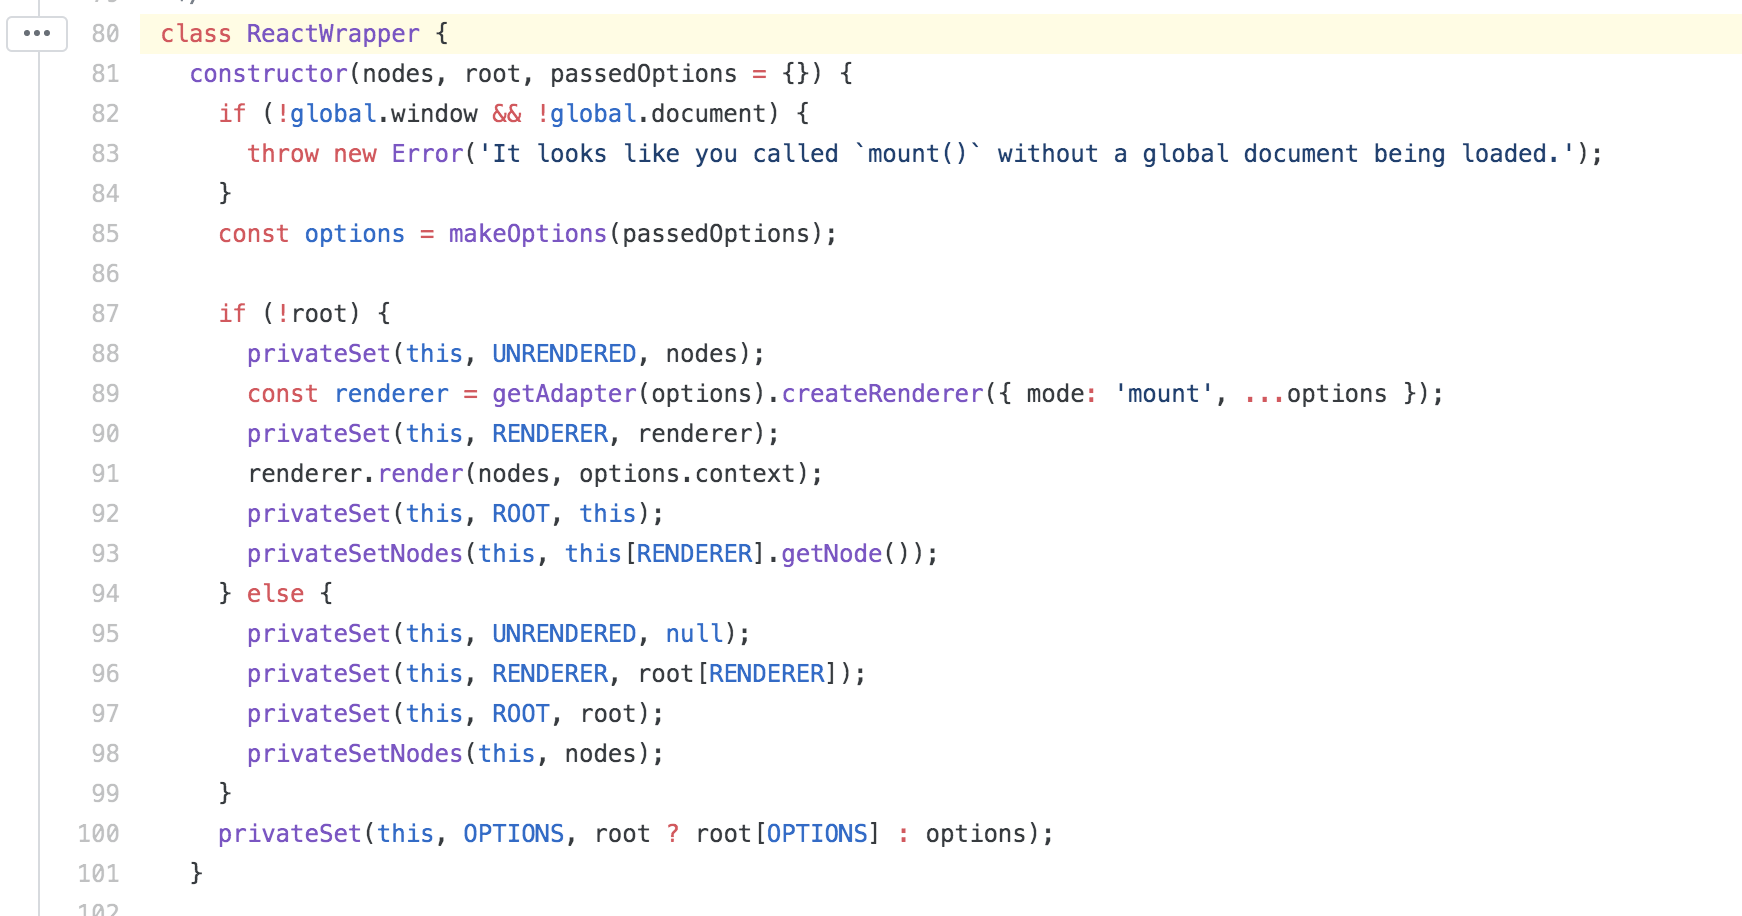
构造函数中调用 privateSetNodes 方法设置根节点
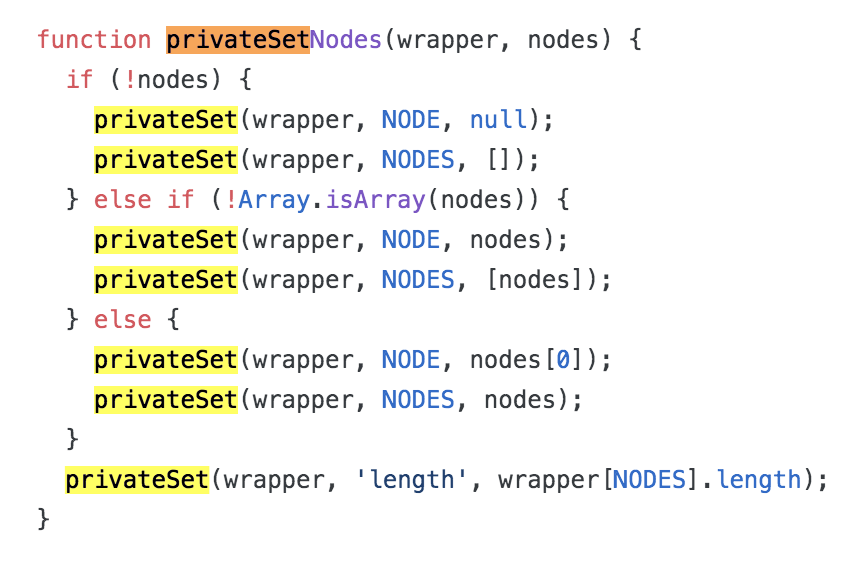
这里调用了 privateSet 函数
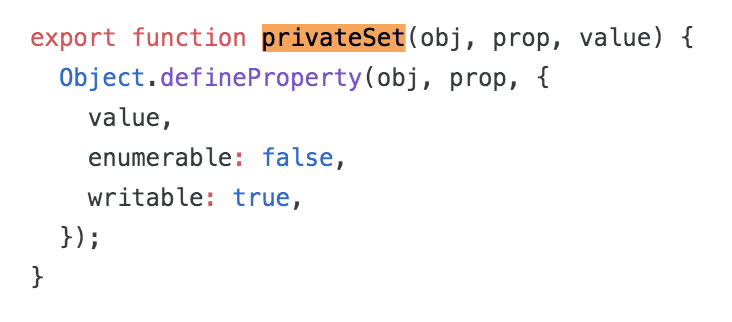
privateSet 是通过 Object.defineProperty api 来完成节点的赋值的,我们看一下 children api 做了什么:

首先获取所有子节点,这里包裹了三层数组操作,我们从外部开始分析:
flatMap 函数传了一个 fn 作为参数:

这里的 getNodesInternals 函数是获取当前根节点
源码是
getNodesInternals() {
    return this[NODES][0]
}
就不贴图片了
这里拿到的是一个单元素数组,数组遍历之后调用了 wrap api,这里是比较重要的一步:
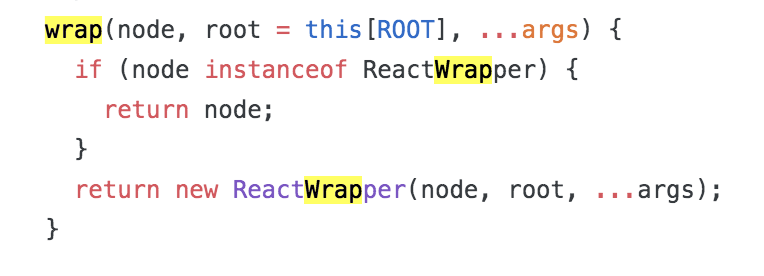
wrap api 保证了根节点继承自 ReactWrapper 类
回到上面,flatMap 将根节点展开去掉假值,输出一个数组
那么 flatMap 传入的 fn 为
n => childrenOfNodes(...)
做了什么呢?

很简单,调用了 node 节点的 rendered 方法,输出子节点数组
到这一步我们再看一下 children api:

当获取所有节点之后,调用选择器,没有选择器是返回全部子节点,至此这个 api 应该可以完成这样的操作
children('.childClass')
children('.child + .child')
...
除此之外,Enzyme 还封装了很多其他的 api,常用的有以下这些:
simulate(event, mock):用来模拟事件触发,event为事件名称,mock为一个event object;
instance():返回测试组件的实例;
find(selector):根据选择器查找节点,selector可以是CSS中的选择器,也可以是组件的构造函数,以及组件的display name等;
at(index):返回一个渲染过的对象;
get(index):返回一个react node,要测试它,需要重新渲染;
contains(nodeOrNodes):当前对象是否包含参数重点 node,参数类型为react对象或对象数组;
text():返回当前组件的文本内容;
html(): 返回当前组件的HTML代码形式;
props():返回根组件的所有属性;
prop(key):返回根组件的指定属性;
state():返回根组件的状态;
setState(nextState):设置根组件的状态;
setProps(nextProps):设置根组件的属性;
childAt(index) 返回索引为 index 的子节点
parents(selector) 返回指定父节点(祖先节点)
...
❓测试是什么?
在我们上手 React Enzyme 测试框架之前,我们要先弄清楚测试的目的是什么,测试需要测试哪些东西,自动化测试需要做到什么级别。
1. 功能测试
2. 性能测试(包括负载/压力测试)
3. 用户界面测试
4. 兼容性测试
5. 安全测试
6. 接口测试
Enzyme 框架的目的是让 React 组件的输出是可以推知、更加可控的,Emzyme 测试可以粒度化到一个小的 React 组件
Enzyme 最重要的就是三个测试 api:
1. Shallow Rendering: shallow(node[, options]) => ShallowWrapper
定义了一种浅渲染方式,只渲染组件的第一层,不渲染子组件,测试速度也比另外两个快得多。

2. Full DOM Rendering: mount(node[, options]) => ReactWrapper
定义了一种完全渲染方式,将组件完全解析为虚拟 dom

3. Static Rendered Markup: render (node[, options])
静态渲染
上面三个 api 将 React 单元化精确到了原子级别,我们可以测试 某个 button 的文案,某个标题的长度,整个组件的 props 等等
🚗 使用
1. 浅渲染(shallow)
import React from 'react';
import { expect } from 'chai';
import { shallow } from 'enzyme';
import sinon from 'sinon';
import MyComponent from './MyComponent';
import Foo from './Foo';

describe('<MyComponent />', () => {
  it('renders three <Foo /> components', () => {
    const wrapper = shallow(<MyComponent />);
    expect(wrapper.find(Foo)).to.have.lengthOf(3);
  });

  it('renders children when passed in', () => {
    const wrapper = shallow((
      <MyComponent>
        <div className="unique" />
      </MyComponent>
    ));
    expect(wrapper.contains(<div className="unique" />)).to.equal(true);
  });
});
2. 完全渲染(mount)
import React from 'react';
import sinon from 'sinon';
import { expect } from 'chai';
import { mount } from 'enzyme';

import Foo from './Foo';

describe('<Foo />', () => {
  it('allows us to set props', () => {
    const wrapper = mount(<Foo bar="baz" />);
    expect(wrapper.props().bar).to.equal('baz');
    wrapper.setProps({ bar: 'foo' });
    expect(wrapper.props().bar).to.equal('foo');
  });

  it('calls componentDidMount', () => {
    sinon.spy(Foo.prototype, 'componentDidMount');
    const wrapper = mount(<Foo />);
    expect(Foo.prototype.componentDidMount).to.have.property('callCount', 1);
    Foo.prototype.componentDidMount.restore();
  });
});
3. 静态渲染(render)
import React from 'react';
import { expect } from 'chai';
import { render } from 'enzyme';

import Foo from './Foo';

describe('<Foo />', () => {
  it('renders three `.foo-bar`s', () => {
    const wrapper = render(<Foo />);
    expect(wrapper.find('.foo-bar')).to.have.lengthOf(3);
  });

  it('renders the title', () => {
    const wrapper = render(<Foo title="unique" />);
    expect(wrapper.text()).to.contain('unique');
  });
});
实例
基于官方的样例,我们启动本地项目进行测试,首先通过 create-react-app 生成一个测试项目,编写 App.test 文件
由于 react-test-renderer 会输出一个 expect api,因此 chai 的 expect api 重命名一下
import React from 'react'
import { expect as cExpect } from 'chai'
import Adapter from 'enzyme-adapter-react-16'
import { configure, shallow, mount } from 'enzyme'
import sinon from 'sinon'
import toJson from 'enzyme-to-json'
import UserInfo from './components/UserInfo'
import List from './components/List'
import 'react-test-renderer'

configure({ adapter: new Adapter() })
1. 测试节点、事件
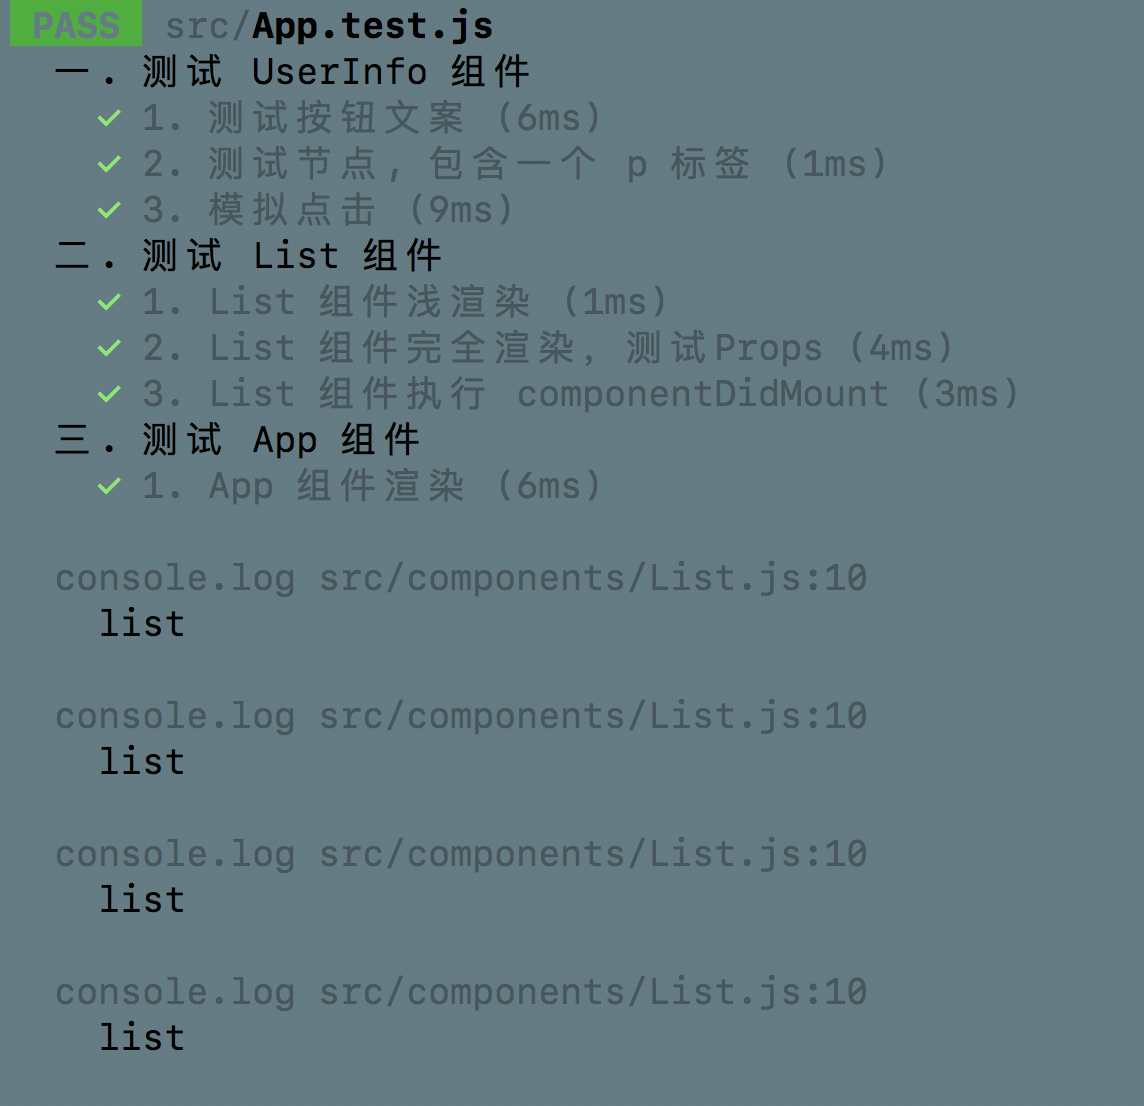
describe('一. 测试 UserInfo 组件', () => {
  const wrapper = shallow(<UserInfo />)
  it('1. 测试按钮文案', () => {
    cExpect(wrapper.find('button').text()).to.equal('按钮')
  })

  it('2. 测试节点, 包含一个 p 标签', () => {
    cExpect(wrapper.find('p').length).to.equal(1)
  })

  it('3. 模拟点击', () => {
    const onBtnClick = sinon.spy();
    const wrapper = mount((
      <UserInfo onBtnClick={onBtnClick} />
    ));
    wrapper.find('button').simulate('click');
    cExpect(onBtnClick).to.have.property('callCount', 1);
  });
})
2. 测试 props,生命周期
describe('二. 测试 List 组件', () => {
  const shallowWrapper = shallow(<List list={['a']} />)
  const wrapper = mount(<List list={['a']} />)

  it('1. List 组件浅渲染', () => {
    cExpect(shallowWrapper.props().list).to.equal(undefined)
  })

  it('2. List 组件完全渲染,测试Props', () => {
    cExpect(wrapper.props().list.length).to.equal(1)
    wrapper.setProps({list: ['shallow', 'mount', 'render']})
    cExpect(wrapper.props().list.length).to.equal(3)
  })

  it('3. List 组件执行 componentDidMount', () => {
    sinon.spy(List.prototype, 'componentDidMount');
    mount(<List />)
    cExpect(List.prototype.componentDidMount).to.have.property('callCount', 1);
    List.prototype.componentDidMount.restore();
  });
})
3. 快照测试
describe('三. 测试 App 组件', () => {
const wrapper = shallow(<List list={[1,2,3]} />)
it('1. App 组件渲染', () => {
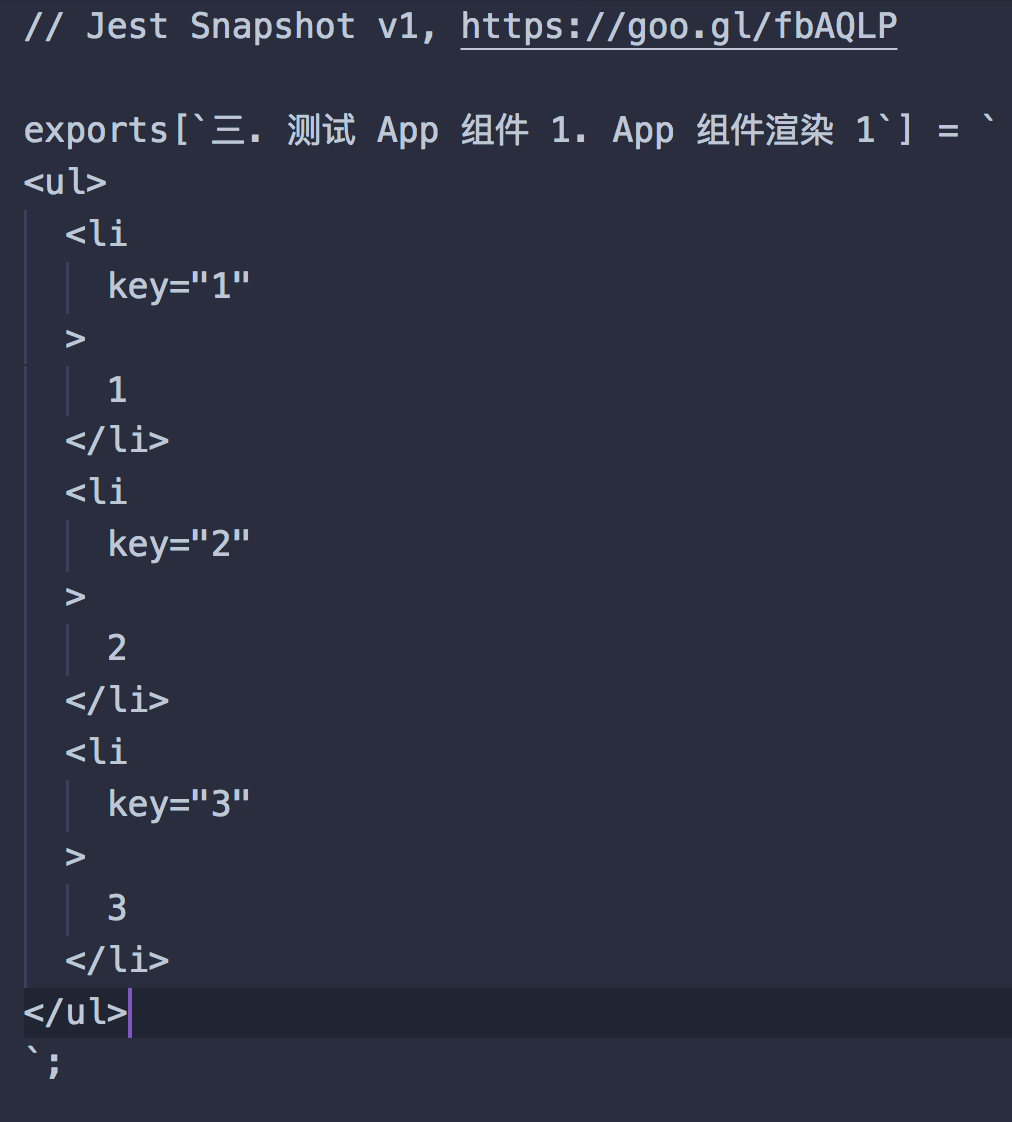
expect(toJson(wrapper)).toMatchSnapshot()
})
})
测试样例通过,快照测试会生成 App.test.js.snap 文件
当组件内容改变时,快照测试会对比上一张照片,找出不同:
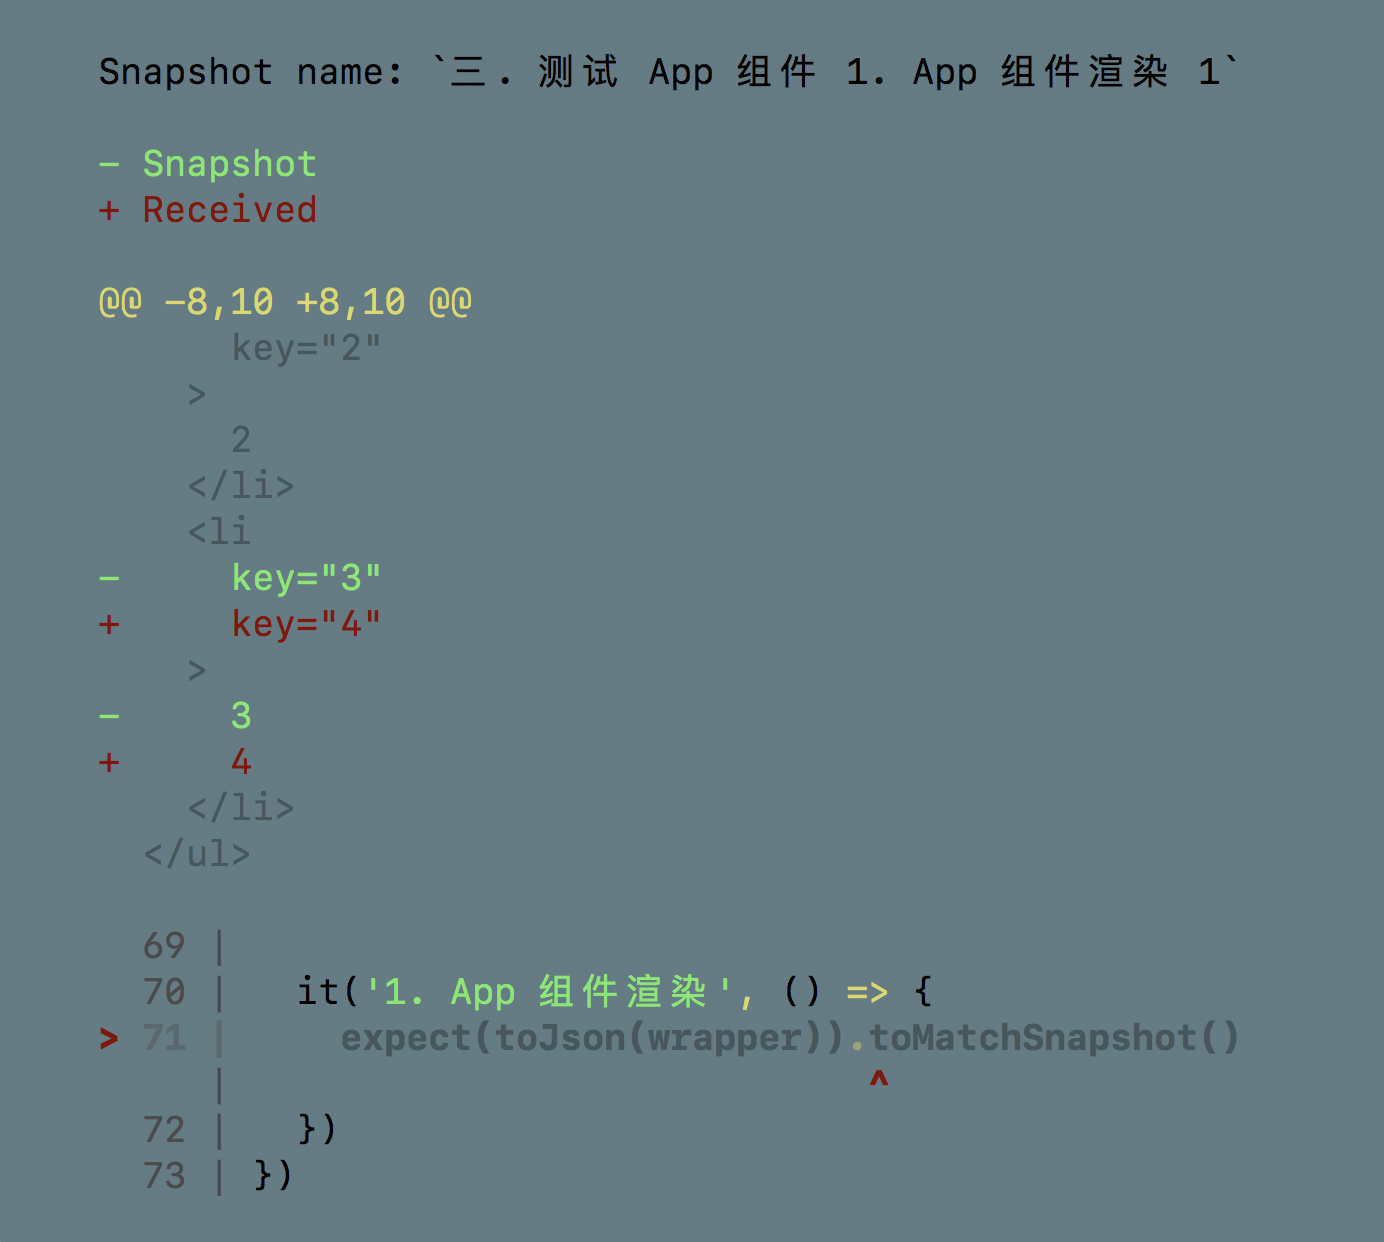
这里可以很清晰地看到组件测试失败地原因
常用测试单元
expect({a:1}).toBe({a:1})//判断两个对象是否相等
expect(1).not.toBe(2)//判断不等
expect(n).toBeNull(); //判断是否为null
expect(n).toBeUndefined(); //判断是否为undefined
expect(n).toBeDefined(); //判断结果与toBeUndefined相反
expect(n).toBeTruthy(); //判断结果为true
expect(n).toBeFalsy(); //判断结果为false
expect(value).toBeGreaterThan(3); //大于3
expect(value).toBeGreaterThanOrEqual(3.5); //大于等于3.5
expect(value).toBeLessThan(5); //小于5
expect(value).toBeLessThanOrEqual(4.5); //小于等于4.5
expect(value).toBeCloseTo(0.3); // 浮点数判断相等
expect('Christoph').toMatch(/stop/); //正则表达式判断
expect(['one','two']).toContain('one'); // 含有某个元素
expect(toJson(wrapper)).toMatchSnapshot() // 测试快照
wrapper.setProps({a: 1}) // 验证setProps
还有更多关于前端测试地知识我们一起探索,代码上传到 github 了,有兴趣的可以看看。
