

导语: 在日常的开发过程中,跨域是一个令人头疼的事情,也在跨域的过程中学到了不少知识,也吃了不少跨域的亏,一直没有时间整理这部分的知识点,现在就我脑海中的跨域知识以及结合开发过程中遇到的坎进行一个系统的总结。
目录
- 跨域是什么
- 跨域解决方法
跨域是什么
说到跨域,就不得不提游览器的同源安全策略。按照MDN所说,同源策略限制了从同一个源加载的文档或者脚本如何和来自另一个源的文档和脚本等资源进行交互,这是阻止恶意文件程序攻击的一个重要安全机制。
同源就是协议(http\https),域名(www.taobao.com)和端口号(80,8080)都相同,这才称之为同源,与之相对的皆是不同源,是跨域的范围了。
这里列一个表格来说明一下:
假设这里有一个url为http://www.example.com/a.html, 想要请求以下地址,默认端口为80。
| 序号 | url | 是否同源 | 原因 |
|---|---|---|---|
| 1 | http://www.example.com/b.html |
是 | 协议、域名、端口相同,只是文件路径不同 |
| 2 | https://www.example.com/c.html |
否 | 协议不同(http\https) |
| 3 | http://store.example.com/c.html |
否 | 子域域名不同(www\store) |
| 4 | http://www.example.com:81/c.html |
否 | 端口不同(80/81) |
| 5 | https://shop.example.com:82/c.html |
否 | 协议、域名、端口都不同 |
注意:有时候w3c的标准到了ie这里就行不通了。所以根据ie游览器的标准,有两个不同点:一是授信范围,也就是高度互信的两个域名,不受同源限制;二是端口不同的两个域名,不受同源限制。
跨域解决方法
据我所知,跨域有以下几种方法:
- jsonp方法,只适用于get请求
- CROS,(跨域资源共享协议),适用于各种请求
- domain设置,只适用于子域
- post Message,适用于父子网页iframe通信
jsonp方法
采用这种方法,是由于html标签src属性不受同源限制,下面就封装一个jsonp方法来进行跨域资源请求。
- 原生方法
function jsonp({url,callback}) {
  let script = document.createElement('script');
  script.src = `${url}&callback=${callback}`;
  document.head.appendChild(script);
}
一个简单的案例:
先用node开一个3000端口,作为服务端,启动node server.js。
// 保存为server.js
const http = require('http');
const url = require('url');
const queryString = require('querystring');
const data = JSON.stringify({
  title: 'hello,jsonp!'
})

const server = http.createServer((request, response) => {
  let addr = url.parse(request.url);
  if (addr.pathname == '/jsonp') {
    let cb = queryString.parse(addr.query).callback;
    response.writeHead(200, { 'Content-Type': 'application/json;charset=utf-8' })
    response.write(cb + '('+ data +')');
  } else {
    response.writeHead(403, { 'Content-Type': 'text/plain;charset=utf-8' })
    response.write('403');
  }
  response.end();
})

server.listen(3000, () => {
  console.log('Server is running on port 3000!');
})
最后请求返回内容。
jsonp({
  url: 'http://localhost:3000/jsonp?from=1',
  callback: 'getData',
})

function getData(res) {
  console.log(res); // {title: "hello,jsonp!"}
}
- jquery方法
<script src="https://unpkg.com/jquery@3.4.1/dist/jquery.js"></script>
$(function () {
  $.ajax({
    url: 'http://localhost:3000/jsonp?from=1',
    type: 'get',
    dataType: 'jsonp',
    success: function(res) {
      console.log(res); // {title: "hello,jsonp!"}
    }
  })
})
CROS
CORS(Cross -Origin Resource Sharing),跨域资源共享,是一个W3C标准,在http的基础上发布的标准协议。
CORS需要游览器和服务器同时支持,解决了游览器的同源限制,使得跨域资源请求得以实现。它有两种请求,一种是简单请求,另外一种是非简单请求。
- 简单请求
满足以下两个条件就属于简单请求,反之非简单。
1)请求方式是GET、POST、HEAD;
2)响应头信息是Accept、Accept-Language、Content-Language、Last-Event-ID、Content-Type(只限于application/x-www-form-urlencoded、multipart/form-data、text/plain);
简单请求有三个CORS字段需要加在响应头中,前面部分都是以Access-Control开头:
1.Access-Control-Allow-Origin,这个表示接受哪些域名的请求,如果是*号,那就是任何域名都可以请求;
2.Access-Control-Allow-Credentials,这个表示是否允许携带cookie,默认是false,不允许携带;
如果设置为true, 要发送cookie,允许域就必须指定域名方法;客户端http请求必须设置:
var xhr = new XMLHttpRequest();
xhr.withCredentials = true;
3.Access-Control-Expose-Headers,这个表示服务器可接受的响应头字段,如果客户端发送过来请求携带的Cache-Control、Content-Language、Content-Type、Expires、Last-Modified,还有自定义请求头字段。
例如:请求一个本地get接口。
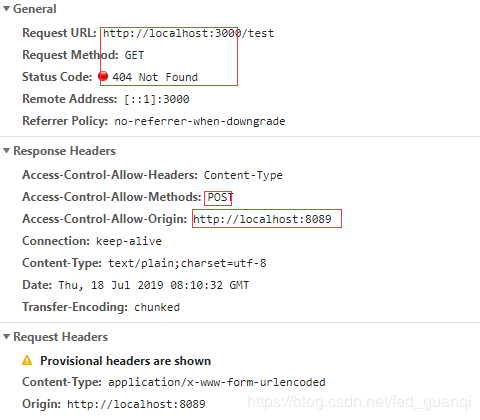
本地服务端开启访问限制,打开server.js,输入以下内容:设置允许域名为http://localhost:8089,允许访问请求方式是POST请求。
const http = require('http');
const url = require('url');
const queryString = require('querystring');
const data = JSON.stringify({
  title: 'hello,jsonp!'
})
const dataCors = JSON.stringify({
  title: 'hello,cors!'
})

const server = http.createServer((request, response) => {
  let addr = url.parse(request.url);
  response.setHeader("Access-Control-Allow-Origin", 'http://localhost:8089');
  response.setHeader("Access-Control-Allow-Headers", "Content-Type");
  response.setHeader("Access-Control-Allow-Methods","POST");
  response.setHeader("Content-Type", "application/json;charset=utf-8");
  if (addr.pathname == '/jsonp') {
    let cb = queryString.parse(addr.query).callback;
    response.writeHead(200, { 'Content-Type': 'application/json;charset=utf-8' })
    response.write(cb + '('+ data +')');
  } else if (addr.pathname == '/test'){
    if (request.method == 'POST') {
      response.writeHead(200, { 'Content-Type': 'application/json;charset=utf-8' })
      response.write(dataCors);
    } else {
      response.writeHead(404, { 'Content-Type': 'text/plain;charset=utf-8' })
    }
  } else {
    response.writeHead(403, { 'Content-Type': 'text/plain;charset=utf-8' })
    response.write('403');
  }
  response.end();
})

server.listen(3000, () => {
  console.log('Server is running on port 3000!');
})
express框架设置如下:
app.all("*", function(req, res, next) {
  res.header("Access-Control-Allow-Origin", "*");
  res.header("Access-control-Allow-Headers", "X-Auth");
  res.header("Access-Control-Allow-Methods", "GET,POST,DELETE,PUT,OPTIONS,HEAD,FETCH");
  res.header("Access-control-max-age", 60*60*24); //测试通过
  next();
})
如果使用get访问http://localhost:3000/test这个接口地址,那么就会报错404。
httpReq这个方法在这篇文章查看。
async function getReqData() {
  let data = await httpReq({
    type: 'get',
    url: 'http://localhost:3000/test',
    data: null,
  })
  console.log(data);
}
getReqData();

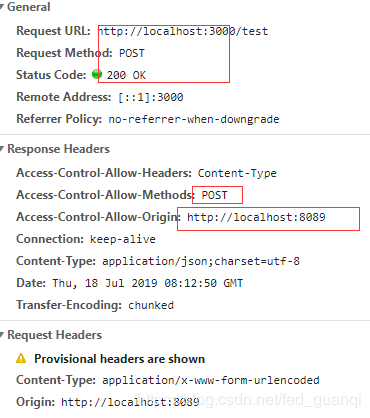
如果是post访问,就会返回正常内容。
async function getReqData() {
  let data = await httpReq({
    type: 'post',
    url: 'http://localhost:3000/test',
    data: null,
  })
  console.log(data);
}
getReqData();

- 非简单请求
就是除了简单请求的几种方法外,比如说PUT请求、DELETE请求,这种都是要发一个预检请求的,然后服务器允许,才会发送真正的请求。
非简单请求有以下几个字段需要传递:
1.Access-Control-Allow-Methods,值是以逗号分隔,比如:GET,POST,DELETE;
2.Access-Control-Allow-Headers,值是默认字段或者自定义字段,例如:X-Auth-Info;
3.Access-Control-Allow-Credentials,是否携带cookie信息;
4.Access-Control-Max-Age,代表预检请求的有效期限,单位是秒。
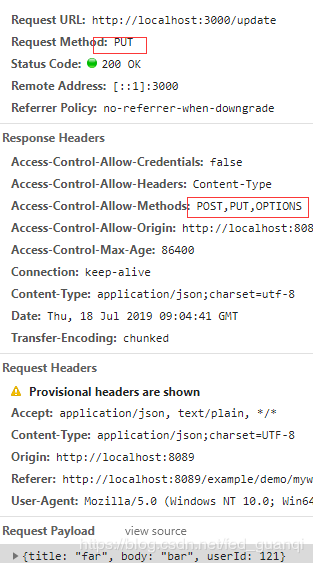
例如:以下这个put请求,服务端设置一个put请求接口,这里使用axios来请求。
// 设置返回信息
const dataUpdate = JSON.stringify({
  title: 'update success!'
})
// 设置允许
response.setHeader("Access-Control-Allow-Methods","POST,PUT");
response.setHeader("Access-Control-Allow-Credentials",false);
response.setHeader("Access-Control-Max-Age", 60*60*24);
if (addr.pathname == '/update'){
  if (request.method == 'PUT') {
    response.writeHead(200, { 'Content-Type': 'application/json;charset=utf-8' })
    response.write(dataUpdate);
  } else {
    response.writeHead(404, { 'Content-Type': 'text/plain;charset=utf-8' })
  }
}
客户端请求,返回内容。
<script src="https://cdn.bootcss.com/axios/0.19.0/axios.min.js"></script>
async function saveInfo () {
  let data = await axios.put('http://localhost:3000/update', {
    title: 'far',
    body: 'bar',
    userId: 121,
  })
  console.log(data);
}
saveInfo();

domain设置
这种方法只适用于子域不同时候的跨域请求,可以使用document.domain来设置。
比如:map.domaintest.org子域名指向根域名domaintest.org,可以使用下面的设置。
if (document.domain != 'domaintest.org') {
  document.domain = 'domaintest.org';
}
例如:
async function saveInfo () {
  let data = await httpReq({
    type: 'get',
    url: 'http://map.domaintest.org:8089/ky.html',
    data: null,
  })
  console.log(data);
}
saveInfo();
if (document.domain != 'domaintest.org') {
  document.domain = 'domaintest.org';
}

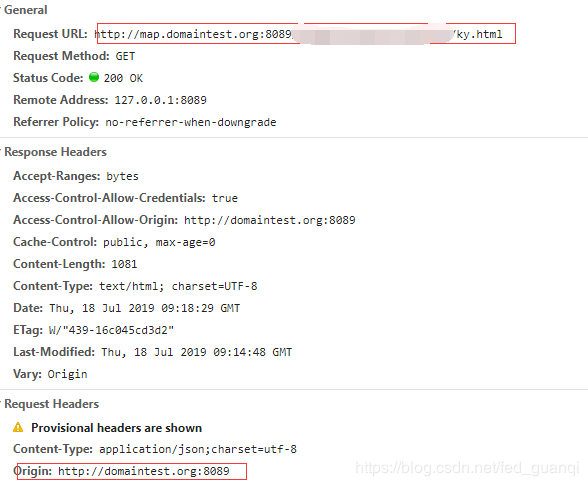
看情况,使用谷歌请求,不加这段也可以成功请求到子域的页面内容。
post Message
这个post Message可以安全的实现跨源通信,适用于父页面和子页面或是两个不同页面之间的请求,iframe的情况就适合用这个。
父页面通过postMessage('<msg>','<url>'),子页面接收消息,并且返回消息到父页面,父页面监听message事件接收消息。
例如:http://map.domaintest.org:8089/parent.html发送消息给子页面http://map.domaintest.org:8089/son.html,子页面返回消息。
- 父页面的:
<!DOCTYPE html>
<html lang="en">
<head>
<meta charset="UTF-8">
<meta name="viewport" content="width=device-width, initial-scale=1.0">
<meta http-equiv="X-UA-Compatible" content="ie=edge">
<title>父级页面</title>
</head>
<body>
<button id="btn">发送消息</button>
<iframe id="child" src="http://map.domaintest.org:8089/son.html" width="100%" height="300"></iframe>
<script>
let sendBtn = document.querySelector('#btn');
sendBtn.addEventListener('click', sendMsg, false);
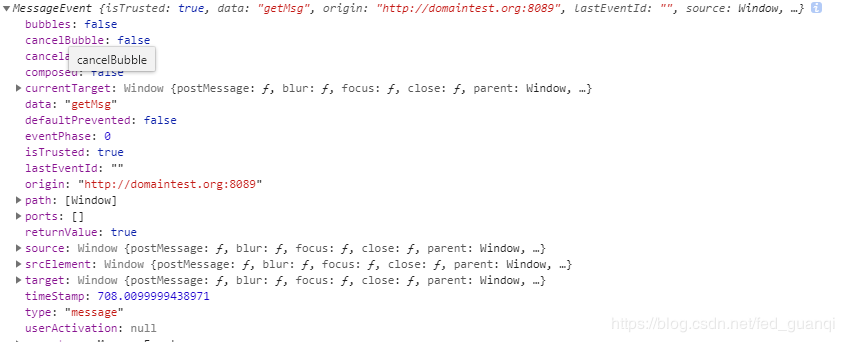
function sendMsg () {
window.frames[0].postMessage('getMsg', 'http://map.domaintest.org:8089/son.html');
}
window.addEventListener('message', function (e) {
let data = e.data;
console.log('接收到的消息是:'+ data);
})
</script>
</body>
</html>
- 子页面的:
<!DOCTYPE html>
<html lang="en">
<head>
<meta charset="UTF-8">
<meta name="viewport" content="width=device-width, initial-scale=1.0">
<meta http-equiv="X-UA-Compatible" content="ie=edge">
<title>子页面</title>
</head>
<body>
<h2>窗口</h2>
<p>我是另外一个窗口!</p>
<script>
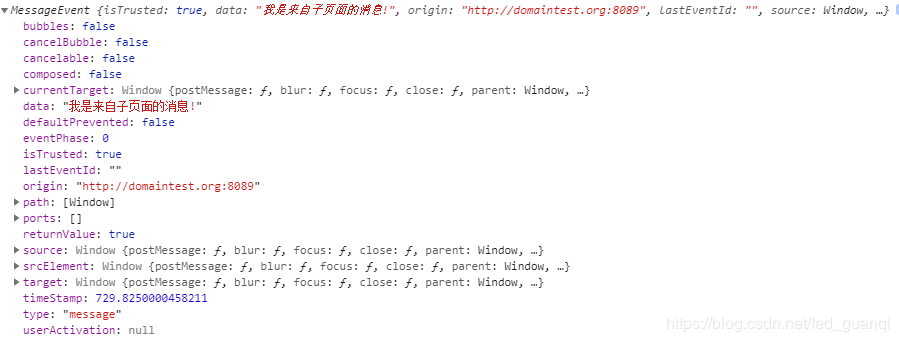
window.addEventListener('message', function (e) {
if (e.source != window.parent) return;
window.parent.postMessage('我是来自子页面的消息!', '*');
}, false)
</script>
</body>
</html>
跨域代理方法补充
有时候可以使用代理的方式来发送跨域请求,比如axios的跨域代理,nodejs跨域代理,nginx跨域代理。下面介绍常见的几种跨域代理设置方法。
- axios的跨域代理
创建实例建立代理:
import axios from 'axios';
var server = axios.create({
  baseURL: 'https://domain.com/api/',
  timeout: 1000,
});
- vue中跨域设置
在config/index.js中设置:
module.exports = {
  dev: {
    //...
    proxyTable: {
      '/api': {
          target: 'http://10.0.100.7:8081', //设置调用接口域名和端口号别忘了加http
          changeOrigin: true,
          pathRewrite:{
            "^/api":""
          }
      }
    },
  }
接口调用时:
this.axios.get('/api/user',{
    params: {
        userId:'1'
    }
}).then(function (res) {
    console.log(res);
}).catch(function (err) {
    console.log(err);
})
- nodejs跨域代理
按照代理代理包
npm i -S http-proxy
设置跨域
var http = require('http');
var url=require('url');
var path=require('path');
var httpProxy = require('http-proxy');

//服务端口
var PORT = 8080;
//接口前缀
var API_URL='api';
//真正的api地址
var API_DOMAIN='http://www.example.com/';

//创建一个代理服务器
var proxy = httpProxy.createProxyServer({
    target: API_DOMAIN,
});

//代理出错则返回500
proxy.on('error', function(err, req, res){
    res.writeHead(500, {
      'content-type': 'text/plain'
    });
    res.end('server is error!');
});

//建立一个本地的server
var server = http.createServer(function (request, response) {
    var pathname = url.parse(request.url).pathname;
    var realPath = path.join("./", pathname);
    var ext = path.extname(realPath);
    ext = ext ? ext.slice(1) : 'unknown';

    //判断如果是接口访问,则通过proxy转发
    console.log(pathname);
    console.log(API_URL);
    if(pathname.indexOf(API_URL) > 0){
        console.log(request.url.substring(4,request.url.length));
        request.url=request.url.substring(4,request.url.length)
        proxy.web(request, response);
        return;
    }
});
server.listen(PORT);
console.log("Server runing at port: " + PORT + ".");
- nginx跨域代理
设置cors
location / {
  if ($request_method = 'OPTIONS') {
    add_header 'Access-Control-Allow-Origin' '*';
    add_header 'Access-Control-Allow-Methods' 'GET, POST, OPTIONS';
    add_header 'Access-Control-Allow-Headers' 'DNT,X-CustomHeader,Keep-Alive,User-Agent,X-Requested-With,If-Modified-Since,Cache-Control,Content-Type';
    add_header 'Access-Control-Max-Age' 64800;
    add_header 'Content-Type' 'text/plain charset=UTF-8';
    add_header 'Content-Length' 0;
    return 204;
  }
  if ($request_method = 'POST') {
    add_header 'Access-Control-Allow-Origin' '*';
    add_header 'Access-Control-Allow-Methods' 'GET, POST, OPTIONS';
    add_header 'Access-Control-Allow-Headers' 'DNT,X-CustomHeader,Keep-Alive,User-Agent,X-Requested-With,If-Modified-Since,Cache-Control,Content-Type';
  }
  if ($request_method = 'GET') {
    add_header 'Access-Control-Allow-Origin' '*';
    add_header 'Access-Control-Allow-Methods' 'GET, POST, OPTIONS';
    add_header 'Access-Control-Allow-Headers' 'DNT,X-CustomHeader,Keep-Alive,User-Agent,X-Requested-With,If-Modified-Since,Cache-Control,Content-Type';
  }
}
或者是反向代理
server {
  listen       80; #监听80端口
  server_name  localhost; # 当前服务的域名
  location / {
    proxy_pass http://localhost:81;
    proxy_redirect default;
  }

  location /apis { #添加访问目录为/apis的代理配置
    rewrite  ^/apis/(.*)$ /$1 break;
    proxy_pass   http://localhost:82;
  }
}
