

前面我们对于 ListView 的操作讲过 Flutter 滑动删除最佳实践,那现在我们来了解一下 ListView 的拖拽排序。
效果如下:
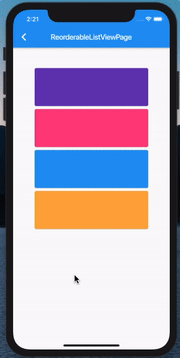
ReorderableListView
想要达到如上效果,需使用该类,官网简介:
A list whose items the user can interactively reorder by dragging.
This class is appropriate for views with a small number of children because constructing the List requires doing work for every child that could possibly be displayed in the list view instead of just those children that are actually visible.
All children must have a key.
简单翻译如下:
用户可以通过拖动来重新排序的列表。
该类适用于少量 children 的页面,因为构造列表需要为每一个 children 执行操作,而不只是可见的 children。
所有的 children 都必须有一个 key。
构造函数
按照惯例,查看构造函数:
ReorderableListView({
  this.header,
  @required this.children,
  @required this.onReorder,
  this.scrollDirection = Axis.vertical,
  this.padding,
  this.reverse = false,
}) : assert(scrollDirection != null),
assert(onReorder != null),
assert(children != null),
assert(
  children.every((Widget w) => w.key != null),
  'All children of this widget must have a key.',
);
了解一下各个参数:
- header:是一个不参与拖动排序的 Widget
- children:不用多说,列表项
- onReorder:见名知意,重新排序后的回调
- scrollDirection:方向
剩下两个就不多说了,都应该了解。
简单使用
既然看完了构造函数,那我们就可以分分钟写一个 Demo 出来:
class _ReorderableListViewPageState extends State<ReorderableListViewPage> {
  List<Color> _data = [
    Colors.blue,
    Colors.pinkAccent,
    Colors.deepPurple,
    Colors.orangeAccent
  ];

  @override
  Widget build(BuildContext context) {
    return Scaffold(
      appBar: AppBar(
        title: Text('ReorderableListViewPage'),
      ),
      body: ReorderableListView(
          header: Container(
            height: 50,
          ),
          children: _data
              .map((s) => Card(
                    color: s,
                    key: Key(s.toString()),
                    child: Container(
                      width: 300,
                      height: 100,
                    ),
                  ))
              .toList(),
          onReorder: (int oldIndex, int newIndex) {
            print("$oldIndex --- $newIndex");
          }),
    );
  }
}
- 首先我们定义好一组颜色的列表
- 然后在 build 方法中返回
ReorderableListView ReorderableListView中的 children 为用颜色定义好的Card- 在
onReorder回调中打印两个参数oldIndex&newIndex
运行一下,看一下打印的 log:
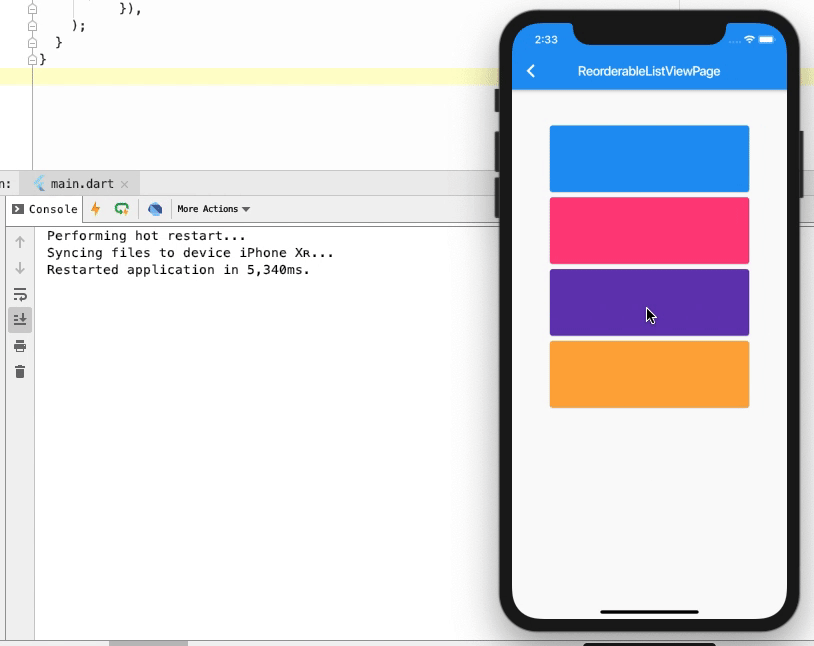
可以看到确实是能打印出新旧两个 index, 但是这里有一个很明显的问题,
我们大家都知道数组的下标是从 0 开始,可以看到 第一次是 从 0 到 3,第二次是从 0 到 4,
但是讲道理明明应该是 从 0 到 2,从 0 到 3。
那为什么我前两次移动后的 newIndex 都 +1 了呢?
我们这里也不去深究,
既然我们要移动,那肯定也会对源数据进行操作,不然移动也都是假的。
所以,基于这样的一个 newIndex,我们只需要这样:
setState(() {
  if(oldIndex < newIndex) {
  	newIndex -= 1;
  }

  var temp = _data.removeAt(oldIndex);
  _data.insert(newIndex, temp);
});
- 先判断是向上还是向下拖拽
- 如果是向下拖拽,那么 newIndex 会多加一个,我们把它减掉
- 然后我们删除旧数据并保存它
- 最后在新的 index 上插入
ListView 的拖拽排序和删除
既然前面说到了 ListView 的删除,那这里也必须把它俩组合起来了:

其实代码非常简单,当然这也得益于 Flutter 一切皆 Widget,我们只需要在 Card 上包裹一个 Dismissible 就ok了:
children: _data
  .map((s) => Dismissible(
    key: Key("dismiss $s"),
    child: Card(
      color: s,
      key: Key(s.toString()),
      child: Container(
        width: 300,
        height: 100,
      ),
    ),
  ))
  .toList(),
总结
在 Flutter 当中,我们可以封装很多的 Widget 来为我们日后的开发来节省时间,
当然,也不要忘记 Flutter 当中的 Widget 测试

